
• Filed to: Android Recovery • Proven solutions
Using Facebook nowadays has become a necessity because not only you have the opportunity to keep in touch with your friends at all times, but though this site you can also get quick access to news, games and a ton of other activities that make it a complete experience. Facebook on Android is a much more interesting experience because thanks to it you can always keep in touch with your friends and family at all times, without having to worry about any issues.
When you use Facebook Messenger for Android, you have the ability to send messages to your friends and family, but sometimes you do want to delete Facebook messages in order to avoid unwanted access from those persons you want to avoid.
Part 1. How to Delete Facebook Messages on Android
There are lots of situations in which you just need to make sure that you can delete the Facebook messages, either you want to remove everything you talked with a person, or you just want to avoid any data leaks. Either way, it's imperative to know how to remove Facebook Messenger messages.
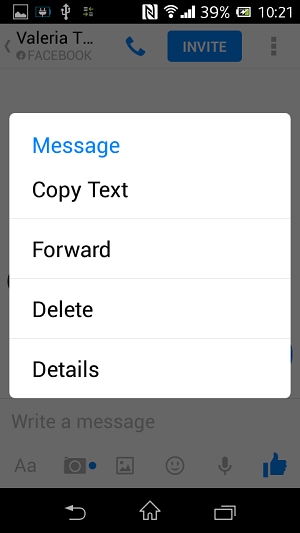
First of all, you need to select the message you want to delete. Tap on the desired message and press "Delete", it will automatically be removed.
Depending on how long the message is, you might need to wait for a little while or attempt to remove the message multiple times. Still, this is the best method that you can use and it is also the one that offers some of the best results in this regard.
Part 2. How to Delete Facebook Conversation on Android
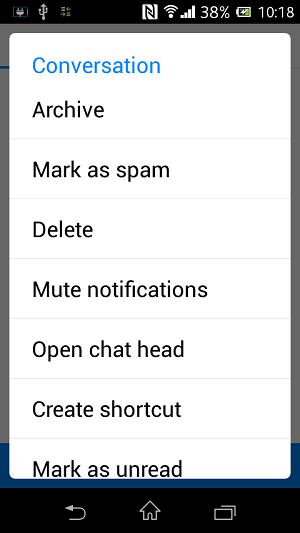
Open the messages and locating the desired conversation history that you want out of the picture. The next step requires you to tap and then hold on this particular conversation until the menu will open, and then select the "Delete" option in the conversation history.
You could also try to perform the action through the mobile browser, and in order to do that you need to sign in to the account, open the messages and the desired history you want deleted, then select delete in order to erase the whole conversation. If the conversation is long, you do have the option to select the messages you want deleted, an option that is very interesting to say the least!
Part 3. Can We Unsend Facebook Messages Once the Messages Has Been Sent on Android?
Unfortunately, the response here is a negative one. Once you send a message to a person via the Facebook chat, it's sent and you can't simply unsend it. Not only they will see the message, but depending on the notification setting that particular person has, he/she might also receive that message as a mail notification.
The main idea here is that you need to do whatever it takes in order to avoid sending Facebook messages by accident, because something like this can happen, and the results might not be to your liking. Still, using the Facebook messenger is a very good idea since you can talk with your friends at any given time without restrictions. Is it OK for you to not be able to undelete the Facebook messages that you might have sent by mistake? Sure this is a problem, but in the end such a thing is supposed to be expected, so again, try to read and re-read the text message a couple of times before you send it, as these can have dramatic consequences in the end.
As you can see, it's quite easy to delete the Facebook Messages on Android, all you have to do is to ensure that your app is working properly, otherwise reinstall it. Follow the steps we mentioned above and you will have no problem deleting the troublesome messages.
dr.fone - Data Recovery (Android) could be your best tool to retrieve deleted text messages on Android phones. It is very easy to use, even for newbies. After launch it, you can get prompt messages on its window, telling what to do next. You just need to do what it tells you to do, then you can successfully recover text messages on Android.
Guide: Recover Deleted Text Messages from Android Phones
As it has been mentioned before that the data recovery process is easy with dr.fone Data Recovery (Android). The process as well as the overall steps that are involved in this regard is mentioned as below. The user can follow the steps to get the outcome which is in line with the demands. It is so easy that the data recovery requirements are met automatically.
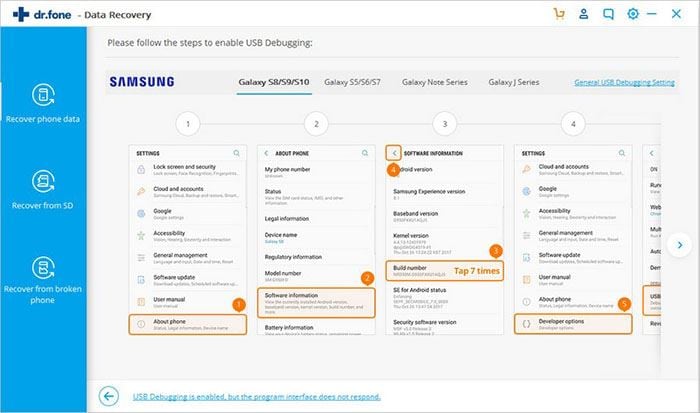
Step 1: Click the Download button to get the installation package of the software. After then, double-click the file and follow the wizard on the software to install it on your computer. Once it has been done successfully, launch it. Use a USB cable to connect your phone with your computer.
Note: if the software can’t detect your phone, then you must check out whether you have enabled the USB debugging or not. If not, there will be wizard in the window of the software, telling you how to do it.
Step 2: After dr.fone Data Recovery (Android) analyze your phone, it will ask you to select file types to scan. Since you’re trying to recover deleted text messages from phone, here you just need to choose “Messaging” and “WhatsApp message & attachments”, and click “Next”.
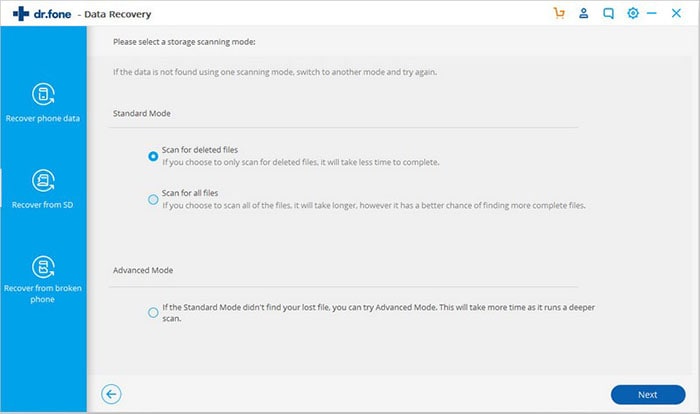
Step 3: There are 2 modes to scan your Android phones to retrieve deleted text messages: Standard mode and Advanced mode. Standard mode only scans for deleted text messages while Advanced Mode can scan your phone everywhere, but it takes longer to scan with Advanced Mode.
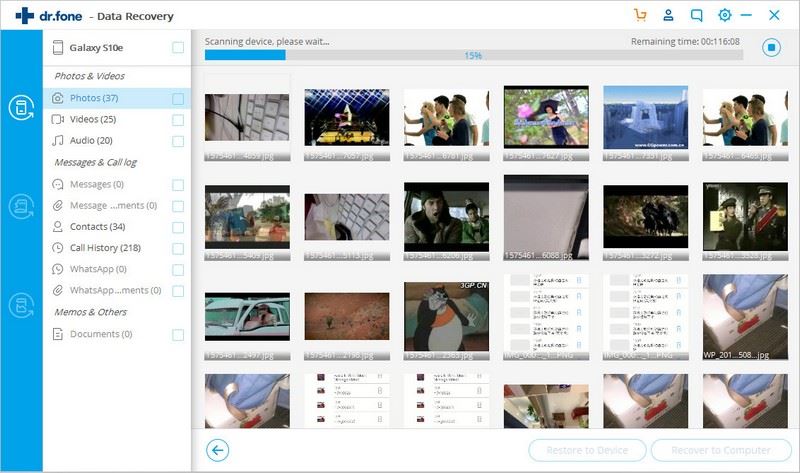
Step 4: The result will be sorted into category and displayed in the main window. If you choose to scan all the files in the last step, you can see that the result contains both existing files and deleted files. Click “Messaging”, then you can preview the found items. If you need them, select them and click “Recover”.
Elva
staff Editor