Android Data Extraction
- 1. Recover Broken Android+
- 2. Recover Broken Samsung+
- 3. Recover Android Data+

• Filed to: Android Recovery • Proven solutions
How to enable USB debugging on Android with broken screen and access it?
USB debugging in Android devices enables the developer mode to connect the device to the computer for the specific purpose. It facilitates a connection between Android device and the personal computer using the Android SDK (Software Development Kit). It could be enabled in the device while connecting to the computer.
However, many of us don't have a good day sometimes, especially when some data needs to be shared or recovered and the mobile screen is dull or broken. What should you do then?
Note: If you have backed up Android to other security places, then you might get out of the accessing issues on broken screen. Don't worry! We have the ultimate solution for your problem. Sit relax and follow the complete article to understand the procedure. There are certain methods to enable USB debugging on your broken or damaged device.
- Part 1. Directly Access Broken Android Phone with dr.fone Android Data Extraction
- Part 2. Using OTG Adapter and A Mouse to Enable USB Debugging with Broken Screen
- Part 3. Using ADB Commands to Enable USB Debugging with Broken Screen (Risky)
- Part 4. How to Enable USB Debugging on Different Android OS?
Part 1. Directly Access Broken Android Phone with dr.fone Android Data Extraction
Now, you can access the data on your damaged phone with the dr.fone Android Data Extraction. It was a myth that it can only be done with the USB debugging, however, we made it possible without updating the USB debugging mode on your device.
First, let's check the main features of this powerful program:
dr.fone - Data Recovery (Android)
Best Tool to Directly Access Internal Storage on Android with Broken Screen
- Directly access to Android's internal memory and extract your needed data from broken, damaged or non-responsive Android within few clicks.
- View all data on broken Android without enabling USB debugging.
- Support data like contacts, messages, photos, videos, WhatsApp messages, apps, etc.
- Simple to use and no requirement of any technical skills for both beginners and experts.
Let's Learn How to Perform Broken Android Data Extraction without Enabling USB Debugging
Step 1 Connect your Android device to computer
Connect the damaged device to the PC via USB port. Launch the iSkysoft toolbox for Android on computer and click on "Data Extraction ( Damaged Device)" in the main screen.

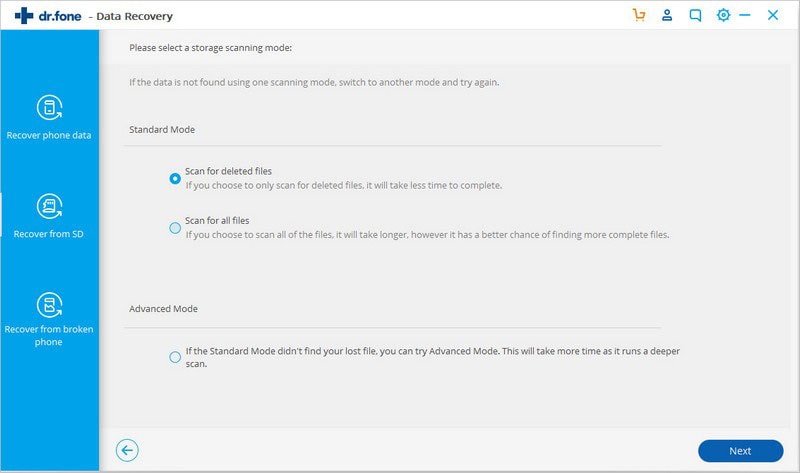
Step 2 Choose the Desired Files for Scanning
Now, choose the files that are required to restore. All the checkbox are already clicked by default. However, you can ONLY choose the files you wish to view according to your own needs. Select the folders and click on "Next".
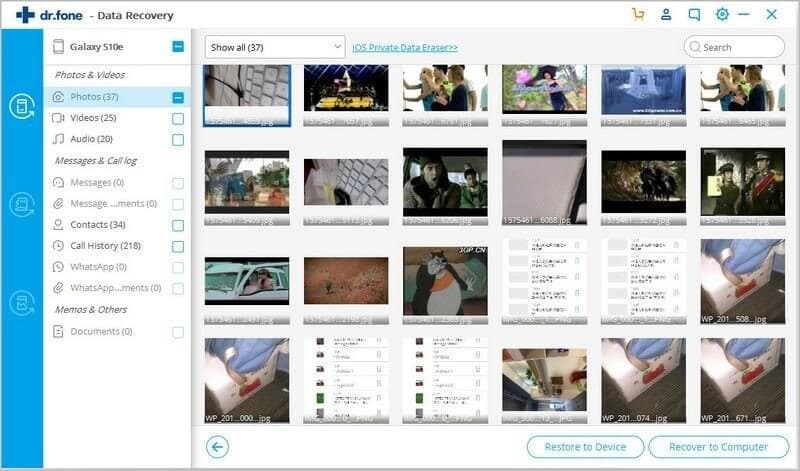
Step 3 Preview and Extract Data from Broken Android
Wait for the device to complete the process and select the files for preview and click the "Recover" button to save them on your computer to avoid losing.
Part 2. Using OTG Adapter and A Mouse to Enable USB Debugging with Broken Screen
When it comes to extracting data from a damaged device it might be a good technique to recover the data back to the device. Only thing you need is a USB mouse and USB OTG( USB on the go) adapter to make the cursor move on your android device. You can easily control your device through this OTG and mouse.
Step 1. Check the COMMS section of your device to configure that it would support the OTG and mouse.
Step 2. Download any OTG detector app available on play store to check the compatibility and get control on your device.
Note:
- You can easily control your mobile screen through this method only if the screen is not responsive but working, it might not work on black screen or broken screen as there would be visibility issues.
- Please be assured that you have your device fully charged or plugged in before you connect the mouse as it would drain the battery fast. If this method is not compatible, you can use the ADB command method.
Part 3. How to Enable USB Debugging with Broken Screen using ADB Command? (Risky)
Every Android device is packed with a tool SDK to debug faults in Android devices. The SDK, has a tool named ADB that enables your device to connect with your PC and insert some commands to enable the USB debugging.
Step 1. Download ADB for your windows and install it. Then launch it while the broken Android is connected.
Step 2. Normally, ADB need to open USB debugging on your device, but now, the option is off on your broken Android, so you need to boot the device into ClockworkMod Recovery mode: press the power button + home + volume up/down.
Step 3. When your phone is in recovery mode, type the command for the process: adb devices.
Step 4. Now, you can type the below command to backup data from broken Android to PC: adb pull / data / media / clockworkmod / backup ~ / Desktop / Android-up.
Note:
As you can see, the process looks a little complicated and risky, it should only be done if you have a knowledge about computers and commands. If you don't know using the ADB commands then you might end up damaging your device permanently.
Part 4. How to Enable USB Debugging on Android OS
USB debugging is useful in data backup, deleted files recovery and data transfer between two phones. Here, you will be provided with the simple steps to turn on USB debugging on other android devices.
This guide follows Android OS as:
- Android 4.2 or higher
- Android 3.0 to 4.1
- Android 2.3 or earlier
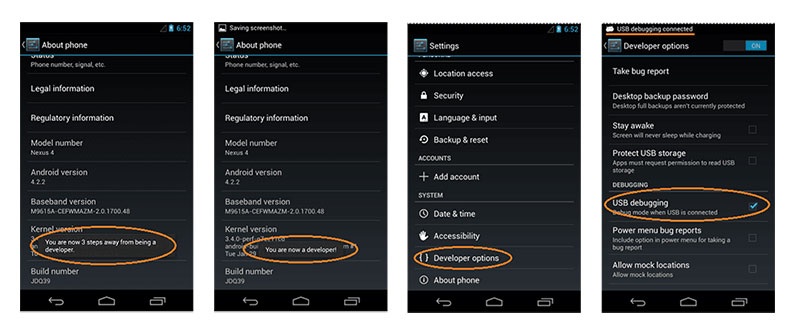
1. Enable USB Debugging on Android 4.2 or Higher
In Android 4.2 or higher the USB debugging option has been hidden and people won't even know it. However, with this ultimate guide you have now got the access to it. Read the complete article and follow these steps to enable the USB debugging on your device.
Step 1. Open up menu and click on "Settings". At the bottom of Settings there is an option named "About phone", click on it and look for the option of "Build number".
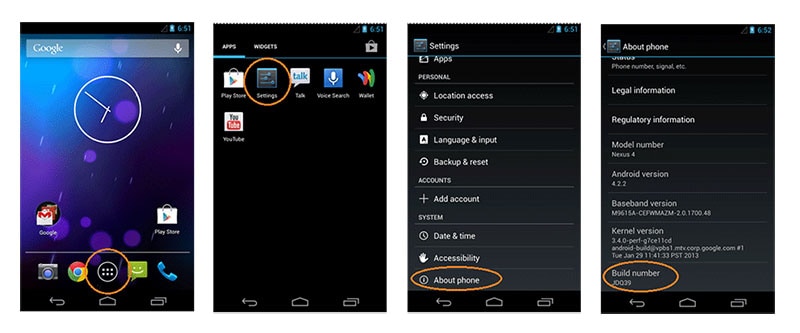
Step 2. Now, randomly click the build number 7 times and you would get a POP up saying "You are now a developer".
Step 3. Then, the developer options are activated on your phone and you can enable or disable USB debugging from there.
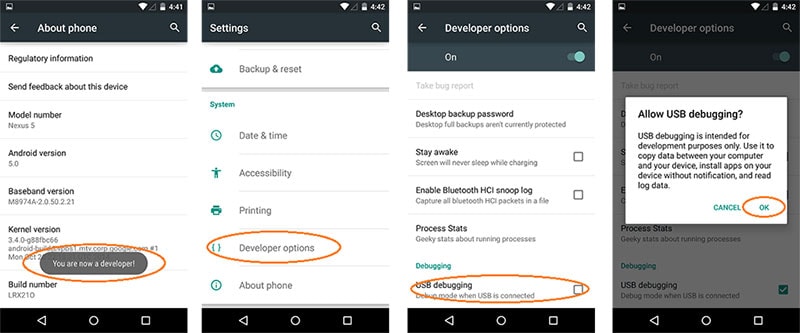
If your Android phone is running on Lollipop 5.0, then, the steps may a little difference than the above steps:
Step 1. After tapping the build number 7 times, then you'll be taken to a developer mode.
Step 2. Here, you need to go back to "Settings" menu and click on "Developer Options".

Step 3. Now, you'll see the USB debugging option, please click the check box and the USB debugging is accessible.
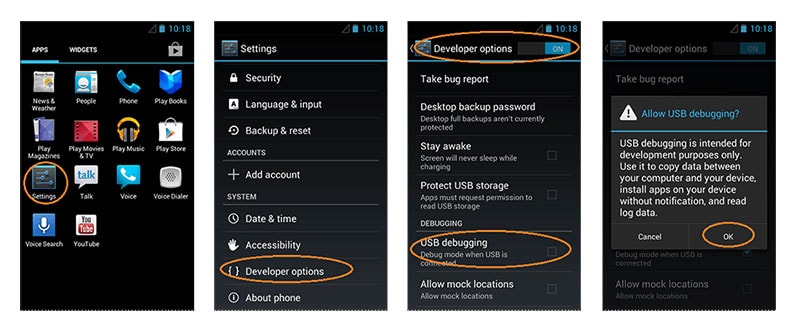
2. Enable USB Debugging on Android 3.0 to 4.1
Step 1. Navigate to "Settings" in the menu.
Step 2. Look for "Developer options" and enable it.
Step 3. Now, you can access the USB debugging option and click the checkbox to enable it.
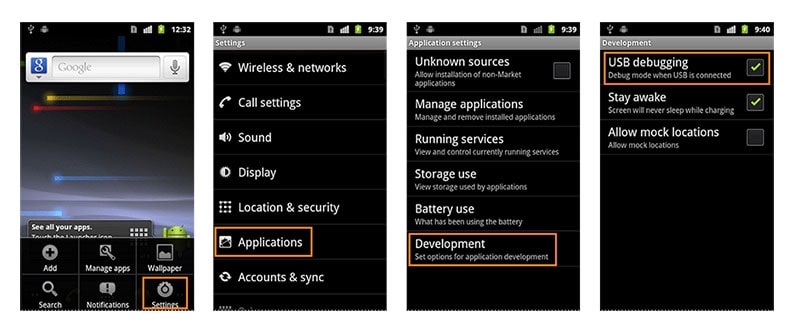
3. Enable USB Debugging on Android 2.0 to 2.3
Step 1. Click on "Settings" on the menu.
Step 2. Click on "Applications" > "Development". You would see and option saying USB debugging.
Step 3. Enable the USB Debugging by clicking the check box.
Conclusion
In this scenario, all the above methods are good as per the protocols. No matter you are going to use the iSkysoft Android Data Extraction, OTG adapter or ADB commands, you can extract data from broken Android device easily.
However, if you have any confusion or circumstances that you face in these methods, then you can go for the first method that is using the iSkysoft Android Data Extraction. This would be the safest and reliable method, no matter your screen is black or damaged completely.
The major factors to choose iSkysoft Android Data Extraction are:
- Safe and reliable.
- Plug and play method.
- Easy to use and understand.
- No threat of device damage.
- Made to comply with the specific problems faced by Android users.
- Get your data recovered in few "Clicks".
dr.fone can provide you with an instant solution to your problems. Now, no need to pity on yourself if your screen is black or damaged in any way. You can simply visit website and download our Data extraction tool without enabling the USB debugging.
Elva
staff Editor