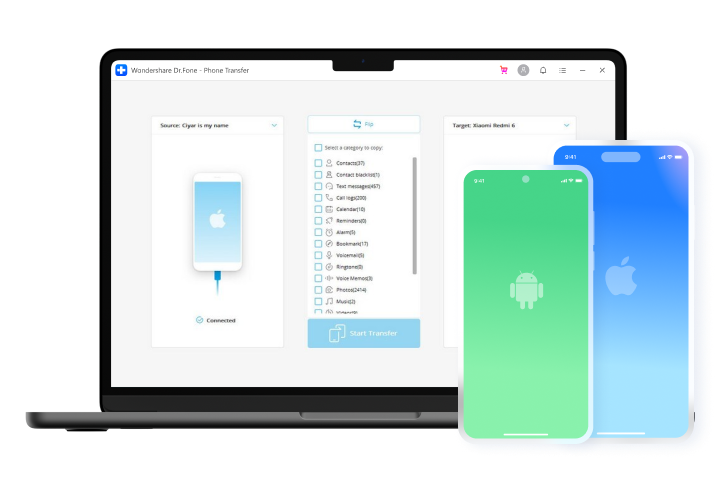
1 Click to Copy One Phone to Another
- · Move data between devices with different OSs, i.e. iOS to Android.
- · Transfer contacts, SMS, photos, videos, music, and more types.
- · Simple, click-through process.
- · Compatible with Android 15 and the latest iOS version.


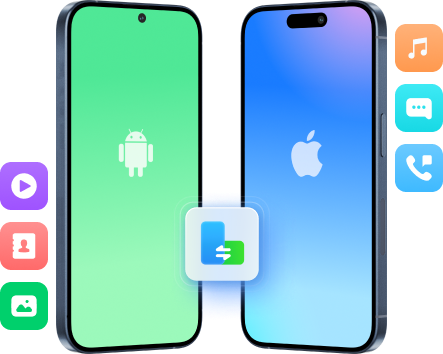
Transfer Content Between iOS/Android
iOS 18Android 15


Support All Kinds of Data Types
1 Click to Transfer Data to New Phone
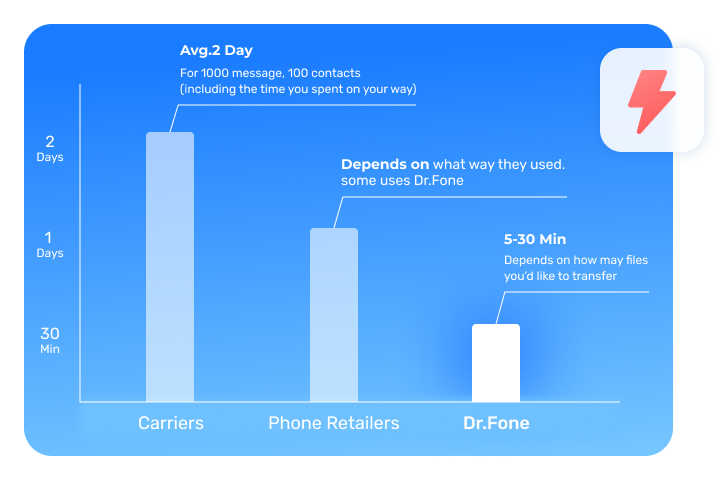
High-Speed Transfer
Why Phone Transfer is a better option
Dr.Fone - Phone Transfer |
Samsung Smart Switch |
Move to iOS |
|
|---|---|---|---|
Device Compatibility |
Compatible with 8000+ iOS and Android devices. Transfer all types of data between any two devices, be they Android or iOS.
|
Transfer data only to Samsung devices from other devices.
|
Transfer data only to iOS devices from other devices.
|
File Types |
Supports a maximum of 15 file types for the phone to phone transfer.
|
Supports a maximum of 15 file types to transfer to Samsung.
|
Supports only 7 file types.
|
Transfer Speed |
Within 3 minutes
|
About 5 minutes
|
5 minutes or longer
|
Easiness |
Easy
|
Medium
|
Complex
|
Transfer Method |
USB transfer
|
USB transfer, cloud transfer
|
Wi-Fi transfer
|


Tech Specs
Processor
1 GHz or faster processor (Intel or AMD)
RAM
2 GB or more of RAM
Hard Disk Space
200 MB of available hard disk space
iOS & Android
Requires iOS 5 or later
Requires Android OS 4.6 or later
Computer OS
Requires Windows 7 or newer
Requires macOS X 10.8 & higher
FAQs - You May Still Be Wondering
-
Can apps be transferred from one phone to another?It depends on your source phone and target phone. If both phones are Android, it's easy to transfer Apps to the new phone. Dr.Fone - Phone Transfer is the easiest tool to help you transfer Apps along with other file types from Android to Android in 1 click. Just Launch Dr.Fone on your computer and connect both phones, select the file types, and click on Start Transfer. Everything else is automatic.
If both your devices are iPhones, when you use the same Apple ID to set up your iPhone and select Restore from iCloud backup, all Apps and other files will be restored to the new iPhone.
If you have both iPhone and Android, there is no solution to transfer Apps between them. You need to download the Apps on the new phone manually. -
How can I transfer text messages from Android to Android?To transfer text messages from Android to Android:
1. Launch Dr.Fone on your computer and select Phone Transfer.
2. Connect both Android phones to the computer using USB cables.
3. Select Text Messages and click Start Transfer.
4. All text messages will be transferred to the new Android phone in just minutes. -
How do I transfer data from Android to iPhone?Here is how to transfer data from Android to iPhone using Move to iOS:
1. On your Android phone, download Move to iOS App from Google Play and open Move to iOS.
2. Set up your new iPhone until you see the "App&Data" screen. If the iPhone is not a new one, you'll need to factory reset it and set it up again.
3. Tap the "Move Data from Android" option.
4. Tap "Continue" on both your Android phone and iPhone.
5. You will see a digital code on your iPhone screen. Enter the code on your Android phone.
6. Then, the iPhone and the Android phone will be connected over Wi-Fi. Select the data types you want to move to iOS.
7. Then, the selected data will be transferred to the iPhone.
The supported data includes contacts, message history, camera photos and videos, web bookmarks, mail accounts, and calendars. -
Can you move data from Android to iPhone after setup?Move to iOS App only transfers data from Android to iPhone before setup. To move data after the iPhone setup, Dr.Fone - Phone Transfer is the best option for you. To transfer data:
1. Open Dr.Fone and connect both Android and iPhone to the computer.
2. Dr.Fone will display both phones. Make sure the Android phone is the source and iPhone the target phone. If not, click the Flip icon.
3. Select the file types you would like to transfer and click Start Transfer.
4. The selected files will be transferred to the iPhone.
1-Click Phone Transfer
With this phone transfer tool, you can transfer all types of data like contacts, messages, photos, music, calendar, etc. from phone to phone seamlessly.
Latest Posts

4 Ways to Transfer Contacts from Android to iPhone
Learn how to transfer contacts from Android to iPhone in this guide. We have provided four different methods to move contacts from Android to iPhone.
4 Ways to Transfer Contacts from iPhone to iPhone Quickly
Switching to a new iPhone is exciting, but transferring all your contacts and other data from the old iPhone to the new iPhone is not all exciting. We've got 4 simple and fast ways to transfer contacts.
[Solved] Move to iOS not Working Problems
if you are looking to transfer your Android data to iOS, Move to iOS is a great feature to save you the hassle. The tolls will help to transfer all your phone's information.
8 Ways to Transfer Photos from Android to iPhone Easily
Do you want to transfer photos from Android to iPhone? You will learn how to transfer photos by bluetooth, google drive, move to iOS App and other popular apps.
Top 9 Phone Transfer Software Are Here!
Changing a phone is easy, but transferring contents from one phone to another turns out to be different. Here is going to tell you easy and safe ways.
How to Transfer Contacts from Phone to Phone
This article mainly tells you how to transfer contacts from phone to phone with easy solutions. Read on the article and try them out.
Keep Your Mobile at 100% with Our Complete Mobile Solution

Unlock any iPhone lock screen when you forget the passcode on your iPhone or iPad.
Retrieve deleted photos, videos, WhatsApp data, messages, contacts, and 18+ other data types.

Integrated data management solution. Your phone data can be managed, backed up, and mirrored to your PC.