5 Ways to Transfer Music from Android to Android Easily
Mar 12, 2025 • Filed to: Data Transfer Solutions • Proven solutions
There can be many reasons to transfer music from Android to Android, such as the change of the device since you bought a new one or want to keep music readily available on multiple devices. Therefore, if you face a dilemma over how to transfer music from one Android device to another, this is the right article for you.
So, keep reading to know about five different ways that will help you transfer your music files easily.
- Part 1: How to transfer music from Android to Android in 1 click?
- Part 2. How to Transfer Music from Android to Android Selectively?
- Part 3. How to transfer music from Android to Android using Bluetooth?
- Part 4. How to transfer music from Android to Android using NFC?
- Part 5. How to transfer music from Android to Android using Google Play Music?
Part 1: How to transfer music from Android to Android in 1 click?
The transfer of all music files from one Android phone to another with a single click of the mouse has never been easier. The switch feature on Dr.Fone - Phone Transfer program has made this action a lot simpler and even faster to transfer music from Android to Android. It can also transfer other file formats such as other multimedia files, contacts, text messages, call logs, including apps and app data files.

Dr.Fone - Phone Transfer
Transfer Music from Android to Android in 1 Click Directly!
- Easily transfer every type of data from Android to Android, including apps, music, videos, photos, contacts, messages, apps data, call logs, etc.
- Works directly and transfer data between two cross-operating system devices in real-time.
- Works perfectly with Apple, Samsung, HTC, LG, Sony, Google, HUAWEI, Motorola, ZTE, Nokia, and more smartphones and tablets.
- Fully compatible with major providers like AT&T, Verizon, Sprint, and T-Mobile.
- Fully compatible with iOS 16 and Android 13
- Fully compatible with the latest Windows or Mac version.
Here are the few simple steps required to be carefully followed to transfer music from Android to Android.
Step 1. The first step is to download the Dr.Fone software from its official website and then run the installer wizard. Once the installation is complete, launch the program.

Step 2. Now, connect both the Android phones via a good USB cable to the PC. Thereafter, go to the Dr.Fone program's main interface and click on the “Switch” button. You will see the two devices connected with the Source device on the left and the Destination device on the right on the next screen.
If you want the Source device to be the Destination device, click on the “Flip” button at the center of the screen.

Step 3. You can now select the files to be transferred by checking the corresponding boxes. In this case, check the Music box and then click on “Start Transfer” to transfer music from Android to Android.

You should now see your music files being transferred with the overall progress displayed on a dialogue box.
There you go; within a few seconds, your music files will be transferred successfully.
Part 2. How to Transfer Music from Android to Android Selectively?
Another way to transfer music from Android to Android is by using the transfer feature on Dr.Fone - Phone Manager (Android). As the name implies, this feature can be used to transfer files from one Android device to another by selecting the particular music file one by one instead of choosing an entire music file.

Dr.Fone - Phone Manager (Android)
Transfer Android Media to Android Devices Selectively
- Transfer files between Android and iOS, including contacts, photos, music, SMS, and more.
- Manage, export/import your music, photos, videos, contacts, SMS, Apps, etc.
- Transfer iTunes to Android (vice versa).
- Manage your iOS/Android device on the computer.
- Fully compatible with the latest iOS and Android version.
Here are a few easy steps to follow on how to transfer music from Android to Android.
Step 1: After installing Dr.Fone software on your computer and launching it, connect the Android device via USB cable. Now click on the “Music” tab at the top of the screen amongst the other listed options. The program would immediately recognize your device.
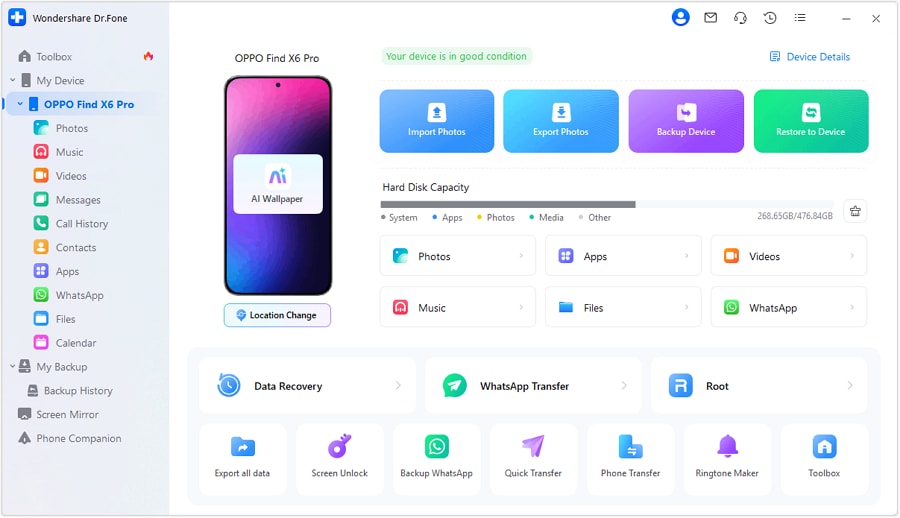
Step 2. The moment all the audio files or music files on the connected device are displayed on the Dr.Fone software screen. You can scroll down and select each file you wish to copy or select an entire folder from the left side pane.
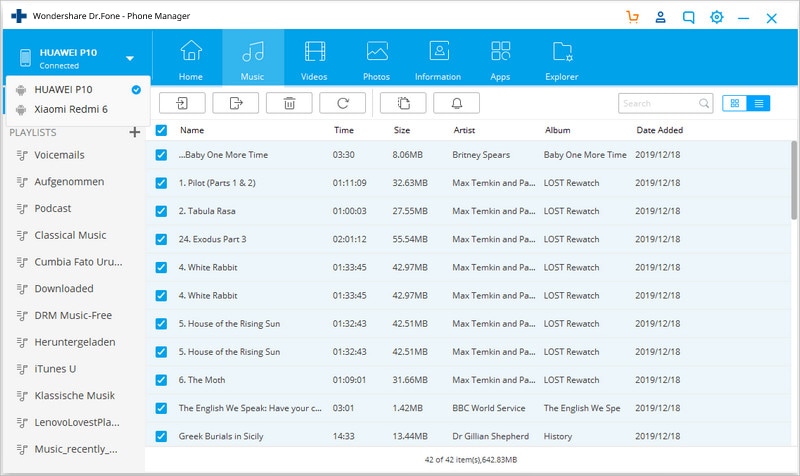
Step 3. After selecting the music files, you wish to copy, click on the “Export” button on the app and then select “Export to Device”. You will see the other device connected; there, click on the device's name to begin the transfer process.
Part 3. How to transfer music from Android to Android using Bluetooth?
Bluetooth transfer is one of the oldest methods that can be used to transfer music from Android to Android, and it is a simple way to make use of it.
Here are the steps to follow to know how to transfer music from Android to Android.
Step 1. There are two ways you can turn on Bluetooth on your Android device
Method 1: The first method is to swipe from top to down on your Android device to view the swipe menu on some Android OS. You would be able to view and immediately turn on Bluetooth with a single click.
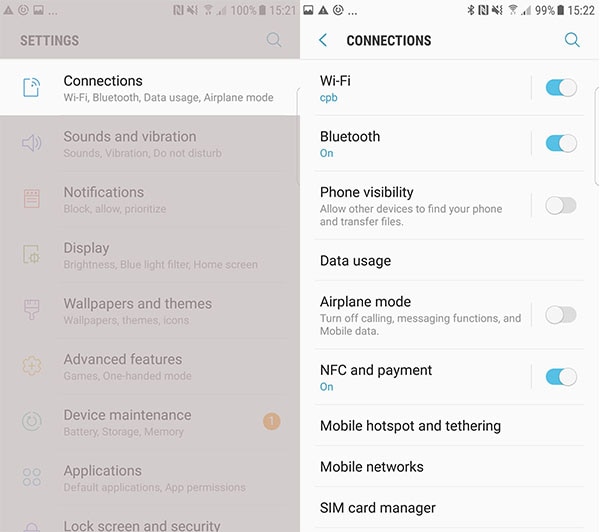
Method 2: Go to “Connection” from the Settings Menu on your Android phone, and then in the Connections options, you will see “Bluetooth”. Make sure it is switched on. Also, ensure that the phone’s Bluetooth visibility is enabled so that your device can be seen and easily paired with the other device.
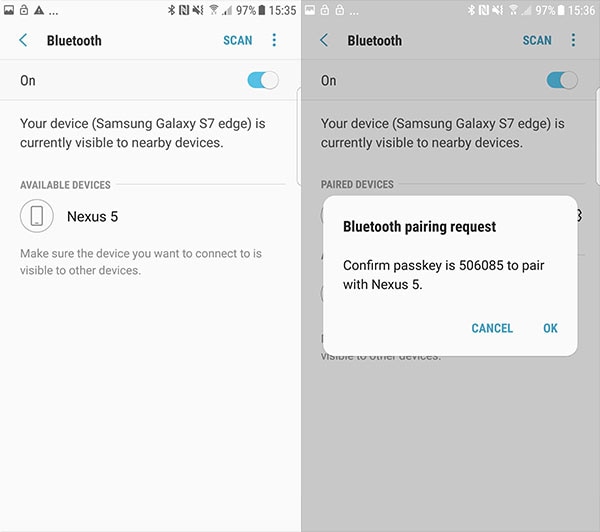
Step 2. Now, switch on the Bluetooth for the destination device as well. Once done, search for your device’s Bluetooth name on the phone and click to pair both Bluetooth devices together.
Mostly, you will be provided with a pair confirmation code that will be displayed on both devices. Click OK to pair both devices successfully.
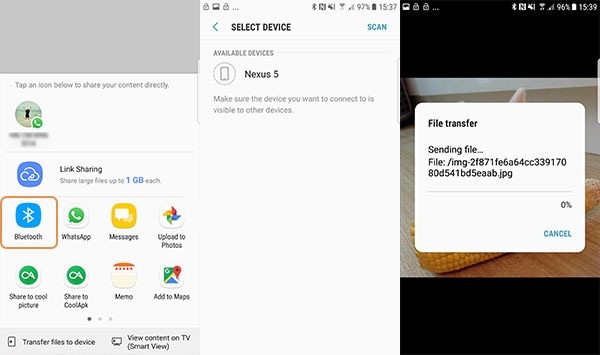
Step 3. The final step is to head to the File Manager app on your phone or go to your Music Player, select the music file you wish to transfer, and then click on your device's Share button or logo.
Here, scroll until you see the “Bluetooth” option. You will be immediately prompted to select the device to share with, click the earlier paired device name, and then click on “Accept” on the other device.
This is how you can transfer music files from Android to Android using Bluetooth.
Part 4. How to transfer music from Android to Android using NFC?
NFC or Near Field Communication is another wireless means to transfer music from Android to Android. Although, unlike Bluetooth, this method requires contact between the two devices making the transfer.
Below are the steps on how to transfer music from Android to Android using NFC.
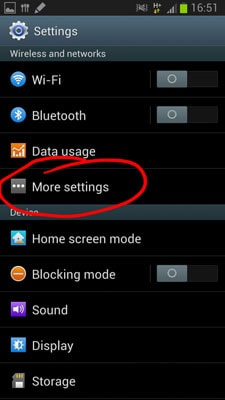
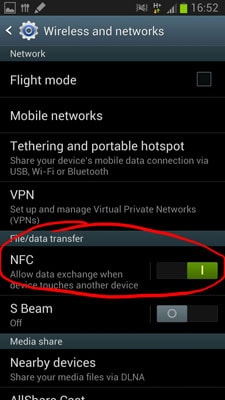
Step 1. First, enable NFC connection on both the devices between which you want to transfer the music files. To switch on NFC on Android, go to Phone’s “Settings” and click on “More Settings” under “Wireless and Network” options. Now click on the NFC button to ensure that it is switched On. Do the same on the other Android device as well.
Step 2. Before you begin to transfer, you need to touch the back of both devices (whose NFC has already been turned on), you will notice that both devices vibrate upon a successful connection. This means you can now start transferring your music files.
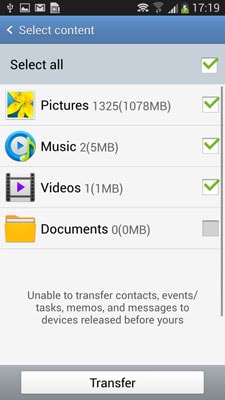
Step 3. After connecting both the devices, you will be provided with media options of files that can be transferred. In this case, select the Music files and then click on “Transfer” to send the music files via NFC.
Part 5. How to transfer music from Android to Android using Google Play Music?
Google Play Music is a free Music streaming service provided by Google and available for all users with a Google account. Follow these steps to transfer music files to an Android phone using Google play.
Note: You need a Google account to be able to make use of this service
Step 1. Open Google Play Music on your computer and sign in with your already existing Google account details (Same as on 1st Android Device).
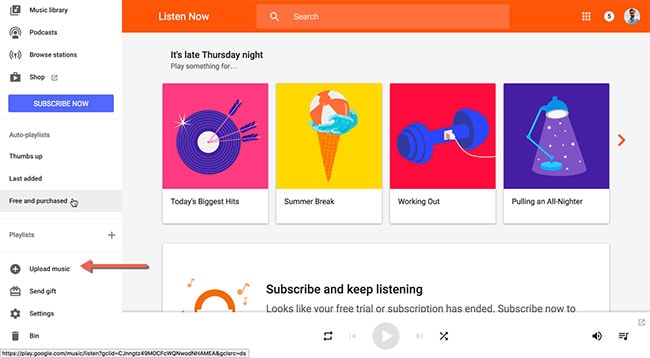
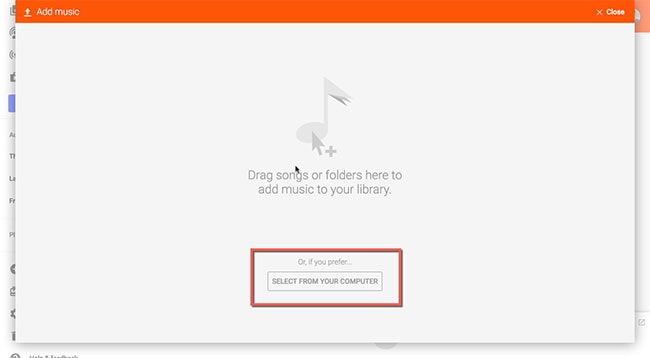
Step 2. You can now upload music files by clicking on the Upload button at the left corner of the screen to view the main Panel of the page. At the bottom of the page, click on “Select From Your Computer” to upload music files from your computer to Google Play.
Step 3. After the upload has been completed, download the “Google Play Music” app on your other Android phone and then log in to the app with the same Google credentials. You will see all the recently uploaded tracks on your Google Play account. You can now stream or download them easily.
At last, we hope that you now know how to transfer music from Android to Android devices safely and securely through the above article. In fact, you have got two very good options to perform the transfer in the form of Dr.Fone - Phone Transfer and Dr.Fone - Phone Manager (Android). Well, choose the most convenient one for you and make sure that you proceed with the guided steps mentioned for each way.



Selena Lee
chief Editor