
Titanium Backup Review and Best Alternative to Backup Data for Android
Android Backup

Mar 18, 2025 • Filed to: Backup & Restore Data • Proven solutions
Do you want a powerful data backup solution but don’t want to root your Android phone? In this blog, you will discover the best titanium backup alternative.
Without regular backups, accidental loss of data can happen to anyone. Losing your contacts, photos, and app data is a nightmare no one wants to face. Titanium backup is a powerful backup tool that requires you to "root" your phone. Rooting is a risky and complex process that voids your phone’s warranty. Dr. Fone is the ultimate alternative to titanium backup, and it requires no root. Dr. Fone is a reliable tool offering a simpler and safer solution for backing up Android data.
In this blog, we will review titanium backup, explore Dr. Fone as its alternative, and compare them both side-by-side.
Before discussing with Dr. Fone in detail, let's briefly look at why backups are important and how backup tools can save you from big hassles.
Part 1. Importance of Android Backups
When you carry your phone in your pocket without any data backup, you carry a potential data loss risk. Data like contacts, media, and app data are sometimes irreplaceable. Backing up data is like creating a safety net. In case you accidentally delete something, lose your phone, or damage it, you can retrieve it using the backup you made.
Regular backups ensure that you never lose your special memories.
If you're planning to get a new phone, remember you might need to spend hours reinstalling apps and logging back into everything. Backups let you quickly transfer your data to your new device, so you can pick up right where you left off. And your new phone feels just like your old one in no time.
Part 2. Titanium Backup - A Brief Overview
Titanium Backup is a popular app for Android. It helps to create detailed Android backups. It is a powerful backup tool and can save almost every bit of data on your phone. It gives users ease of backing up or transferring data. This requires rooting your phone. This means you are giving the app access to the system files and settings.
Using Titanium backup, you can set up your device exactly like the backup you created. Let’s review some pros and cons of Titanium backup.
|
Pros |
Cons |
| You can sync backups to cloud storage services like Google Drive or Dropbox. | Its interface could be easier to navigate and clearer for most of the users. |
| Move your apps to an SD card. | This requires rooting the phone. It requires technical know-how and can be quite complex. |
| You can schedule regular backups. | Rooting the phone causes compromised safety and security of your device. |
| Filter through backups and find what you want. | It also voids the device’s warranty, leaving you without support or protection in case something goes wrong. |
Overall, we can say that if you are a non-tech user, this app is not for you. Advanced users who understand these risks and benefits can use this app.
There is a much simpler alternative to titanium backup. Wondershare Dr. Fone. This backup tool does not require root or any other complicated changes to Android phones. Let’s discover this tool in detail.
Part 3. Dr. Fone - Best Titanium Backup Alternative
Wondershare Dr.Fone can serve as a great titanium backup non-root alternative. Using Dr. Fone, you can create comprehensive backups without any complex and risky process like rooting. It has a simple user interface that guides you through the process with clear instructions. So, people with any technical expertise level, even beginners, can use this effortlessly.
With Dr. Fone, you can choose what you want to back up: your contacts, photos, apps, or other important data. With just one click, you can save over ten types of data from your Android phone to your computer.
You can preview your backup and restore it to any Android or iOS device. It makes switching between phones simple. It's compatible with over 8,000 Android devices and can transfer backups from iCloud and iTunes to your Android.
Overall, we can say that it is a simple, quick, and reliable way to back up your data. Now let’s learn how to use Dr. Fone for data backup as a replacement of Titanium Backup.
Dr.Fone - Phone Backup (Android)
Dr. Fone - Best Titanium Backup Alternative
- Selectively backup Android data to the computer with one click.
- Preview and restore the backup to any Android device.
- Supports 8000+ Android devices.
- There is no data lost during backup, export, or restoration.


A Step-By-Step Guide to Use Dr. Fone for Android Backups
Dr. Fone offers a safe solution for data backup without complications associated with Titanium Backup. A computer is needed to back up your data. Before the process, make sure to download to your computer and Wondershare Dr. Fone from the official website. Please install it using installation prompts and log in with a Wondershare ID account to activate it.

Here is how to back up your data with Dr. Fone:
Step 1 First, you need to establish a connection between your phone and Dr. Fone. You can connect using a USB cable or connect your Android wirelessly using the Dr. Fone link app. Open the “My Device” tab and click “Wireless” to connect wirelessly.
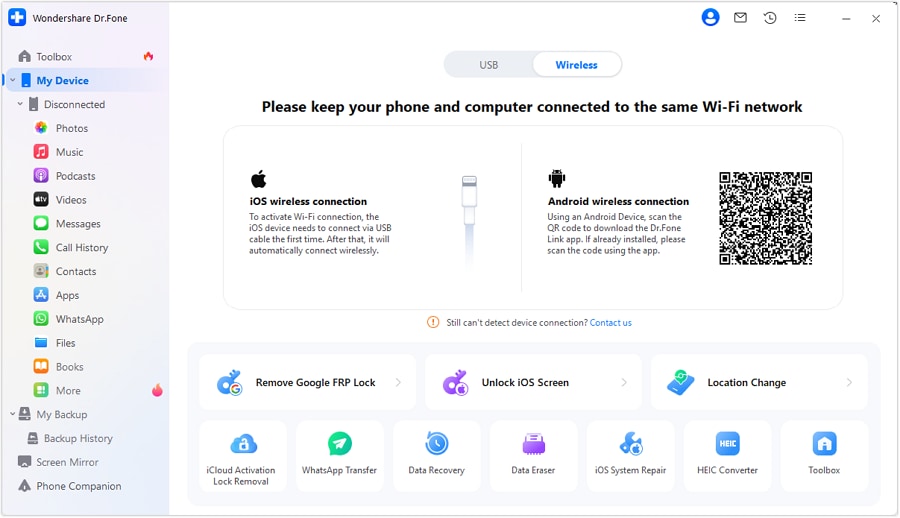
Step 2 Install the Dr. Fone Link app on your Android phone and launch it. Click the scan button and scan the QR code from Dr. Fone computer screen.
Step 3 It will connect your phone to Dr. Fone and display its details on screen.

Step 4 Open the “My Backup” tab and click “Back Up Now”.

Step 5 You will see a prompt message on the next screen. If you want to back up your text messages, you need to set the Dr. Fone Link app as the default SMS app. Click OK when done.

Step 6 Dr. Fone will start the backup process, and you can see the progress.

Step 7 After the process is complete, you will see another prompt to set the default SMS app back. This will enable you to send and receive messages now through your phone.

Step 8 Once the backup is complete, you can view the backups in your computer’s folder or inside Dr. Fone.

Restore Backup to Your Android Device
Let’s learn the simple process to restore the backup created inside Dr. Fone.
Step 1 Connect the device where you want to restore the backup to Dr. Fone on your computer.
Step 2 Select the “My Backup” tab and select any backup you want to restore. View the backup file and click “Restore to device”.
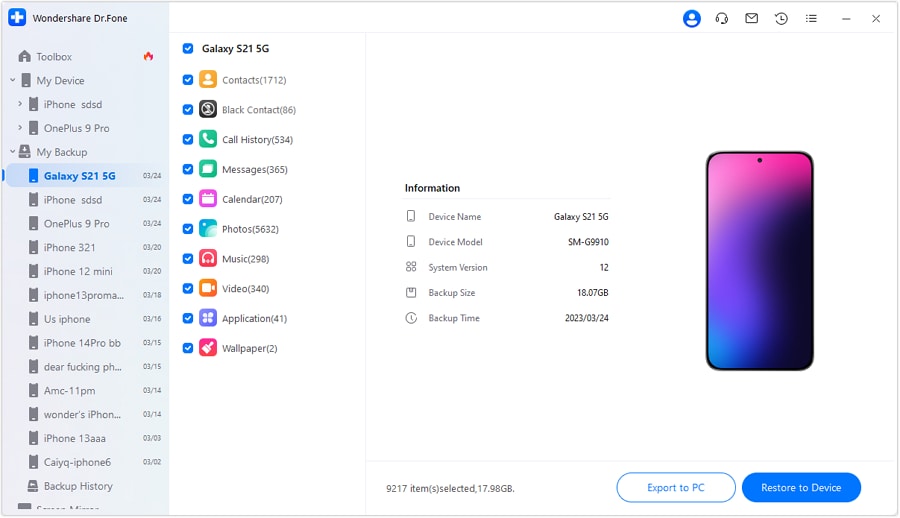
Step 3 A screen will show the list of data types that can be restored to your specific device. Review and select your desired data and click “Continue.”

Step 4 You will see the progress on the next screen. Once it is completed, it will display the “Restore Completed” message.

Part 4. Comparison of Dr. Fone with Titanium Backups
We have discussed Dr. Fone as a Titanium Backup nonroot alternative. It surpasses Titanium backup in terms of safety and security. Let’s sum up all the features that both offer and compare them.
|
Feature |
Dr. Fone |
Titanium Backup |
| Requires Rooting | ❌ | ✅ |
| Easy Interface | ✅ | ❌ |
| Cross-Platform Capability | ✅ | ❌ |
| Automatic Backups | ✅ | ✅ |
| Wide Range of Data Types | ✅ | ✅ |
| iCloud/iTunes Backup Transfer | ✅ | ❌ |
| Safety & Security | ✅ | ❌ |
Overall, Dr. Fone offers more features and flexibility for data backup. The main difference between titanium backup and Dr. Fone is rooting. Titanium backup requires rooting, which means it asks for privileged access to system files. It needs rooting for its advanced backup and restore functions. Rooting makes the device vulnerable to threats and increases the risk of security issues. Dr. Fone does not need rooting, and it ensures that your data remains secure and private on your computer. So, it is a safer and more reliable option for non-tech users.
Conclusion
It is a need of the hour to keep your digital memories and data safe with you. Titanium Backup has been a popular choice for Android users. However, its need for rooting makes it less appealing to users who don’t want to indulge in complex procedures.
While Wondershare Dr. Fone, on the other hand, is a user-friendly alternative to titanium backup. It offers many features, and ease of use is at the top of the list. It is a perfect choice for people who want a hassle-free backup solution.
So, choose Dr. Fone and enjoy peace of mind with a reliable backup tool.


Daisy Raines
staff Editor