Backup iPhone
- iPhone Backup Solutions+
-
- Backup iPhone to iCloud
- Backup iPhone to External Hard Drive
- Backup Jailbroken iPhone
- Backup iPhone to Computer
- Backup iPhone to Dropbox
- Backup iPhone iPad
- iPad Backup Software
- Top iPhone Backup Software
- Backup Jailbroken iPhone
- Backup iPhone Without Computer
- Backup iPhone to iTunes
- iPhone SMS Backup Apps
- Backup iPad without iTunes
- Backup Locked iPhone
- Backup iPad to Computer
- Backup iPhone Without Passcode
- Backup iPhone 6s
- iPhone Backup Data+
-
- Backup iPhone Contacts
- Extract Contacts from iPhone Backup Files
- Backup iPhone Contacts to Google Account
- Backup iPhone Notes
- Backup iPhone Music
- Backup iPhone SMS to Gmail
- Backup iPhone WhatsApp
- Backup Messages on iPhone
- Backup iPhone Photos
- Backup iPhone Calendar
- iPhone Google Cloud Print
- Backup iPad Bookmarks
- Contacts from Phone to Computer
- Restore iPhone Backup+
- iPhone Backup Tips+
-
- Delete iPhone Backup
- Undo iPhone Backup
- iPad Won't Backup
- iPubsoft iPhone Backup Extractor
- Delete iPhone Backup on Mac
- Backup iPhone Contacts Without iTunes
- iTunes Backup Location
- iTunes Backup Password
- iMessage for Windows
- Export iPhone Calendar
- Print Contacts from iPhone
- Save iPhone Messages
- Print Messages from iPhone
- Upgrade Jailbroken iPhone
- Export Emails from iPhone
- Hide Messages on iPhone
- iPhone Print
- iPhone Voicemail not Working
- 3 Methods for Backing up iPad without iTunes

• Filed to: Backup iPhone • Proven solutions
Why is my voicemail not working on my iPhone, who can help?
iPhone Voicemail Unavailable?
iPhone Voicemail not working?
A variety of reasons may lead to iPhone voicemail not working. The settings on the device may have been changed by an upgrade of the iOS thereby causing connection problems.
Your carrier may also have a poor connection in your area, causing the slow retrieval of your voicemail messages. Whatever the reason, there are many ways in which you can rectify this problem. Here are some of them.
Part 1: How to Fix your iPhone Voicemail Problems?
1. Issues related to device settings:
Restart your iPhone and reset the device settings. Usually, this should solve the issue, but to make sure that it does not happen again, Tap on settings and go to the general reset feature. Click on "Reset" followed by "Reset Network Settings". This can be summarized as "Settings > General > Reset > Reset Network Settings".
2. Issues related to carrier settings:
Restart your iPhone and make sure it is connected to the internet. Tap on Settings, then go to the General feature and select "About". This can be summarized as "Settings>General>About". If there are mandatory settings, you will get a prompt that only says "OK". If it is a simple update, then you will have the option of accepting or declining the update.
3. Issues related to Voicemail settings:
Your changed password to Voicemail could cause Voicemail not working on iPhone. This is the easiest situation as you just need to re-enter the new iPhone Voicemail password and it will work again.
4. Why does iPhone voicemail experience delays?
The answer to this will lie in the settings of your voicemail. Usually after installing a tethering hack, the settings of the .IPCC file which has the carrier settings is changed, thereby disabling your voicemail. The solution to this is quite simple; restore your voicemail settings on the network using "Settings > General > Reset > Reset Network Settings".
5. Why iPhone cannot connect to voicemail?
When your voicemail screen shows "Cannot Connect to Voicemail", the error is caused when you change SIM cards or restore the device to factory settings. Here is how to correct the error.
Step 1 Call your own number from the iPhone, and you will be connected to your voicemail.
Step 2 Press the star (*) to go to the menu; if you have a password, enter it now.
Step 3 Once in the Menu, select "Personal Settings".
Step 4 Select "Administrative Options" and "Passwords".
Step 5 Follow the on-screen prompts to temporarily disable your password.
Step 6 Hang up and then repeat from step 1 again, but this time, when you get to step 6, turn on your password.
Step 7 Hang up once again and wait for a minute or two, and you will get a dialog pop-up that will ask you for your password.
Step 8 Enter the password, and you will be able to connect to your voicemail once again. If your voicemail has a lot of messages, then it will take some time for them to be added, so be patient.
Part 2. How to Retrieve Deleted Voicemail on iPhone?
dr.fone - Data Recovery (iOS) is a powerful application used for the restoration of many functions and data on all iOS (including iOS 15) devices.
With this software, you can recover the deleted data on your device from time to time in simple steps. When you have lost your data or Voicemails, you can use it to restore them from your iPhone device.
dr.fone - Data Recovery (iOS)
Key Features of dr.fone - iOS Phone Data Backup & Restore
- Easy to use - this is perhaps one of the best features of this tool. You can use it easily even if you are not tech-savvy. Everything you need is clearly labeled and easy to locate.
- Full iOS device compatibility - it does not matter which device you are trying to recover data for; you can use dr.fone recovery on all iOS devices, including iOS 11 devices.
- Choice of data - Most backup tools will have to restore full data categories; with dr.fone, you can select which particular data you want to restore.
- Quick Preview - The preview feature allows you to view the data that you want to restore, before you actually recover it.
- One-click Operation - dr.fone - iOS Data Backup & Restore allows you to backup and restore files with 1 click. Files can be covered by contacts, photos, messages, voicemail, calendar, etc.
Step-by-step guide for how to restore deleted voicemail data via dr.fone
Step 1 dr.fone has versions for both Windows PC and Mac. You're supposed to download the right version on your computer, install and launch it. The main window will look like the picture below. Click "Data Recovery".

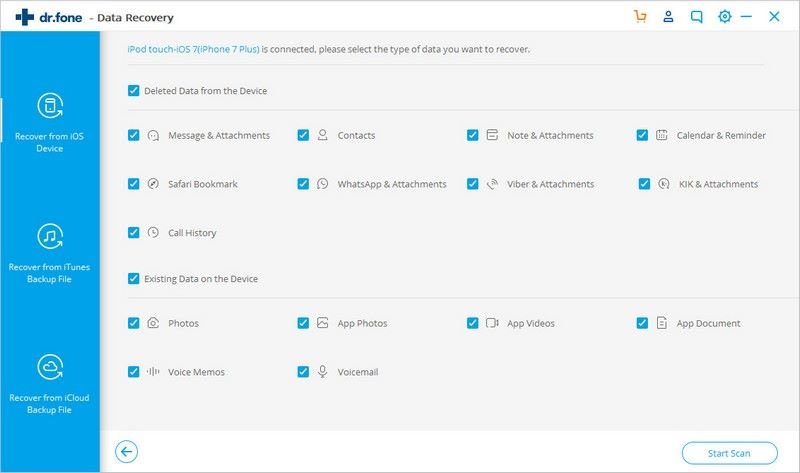
Step 2 Now select the recovery type "Recover from iOS Device" and select the data you want to recover. Note that Viocemail is on the bottom left corner of the window. Then click "Start Scan". The software will start to scan the deleted/lost files.
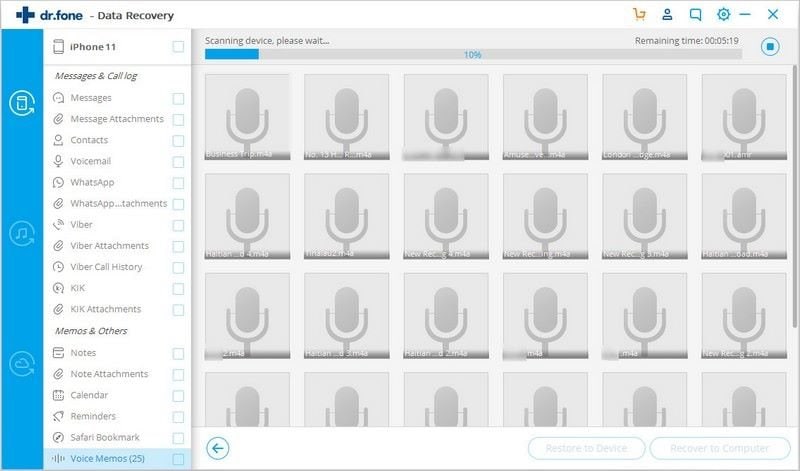
Step 3 The program is scanning your data and you can see them appear on the below screen. After the scanning process finishes, you can select and preview the data you want to restore.
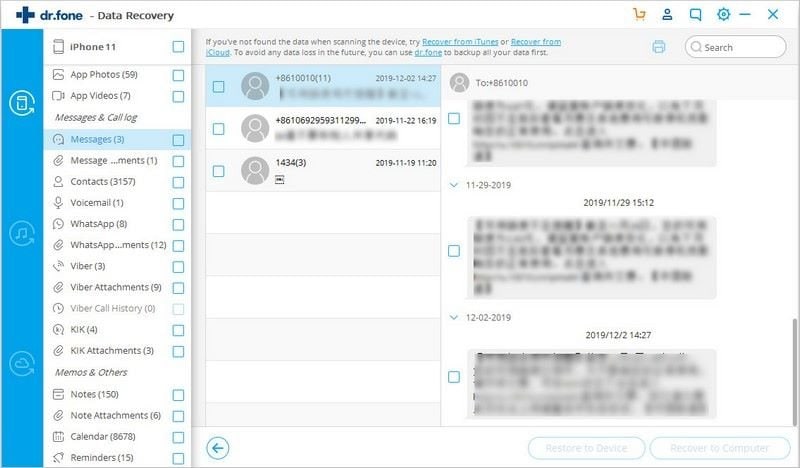
Step 4 After you preview the data quality, you can click "Restore to Device" or "Recover to Computer" to get deleted data (voicemail or other types of data) back.
Conclusion
Next time you don't have to excessively worry about lost voicemails or other data important to you. We hope the simple guide above will help you solve the question.
Elva
staff Editor