
Apr 03, 2025 • Filed to: Recover Files • Proven solutions
The deletion of the Windows Update Files is made to gain more space into the computer's hardware, to eliminate the corrupted and outdated files. Windows Update is running in the backend with the frequency selected by the Windows user. If you have not selected a regular update, when Windows updates are available, you are notified by a notification window. Usually are transmitted information related to the size of the updates. Thus you will know how much space you need for updates.
Windows 7, or Windows 8 operating system requires 16 GB available hard disk space for the 32-bit version, or 20 GB for the 64-bit version. It is recommended to have a free space of 40 - 50 GB on the partition you intend to install Windows, to have enough space for updates, also.
Part 1 Why deleting Windows Updated Files
The reasons for the deletion of the updated files are to save more space on the hard drive, avoid corrupt files harm the computer. However, the most essential reasons are that Windows doesn't make any cleanup after finished updating the system. Outdated and / or corrupted files give so many headaches, that we strongly think to give up the computer and buy another one (probably with another operating system). But we don't have to push things so far because remedial solutions exist even within the Windows operating system.
The size for the update files are different and depend on the version of Windows you have on your computer, and updates you want to do. For example, if you have Windows 8, you need 3000 MB of available space to install the 32-bit version of Windows 8.1, and 3850 MB of available space to install the 64-bit version of Windows 8.1.
Part 2 How to delete Windows Update Files in several steps
You can use Disk Cleanup and the Windows Update Cleanup feature to delete Windows update files that you no longer need and only occupies storage that you can utilize for files you need.
Follow the steps below to clean up Windows Update Files:
- Open Disk Cleanup wizard
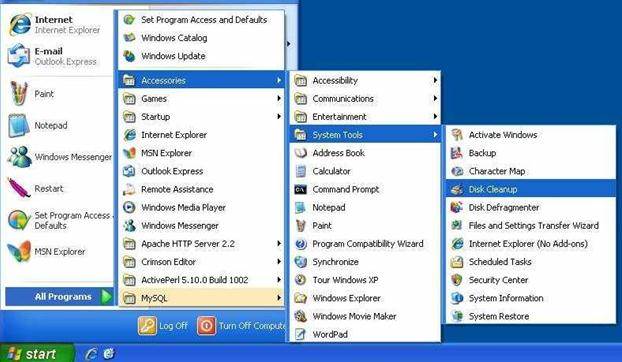
Go to Start, search after All Programs menu, click on Accessories, and after a click on System Tools. The final step is to click on Disk Cleanup.
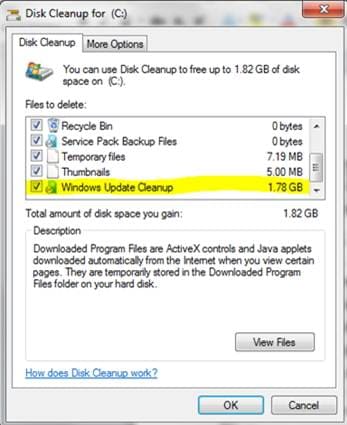
- Run Windows Update Cleanup
The option of Windows Update Cleanup is checked by default. Thus, when you use the Disk Cleanup, this tab is already ready to be used.
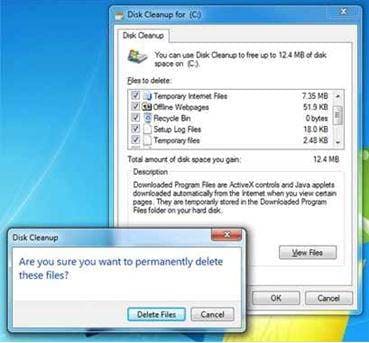
- Delete the Update Files
You will be prompted with a notification window and you must click on Delete Files.
More Related Articles:
Part 3 Tips & Tricks for deleting Windows Update Files
You can delete Windows Update Files by using Disk Cleanup only if you have administrator permissions. If you receive some message that you do not have this privilege, click on the right button from your mouse and select Run as Administrator.
The Disk Cleanup wizard runs in the background and you can still work on your computer. However, keep in mind that your computer will restart in most cases after the cleanup of files is done.
You should know that the Windows Update Cleanup option is available only when the Disk Cleanup wizard detects Windows updates that you do not need on the computer. Thus, even if you think that you have update files that you do not need anymore, Windows could "think" differently. When you don't see that this option is available, probably you should check twice the files you consider to delete.
If you lost the data on your computer, don't worry! You still have the chance to get lost data back. To recover files from the computer hard drive, you can have tried the following tool.
How to Recover Lost Data from your Computer

Your Safe & Reliable Hard Drive Data Recovery Software
- Recover lost or deleted files, photos, audio, music, emails from any storage device effectively, safely and completely.
- Supports data recovery from recycle bin, hard drive, memory card, flash drive, digital camera, and camcorders.
- Supports to recover data for sudden deletion, formatting, hard drive corruption, virus attack, system crash under different situations.


Amy Dennis
staff Editor