
Have you ever been typing away in Microsoft Word, and then all of the sudden your computer crashes and you lose everything that you typed? If so, then you'll be happy to know that Microsoft has a feature called Autosave that will save your work automatically.
In this blog post, I'll show you how to enable Autosave in Microsoft Word, and I'll also give you some tips on how to make sure that your work is always saved. Let's jump right into the topic.
In this article
What Is Autosave?

Autosave is a feature that automatically saves your work as you're working on it. So, if your computer crashes, or if you accidentally close your document, you'll be able to continue where you left off.
This feature is available in most Microsoft Office programs, including Word, Excel, and PowerPoint. It's also available in some other programs, such as Adobe Photoshop and Google Docs. In some cases, you may not even realize that Autosave is turned on, because it happens automatically in the background.
Autosave is turned on by default in most programs, but you can check the settings to make sure it's turned on. I'll show you how to do that in Microsoft Word.
How Often Does AutoSave Save My Work?
It helps to understand how often autosave woks so that you know how much work you'll lose if your computer crashes.
The frequency of autosaves depends on the program that you're using. In Microsoft Word, the default autosave interval is 10 minutes. You can change this interval, but I recommend leaving it at the default.
The last saved file can always be accessed from the Version History, here all your data history is saved according to time and date.
How to Change the AutoSave Time Intervals?
Microsoft Word automatically saves your document every 10 minutes by default, but you can change it according to your need. To change the autosave intervals, follow the steps below:
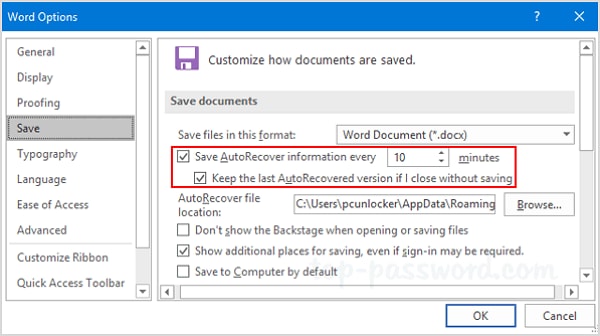
Step 1. Open the Word file and go to File > Options >.
Step 2. Under the Save documents section, you can type a number in the Save AutoRecover information every[] minutes box.
Step 3. Click OK to save the change.
We recommend that you keep a relatively short interval, as the shorter the time, the less data loss. Also, Also, saving more is better than saving less, because in the event of any power outage or system crash, you won't lose much data.
How Can I Ensure That Files Are AutoSaved?
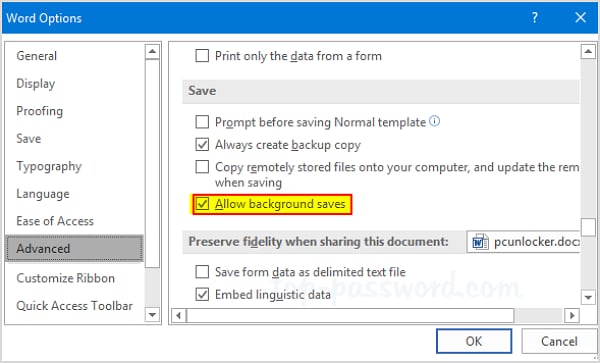
If you don't see the Autosave feature in your program, it might be turned off. Here are the steps to check if your Word documents can be autosaved: Go to File > Options > Advanced. Scroll down to the "Save" section, make sure that the "Allow background saves" checkbox is selected. If it's not, select it, and then click "OK." Now, Autosave will be turned on, and your work will be saved automatically.
How to Enable and Disable Word Autosave?
In MS word, enabling or disabling the Autosave features is simple and easy. Here's the step-by-step guide how you can do it on Word 2007 and Word 365.
Enable and Disable Autosave in Word 2007
Step 1. Launch Word and go through File> Word Options.
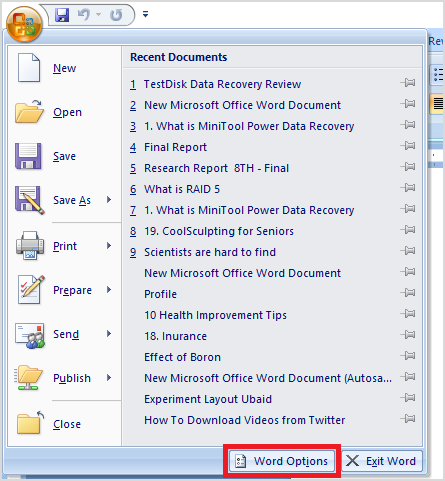
Step 2. Once you have accessed the options, click on "Save."
Here you will find the "Save Auto Recover option." If the box is checked, it means "Autosave Enabled," but if the box is not checked, it means it's "Disabled."

Enable and Disable Autosave in Word 365
The autosave function of Word 365 is slightly different from the classic Word 2007 as it doesn't save any file on your computer's drive. Instead, it keeps all its autosave files on OneDrive online for extra security. Here's how you can enable or disable Autosave in Word 365:
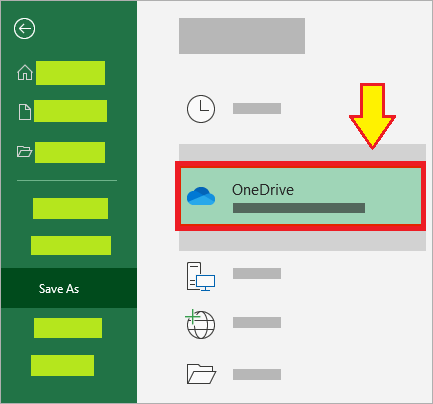
Step 1. Save on OneDrive. The very first step is to save the file on OneDrive manually.
To do that, go to File > Save As. Here you will find the "OneDrive" Click on it and choose the sub-folder from the appeared list.
Step 2. Enable Office Sync.
Once you have selected the OneDrive option, it will automatically show you the settings. Now click on More > Settings > Office.
Step 3. Check if the "Use Office applications to sync" box is On or Off.
If it's off, you must turn it on to enable the autosave feature via OneDrive. Once it is synced, you will find the Autosave button on the top bar of your Word document.

How to Find Autosaved Documents in Word on Windows?
Your autosaved documents are saved over your original documents, but Word also makes a copy of these autosaved documents in its directory. Follow the steps to locate the autosaved documents:
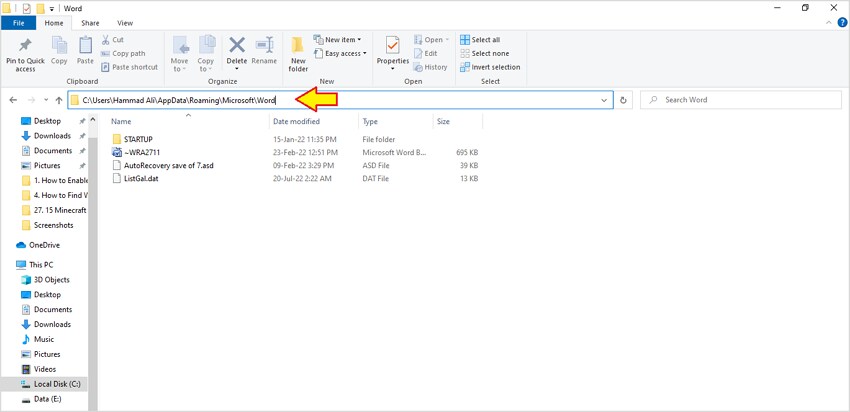
Step 1. Open a Word document and go through File> Options >.
Step 2. You will see the "AutoRecover File Location" bar in the Save section.
Click on the "Brows" options to open the autosaved file location. By default, it is
C:\Users\Your_username\AppData\Local\Microsoft\Word or
C:\Users\Your_username\AppData\Local\Temp.

Step 3. Once you have confirmed the save location, you can also access this folder from your drives, or you can change its default location.
How to Find Word Autosave Location on Mac?
Usually, you don't have to look for the autosaved file on Mac since the file is rewritten on your original document and opens automatically when you launch the Word application on Mac. These autosaved files are stored in the temporary file folder. However, in case you want to access the location, here's the step-by-step guide:
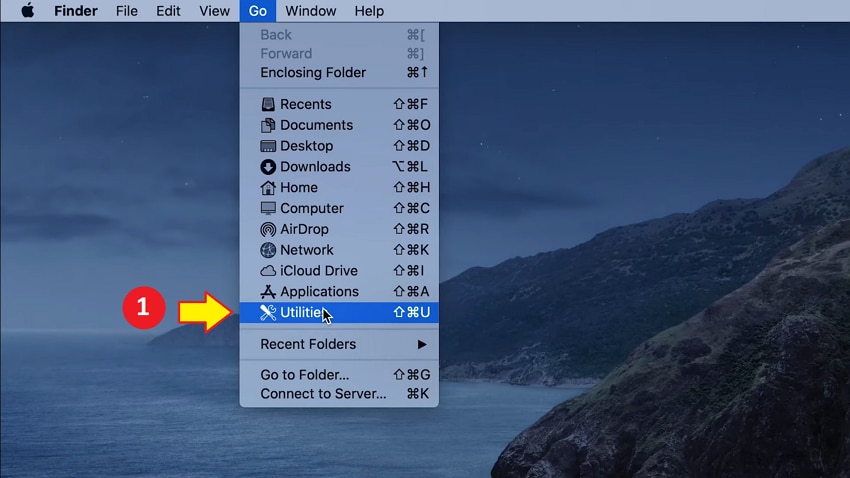
Step 1. Go to the Utilities from the "GO" menu on your Mac operating system.
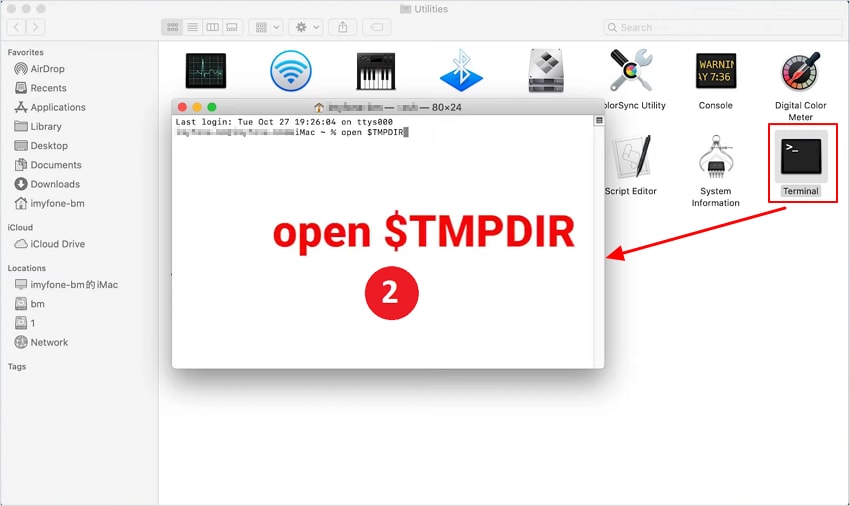
Then, open the "Terminal" application similar to "Run" in Windows.
Step 2. Type "open $TMPDIR" in the Terminal and hit the Enter It will redirect to the temporary folder directory.
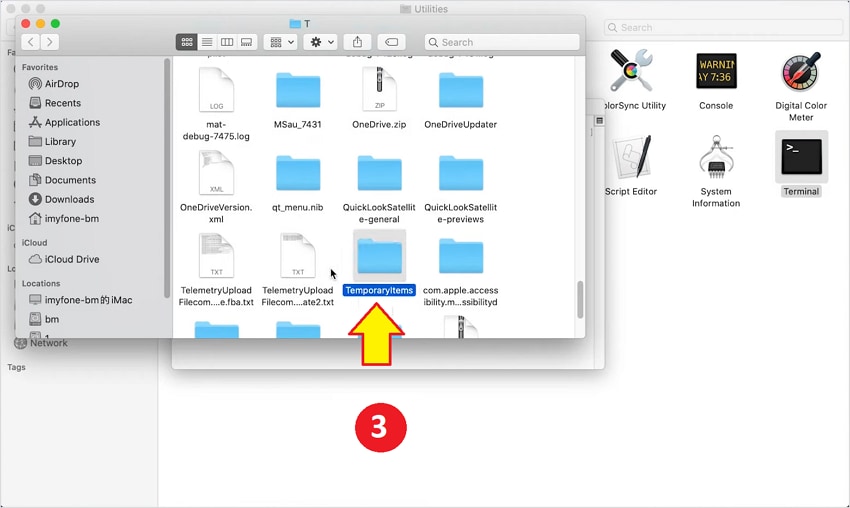
Step 3. Now search for the folder named "TemporaryItems." Here, you will find your autosaved word file.
How to Recover Autosaved Word Document on MacOS
In Mac operating system, the recovery of the autosaved file is quite easy. First, the office will automatically ask you to open the last saved file when you suddenly closed it without saving it the last time. Then, you can check and save it to your desired path. But sometimes, you have to access it manually.
To access the file manually,
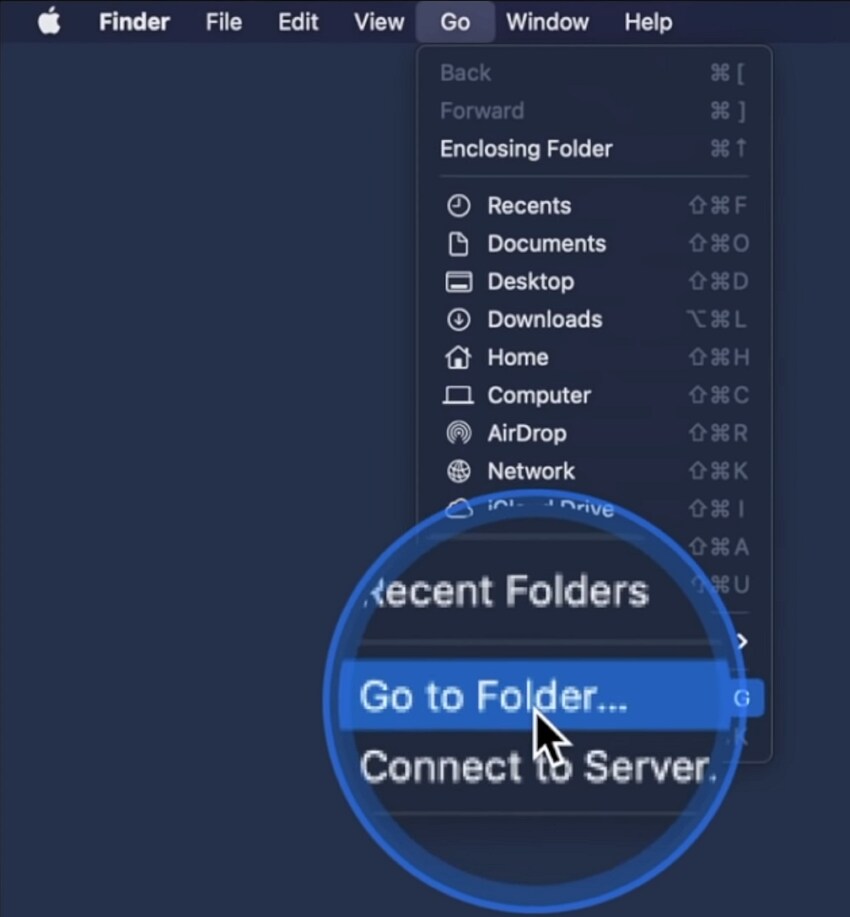
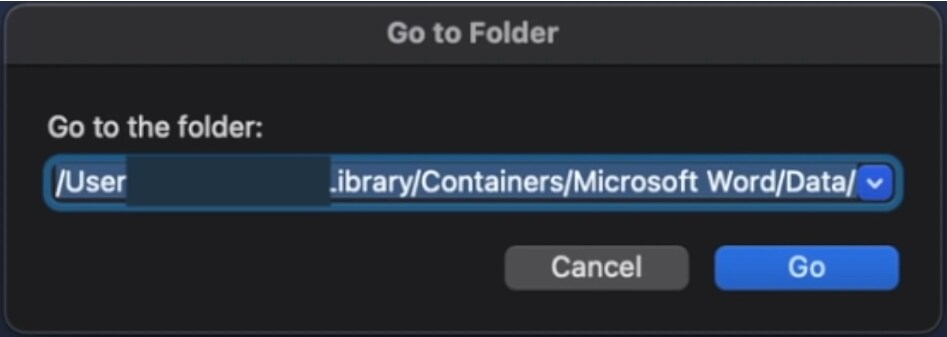
Step 1. Open the "Go" file from the file menu and then click on "Go to the folder".
Step 2. Now type “/Users/<username>/Library/Containers/com.Microsoft/Data/Library/Preferences/AutoRecovery” into the bar and hit Enter.
You will be redirected to the folder where your autosaved file is located.
Step 3. Find the file you want to recover in the folder. Then open and save it to a secure location.
How to Recover Autosaved Word Document on Windows
The first thing you will have to understand that where does Word save the Autosave file. By default, Microsoft Word autosaves the copy of your working document in a temporary folder that gets deleted when you close the program.
By default, Word saves all Autosave files in the temp folder. To find this folder, go to This PC and then navigate to the following path:
C:\Users\Your_username\AppData\Local\Microsoft\Office\
Here, you will see all the Autosave files created by Word. You can open any file and then save it to your desired location.
Conclusion
Autosave is a great feature that can help you avoid losing your work, but it's important to know how it works and how to use it safely. We hope this article has helped explain what Word Autosave is and show you how to enable and disable it in Microsoft Word.