5 Ways to Fix iPhone Error 2009 or iTunes Error 2009

Feb 29, 2024 • Filed to: Mobile Repair Solutions • Proven solutions
Receiving error messages whilst you are updating to iOS 12.3 or restoring your iPhone, iPad or iPod Touch is a problem. One of those errors, which we see evidence of quite often, is iPhone Error 2009 or iTunes Error 2009.
Someone who uses an iPhone, iPad or iPod Touch, and is updating to iOS 12.3 or restoring their device in iTunes, may receive a message, stating "The iPhone (name of the device) could not be restored. An unknown error occurred (iTunes error 2009)." From a long list of possible errors, "Error 2009" is just one. However, this error will prevent you from updating to iOS 12.3 or restoring your phone.
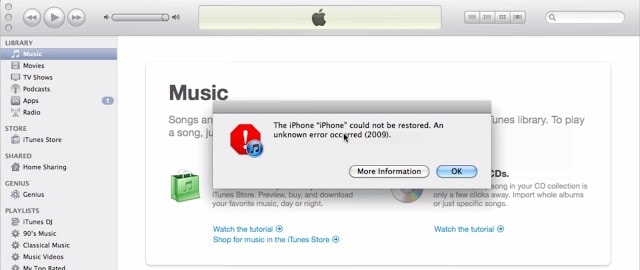
The iPhone could not be restored. An unknown error occurred (error 2009)
All of this sounds a bit gloomy. It is not. There are lots of ways to solve the problem. We are going to start with what is, of course, our favorite.
- Solution 1. Restart your computer or iOS 12.3 device (Fast Solution)
- Solution 2. How to fix iPhone error 2009 without losing data (Safe Solution)
- Solution 3. Fix iPhone error 2009 using an iTunes repair tool
- Solution 4. Ensure Antivirus program updated
- Solution 5. Disable iTunes helper
Solution 1. Restart your computer or iOS 12.3 device (Fast Solution)
It is a big cliché. But, like most other clichés, their popularity comes from them being true regularly. If you have a desktop or laptop computer, carrying out a ‘reboot’ often helps put things back in proper order.
You can sometimes correct iTunes error 2009, simply by switching your computer off, and then back on again. Once rebooted, start iTunes, and then start the update or restore process.
Restarting your smart device, your iPhone, iPad, or iPod Touch can also prove to be a very simple solution to curing errors which have occurred due to a USB connection failure. You can try the below steps to restart the device and fix the iTunes error 2009:
- press and hold the ‘Sleep/Wake’ button until the ‘Red Slider’ appears on the screen.
- Drag the slider to turn off your device.
- After the device switches off completely, press and hold the ‘Sleep/Wake’ button one more time, till the time ‘Apple logo’ appears.
- Just sometimes, this will be enough to correct iPhone error 2009

Rebooting your phone will often do the trick.
If that doesn't work, your next step is to update iTunes.
Solution 2. How to fix iPhone error 2009 without losing data on iOS 12.3 (Safe Solution)
If you're still seeing the error 2009 and nothing else has worked, there might be a system problem on your iPhone. Dr.Fone - System Repair may help you to fix iPhone error 2009 (iTunes Error 2009) quite easily and safely. This program is a powerful and safe system recovery tool that can help you fix most of the iPhone or iTunes errors without losing your data. You can check below for more features about Dr.Fone.
Dr.Fone - System Repair
Fix iPhone error 2009 (iTunes Error 2009) without data loss
- Fast, easy and reliable.
- Fix with various iOS 12.3 system issues like stuck in recovery mode, white Apple logo, black screen, looping on start, etc.
- Fixes other problems with your valuable hardware, along with iTunes errors, such as error 4005, iPhone error 14, iTunes error 50, error 1009, iTunes error 27 and more.
- Work for all models of iPhone, iPad and iPod touch.


How to fix iPhone error 2009 (iTunes Error 2009) successfully for iOS 12.3
Step 1: Choose the Repair feature
It is easy. Download, install and run Dr.Fone. Choose "System Repair" from the dashboard window.

Clear and helpful.
Now connect your device to your computer with a USB cable. Click on ‘Standard Mode’ to continue the process which can retain phone data after the iPhone is fixed.

Just click ‘Standard Mode’.
Step 2: Download and select firmware
You will find this process very easy as Dr.Fone will identify your device, offering to download the correct, latest version of iOS 12.3 for download. You should, of course, click on ‘Start’ and then just wait a little while for our tools to finish the process automatically.
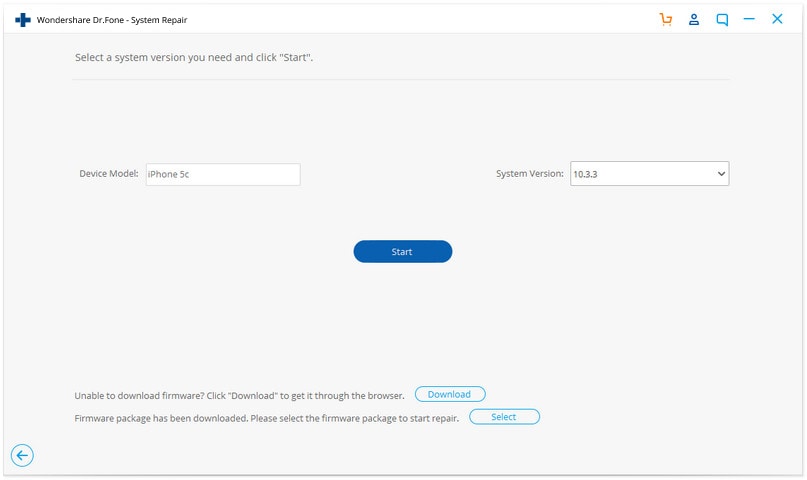
Usually, it will be easy, you can just click through the process.
Step 3: Fix error 2009
Once the download process is completed, the program will start repairing the iOS, which is the operating system, on your device. This will take your iPhone, iPad, or iPod Touch out of recovery mode, or Apple logo looping, you are well on the way to curing iTunes error 2009. Within minutes, you will be notified that the device is restarting back in normal mode.
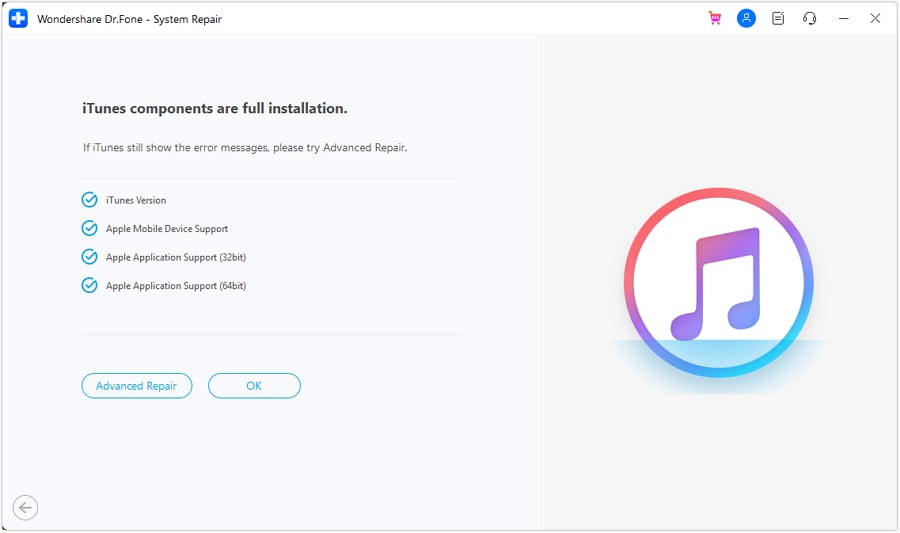
Tips: If error 2009 cannot be fixed with this solution, your iTunes may go wrong. Go to repair iTunes components and see whether it is fixed.

Dr.Fone keeps you informed all the way.

Job done!
Besides this, you can also check other solutions below.
Solution 3. Fix iPhone error 2009 on iOS 12.3 using an iTunes repair tool
iTunes may be corrupted or too obsolete so that it fails to work properly and constantly gives the error 2009. This is a common reason for iTunes error 2009 popups. You should then have your iTunes fully repaired to normal state.
Dr.Fone - iTunes Repair
Easiest Solution to Fix iTunes Error 2009
- Fix all iTunes errors like iTunes error 2009, error 21, error 4013, error 4015, etc.
- Fix any iTunes connection and sync issues.
- Get rid of iTunes issues without affecting existing data in iTunes or iPhone
- Fastest solution in the industry to repair iTunes to normal.
The following steps can help you fix iTunes error 2009 smoothly:
- After downloading and launching Dr.Fone - System Repair, you can see the screen below.
- Click "Repair" > "iTunes Repair". Connect your iPhone or iPad to the computer.

- For starters, we need to exclude the iTunes connection issues. Choose "Repair iTunes Connection Issues" for repair.
- If iTunes error 2009 still exists, click "Repair iTunes Errors" to verify and repair all the basic iTunes components.
- After the basic components are repaired, click "Advanced Repair" to have a thorough fix if iTunes error 2009 persists.
Solution 4. Ensure Antivirus program updated
They definitely help us, you would be foolish to run a computer without having one installed, but, just now and then, the anti-virus programs can cause a problem. Even with something like this iTunes error 2009 situation, the antivirus program on your system might be responsible for getting in the way. Check if there are any updates for your anti-virus security software available. If there is, then download and install it. When you are satisfied that everything is as it should be, try to update your iOS 12.3 device again.
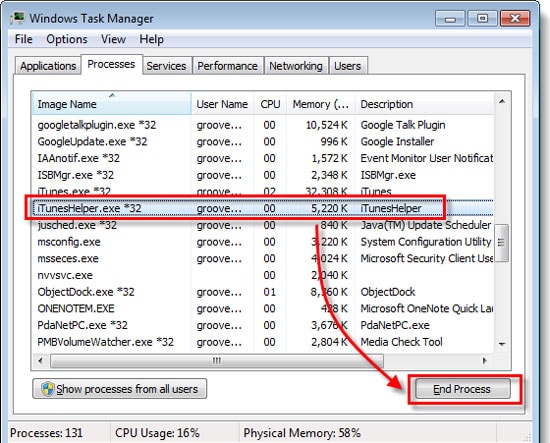
Solution 5. Disable iTunes helper
If you have a Mac computer, you need to go to ‘System Preferences’ < ‘Account’, and then click on ‘Login Items’. You will find ‘iTunes Helper’ in the items list. Disable it.
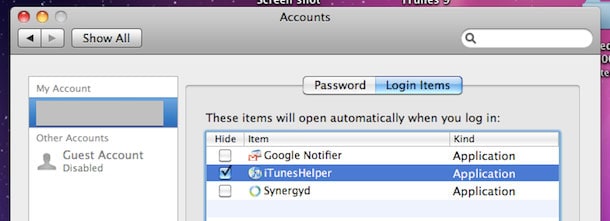
Stop it from starting!
If you are using Windows PC, firstly click on ‘Start’, and open the ‘Run’ command. Type ‘MsConsfig’, ‘ then press ‘Enter’. Find ‘iTunes Helper’ and disable it.
There are different versions, but the idea is always the same.
You may have noticed before, that iTunes can be very persistent in insisting it does just what it wants to do. It will soon re-enable the process of iTunes Helper. You only require it to be off until you will finish with the restore or update process.
Now, straight away, now you have disabled iTunes Helper, you need to try to update your iPhone / iPad / or iPod Touch. Whatever process was stopped by iTunes error 2009, you should attempt to do it again.
We hope you have not taken too long to find a solution to your problem from one of the suggestions we have made above. We are here to try and help!
Dr.Fone – The original phone tool – working to help you since 2003
Join millions of users who have recognized Dr.Fone as the best tool.
It is easy, and free to try – Dr.Fone - System Repair.


Other Popular Articles From Wondershare
iPhone Errors
- Errors 0 ... 100
- 1. iPhone Error 6
- 2. iPhone/iTunes Error 9
- 3. iPhone Error 10
- 4. iPhone/iTunes Error 21
- 5. iPhone Error 35
- 6. iTunes Error 40 on iPhone/iPad
- 7. iPhone Error 47
- 8. iPhone Error 69
- 9. iPhone Error 75
- 10. iPhone Error 78
- Errors 1xxx
- 1. iPhone Error 1009
- 2. iPhone Error 1015
- 3. iPhone/iTunes Error 1100
- 4. iPhone Error 1110
- 5. iPhone Error 1667
- Errors 2xxx
- Errors 3xxx
- 1. iTunes Error 3004
- 2. iTunes Error 3014
- 3. iTunes/iPhone Error 3194
- 4. iPhone Error 3503
- 5. iPhone/iTunes Error 3600
- Errors 4xxx
- Other iPhone Errors
- 1. iPhone Error 7005
- 2. iPhone/iTunes Error 9006
- 3. iPhone Error 0xe8000015
- 4. iPhone Cellular Update Failed Error
- 5. iPhone Activation Error
- 6. iPhone SSL Error
- Other iPhone Issues
- ● Manage/transfer/recover data
- ● Unlock screen/activate/FRP lock
- ● Fix most iOS and Android issues
- Repair Now Repair Now Repair Now
Alice MJ
staff Editor
Generally rated4.5(105participated)