[Works!] 21 Methods to Fix iPhone Error 0xe8000015

Aug 30, 2023 • Filed to: Mobile Repair Solutions • Proven solutions
Have you been trying to connect your iPhone to iTunes? During the connection, have you been facing Error 0xe8000015 iPhone, which prevents you from connecting and performing actions on your device? As iTunes helps in managing multiple system functions, having such issues can be quite problematic and can chain towards more problems. To get rid of this error, this article provides a detailed guide on how to fix the iPhone Error 0xe8000015 with the help of multiple kinds of methods and solutions.
- Part 1: What is iTunes Error 0xe8000015?
- Part 2: Why Does iTunes Error 0xe8000015 Appear?
- Part 3: Basic Solutions to Solve iTunes Error 0xe8000015?
- Solution 1: Check USB Cable/Port/Connector
- Solution 2: Check the Internet Connection
- Solution 3: Check the SIM Card
- Solution 4: Check if Your iPhone has Enough Space
- Solution 5: Check if Your iPhone is Turned on
- Solution 6: Check if Your iPhone Trusts Your Computer
- Solution 7: Check if Antivirus Software on Your Computer is Blocking Your iPhone
- Solution 8: Check if iTunes is Updated to the Latest Version
- Solution 9: Check if Your iPhone is Updated to the Latest Version
- Solution 10: Check if Your Computer is Updated to the Latest Version
- Solution 11: Restart Your iPhone and Computer
- Solution 12: Connect Through Another Computer
- Solution 13: Contact Apple's Support Team
- Part 4: Advanced Steps to Solve iTunes Error 0xe8000015
- Solution 1: Disable Restriction on iPhone
- Solution 2: Reset iTunes Lockdown Folder
- Solution 3: Use iOS Repair Software [No Data Loss]
- Solution 4: Factory Reset Your iPhone [Data Loss]
- Solution 5: Put Your iPhone into Recovery Mode [Data Loss]
- Solution 6: Reset Your iPhone in DFU Mode [Data Loss]
- Solution 7: Unlock a Disabled iPhone Without iTunes or iCloud
- Solution 8: Reinstall USB Drivers on the Computer
Part 1: What is iTunes Error 0xe8000015?
The specific error of 0xe8000015 appears in conditions where you are connecting your iPhone to iTunes through a cabled connection. When the connection does not establish properly, a particular error arises. It means that there is an unknown reason behind the lines that is not allowing the proper establishment of a connection between the iPhone and iTunes.

Part 2: Why Does iTunes Error 0xe8000015 Appear?
To know about the reasons, you should review the Error 0xe8000015 iPhone and discover the causes that are leading to this problem. Before you look into the detailed list of solutions for this error, you should be aware of the reasons that will help you find the perfect remedy rather than experimenting with the iPhone. You should be mindful of the following reasons to know more about the error 0xe8000015:
- The computer that is being used to establish a connection with the iPhone can have multiple issues. The problems can range from unnecessary security software to glitches in the system, which will avoid the proper establishment of the connection between the iPhone and iTunes.
- Drivers are an essential element in the procurement of any process. If you are looking to connect your iPhone to iTunes using a USB connection, it is possible that problems in the drivers can lead to problems in the connection of the device with the computer.
- Issues in the iPhone settings can also cause problems, such as the Error 0xe8000015 Having such configuration problems can be pretty devastating for the iPhone, as it can cause multiple system problems.
- iPhone is a complete mobile phone device that also accommodates a SIM card for different operations. If the SIM card is not properly inserted or is defective, you will have to face issues like the Error 0xe8000015 on your iPhone while connecting with iTunes.
- Outdated software and devices can also cause problems in such connections. Your iPhone might not even connect to iTunes if the software or the devices involved in the process are outdated. The only solution to this problem is to update them to the latest version.
Part 3: Basic Solutions to Solve iTunes Error 0xe8000015?
We will start our discussion of the solutions to the iPhone Error 0xe8000015 with some basic remedies that can be tested out to resolve the problem. These solutions, while being basic, can be pretty conclusive in resolving such connectivity issues. Ranging from hardware to software issues, all kinds of considerations have been made related to Error 0xe8000015.
Solution 1: Check USB Cable/Port/Connector
The first thing that you should check before going into other deep solutions is the connection that is being established. For that, you should look into the USB cable and see if it is connected properly. If damaged, it would be the root cause of the problem. Along with that, check the ports and connectors of your computer to see if they are not the cause of this issue. Resolve such hardware issues if they are the perpetrators of this error.

Solution 2: Check the Internet Connection
Another essential used in this process is the internet, which is used to connect the device and execute multiple tasks across it. If your internet is not working, you must look into the "Settings" of your iPhone and check the status of the internet. Use any speed testing service such as Ookla to assess the conditions of the internet. If the issue with Wi-Fi networks is a long walk, you can shift to cellular networks or other Wi-Fi connections.

Solution 3: Check the SIM Card
Issues in SIM cards are also addressed as a concern for the Error 0xe8000015 iPhone. See if you are getting any cellular network signals on the top of your iPhone, which clarifies the status of the SIM card. Check your SIM jackets and see if the SIM is connected properly. If the SIM gets damaged, it also causes problems for the user, which also contains this particular error when connecting to iTunes.

Solution 4: Check if Your iPhone has Enough Space
As you are about to perform a specific task using iTunes, your iPhone should have some space to adjust the changes. You must look into the "Settings" and move towards the "General" section to analyze the "iPhone Storage." If there is minimal or no space available, you must free up some space from your device to bring out space to save more data on your iPhone.

Solution 5: Check if Your iPhone is Turned on
If your iPhone is not turned on, you will never be able to connect your device to iTunes. It is imperative for the iPhone to be turned on to establish a connection. With no power, there is no chance that you can make any system changes to your iPhone.
Solution 6: Check if Your iPhone Trusts Your Computer
There might be a chance that your iPhone won't connect to the computer and bring out the iPhone Error 0xe8000015 on the screen. It may be possible because of the problem of trusting the computer. Whenever you connect an iPhone to a new device, it asks you to trust the device, after which you can perform edits on the device through the computer. Always check for this pop-up when you connect the iPhone to a computer, thus resolving the problem of trusting the computer.

Solution 7: Check if Antivirus Software on Your Computer is Blocking Your iPhone
Any anti-virus or security protection software installed on the computer can cause issues in the general files and services of the device. You must look into the software and see if it is causing problems in such processes. The best thing to do is to check the software and pause its services to avoid blocking your iPhone from connecting to iTunes.

Solution 8: Check if iTunes is Updated to the Latest Version
iTunes is an excellent platform for performing different system-related tasks on the iPhone. If it is outdated, you will have to look into the iTunes version that is installed on the computer. Having outdated software will lead to multiple problems, which include the 0xe8000015 error. To update your iTunes to the latest version, you will have to access the platform and access the "Help" section. Select "Check for updates" from the options to look out for any current updates that can be installed.

Solution 9: Check if Your iPhone is Updated to the Latest Version
Outdated devices have also been referred to as the reason for the issue of 0xe8000015 when connecting to iTunes. There are multiple devices involved in the process, out of which any device can have this particular problem. If your iPhone is not updated to the latest version, you must look ahead in the steps for updating it:
Step 1: You have to first locate and open the "Settings" of your iPhone and then access the "General" settings.

Step 2: Find the "Software Update" option in the list to check for any prevailing updates. If there are any updates, click on the "Download and Install" button to initiate execution.

Solution 10: Check if Your Computer is Updated to the Latest Version
You should also check your computer for any prevalent updates. Having an outdated computer can also cause issues with establishing connections with iTunes. To update the computer, you must follow these simple steps:
Step 1: Look for the "Search" icon on the taskbar and look for the option "Windows Update settings."

Step 2: As you open a new window, you must look for the button "Check for updates" and see if there are any updates that are to be downloaded and installed.

Solution 11: Restart Your iPhone and Computer
Temporary errors and glitches within the iPhone and computer can also lead to issues such as the Apple iPhone Error 0xe8000015. To resolve them, the best thing to try as a starter is to restart your iPhone and computer.
For iPhone: To restart your iPhone, open "Settings" and look for the "General" settings. Afterward, locate and select the option of "Shut Down" in the list to turn off the iPhone. Press and hold the Power button to power it up again.

For Computer: Access the Start menu on the bottom taskbar of your computer and locate the "Power" options. Select the option of "Restart" to reboot the computer.

Solution 12: Connect Through Another Computer
If you cannot rectify the problem with the computer in establishing a connection with iTunes, you should look to shift your iPhone to another computer. Shifting your desktop will give you a new platform to try out connecting with iTunes. Follow through the similar process of connecting the iPhone with another computer and see if there is no problem appearing in the shape of error 0xe8000015 appears.
Solution 13: Contact Apple's Support Team
With no basic options left, the only haven left in this case is to contact the Apple Support Team. Asking for their service for resolving such issues is appropriate; however, the cost and time do not suit you as a primary option. Thus, be very careful while accessing and putting in a deal with the Apple Support Team.

Part 4: Advanced Steps to Solve iTunes Error 0xe8000015
We will now come across some advanced methods that can be used to fix the iPhone Error 0xe8000015 and establish and proper connection with iTunes. These methods, if properly assessed, will guide you on how to fix iPhone Error 0xe8000015:
Solution 1: Disable Restriction on iPhone
The first method to resolve this particular issue within the connection of iPhone and iTunes is to disable any restrictions on the iPhone if applied. Usually, having such restrictions prevents you from establishing a connection with iTunes and performing any action. To disable the restriction, you will have to perform the following steps:
Step 1: Open the "Settings" of your iPhone and lead into the "Screen Time" option by scrolling down the settings.

Step 2: In the next screen, look for the "Content & Privacy Restrictions" option to proceed into the comprehensive settings. Turn off the toggle against the option to disable all restrictions on the iPhone.

Solution 2: Reset iTunes Lockdown Folder
Whenever you connect the iPhone to iTunes on a computer, a particular folder is created. Out of these folders, there is a "Lockdown" folder that can cause issues in connectivity and lead to the error 0xe8000015 iPhone. To reset this folder, you will have to delete it permanently:
Step 1: Launch the Run program using the "Windows + R" combination and type "%Programdata%" to open a new window.

Step 2: Search for the "Apple" folder and access the Lockdown folder in the list. Next, right-click on the Apple folder and select the "Delete" option. Whenever you connect your iPhone to iTunes on the computer, this folder recreates itself again.

Solution 3: Use iOS Repair Software [No Data Loss]
What if there is a third-party solution to resolve the problem of iPhone Error 0xe8000015? Dr.Fone - iTunes Repair is an available technique that allows you to easily manage the issues of your iTunes and repair them without compromising the data of your device. While the process is straightforward to utilize, it provides a complete system of iTunes repair with an in-depth assessment.
There are some prominent features involving this tool, which makes it a great option in the market. Let's review these points before leading into how to fix iPhone Error 0xe8000015:
- It provides a complete solution for all versions of iTunes, making it a strong contender in the market.
- The process helps you cover more than 100 iTunes errors and issues, which is a significant number.
- There is no need to have any exceptional knowledge of using the tool, as it is a one-click solution.
We will now look into the steps of fixing the Error 0xe8000015 on your iPhone and iTunes with the help of Dr.Fone - iTunes Repair:
Step 1: Access the System Repair
Launch Dr.Fone on your computer after downloading it on your computer. Proceed to select "System Repair" from the options and redirect to select "iOS" on the next window.

Step 2: Open the iTunes Repair
You will have to select the "iTunes Repair" option on the next screen to access the iTunes problems and resolve them.

Step 3: Start Repairing iTunes Errors
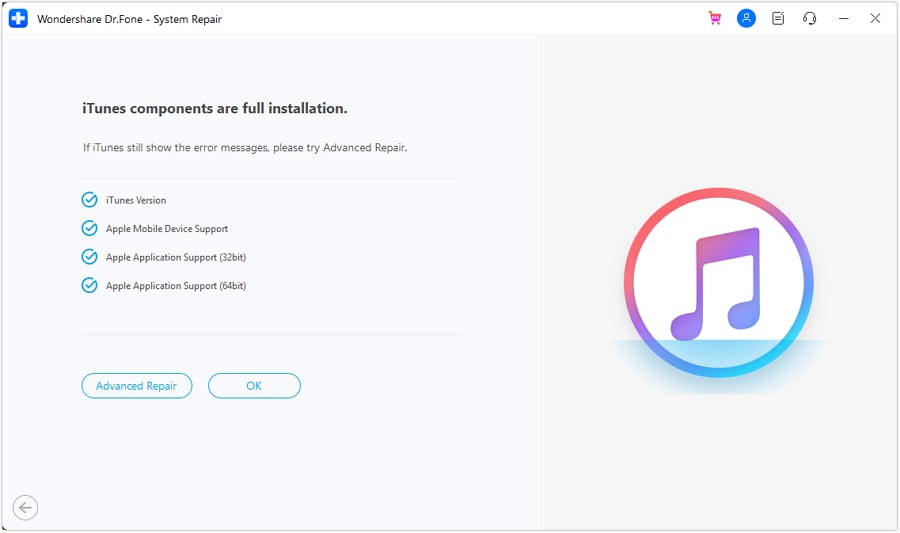
With the window that opens, select the "Repair iTunes Errors" option to proceed with the method. The platform starts detecting the issue with iTunes and resolves it.

Step 4: Try Advanced Repair
If the results are not satisfactory, you can consider using the "Advanced Repair" option for a more in-depth repair. This will surely help you get out of the error 0xe8000015.
Solution 4: Factory Reset Your iPhone [Data Loss]
If you are comfortable with sabotaging the data on your iPhone, you can also consider factory resetting it. The process is quite simple to conclude; however, you have to ensure that the iPhone data is backed up on iCloud. This will help you access it whenever you initialize your device after resetting it. To reset your iPhone to factory settings, use the following steps:
Step 1: Open the "Settings" of your iPhone and lead through the "General" settings. Following this, find the option of "Transfer or Reset iPhone" from the list of options.

Step 2: On the next screen, locate the "Erase All Content and Settings" option at the bottom of the screen to initiate the factory reset. Follow the instructions provided on the screen to factory reset your iPhone successfully.

Solution 5: Put Your iPhone into Recovery Mode [Data Loss]
Another appropriate solution to try out as a resolution to the Error 0xe8000015 iPhone is putting the iPhone in Recovery Mode. If the device is unresponsive to simple settings, you will have to initiate the advanced techniques that will help you assess the problem at hand. With the device in Recovery Mode, you will be able to restore its settings while losing all the data contained in it.
Step 1: Start by opening iTunes and connecting your iPhone to the computer with a USB connection. You will then have to put your iPhone in Recovery Mode:
- For iPhone 8 and Above: Press the "Volume Up" button and lead to press the "Volume Down" button in order. Then, you must press and hold the "Power" button until you observe the Recovery Mode screen.
- For iPhone 7 and 7 Plus: You will have to press and hold the "Volume Down" and "Power" buttons for a while until the Recovery Mode screen appears on the device.
- For iPhone 6 and Below: Use the "Home" and "Power" buttons of your iPhone to put the device in Recovery Mode successfully. Do not leave the buttons until the device goes into Recovery Mode.

Step 2: As the iPhone gets into Recovery Mode, you will find a pop-up appearing on the screen where you can select the option of "Restore" or "Update" as per the requirements.

Solution 6: Reset Your iPhone in DFU Mode [Data Loss]
If the Recovery Mode does not work out for you, you can look for access to the DFU Mode of your iPhone and resolve the problems in it. To put the device in DFU mode and use it to restore it properly, you will have to access the following steps:
Step 1: Start by connecting the iPhone to the computer with a lightning cable and launch iTunes. Then, you will have to put the device in DFU Mode, for which you will have to process the following:
- For iPhone 8 and Above: Press the "Volume Up" button followed by the "Volume Down" button and then hold the "Power" button for 10 seconds at least. When the screen goes black, hold the "Power" and "Volume Down" buttons for at least 5 seconds. Then leave the "Power" button but keep holding the "Volume Down" button.
- For iPhone 7 and 7 Plus: You must press and hold the "Volume Down" and "Power" buttons for 10 seconds at least. Leave the "Power" button and keep holding the "Volume Down" button for a while.
- For iPhone 6 and Below: Press and hold the "Power" and "Home" buttons for 10 seconds, after which you should leave the "Power" button. However, keep holding the "Home" button.
Step 2: As iTunes detects the iPhone, it will display a message where you have to click the option of "Restore iPhone." The only con of using this method is that it will erase your entire iPhone data.

Solution 7: Unlock a Disabled iPhone Without iTunes or iCloud
Do you have a disabled iPhone that is not activating for establishing a connection with iTunes? Since you do not have a particular solution for unlocking it with iTunes or iCloud, you will need something better that can resolve it without complicating the device's problems. Dr.Fone - Screen Unlock (iOS) is a perfect tool designed for managing all kinds of iPhone lock screen issues.
You can easily unlock the disabled iPhone with the help of this tool, which makes it a great option. To know why it is a good option for unlocking iPhones, we have provided some prominent reasons:
- It can easily bypass iCloud Activation Lock, which cannot be surpassed easily otherwise.
- You can also remove the MDM locks on your iPhone.
- It supports all versions of iOS, including the latest iOS 16, which makes it compatible with all major devices.
To know how you can unlock a disabled iPhone without using iTunes or iCloud with Dr.Fone - Screen Unlock (iOS), let's find out in the following steps:
Step 1: Open Screen Unlock
You must launch Dr.Fone on your computer and proceed with selecting the "Screen Unlock" option in the list.
Step 2: Start Unlocking iOS Screen
Connect the device with a lightning cable and select "Unlock iOS Screen" on the next window.

Step 3: Set Device Information and Start
Put the device in DFU or Recovery Mode with the on-screen instructions, after which you will be able to see the information of the iPhone on the next window. You will have to verify the "Device Model" and select the "System Version" before clicking on "Start."

Step 4: Unlock iPhone Successfully
The respective iOS firmware downloads and gets verified by Dr.Fone before it can be installed on your disabled iPhone. After the iOS firmware verification, you have to hit the "Unlock Now" button to install the firmware on the iPhone, after which it is unlocked successfully.

Solution 8: Reinstall USB Drivers on the Computer
Problems with the USB drivers can also be a reason for the Apple iPhone Error 0xe8000015. The best way to get rid of it is to reinstall USB drives on the computer, for which you will have to:
Step 1: Open the "Device Manager" by searching for it in the "Search" icon on the taskbar.

Step 2: On the new window, look for the drivers representing the USB and right-click on it to select the option of "Uninstall driver." Follow the on-screen instructions to delete the USB drivers successfully.

Step 3: Restart your computer and re-insert the USB cable used to connect your iPhone with iTunes to install the drivers automatically.
Conclusion
Do you know enough about the Error 0xe8000015 iPhone? With all these solutions in hand, you can indeed resolve all relevant problems with your iPhone and iTunes, along with all other stakeholders involved in the process. Get rid of the error and perform the system processes that can be done with iTunes. Along with that, tools like Dr.Fone - iTunes Repair (iOS) helps you repair iTunes errors with ease.


Other Popular Articles From Wondershare
iPhone Errors
- Errors 0 ... 100
- 1. iPhone Error 6
- 2. iPhone/iTunes Error 9
- 3. iPhone Error 10
- 4. iPhone/iTunes Error 21
- 5. iPhone Error 35
- 6. iTunes Error 40 on iPhone/iPad
- 7. iPhone Error 47
- 8. iPhone Error 69
- 9. iPhone Error 75
- 10. iPhone Error 78
- Errors 1xxx
- 1. iPhone Error 1009
- 2. iPhone Error 1015
- 3. iPhone/iTunes Error 1100
- 4. iPhone Error 1110
- 5. iPhone Error 1667
- Errors 2xxx
- Errors 3xxx
- 1. iTunes Error 3004
- 2. iTunes Error 3014
- 3. iTunes/iPhone Error 3194
- 4. iPhone Error 3503
- 5. iPhone/iTunes Error 3600
- Errors 4xxx
- Other iPhone Errors
- 1. iPhone Error 7005
- 2. iPhone/iTunes Error 9006
- 3. iPhone Error 0xe8000015
- 4. iPhone Cellular Update Failed Error
- 5. iPhone Activation Error
- 6. iPhone SSL Error
- Other iPhone Issues
- ● Manage/transfer/recover data
- ● Unlock screen/activate/FRP lock
- ● Fix most iOS and Android issues
- Repair Now Repair Now Repair Now
James Davis
staff Editor
Generally rated4.5(105participated)