iPhone/iTunes Error
- iPhone Error List+
-
- iPhone Error 1
- iPhone Error 6
- iPhone Error 9
- iPhone Error 14
- iPhone Error 21
- iTunes Error 27
- iTunes Error 39
- iPhone Error 53
- iTunes Error 54
- iPhone Error 56
- iTunes Error 1035
- iTunes Error 13014
- iTunes Error 2001
- iPhone Error 2009
- iPhone Error 3194
- iPhone Error 4000
- iTunes Error 4005
- iPhone Error 4013
- iTunes Error 9006
- iPhone Error 9
- iTunes Error 3259
- iTunes Error 2002
- iTunes Error 17
- iTunes Error 51

• Filed to: Fix iPhone System • Proven solutions
Apple have always thought about the sharing of content on certain networks and devices, and have installed software that allows you to do that.
When you easily want to share content with your brother or sister at home, you can easily do so on one network, and sometimes using the same Apple ID.
One day, you download a particularly funky tune on iTunes and want to share it to your allowed networks and devices, then all of a sudden, you get the iTunes Error 1001 (Purchase Validation Error.)
Basically, iTunes has suddenly stopped you from sharing content like you used to in the past. You cannot stream music or movies from your iPhone to your Apple TV, which can be really frustrating.
Thankfully, there are quick-fixes that you can use to remove the error 1001 from your iTunes account and iOS devices.
Solution 1. Check if you are using the correct Apple ID.
The error unknown code 1001 could be due to an error in the use of the Apple ID that you have assigned to all shared devices on a network. If you share files across one network at home or at work, and someone enters the wrong Apple ID, the error 1001 iTunes fault may appear.
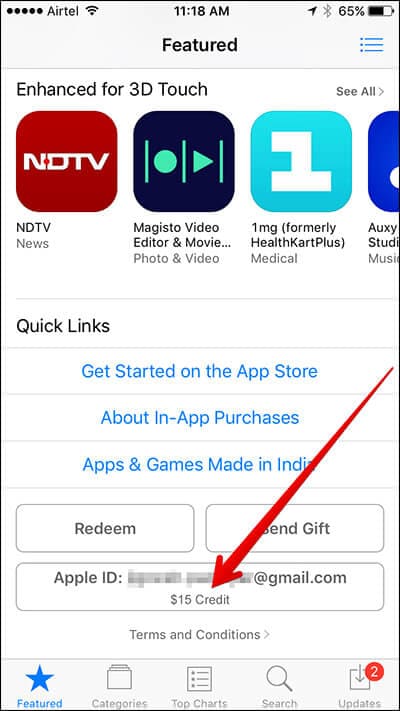
Start off by opening the App Store on your iPhone, scroll to the bottom and check on the left side. You should see the Apple ID that is in use displayed there.
You may also check the Apple ID by going to the settings of your iPhone, tapping on iTunes & App Stores and then checking the displayed Apple ID.
You may find that the Apple ID that is in use is actually the correct one, but may have some restrictions applied to it.
Scroll to "Settings > General > Restrictions > Allowed Content > In-App Purchases." Now check and see if the toggle has been set to the "ON" position.
Now that you have checked and ascertained that the Apple ID and all settings are in the correct positions, you may go ahead and restore all blocked purchases.
Simply click on the "Restore Purchases" button, which is found in the top right of the menu options, and finally remove the iTunes error 1001 by entering the correct Apple ID and Password.
This is a simple step that will help renew all purchases made under your account and then allow you to share them with your friends and loved ones like you did before.
Solution 2. Turn on "Home Sharing" in iTunes
It is not uncommon to find that you have accidentally turned off "Home Sharing" on iTunes and this is the reason why you are getting an iTunes error code 1001. This error questions that validation of the purchase and stops you from sharing it on your allowed networks at home or at work.
Another simple way to fix error 1001 on iTunes is to check if the "Home Sharing" option is actually turned on.
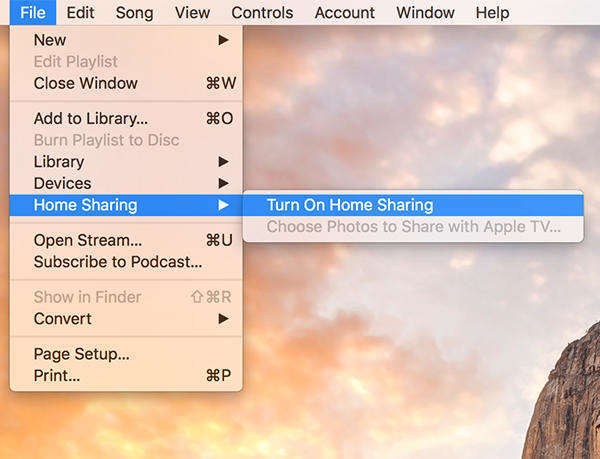
If you are using a Windows Computer, log into your iTunes account and then go to "File > Home Sharing > Turn On Home Sharing."
If you are on a Mac, access "File > Home Sharing > Turn On Home Sharing."
Once you have set these correctly, you may now continue downloading any purchases that you have made and then share them on your home network or at work.
Solution 3. Check Bonjour Service's working status
Bonjour, is French for "Hello", but what you may not know is that Apple Bonjour is an important application, which runs in the background, and is used by Apple and third-party software to discover devices and shared services using the same local network.
And yes, it is also used by iTunes and Internet Explorer to find shared music libraries.
This explains why Bonjour may be the reason why you are getting the iTunes error 1001 on your devices.
So how do you turn it back on? Follow these simple steps:
1. Go to Windows and open the "Run" dialog box by clicking on the "Windows + R" keys.
2. Once opened, type "compmgmt.msc" followed by hitting the "Return" key, and this will open your computer management window.
3. Now you have to find the "Services" option, by first choosing "Services and Applications" followed by clicking the arrow on the side to expand it.
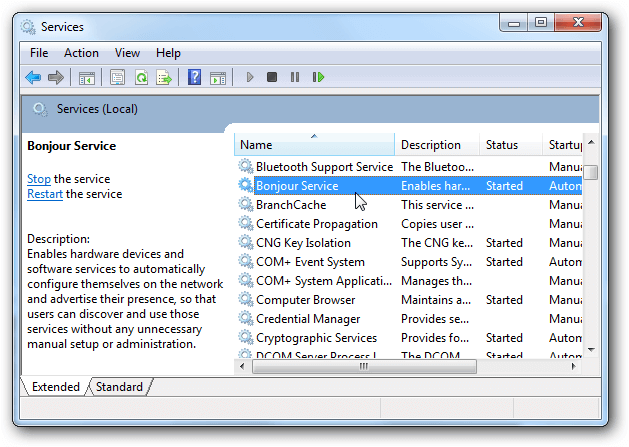
4. Once you get "Services, right-click on it and look through the names in the middle pane and then right-click on "Bonjour Service" followed by "Start". Wait for a few seconds and the service will start.
5. Repeat the step whereby you right-click on "Bonjour Service" but select "Properties" in this instance.
6. Go to the "General" tab and from the drop-down list, next to "Startup Type", click on "Automatic (Delayed Start)".
7. Finally click on "OK" and exit the Computer Management Window.
NOTE: When you start your Bonjour Service, you may get another error message. This shows that your anti-virus of firewall is blocking the service from being used. Simply make iTunes an exception in your firewall and white list it on your anti-virus and this error message will disappear allowing Apple Bonjour to restart.
Solution 4. Reboot computer to fix iTunes error 1001
Sometimes there is nothing really wrong with your iPhone or iTunes accounts, which leads to the error 1001. It may simply be a problem with the way drivers were loaded, or some other system glitch that can be resolved by restarting the computer.
Whether you are using a Mac or Windows, it would be best that you follow the correct procedures for powering down your computer.
Rather than simply click on "Restart", it would be best that you completely turn it off, and let it alone for a couple of minutes, then restart it once more.
Many times you have seen computers hand up and are fixed by a simple restart.
This is probably one of the easiest ways how to fix error 1001.
Solution 5. Check network connections
For those of you who have the knowledge of changing computer settings, you should check if the network settings may be causing the unknown error 1001 on your iTunes account.
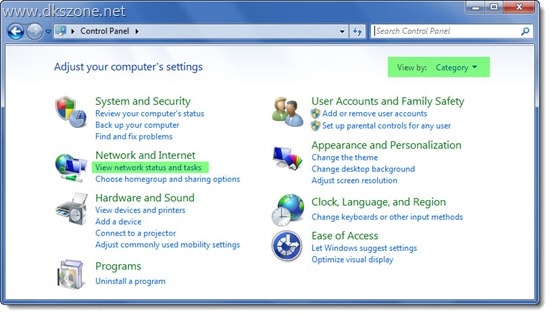
1. On your computer, go to "Control Panel". There you will find a list of options you can control.
2. Select the one clearly labeled "Network and Internet."
3. Go to the troubleshooter and allow it to run its course and check if the network is working well.
4. When your troubleshooter brings up an error on your network, then you will have to make changes to the settings so it can connect well with iTunes.
5. In the "Network and Sharing Center" region, choose the "View Network Status and Tasks" option
6. The go to "Choose Your Active Connection".
7. Click on the "Properties" button.
8. In order for your internet and iTunes to work properly, the "Internet Protocol Version 6 (TCP/IPv6)" checkbox should not be selected. If it is selected, click to remove it once more.
9. Exit and then restart your iTunes. The error 1001 should no longer appear.
Solution 6. Reinstall iTunes
When you want to reinstall iTunes, you have to make sure that all components of the former installation have been removed completely. Installing a new version of iTunes may help restore corrupted files or drivers and remove the error 1001.
Go and uninstall your iTunes, using the Control Panel.
After the process of removing iTunes is complete, you will get a "User Account" dialogue box.
Hit the "yes" button and then proceed.
The reason you have to indo this is because not all components are removed when you use the "Control Panel" to uninstall iTunes.
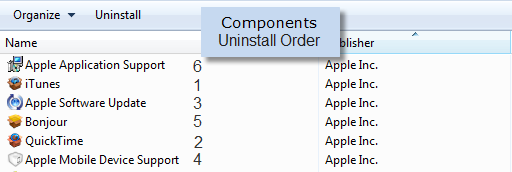
Now choose to uninstall the following in the order they are listed.
1. Apple Software Update
2. Apple Mobile Device Support
3. Bonjour
4. Apple Application Support 32-bit
5. Apple Application Support 64-bit
Now simply go through your iTunes related folders and see if there are other remnants of the older installation.
Once you are sure that you have removed all files related to iTunes, you should reboot your computer.
Go to Apple and then download the new version of iTunes and then proceed to install it. Make sure that you allow it to also install to the "User Account Control" dialogue box.
That is it, you have fixed the error 1001.
Solution 7. Check and repair keychain access
The error 1001 iTunes code may be due to the corruption of your passwords.
Oh yes, it is possible for a virus or faulty configuration to corrupt your passwords, and this is why you have to reset the keychain access. You may find that you are requested to enter a password several times and still keep getting all sorts of errors including the iTunes 1001 error.
This is a quick error 1001 fix
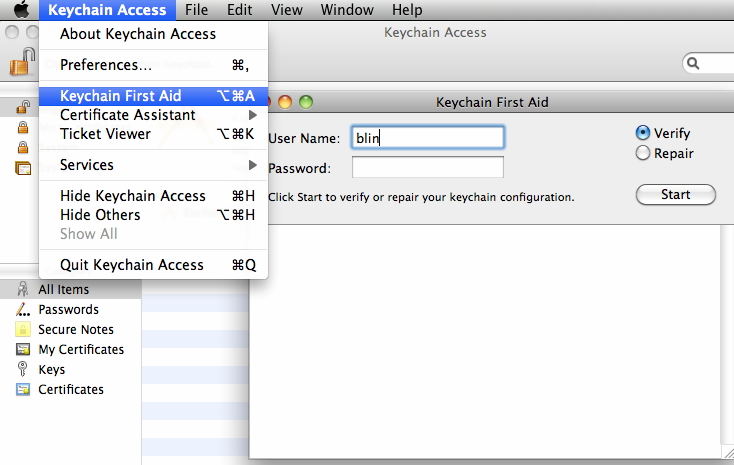
1. Click on "Go > Utilities > Keychain Access."
2. Once you get into the key chain access menu, click on "Keychain First Aid."
3. Now type in a Username and Password.
4. You should now click on "Verify" in order to see which ones have been corrupted. The corrupted passwords will be displayed in red.
5. Now click on "Repair" so these entries can be restored to their original form.
Now your iTunes error 1001 will no longer appear.
Solution 8. Delete plist of SU and iTunes
A .plist file is also known as a preference list file. It is used by your Mac to find user preferences for several applications on your Mac. The iTunes Error 1001 could be caused by a corrupted Plist file.
It is important that you know how to edit and move plist files. In this case, you only want to delete those related to your SU and iTunes folders.
A word of caution: Apple does not support the editing or deleting of .plist files. This is simply a hack that was developed by advanced users and has been adopted by the community as one way of fixing performance errors on a Mac.
Delete Plist on Older OS X
1. Go to the Finder and then choose your hard drive
2. Now advance to "System > Library > Extensions."
3. Now browse through the files and look for one text file that has the name of "IOPlatformPluginFamily.kext."
4. Proceed and right-click on this file and then choose "Show Package Contents".
5. Once they are shown, click on "Contents > Resources > Plugins."
6. In the new list, click on "ACPI_SMC_PlatformPlugin.kext."
7. Once again, right click on this file and choose "Show Package Contents."
8. Now scroll through the files listed and select the .plist file.
9. Proceed and delete it from your system.
Now restart the Mac, log onto your iTunes account, and the error 1001 will no longer appear.
Delete plist file on macOS High Sierra
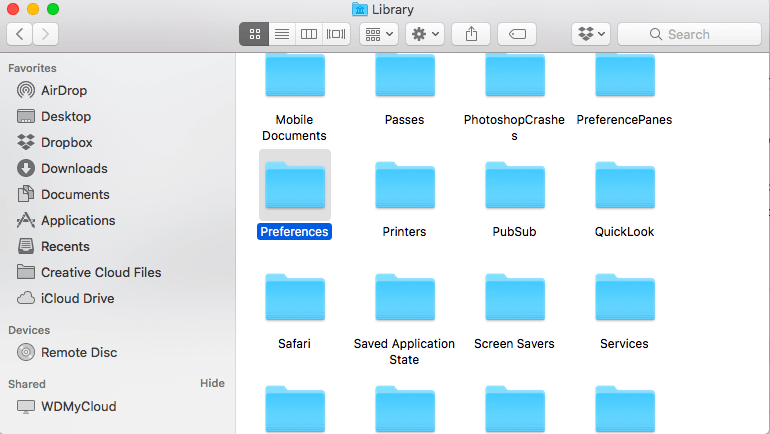
In High Sierra, the process is much different and simpler. In order to access your .p-list files in this version, follow these steps:
1. Go to your Finder and then hold the "Option" key.
2. Click on the "Go" menu.
3. Select "Go > Library > Preferences."
4. There you will find the plist files that you want to delete.
Once you have deleted them, reboot your computer and restart iTunes. The error iTunes 1001 notification will no longer appear.
In conclusion
It can be quite frustrating when you want to share files within your home network, maybe with your Smart TV or other devices and you get the iTunes Error 1001 (Purchase Validation Error) Notification.
Basically, it stops all sharing even within your own network. This can be quite frustrating.
However, there are several ways in which you can resolve this issue. You should be armed with knowing how to fix error 1001 on iTunes.
The above tutorial has shown you ways in which to go about it. Some may be simple and others may need some advanced understanding of your computer.
There are third party applications that can be used to resolve this issue in an easier manner, but that is a topic we shall cover in another tutorial.
Keep it here and get to know more about how you can fix error 1001 and other errors in simple and risk-free ways.
Elva
staff Editor