9 Ways to Solve iTunes Error 21 or iPhone Error 21 while Restoring iPhone

Aug 15, 2025 • Filed to: Phone Repair Solutions • Proven solutions
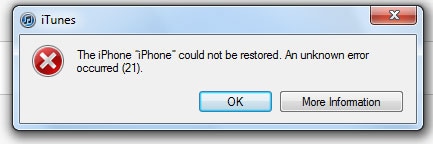
It might have happened to you that you're trying to restore your iPhone but no matter what you do, iPhone won't restore because an iTunes error 21 or iPhone Error 21 keeps popping up! It's like whack-a-mole, you keep trying to restore, but that infernal iPhone Error 21 comes again. Generally, these errors are a result of some security software package interfering with your restore, and it usually has an easy fix.
So here we're showing you 8 different ways by which you can fix iTunes error 21 or iPhone Error 21, restore with ease, and continue using your device!
- What is iTunes Error 21 (iPhone Error 21)?
- Solution 1: How to fix iTunes error 21 or iPhone error 21 without losing data
- Solution 2: Repair iTunes to fix iTunes error 21
- Solution 3: Check USB Cable and Port
- Solution 4: Fix iTunes error 21 by updating iTunes
- Solution 5: Turn off Anti-Virus to fix iPhone error 21
- Solution 6: Remove unnecessary USB devices
- Solution 7: Check the Sensor Cable
- Solution 8: How to fix iTunes error 21 via DFU mode
- Solution 9: Check modified or outdated software
What is iTunes Error 21 (iPhone Error 21)?
Now before we get to the nitty-gritty's of how to fix iTunes Error 21, I'm sure you must be wondering what is iTunes Error 21 (iPhone Error 21) to begin with, and why it has this strange obsession with your phone! The most common reason for iTunes Error 21 is that your iTunes is trying to download the restore files (.ipsw) but is, unfortunately, being blocked from authentication. This may be due to a hardware error, or maybe there is a communication failure between your device and the servers. When it comes to iTunes Error 21 (iPhone Error 21), the most common causes include:
- USB Connection Issues: Unstable or damaged USB connections can lead to communication errors between the iPhone and the computer during the restore or update process.
- Outdated iTunes Version: Using an outdated version of iTunes may result in incompatibility with the iPhone's firmware, leading to the occurrence of Error 21.
- Hardware Malfunction: Problems with hardware components like the device's battery or connecting cables can disrupt operations during restore or update, causing Error 21.
- Security Software Interference: Antivirus or firewall software can sometimes prevent iTunes from accessing the iPhone, resulting in communication errors and triggering the error.
These factors represent the most common and significant causes when encountering iTunes Error 21. Understanding these causes can help you address the issue more effectively. Fret not! The following part will show you how to fix that iPhone Error 21 easily and effectively and get back to leading your iPhone-engrossed lives!

Solution 1: How to fix iTunes error 21 or iPhone error 21 without losing data
One of the biggest concerns you probably have while attempting your restore and trying to fix the iPhone Error 21 is whether your data is safe. That is a legitimate concern as a lot of techniques out there might or most certainly will lead to data loss. That is why we're starting our list with a technique that can ensure there won't be any data loss. To ensure this you can use an easy-to-use and convenient software called Dr.Fone - System Repair (iOS)
Your memories and data are all precious and you shouldn't risk them. Dr.Fone seems to place great emphasis on data preservation and as such is the recommended means to fix iPhone Error 21. Furthermore, its convenience and mile-purpose nature help as well.
Dr.Fone - System Repair
Fix iTunes error 21 or iPhone error 21 without Data Loss
- Fix various iOS system issues stuck in recovery mode, white Apple logo, black screen, looping on start, etc.
- Only fix your iOS to normal, no data loss at all.
- Fixes other iPhone errors and iTunes errors, such as iTunes error 4013, error 14, iTunes error 27, iPhone error 9 and more.
- Works for all models of iPhone, iPad, and iPod touch.
- Fully compatible with the latest iOS version.


Steps to fix iTunes error 21 with Dr.Fone
Step 1. Choose 'System Repair'
After launching the Dr.Fone toolkit, you'll find 'System Repair'. Click on that.

Step 2. Connect the iPhone
Connect your iPhone via a cable and let Dr.Fone detect it. Click 'iPhone' > 'iOS Repair' > 'Standard Repair' to go on with the process.
Important: Please note that by fixing the issue - iPhone stuck at the Apple logo, the iOS operating system on your iPhone will be updated to the latest version. And if the device is a jailbroken iPhone, then it will be converted back to its none jail-broken state.

Step 3. Download the firmware
Put your iPhone into recovery mode, Dr.Fone will identify the iPhone model and offer the latest iOS version for you to download. Simply click 'Download' and wait for the process to complete.

Step 4. Fix iTunes error 21
Once the download is complete, Dr.Fone will automatically start repairing the iOS, except this time you won't be bothered with an iPhone error 21 message!
Tips: If these steps won't work, probably the iTunes components are corrupted. Go to repair your iTunes and try again.

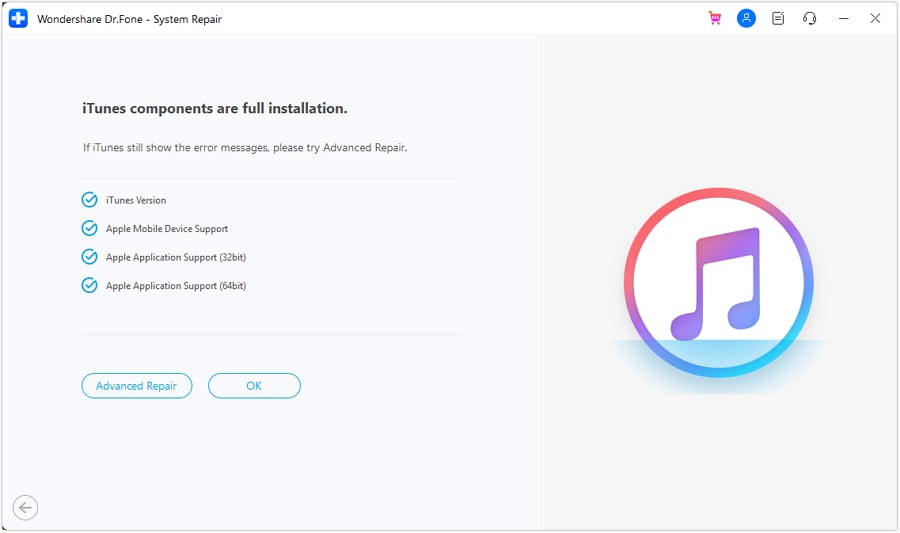
Solution 2: Repair iTunes to fix iTunes error 21
If there's a real problem like iTunes error 21, having iTunes components repaired will be effective. No matter whether the iPhone Error 21 is a temporary glitch or a component corruption issue, with the following iTunes repair tool, you can take care of it easily.
Do you remember how I mentioned that the iTunes Error 21 may be a result of iTunes being blocked? Well, sometimes simply repairing iTunes can prove enough to fix iTunes Error 21. So you might wanna' lead with that.
Dr.Fone - iTunes Repair
Fix iTunes error 21 with a few clicks. Easy & fast.
- Fix all iTunes errors like iTunes error 21, error 54, error 4013, error 4015, etc.
- Fix all issues when you attempt to connect or sync iPhone/iPad/iPod touch with iTunes.
- Fixing iTunes issues without existing iTunes data.
- Fastest solution in the industry to repair iTunes to normal.
Operate based on the following steps. Then you can fix iTunes error 21 quickly:
Step 1. Download the Dr.Fone toolkit. Then install, start it up, and click "System Repair" in the main menu.
Step 2. In the new window, click "iPhone" > "iTunes Repair". Then connect the iOS device to your PC.

- First, we should exclude the connection issues. So let's choose "Repair iTunes Connection Issues".
- If iTunes error 21 still pops up, click "Repair iTunes Errors" to verify and repair all iTunes components.
- Lastly, if iTunes error 21 is not fixed by the above steps, click "Advanced Repair" to have a thorough fix.
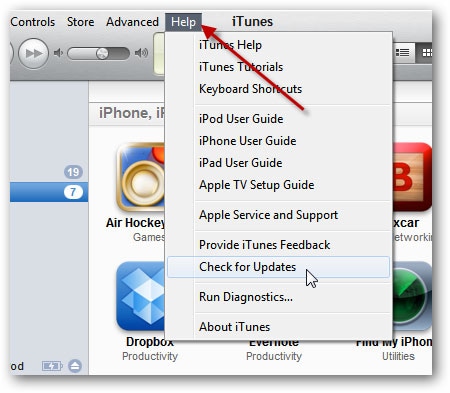
Solution 4: Fix iTunes error 21 by updating iTunes
Updates on all Apple products can be imperative as they help fix bugs and whatnot. So if you have been holding out on updating iPhone because you have a slow net, or because your phone is jailbroken, or whatever reason you might have, now is the time to update it. Get the latest version of iTunes and you might be able to fix iTunes Error 21.
How to update iTunes to fix iTunes error 21
On Windows:
- Open up 'iTunes.'
- Go to Menu > Help.
- Select 'Check for Updates'.
On macOS:
- Open the App Store on your Mac.
- Click on your profile picture in the bottom left.
- If an iTunes update is available, you'll see it in the Updates section.
- Click "Update" next to iTunes if prompted.
Solution 5: Turn off Anti-Virus to fix iPhone error 21
A lot of times the proper functionality of some vital programs may be hampered by the anti-virus as they might be corrupted or be threats. In that case, turning off the Anti-Virus helps access those programs regardless and maybe update your device.
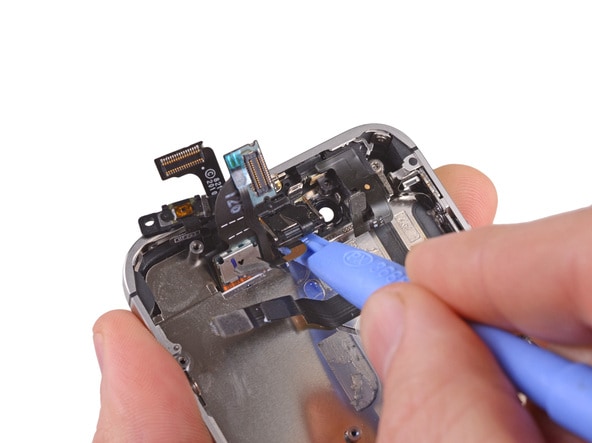
Solution 7: Check the Sensor Cable
This method sounds either complicated or risky. However, it's, not unless you do it exactly as it's supposed to be done. It's sorta' like defusing a bomb, cut the wrong wire and your device goes boom! Well, not literally, but you get the picture. However, if you do it right, you might be able to fix iPhone Error 21. All you have to do is open the device, and confiscate the screw which connects the battery. Disconnect the device cable and put it back together. This might help, though it seems like quite an extreme and risky measure, especially considering you have a far more guaranteed and viable option in Dr.Fone from Solution 1.
Solution 8: How to fix iTunes error 21 via DFU mode
This method involves you trying to fix iPhone Error 21 via DFU mode. DFU stands for Device Firmware Upgrade and ensures a complete restore of the iPhone. While this does guarantee to fix iPhone Error 21, it does not guarantee that all your data will be safe. So only use this method if you've exhausted all other options. Here's how you can do it.
Fix iTunes error 21 or iPhone error 21 through DFU mode
Step 1. Connect to iTunes.
Plug your iPhone into your computer, and access iTunes.
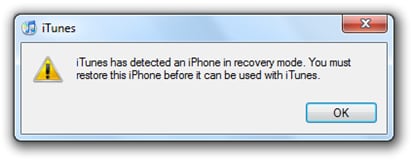
Step 2. Put your device into DFU Mode.
When your device is in DFU mode, you will see the following pop-up message.
Step 3. Restore iTunes.
- Open the 'Summary' tab in iTunes, then click 'Restore.'
- After Restore, your device is going to Restart.
- When asked to "Slide to set up," simply follow the Setup.
This solution is likely to fix iPhone Error 21, however, as I mentioned earlier it restores your phone to factory settings without giving you a chance to create a backup. This would lead to considerable data loss, as opposed to the alternative of Dr.Fone.
Solution 9: Check modified or outdated software
The iTunes Error 21 might be caused because of outdated or corrupt software. You might be using an old version of iTunes in which case you should refer back to Solution 3 and update it. You might be attempting to install an older version of iOS, in which case you should find the latest version and install that.
Conclusion
In listing out the different methods by which you could fix iPhone Error 21, we haven't discriminated between the different methods. We believe you should have the ultimate power of decision so we've listed them all, along with their pros, cons, and risks. For example, some of the techniques are considered risky and can lead to severe data loss, some may even ruin your iPhone if not handled well, and most of them don't offer any guarantee of success. That is why my recommendation is to go with Dr.Fone - System Repair (iOS) as it is a safeguard against all the risks I just mentioned. But, hey, the choice is in your hands! We just hope you make the right call, and then do common down below to let us know which method worked best for you!


iPhone Errors


Alice MJ
staff Editor
Generally rated4.5(105participated)