iPhone/iTunes Error
- iPhone Error List+
-
- iPhone Error 1
- iPhone Error 6
- iPhone Error 9
- iPhone Error 14
- iPhone Error 21
- iTunes Error 27
- iTunes Error 39
- iPhone Error 53
- iTunes Error 54
- iPhone Error 56
- iTunes Error 1035
- iTunes Error 13014
- iTunes Error 2001
- iPhone Error 2009
- iPhone Error 3194
- iPhone Error 4000
- iTunes Error 4005
- iPhone Error 4013
- iTunes Error 9006
- iPhone Error 9
- iTunes Error 3259
- iTunes Error 2002
- iTunes Error 17
- iTunes Error 51

• Filed to: Fix iPhone System • Proven solutions
More often than not, iTunes errors keep on coming with every iOS update. But, it's not the iOS update or iTunes update that propels issues like Error 26 on iTunes. Hardware glitches to software issue, and lot many other reasons surmount to this annoying iTunes Error 26. If you have encountered this problem while connecting your iPhone to iTunes for transferring data or just syncing it for backup. Then, you have obviously found yourself in soup! Though, it might seem distressing, you need not panic at all. We have the perfect solutions for you to get out of this technical mess.
In this article, we will be discussing the reasons and how you could overcome them with ease. Keep reading to explore more!
Part 1: Causes of iTunes error 26
Well, when it comes to resolving Error 26 in iTunes, you must know its actual cause first. As we have already said, hardware and software glitches are the major factors behind this issue. There are other problems too that results in Error 26 iTunes. Let's go through them briefly.
1. NOR flash memory issue:
Among the nonvolatile memory of your iPhone (flash memory) responsible to store call records, SMS, videos and photos, NOR is technically described as Not OR. But, majorly iOS and applications are stored in NOR. It reads data faster and helps run applications within your device. As it prevents copying applications on to your RAM the speed is better than NAND flash memory. But, it mostly undergoes low erase and write performance, which might result in iTunes 26 error.
2. Snowbreeze issue:
In case, you have used Snowbreeze to create custom IPSWs then your iPhone gets unlocked and jailbroken. When you want to restore the iPhone firmware, you would require iTunes version 11.1. in case, you are using any other version, it might flash the iTunes error 26.
3. Hardware issue:
Hardware issues with your computer or iOS device interrupts their functions. Ensure that iPhone is working perfectly and has no hardware glitches.
4. Outdated iTunes or iOS:
When iTunes is not being updated, it behaves crazily while connecting your iOS device or restoring it. Ensure that iTunes and iOS are latest to avoid any conflict between them during restore or sync results into Error 26 in iTunes.
Part 2: 2 easy ways to fix error 26
Method 1: Restart iTunes and iPhone
This first method to force reboot iPhone and reboot iTunes, at times, has effectively resolved several iTunes or iOS related issues, including error 26 on iTunes. Here's the step by step tutorial on how to force reboot various iPhone models.
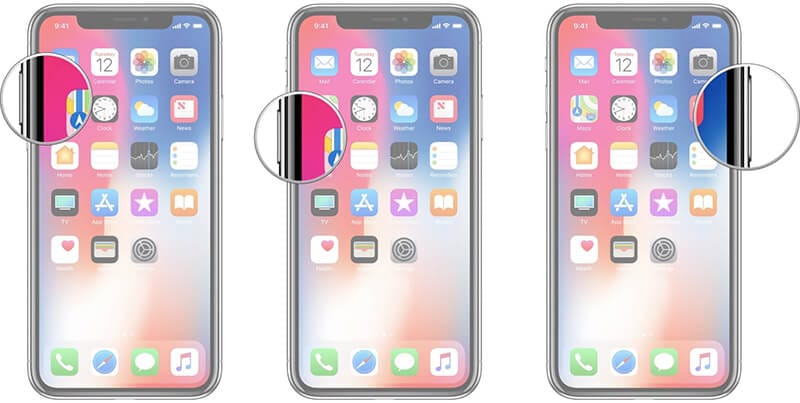
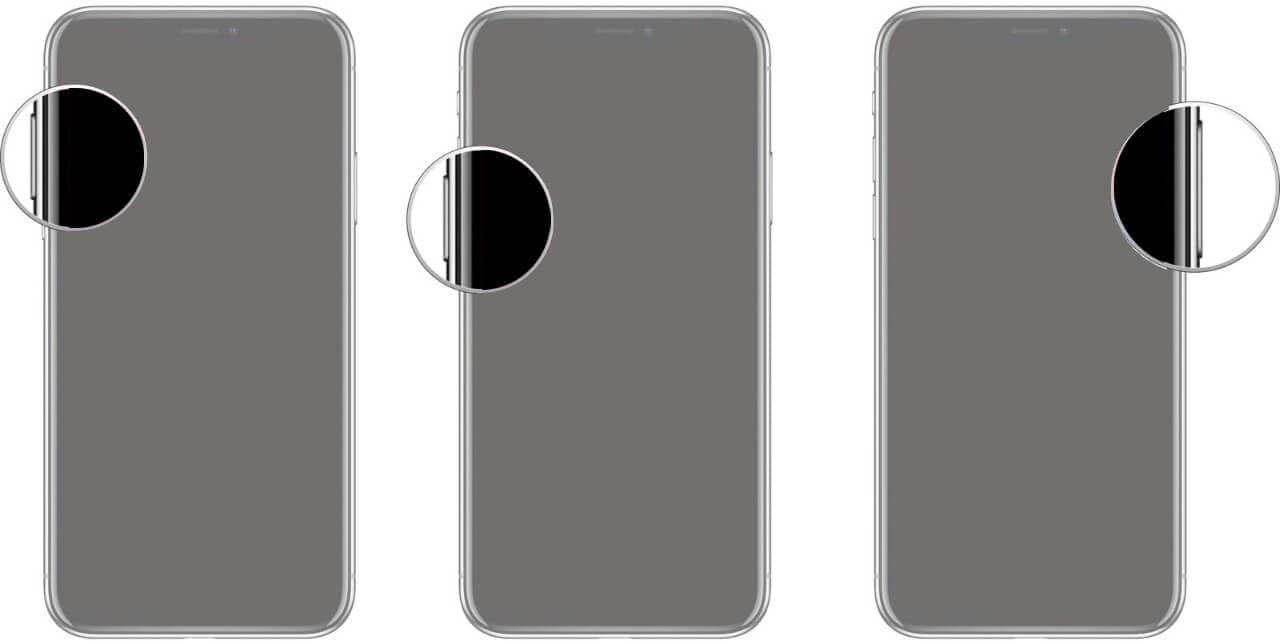
iPhone 8/X/XS (Max)/XR:
Hit "Volume Up" key and let go immediately. Now, you got to quickly repeat the same thing with "Volume Down";. Subsequently, press "Sleep/Wake" key but this time don't let go the "Power" key unless you see Apple logo glow.
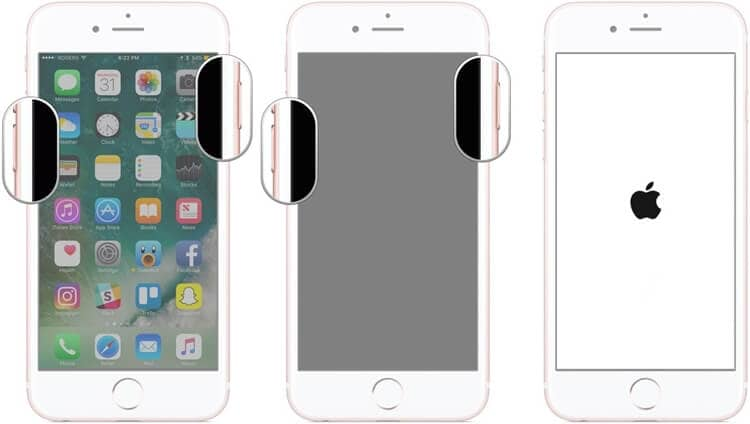
iPhone 7/7 Plus:
Press down the "Volume Down" button and at the same time you need to hold down the "Sleep/Wake" button too for about 10 seconds. You can let go the button when you see Apple logo appear on screen.
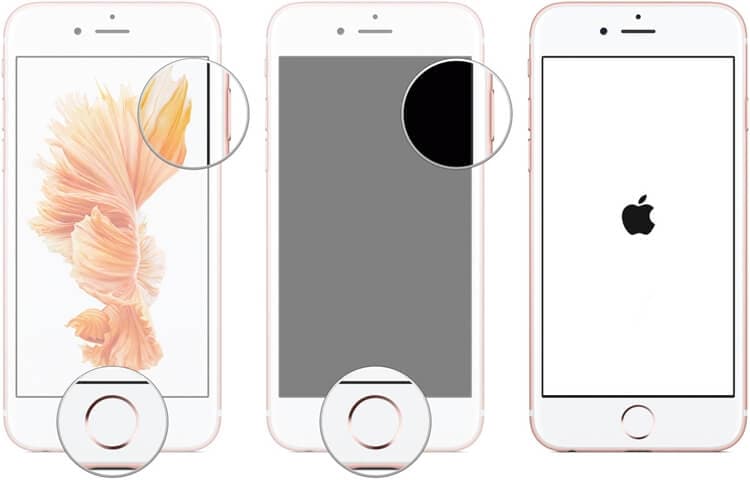
For iPhone 6 and older:
Hold down the "Home" button simultaneously with the "Sleep/Wake" button for no approximately 10 seconds. Release the aforementioned buttons when you get to see Apple logo cropping up on your screen.
Method 2: Update iTunes
A faulty or corrupted iTunes often leads to crucial iTunes issues and prevent iOS restoring or syncing at the first place. So, let's update it first.
Step 1. Completely uninstall iTunes and its related components
As we know, problematic iTunes would push your device to behave abnormally as it won't support the desired functionalities when connected. To protect your device and promote a healthy connection for syncing or restoring iPhone, first uninstall the iTunes and its components.
Here is the detailed guide for uninstalling iTunes and the components:
Uninstalling iTunes:
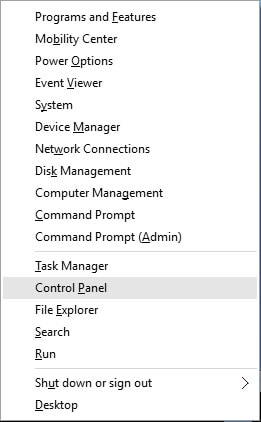
Tap the "Windows" + "X" keys together and a pop up window will appear, select the "Control Panel" option from it.
Now, on the new appearing window, you need to locate the "Programs and Features" tab from the available options
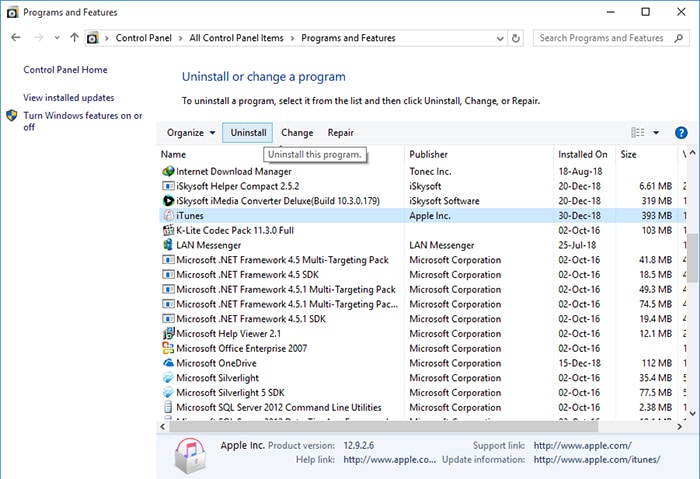
You'll then be redirected to a new window where the entire list of programs installed on your PC will be visible. Look for "iTunes" entry, select it and then hit the "Uninstall" button over the top.
Lastly, you need to reboot the computer to allow changes to take effect.
Uninstalling iTunes related components in the exact order as described below:
First, remove 'iTunes' > 'Apple Software Update' > 'Apple Mobile Device Support' > 'Bonjour' > 'Apple Application Support 32-bit' > 'Apple Application Support 64-bit'.
Note: In case, there are 2 versions of Apple Application Support or iTunes, you got to remove both of them.
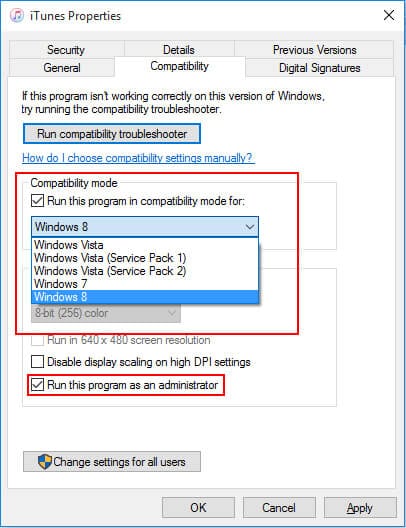
Step 2. For re-installing iTunes latest version:
Download the latest version of iTunes on your system > search for the iTunes setup file and right-tap on it > browse for 'Properties' > tap 'Compatibility' > select 'Run this program in Compatibility mode' > finally, install iTunes.
Part 3: Conduct a DFU restore with loss of data;
Putting the device in DFU mode comes in handy while changing, updating or troubleshooting iOS issue. If your iOS device got bricked during a failed iOS update with a broken phone or you wish to downgrade the iOS, then DFU mode is a viable option. To unlock a SIM or un-jailbreak an iPhone, DFU mode is the apt option. As long as the iOS version is signed by Apple, you can easily use DFU mode to downgrade the iOS. For resolving iTunes error 26, it seems a good option to boot the device in DFU mode.
Step 1. Boot iPhone in DFU Mode
There's one thing that you need to do irrespective of the iPhone variant you possess. It is that to connect your iPhone to the computer using only an official Apple certified lightning cable and then launch iTunes app over your PC.
iPhone 6/6s or earlier:
Hold down the "Home" + "Sleep/Wake" keys together for 8 seconds. Let go of the "Sleep/Wake" key only and wait till the iPhone screen turns dark but iTunes will detect your device in recovery mode, let go all keys now.
iPhone 7/7 Plus:
Press and hold "Sleep/Wake' button altogether with the "Volume Down' button for no less than 8 seconds.
Release hold of the "Sleep/Wake' button only but ensure to keep down the "Volume Down" button still and wait until the iTunes recognizes the device on recovery mode. You can let go the button afterwards.
iPhone 8/8 Plus/X/XS/XS Max/XR:
Tap and release "Volume Up", and then "Volume Down" button. Now, you need to push down the "Sleep/Wake" button until your screen goes black.
Next, hold the "Volume Down" and "Sleep/Wake' buttons altogether for about 5 seconds. Then, leave the "Sleep/Wake" button only and let iTunes detect your device in recovery mode. Once done, let go all the buttons.
Step 2. Restore iPhone with iTunes
Now, it's time to restore your iPhone using iTunes to fix error 26. Here's how to do it.
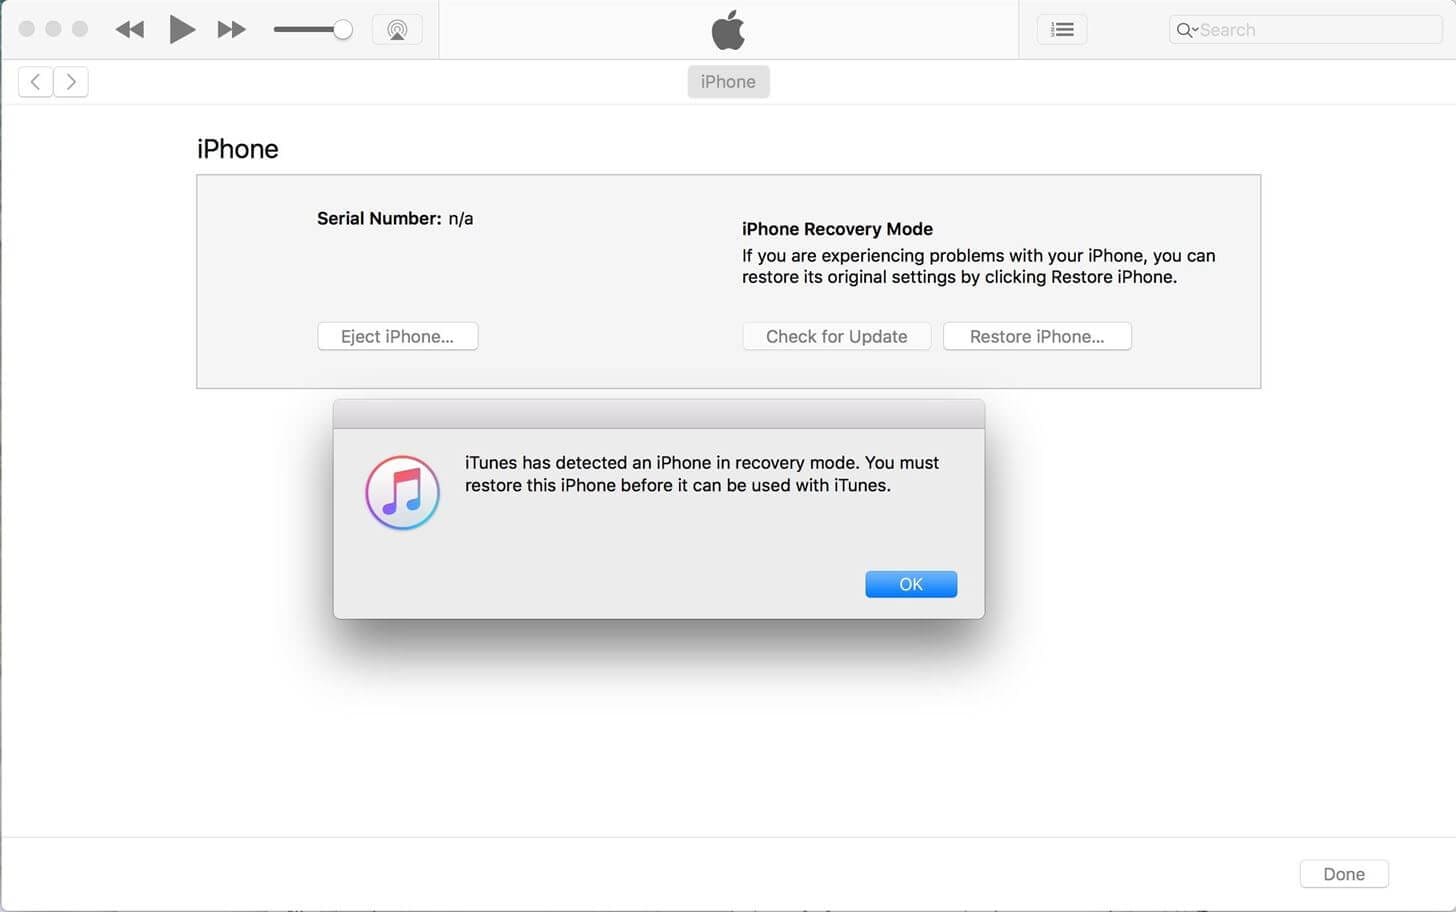
- As iTunes detects the iPhone in DFU mode, "iTunes has detected an iPhone in recovery mode. You must restore this iPhone before it can be used with iTunes" message flashes on screen. Tap "OK' on it.
- Now, press the "Restore iPhone" button on iTunes window and then confirm your choices.
Part 4: Restore your iPhone via Recovery Mode
Alternatively, restoring iPhone in recovery mode will also get you out of the iTunes error 26. If your iPhone is not stuck on recovery mode yet, it will be a suitable option to go ahead. It helps you re-flash your iPhone with a fresh OS, in case the existing one got corrupted or got stuck in update. Upgrading and restoring iPhone with iTunes becomes easy with recovery mode. You can restore your iPhone in recovery mode to the factory settings and bring it back to life.
Step 1. Boot iPhone in Recovery Mode
Likewise the aforementioned DFU Mode guide, you need to do a pre-requisite step irrespective of the iPhone variant you possess.
Turn your iPhone device Off and establish connection between your iPhone and computer with an authentic lightning cable. Afterwards, launch iTunes app over your PC and then perform the below mentioned steps.
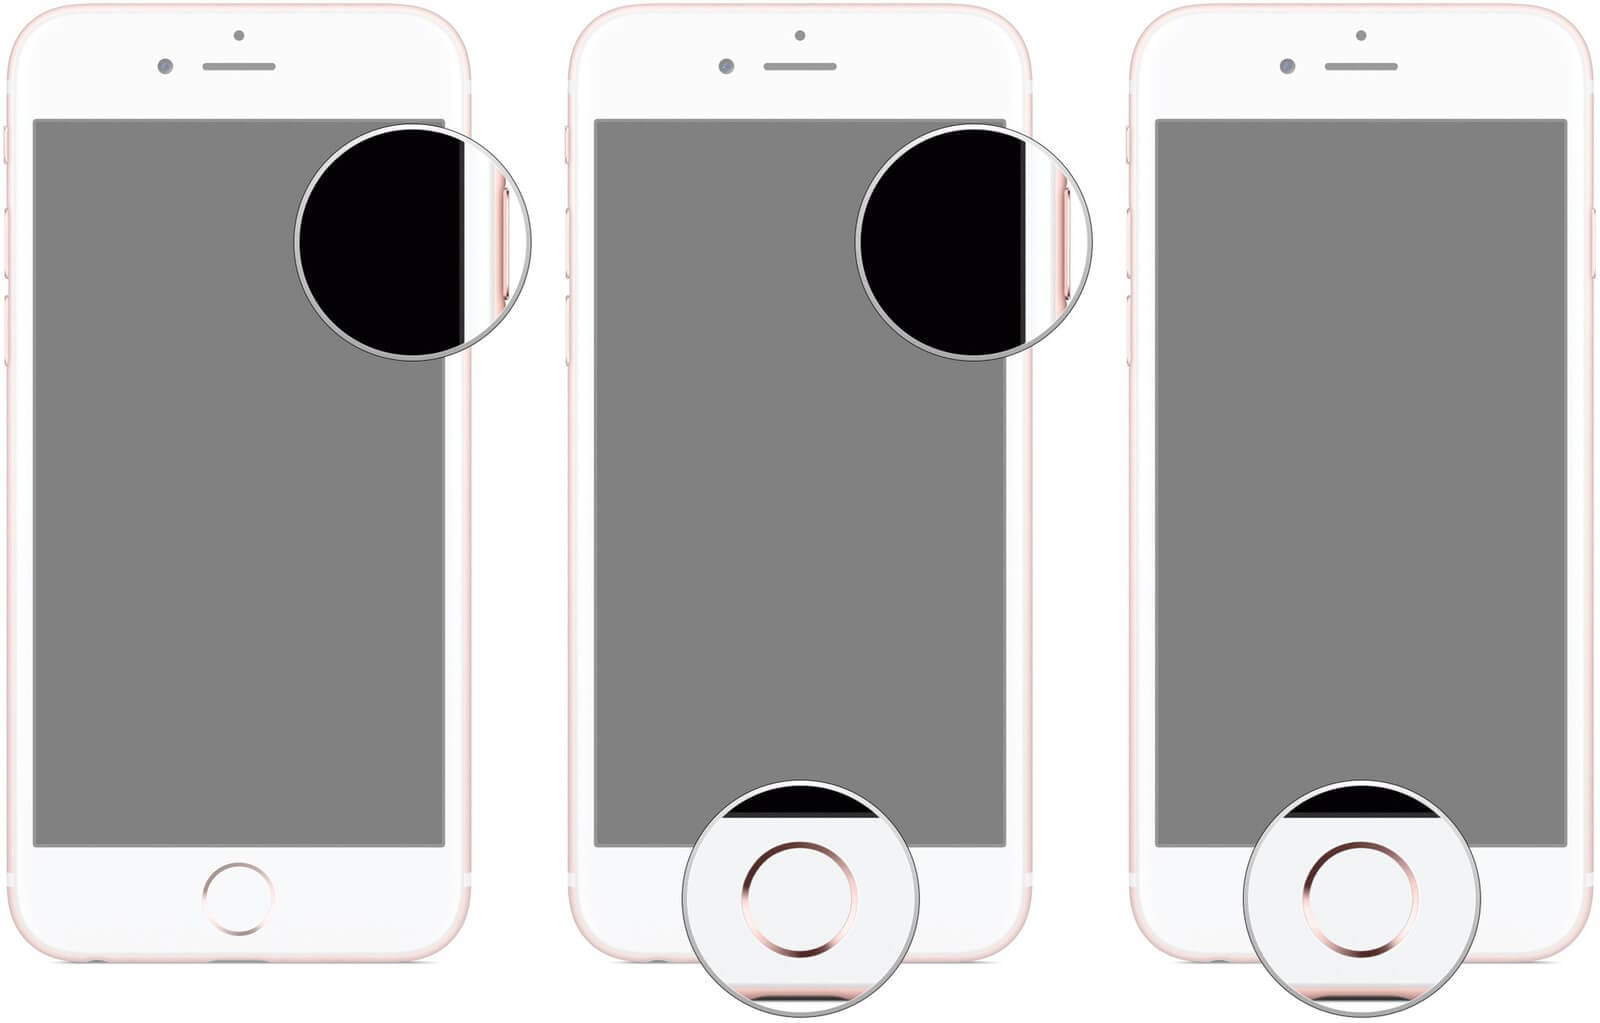
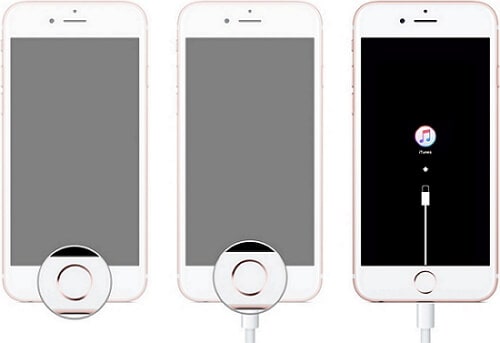
iPhone 6/6s or earlier:
Press "Home' key down and keep it holding until "Connect to iTunes' flashes on your iPhone screen.
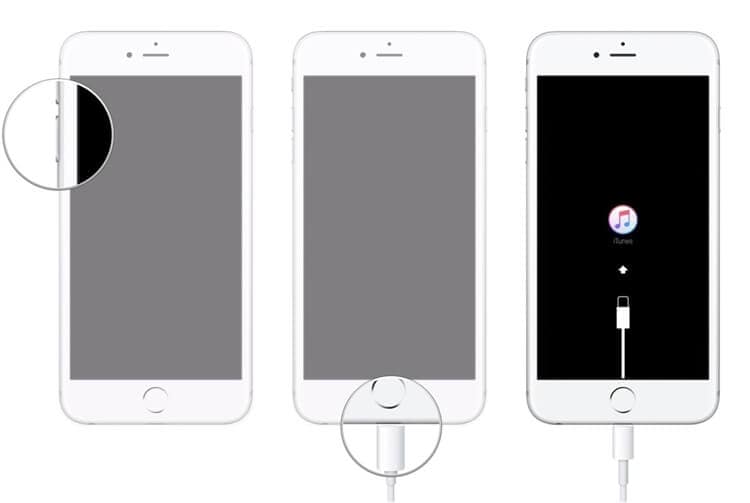
iPhone 7/7 Plus:
Hold "Volume Down' key down and keep it down until "Connect to iTunes' appears on your screen.
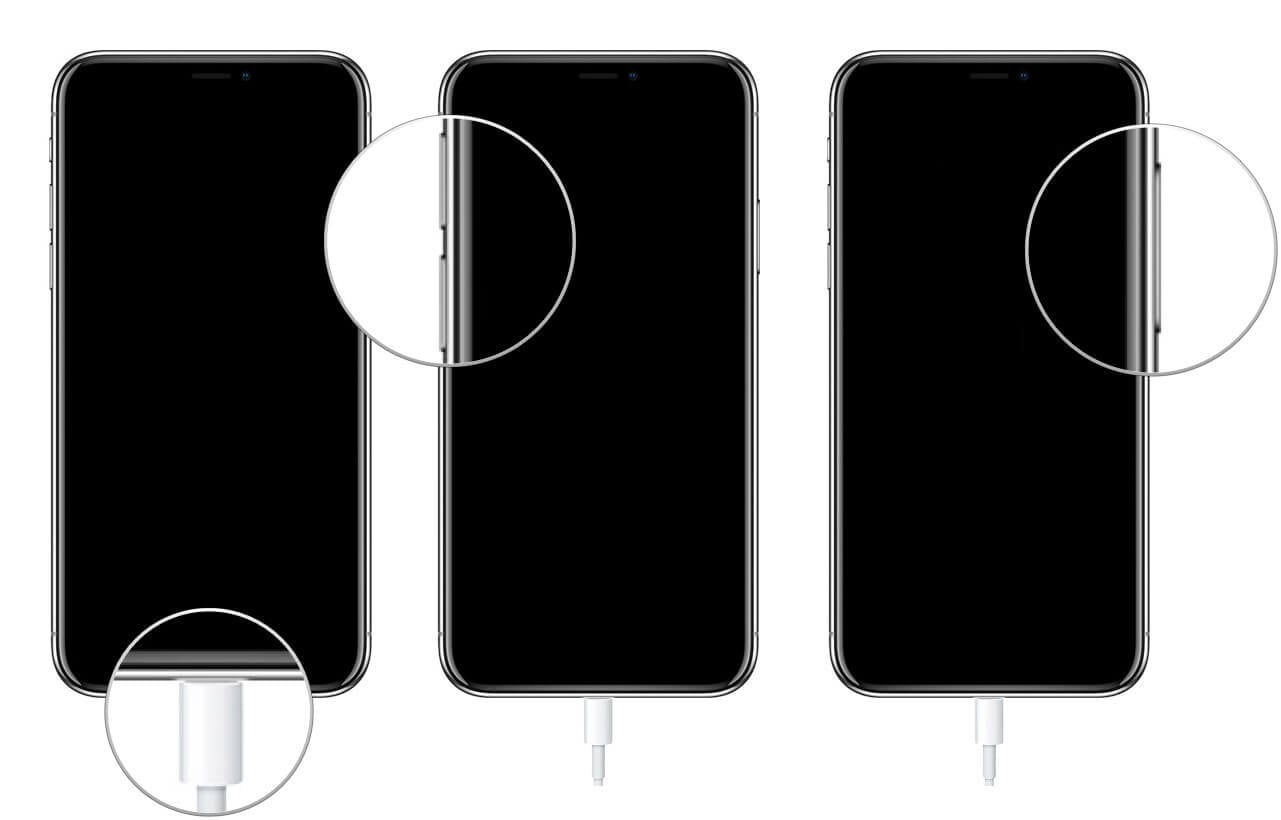
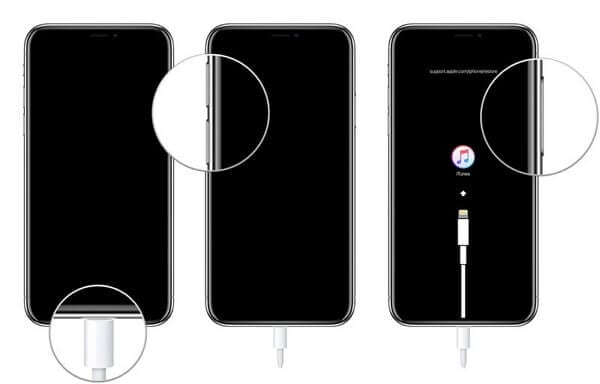
iPhone 8/8 Plus/X/XS/XS Max/XR:
Quick tap "Volume Up' key and then repeat with "Volume Down'. Now, hold down "Sleep/Wake' key unless you see "Connect to iTunes' appear.
Step 2. Restore iPhone with iTunes
This guide to restore iPhone with iTunes after you've boot your iPhone in recovery mode, remains the same as that of DFU mode above.
Press "OK" on the pop up message that reads "iTunes has detected an iPhone in recovery mode". Then, hit on "Restore iPhone' button and confirm your selection afterwards.
Part 5: How to resolve iTunes error 26 using dr.fone - System Repair (iOS)
dr.fone - System Repair (iOS) is the best option for fixing iTunes error 26. This tool repairs the iOS easily when stuck in recovery mode, looping on start, Apple logo or black screen. The best part is, there is no data loss in this method. It can fix any iOS system and iTunes issue for the latest iOS device models. It is compatible with the newest iOS versions.

dr.fone - System Repair (iOS)
Best iPhone/iPad system recovery tool
- The user interface of this powerful tool is quite intuitive and is extremely easy to use.
- It offers a unique option to "Retain native data' which, if selected, ensure that there is no data loss during the process.
- This tool supports smooth execution on both Mac and Windows computers.
- This tool offers the utmost success rate to fix iOS related issues.
- With dr.fone - System Repair (iOS) you can easily fix almost every iOS system issue.
Step 1. Install the software
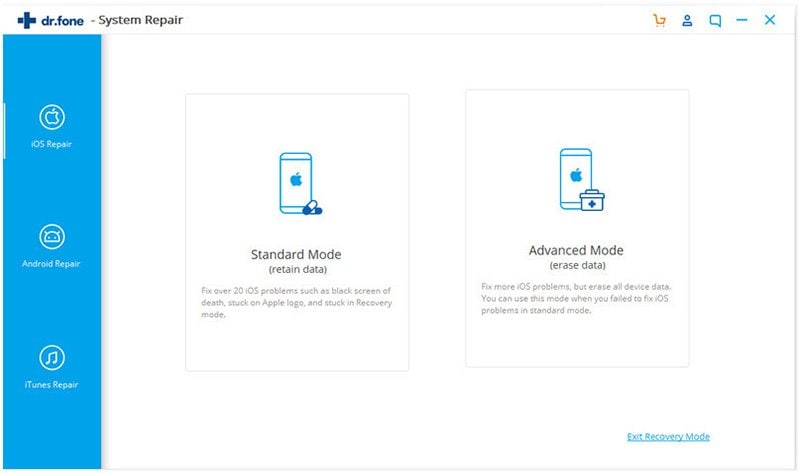
Get dr.fone - System Repair (iOS) installed on your system and run it. Then, press the "System Repair" tab from the main screen.

Step 2. Specify the occurring issue
Now, you need to link your iPhone with your computer. Meanwhile, opt for the issue that is being experienced by you and then tap "Start" button. As soon as your iPhone gets detected, click "Next' thereafter.
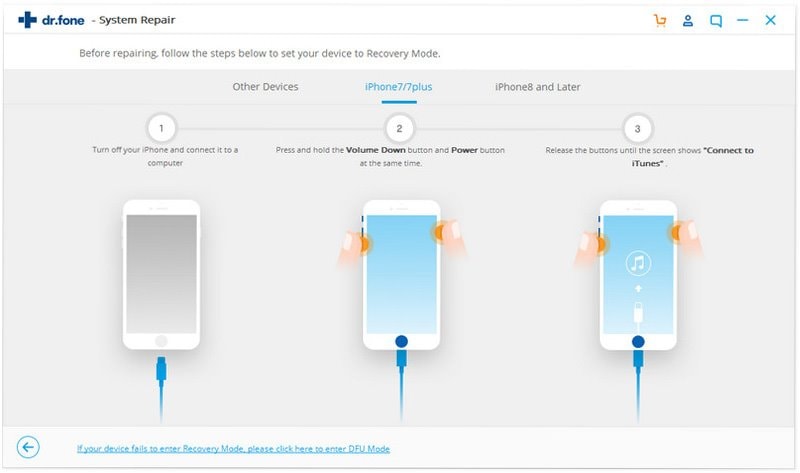
Step 3. Put your iPhone in DFU mode
If in case, you are not fortunate enough that the iPhone isn't detected by the software automatically or if your iPhone is irresponsive, put it in DFU mode with the onscreen guide.
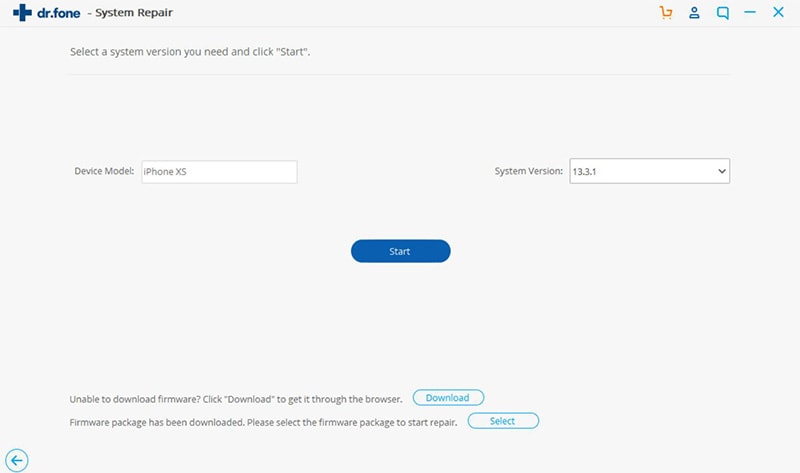
Step 4. Downloading the firmware
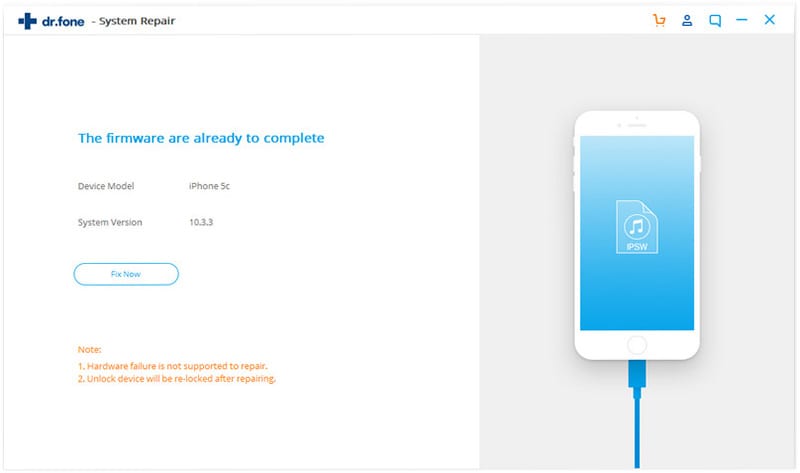
The next screen will display the automatically fetched information of your iPhone model and the latest iOS firmware information. Simply, press "Download' button and wait.
Step 5. Fix the iOS (iTunes 26 error)
Lastly, hit the "Fix Now' button, after iOS download is complete. In a short while the iTunes error 26 will be sorted and you can then carry forward your tasks with iTunes.
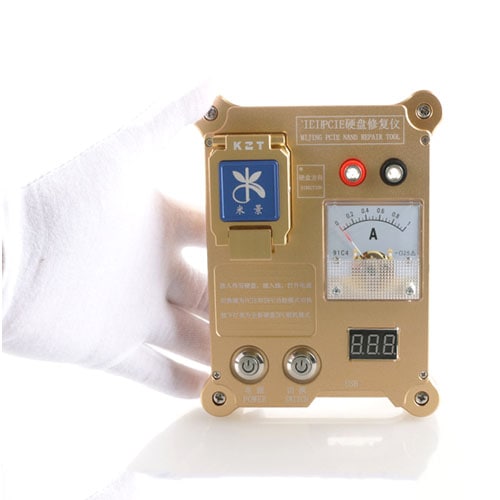
Part 6: Check NAND like the three voltages (For geeks only)
Well, for the all the geeky people, pay attention to NAND as it is responsible for storing your iPhone's important information. A damaged NAND chip would hurt your device, so get it checked to fix the problem.
For this, you should have a PCIE reader to check the three voltages. Get it handy and then pop off your nand chip and check it's resistance on the pads if you can read it or not.
Note: You need to be sure that your data line resistors must have some resistance, in the first place.
Conclusion
From the above article, we conclude that dr.fone - System Repair (iOS) is the best means of resolving Error 26 iTunes. No matter you are a geek or novice, this intuitive and data-loss-less method is the perfect way to get out of any iOS system issue.
Elva
staff Editor