Hard Drive Recovery
- Format Hard Drive+
-
- How to Clone Hard Drive
- How to Format Hard Drive from Bios
- Format Hard Drive for Xbox One
- How to Format C Drive in Windows 10/7/XP
- How to Perform PS4 External Hard Drive Format
- How to Format Hard Drive from Bios
- Format Hard Drive for Xbox One
- How to Format C Drive in Windows 10/7/XP
- How to Perform PS4 External Hard Drive Format
- How to Format Drive in Linux
- How to Format Hard Drive to NTFS
- How to Format WD My Passport
- How to Format Your Drive to FAT32 System
- Format HDD Low Level
- Format a BitLocker Encrypted Drive
- How to Unformat Hard Disk
- How to Format a RAW Drive
- Fix Your Hard Drive’s Formatting Issues
- How to Format SSD
- How to Format your Hard Drive to exFAT File System
- How to Format a Hard Drive to FAT32
- Hard Drive Recovery+
-
- Top 10 Hard Drive Recovery Tools
- How to Recover Lost Data from Maxtor External Hard Drive
- How to Recover Data from Hitachi External Hard Drive
- How to Recover Data from Dead Hard Drive
- How to Recover Data from SimpleTech External Hard Drive
- How to Recover A Formatted Hard Drive in 3 Simple Clicks
- How to Recover Lost Data from Iomega External Hard Drive
- How to Recover Data from Toshiba External Hard Drive
- How to Recover Data from Transcend External Hard Drive
- Lacie External Hard Drive Data Recovery and Repair
- Best Way to Recover Data from a Floppy Disk
- How to Recover Data from HP External Hard Drive
- Best Method to Recover Data from Crashed Hard Drive
- How to Repair Toshiba Hard Disk
- Recover Files from WD My Book External Hard Drive
- Ways to Repair Seagate Hard Disk
- Fix Hard Drive Error+
- Hard Drive Tips+
- Mac Hard Drive Recovery+
-
- Recover Lost Data from Seagate External Hard Drive on Mac
- How to Recover Data from Formatted Hard Disk Drive on Mac
- How to Recover Data from Seagate Backup
- How to Recover Lost Data from Western Digital External Hard Drive
- Top 5 Tools for Mac Disk Recovery on Mac
- How to Format Toshiba Hard Drive for Mac
- Format a Hard Drive for Mac: Ultimate Guide 2021

• Filed to: Hard Drive Recovery • Proven solutions
“I want to backup all my Mac’s data in an External Drive. How to clone Mac’s Hard Drive using Disk Utility on Mac?”
Cloning your Mac’s Hard Drive is a great way to backup all of your Mac’s data. Other then backup, you can achieve more things with a cloned Hard Drive of Mac. To clone your Hard Drive, the MacOS provides you with an inbuilt feature with Disk Utility, making it super easy and reliable to clone your Mac’s Hard Drive without the use of any third-party tool. To clone Mac’s Hard Drive using the Disk Utility, you will be required to follow the method mentioned in this article. Go through the article to find out more about cloning your Hard Drive.
Part 1. Why Should You Clone Your Mac Hard Drive?
Cloning a Mac Hard Drive basically means cloning all the data on your Hard drive to another Hard Drive, Mac, or Storage Devices. Cloning of HDD can have many benefits or many convincing reasons, and it rarely has any cons. Thus, one should always think about the cloning of Mac hard drive.
Below are the various reasons to clone Mac Hard Drive:
- When you clone a Hard Drive, you basically create a copy of your Hard Drive and all the data in it. You can use the copy of the data whenever needed.
- A cloned Hard Drive can be used to have all the same data on various Macs. It is really helpful when you own multiple Macs.
- If you have a clone of your Mac’s Hard Disk, it is really easy to transfer or shift all the data of your Hard Drive on Mac to another. It is helpful in cases where you buy a new Mac and wish to shift or transfer all the data safely from your old Mac in one go.
- In case of system damage or system crash, you can lose all of your data from your Mac’s Hard Drive. But not if you have a clone of your Mac’s HDD. Yes, if you have a clone of your Mac’s HDD, you can simply restore your Mac from the cloned HDD.
- If you have a clone of MacBook Hard Drive, your data is never at risk of any Malware attack or Bug threat. If anything happens to your existing data on your Mac, you can replace it with the data on the cloned Hard Drive.
- It acts as a physical backup drive. Yes! If you have a clone of your Mac’s HDD, you don’t need to worry about any backup of your data. You will always have a physical drive with the backup of all your data.
Part 2. How to Clone Mac Hard Drive with the Help of Disk Utility?
You can use the Disk Utility on Mac to clone your Mac’s Hard Drive. It’s an easy and efficient way to clone your Hard Drive.
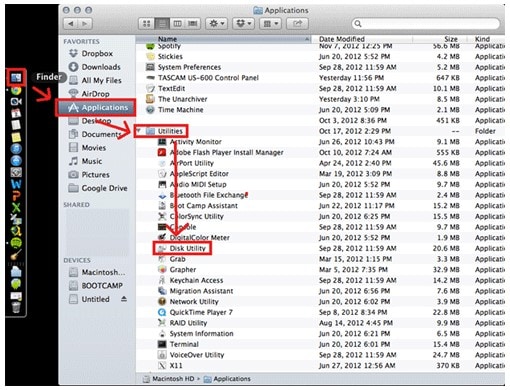
Step 1 On your Mac, you need to run the Disk Utility by first going to the Utilities folder.
Step 2 Once you are on the Disk Utility window, click on the “Erase” tab to open it.
Step 3 Now, on the left panel, you need to select the Drive on which you would like to take a copy of all your data. Select the destination drive.
Step 4 Now, select the Mac OS Extended (Journaled) as the Format Type under the “Format Drop Down Menu”. After that, click on the “Erase” button. This will clear the disk and will prepare it for cloning by remounting the drive on the desktop. This might take some time.
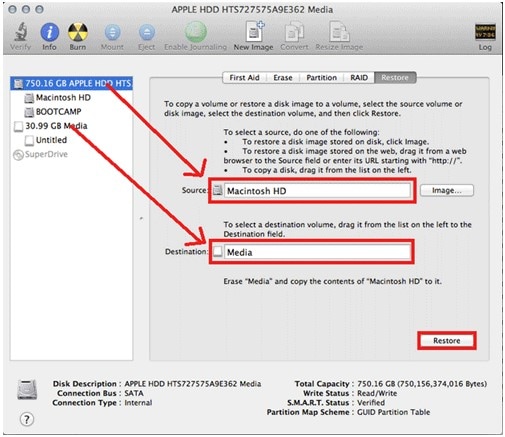
Step 5 Once done, now go to the “Restore” tab from the Disk Utility window. Now, you will see two fields on the main section of the window i.e. Source and Destination.
Step 6 On the left panel, select the source drive (the drive to be cloned) and drag it to the field named “Source” on the main window section. Now, drag the Destination drive (the drive on which the data will be cloned) to the “Destination” field.
Step 7 Once you have ensured that both the driver in the “Source” and “Destination” fields are correct, then click on the “Restore” field to clone Mac’s Hard Drive.
Note: Before you click the “Restore” button, go to your Mac’s Desktop, and execute the “Command – I” command by selecting the “Destination Drive” icon. This will take you to the “Get Info” window. Here you need to ensure that the option “Ignore Permissions for the Volume” under the “Ownerships and Permission” section is unchecked, or disabled.
Part 3. How to Recover Data from a Mac Hard Drive? Use Recoverit (IS) for Mac
There are instances when you forget to clone your Hard Drive before erasing it for some reason, or the process of cloning fails and you lose your data from Macs Hard Drive. There can be other reason as well behind the lose of data such as Accidental Deletes, Malware attacks, etc. In such cases, you will lose all of your important data and will need to recover your data from Mac’s Hard Drive or from Cloned Hard Drive.
In such cases, we would suggest you use a reliable and powerful data recovery tool. Do not risk your important data for any cheap or unreliable recovery tool. You can use Recoverit (IS) Tool to recover data from your Mac’s Hard Drive. It’s a tool that is super reliable, very efficient, and very easy to use. iSkysoft is one of the highest Mac data recovery tools, and it can be used to recover any type of data loss due to any reasons. With being powerful and efficient, iSkysoft is also one of the most affordable recovery tools in the market.
Recoverit (IS) for Mac
Have a Look at the Great Features of Recoverit (IS) Tool
- You can recover data from all types of storage devices like Hard Drive, Solid State Drive, SD Card, Floppy Disks, Pen Drive, USB Drive, etc.
- You can use any operating systems like Windows, macOS, Android, iOS, to recover the deleted data.
- iSkysoft allows you to recover more than 1000 types of files from your Mac Hard Drive.
- To help you in recovering data from Hard Drive on Mac, iSkysoft comes with two powerful scanning modes i.e. All-around Scan and Deep Scan.
- You can pause and resume the scanning process at ant time with the Pause & Resume features.
- You can use the Bootable Recovery feature of the tool to recover deleted data from a crashed system.
User Guide to Recover Data from a Mac Hard Drive
Step 1 To recover data from a Mac Hard Drive, you first need to download the Mac-compatible version of the Recoverit (IS) tool. Go to the Recoverit (IS) tool website and choose the Mac version of the tool to download and install it.
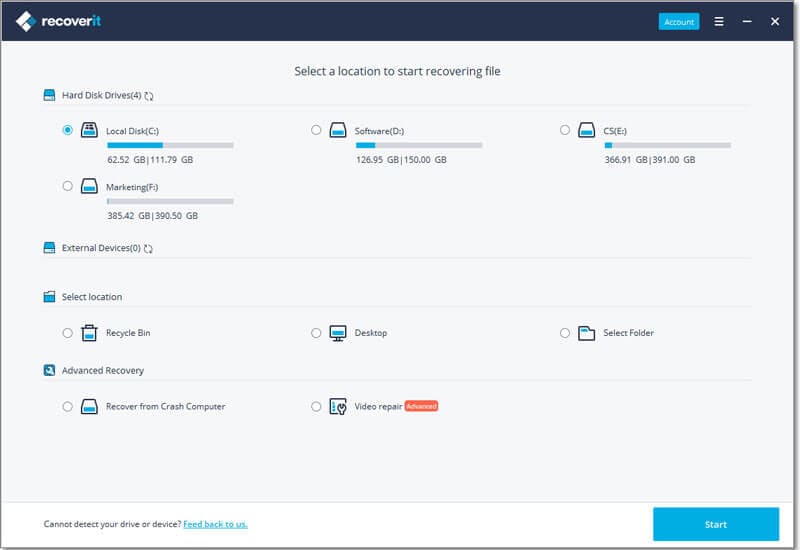
Step 2 Launch the installed iSkysoft Data recovery tool on your Mac. You will be taken to the Storage Drive selection window, where you will see all of you Mac’s storage drives and Hard Drives listed. Select the drive you want to recover data from and click on the “Start” button.
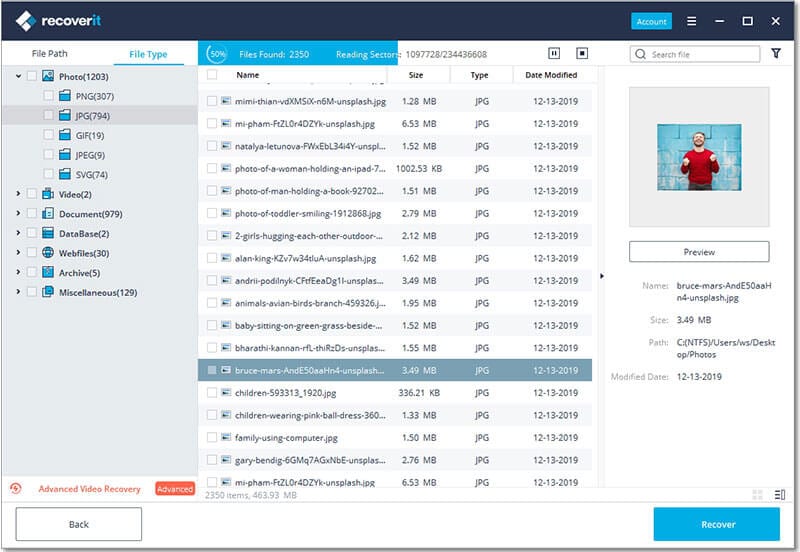
Step 3 Once you click the Start button, it will initiate the scanning of your selected drive on your Mac. The scanning may take time depending upon the size of the data needs to be scanned. Meanwhile, you can Pause and Resume the scanning process at any time, or you can also start the recovery process at any time during the scanning.
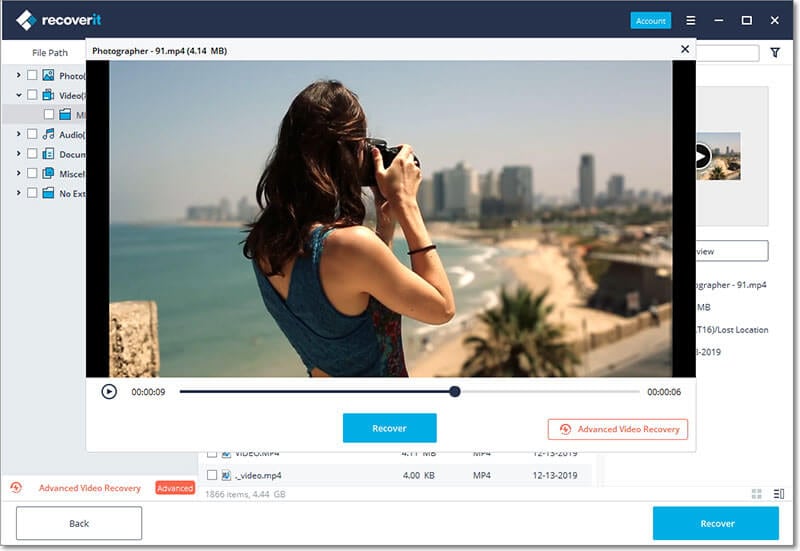
Step 4 After the scanning is done, all you need to do is to preview the scanned files before recovery and select all those files that you want to recover. Once selected, simply click on the “Recover” button at the bottom of the recovery window. You will be asked to choose a location on your Mac to store all the recovered data. Choose a secure location and click on “Ok”.
All the files that you have selected will now be recovered and will be restored to the location you selected. You can simply navigate to the location and access all the files deleted from the Hard Drive of your Mac.
Conclusion:
Cloning you Mac’s Hard Drive is very important and has many benefits. It does not only help you in transferring the data, but it also works as a lifesaver during the emergencies when you lose your data by accident. So, it’s good to clone your Mac’s Hard Drive.
Elva
staff Editor