Hard Drive Recovery
- Format Hard Drive+
-
- How to Clone Hard Drive
- How to Format Hard Drive from Bios
- Format Hard Drive for Xbox One
- How to Format C Drive in Windows 10/7/XP
- How to Perform PS4 External Hard Drive Format
- How to Format Hard Drive from Bios
- Format Hard Drive for Xbox One
- How to Format C Drive in Windows 10/7/XP
- How to Perform PS4 External Hard Drive Format
- How to Format Drive in Linux
- How to Format Hard Drive to NTFS
- How to Format WD My Passport
- How to Format Your Drive to FAT32 System
- Format HDD Low Level
- Format a BitLocker Encrypted Drive
- How to Unformat Hard Disk
- How to Format a RAW Drive
- Fix Your Hard Drive’s Formatting Issues
- How to Format SSD
- How to Format your Hard Drive to exFAT File System
- How to Format a Hard Drive to FAT32
- Hard Drive Recovery+
-
- Top 10 Hard Drive Recovery Tools
- How to Recover Lost Data from Maxtor External Hard Drive
- How to Recover Data from Hitachi External Hard Drive
- How to Recover Data from Dead Hard Drive
- How to Recover Data from SimpleTech External Hard Drive
- How to Recover A Formatted Hard Drive in 3 Simple Clicks
- How to Recover Lost Data from Iomega External Hard Drive
- How to Recover Data from Toshiba External Hard Drive
- How to Recover Data from Transcend External Hard Drive
- Lacie External Hard Drive Data Recovery and Repair
- Best Way to Recover Data from a Floppy Disk
- How to Recover Data from HP External Hard Drive
- Best Method to Recover Data from Crashed Hard Drive
- How to Repair Toshiba Hard Disk
- Recover Files from WD My Book External Hard Drive
- Ways to Repair Seagate Hard Disk
- Fix Hard Drive Error+
- Hard Drive Tips+
- Mac Hard Drive Recovery+
-
- Recover Lost Data from Seagate External Hard Drive on Mac
- How to Recover Data from Formatted Hard Disk Drive on Mac
- How to Recover Data from Seagate Backup
- How to Recover Lost Data from Western Digital External Hard Drive
- Top 5 Tools for Mac Disk Recovery on Mac
- How to Format Toshiba Hard Drive for Mac
- Format a Hard Drive for Mac: Ultimate Guide 2021

• Filed to: Hard Drive Recovery • Proven solutions
“How can I erase a Macintosh HD? I want to reset my Mac and install the newly released OS on it so that I can use my computer like brand new!”
This is something a lot of Mac users ask who would like to erase Mac HD and reset their system. From reselling their computer to resolving any issue with its hard drive, there can be all kinds of reasons for this. The good news is that you can easily erase the internal or external hard drive on Mac. Though, there is a stepwise process that you should follow to entirely reset your system while still retaining its data. In this guide, I will tell you how to erase Macintosh HD and would also make you familiar with ways to recover erased hard drive on Mac.

Part 1: What is Macintosh HD?
As the name suggests, a Macintosh HD is the primary hard drive of a Mac system. Ideally, it is where all the data on your Mac is stored. Even though you can further partition it, the Mac HD would represent the entire hard drive of your system. Apart from the macOS itself, it can store your accounts, photos, videos, documents, apps, and so much more.
A Macintosh HD can either be an HDD (Hard Disk Drive) or an SDD (Solid State Drives). While an HDD is based on a flash drive that operates faster, an SDD is an older technique that stores our data on disks. Some Apple systems also have the unique Fusion drive as well. The way data is stored on a Macintosh HD is supported by its file system, which could be HFS+, FAT, APFS, and so on.
You can access your Macintosh HD from the desktop or Finder and view its partitions, folders, and the stored data.
Part 2: Why Need to Erase Macintosh HD
Before we learn how to erase a drive on Mac, it is important to understand why so many users need to do the same. Following are some of the major reasons for one to erase Mac HD.
- If you wish to resell your Mac, then you can choose to erase Macintosh HD so that the other user won’t have access to your data anymore.
- A lot of people erase Mac HD to resolve a problem with their system like a corrupt partition or a logical error with the hard drive.
- Your system can get corrupted by a malware and erasing its drive can fix your malfunctioning Mac.
- Before installing the latest macOS version, users often erase the existing data for a seamless update.
- You can also erase an external hard drive on Mac if you wish to reuse it for some other purpose.
- There can be different other reasons behind erasing a Mac’s hard drive related to troubleshooting, getting rid of sensitive data, removing personal accounts, etc.
Part 3: How Do You Wipe Mac Hard Drive and Reinstall macOS?
If you want, you can just go to the Disk Utility application on Mac to erase your data. Though, your accounts would still be linked to your system. Therefore, if you wish to erase everything on Macintosh HD properly, then consider following these instructions one by one:
Step 1 Backup Your Mac with Time Machine
If you don’t want to permanently get rid of your Mac data, then consider taking its backup first. There are different ways to back up your Mac content. For instance, you can just copy your data and store it on another source like an external hard drive. Besides that, you can also take the assistance of Mac’s Time Machine application to take an extensive backup.
1
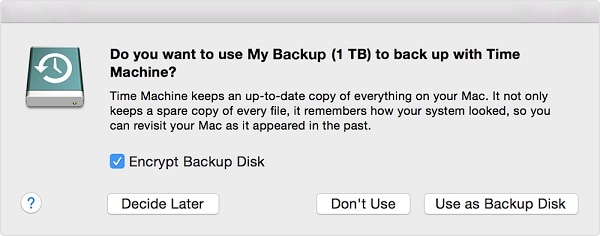
Just attach an external device where you wish to backup your Mac’s data. The drive would automatically be detected by Time Machine and it will give you an option to use it as a backup drive.
2
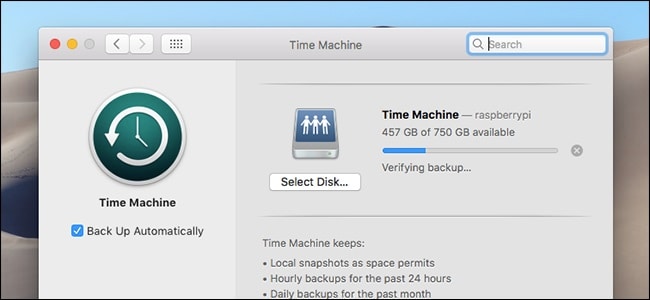
If it won’t be detected, then you can manually launch Time Machine by visiting Mac’s Finder > System Preferences > Time Machine. Here, you can alter the backup preferences and select the backup drive manually.
3
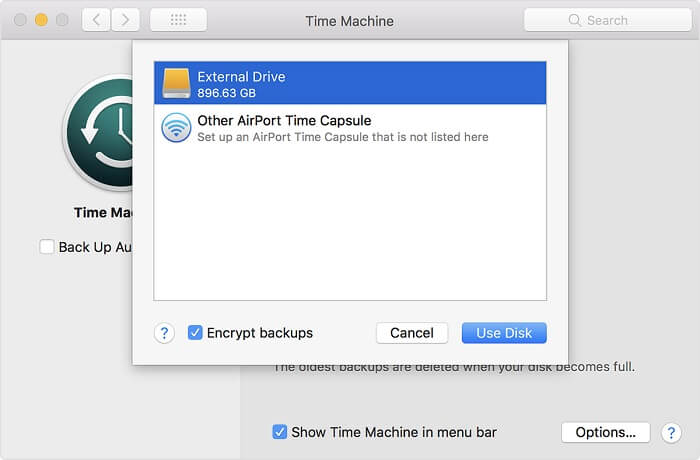
Once you click on the “Select Backup Disk” option, Mac will display the connected external drives that can act as a Time Machine disk. Simply select your external HD from here and start the backup process. If you want, you can encrypt the backup to further protect your data.
Step 2 Deauthorize iTunes, iCloud, iMessage and Mail
Great! Once you have taken a backup of your data, you are all prepped-up to erase Macintosh HD. Before you erase the stored data, it is important to de-authorize the linked accounts such as iTunes, iCloud, or iMessage from your Mac. This will help you reset your Mac besides just erasing its stored content.
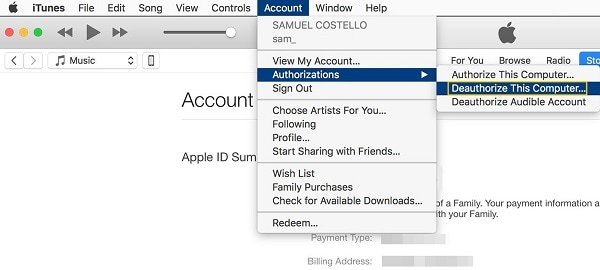
1
Firstly, launch iTunes on your Mac and go to its Accounts > Authorizations option. From here, click on the “Deauthorize this Computer” option and confirm your choice.
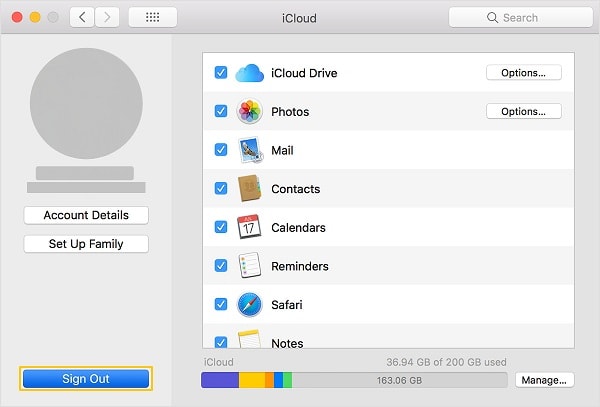
2
Similarly, it is recommended to un-link your iCloud account from your system. Just launch the iCloud application on your Mac and click on the “Sign Out” button.
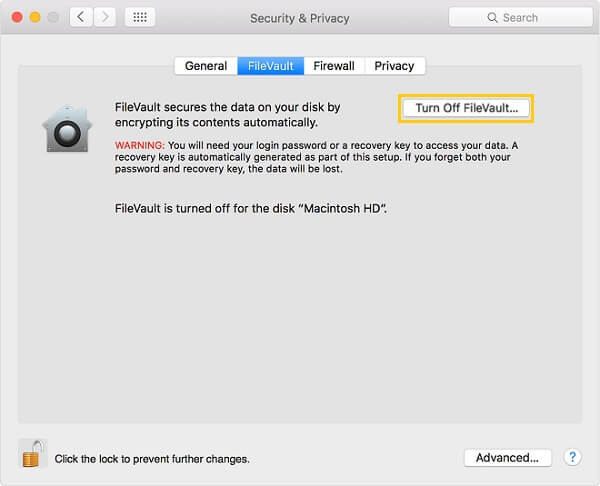
3
It is also recommended to disable the FireVault feature on your Mac while erasing it. Visit its Security & Privacy settings from System Preferences and turn off FireVault from here.
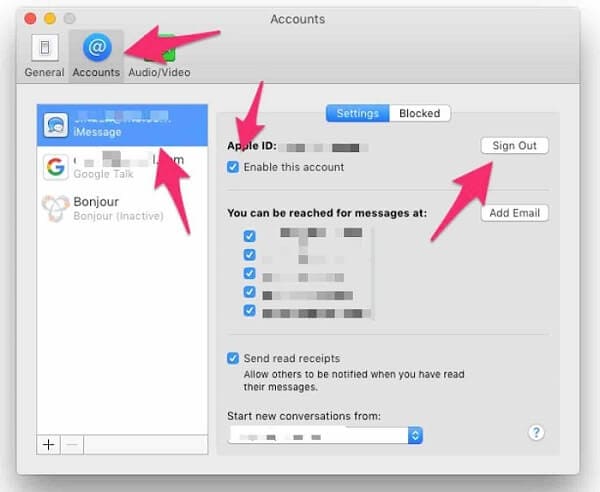
4
Lastly, go to the Messages app on your Mac and visit its Preferences > Accounts. Select the iMessage account from the sidebar and just sign out of your account from here.
Step 3 Boot Mac to Recovery Mode
Now you are all set to erase Mac HD or reinstall the latest version of its operating system. To do this, we will take the assistance of macOS Utilities that are available in the Recovery Mode of Mac. You can boot your Mac in the Recovery Mode by following these steps:
1
If you are already using your Mac, then just go to Finder and click on the “Restart” button. Confirm your choice to restart your Mac subsequently. In case if the system is already off, then just press the power button to turn it on.
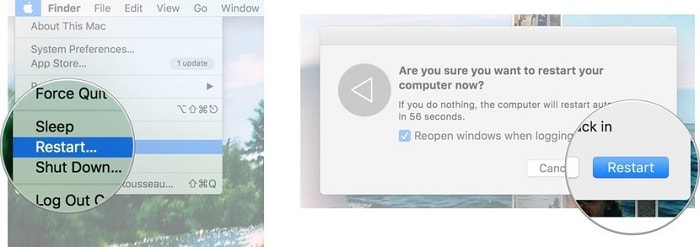
2
As your Mac would turn on, press and hold the Command + R keys on its keyboard. Keep holding both the keys at the same time for at least 10 seconds during its boot. This will ditch the standard booting process and would start your Mac in the recovery mode instead.

Step 4 Securely Wipe Mac Hard Drive
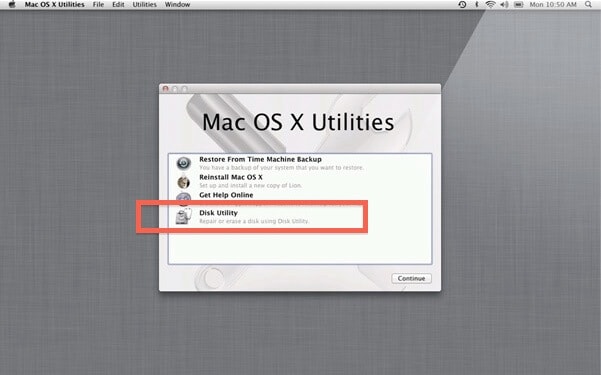
Once your system boots in the recovery mode, it will display the macOS Utilities window with all kinds of options. From here, you can launch the Disk Utility app to erase Macintosh HD.
1
The Recovery Mode screen will have the macOS Utilities window with a few options listed. Just click on the “Disk Utility” field to launch the dedicated app.
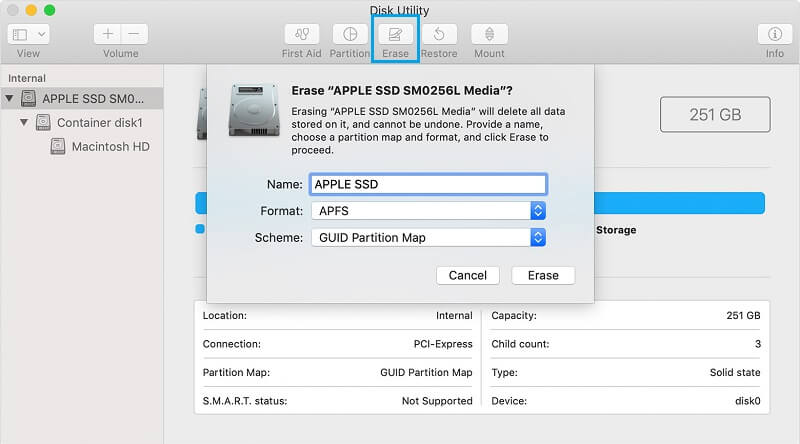
2
The Disk Utility interface will display all the partitions (and drives) on the sidebar. From here, just select your Macintosh HD to get all the operations that can be performed on it.
3
Now, just click on the “Erase” button on the toolbar to get the following pop-up window. Select the partition scheme and format for the disk and click on the “Erase” button to format the drive.
Step 5 Reinstall macOS
Sit back and wait for a while as Disk Utility would erase Macintosh HD successfully. Once it is done, you would be returned to the Recovery Mode interface. If not, you can restart your Mac and boot it to Recovery Mode again.
1
From the available options on macOS Utilities, just click on the “Reinstall macOS” button and continue. Kindly note that Mac should be connected to a stable internet connection beforehand.
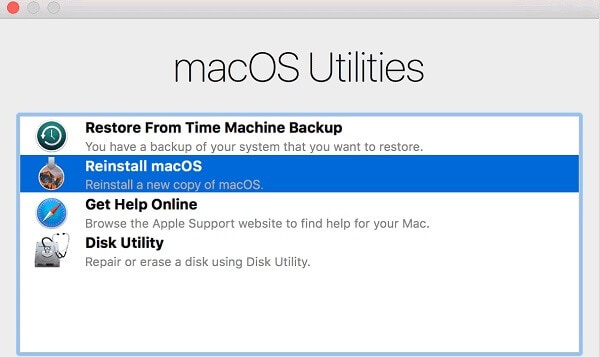
2
This will let Mac search for the latest version of the stable macOS that is available (and compatible) for your system. You can select where you wish to install it (Macintosh HD in this case) and click on the “Install” button.
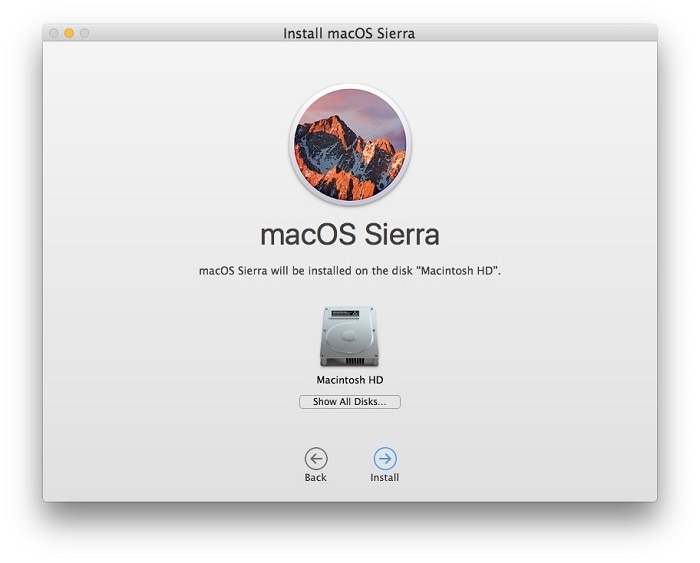
That’s it! Now you can just follow the simple on-screen instructions to complete the setup and install the new macOS version on your system. In the end, your system would be restarted with the new macOS and no existing data or linked accounts on it.
Part 4: Bonus: How to Recover Lost Data When You Accidentally Erased Mac Hard Drive
As surprising as it might sound, a lot of people complain of accidentally erasing hard drive on Mac. In this case, you can simply recover the erased hard drive content from Mac by using a professional tool like Recoverit (IS). This user-friendly and highly efficient tool can help you get back all kinds of lost, deleted, or inaccessible content from your Mac under different scenarios. This includes accidental deletion of files, formatting of the entire HD, malware corruption of data, lost partition, and so on.
Recoverit (IS)
A Life Saver to Solve Your Data Loss Problems!
- It is compatible with both Windows and Mac operating system.
- It supports a large number of storage device type including hard drives, USB flash drives, SD cards, etc.
- All major types of files can be recovered including music, images, video, documents, emails, and archives.
- It has a deep scan features for in-depth scanning of the hard drive for searching files to recover.
Apart from Mac’s internal hard drive, it supports data recovery from other sources like external hard disk, SD card, flash drive, digital camera, and more. The application supports the recovery of photos, videos, music, documents, emails, compressed files, and every other kind of data. To learn how to recover accidentally erased Macintosh HD, follow these steps:
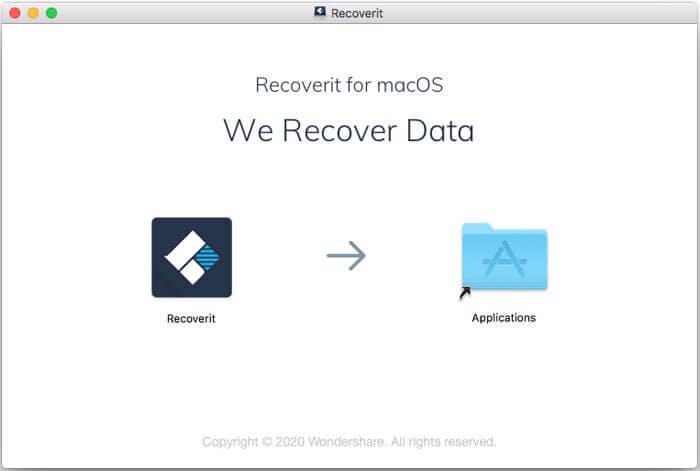
Step 1 Install Recoverit (IS) on Mac
Firstly of all, you need to visit the official website of iSkysoft to download the data recovery software. Launch the DMG file to complete the installation of the application. It is recommended to install it on a partition other than from where you have lost your data. You can find it under your Applications and further complete the registration process.
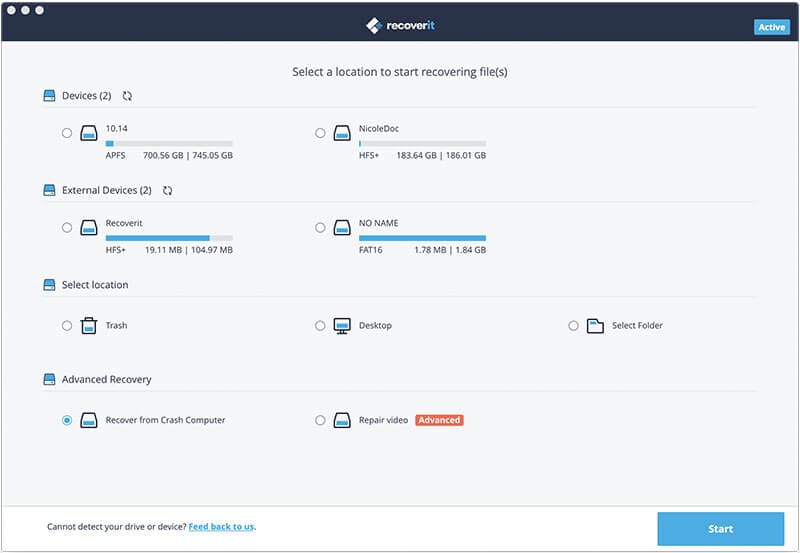
Step 2 Choose where (or what) to scan
Whenever you wish to recover erased hard drive on Mac, just launch the Recoverit (IS) application. From here, you can select a partition or the entire hard drive to scan. If you want, you can even scan an external hard drive or any other device to scan as well.
Step 3 Preview and Restore your Data
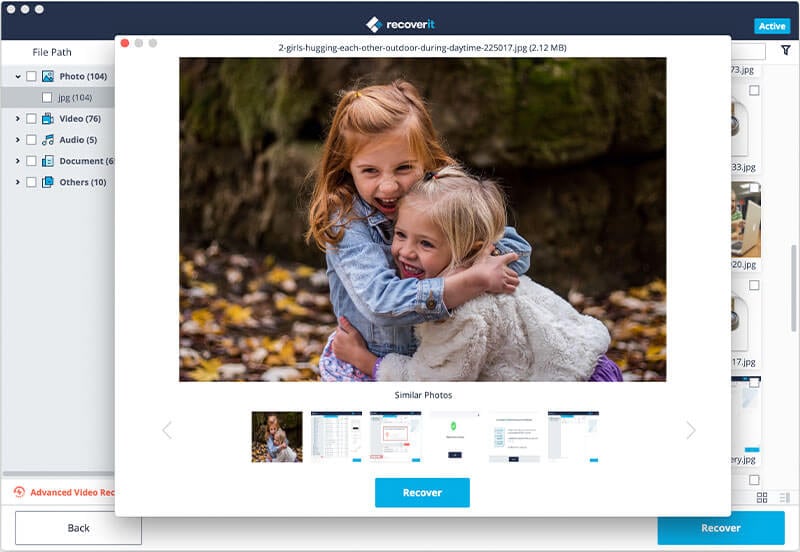
That’s it! Once you select a location to scan, Recoverit (IS) would perform a deep scan and would extract all kinds of lost data from your Mac.

After when the scan is completed, all the extracted content will be displayed by iSkysoft under different sections. You can just preview your photos, videos, or documents here and select what you wish to save. In the end, click on the “Recover” button and save your files to any location of your choice.
That’s a wrap, everyone! I’m sure that after following this guide, you would be able to erase Macintosh HD successfully and reinstall macOS on it. For your convenience, we have included a process to save your data by taking its backup. This will make sure that you would have a backup of your data nonetheless. Besides that, if you have accidentally erased hard drive on Mac, then you can take the assistance of Recoverit (IS). A highly smart and reliable data recovery solution, it will certainly come handy to you on different occasions.
Elva
staff Editor