How to Unlock Disabled iPad without iTunes?

Dec 06, 2023 • Filed to: Remove Screen Lock • Proven solutions
Sometimes, our device stops working even when everything is going well. This is an unexpected but standard issue in some devices, especially observed in iPads. If your iPad has been disabled automatically, then we know how to deal with this issue. You might have entered the wrong passcode that has led to this problem. Therefore, we made up our mind to share the solutions with you in this content. Are you involved in learning how to unlock disabled iPad without iTunes? Go through this piece and find ways to unlock your disabled iPad. Usually, people use iTunes to unlock disabled iPad, but we decided to introduce a new tool for you.
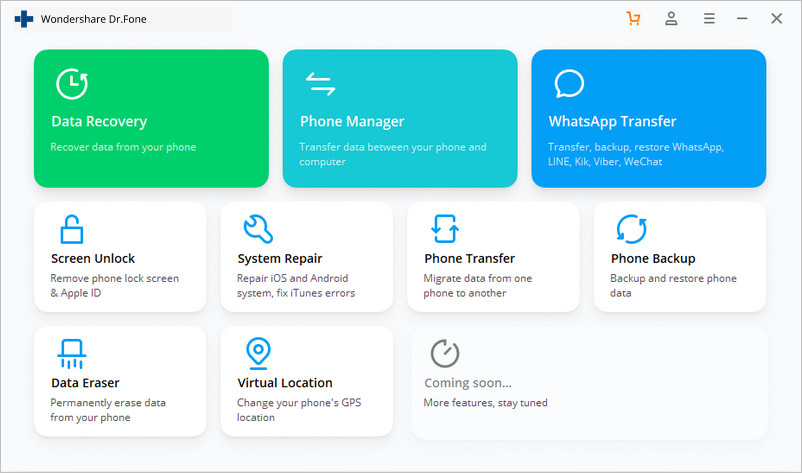
Part 1: How to unlock disabled iPad without iTunes using Dr.Fone - Screen Unlock (iOS)?
There are many ways to unlock an, iPad and one of them is to use iTunes. Although iTunes offers an effective way of getting rid of disabled iPad, we can try Dr. Fone Screen Unlock (iOS). The issue mainly occurs because users forget the passcode or they purchase a second-hand iPad without resetting it completely. To use this tool, you do not have to be a smart techie. It permits the user to unlock an iPad with a few clicks.
Moreover, the Dr. Fone Screen Unlock bypassing tool helps unlock Apple ID. Because 50 million customers trust this product, your data is in the right hand. It supports most of the iPhone and iPad, including older and latest models. The steps to unlock disabled iPad using Dr. Fone Screen Unlock are as follows:
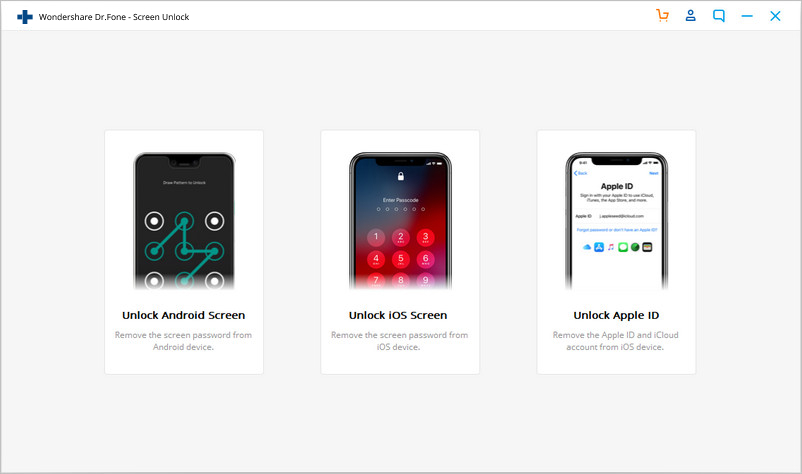
Step 1: Connect your iPad
Go to the link https://drfone.wondershare.com/iphone-unlock.html from where you can download the required tool and run this software after installation. Select “Screen Unlock” out of all the given options.
Step 2: Connect Device
Now, use the right cable to connect your iPad and then click on “Unlock iOS screen.”
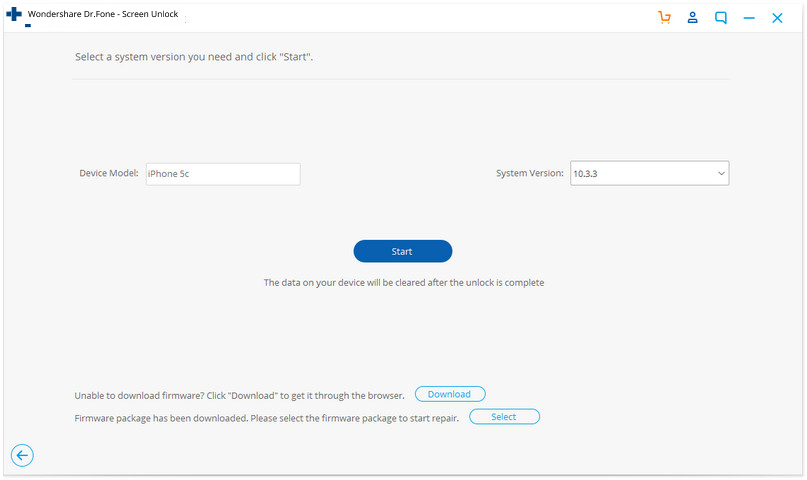
Step 3: Boot your iPad in Recovery or DFU mode
Before bypassing the iPhone lock screen, it is crucial to boot it in either Recovery or DFU mode. The instructions will be present on the screen. Keep in mind that for the iOS lock screen, recovery mode is set by default. If you are unable to activate it, you can click on the link present at the bottom to boot in DFU mode.
Step 4: Confirm details and Unlock
When the device is booted in DFU mode, Dr. Fone will show the information of your iPad like a model, system version etc. Incorrect information means, still you can choose the correct info given in the drop-down list. Now, to download the firmware for your iPad, click on “Download.”
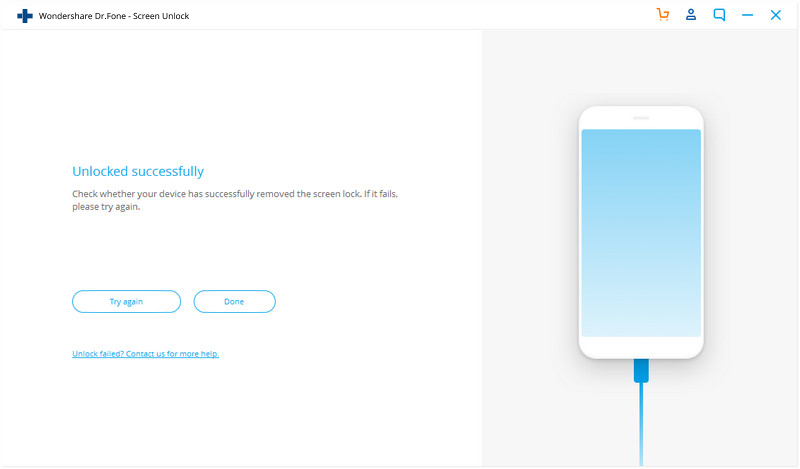
Step 5: Unlock Screen
Once the firmware is downloaded, click on “Unlock.” The iPad will be unlocked in a few seconds. Don’t forget that this will erase all the previous data stored on your iPad.
Part 2: How to unlock disabled iPad without iTunes via a manual restore?
There is another option to unlock a disabled iPad without using iTunes. This can only be done with the help of manual restoration. However, we can also use the “Find My iPhone” feature but trying manual restore is also good so we will see that solution in part 3. Manual storing of your iPad will fix the disabled iPad issue quickly. Many times, this has worked for iOS users so you must give a try this solution. The steps for restoring your iPad; manually is given in the following steps:
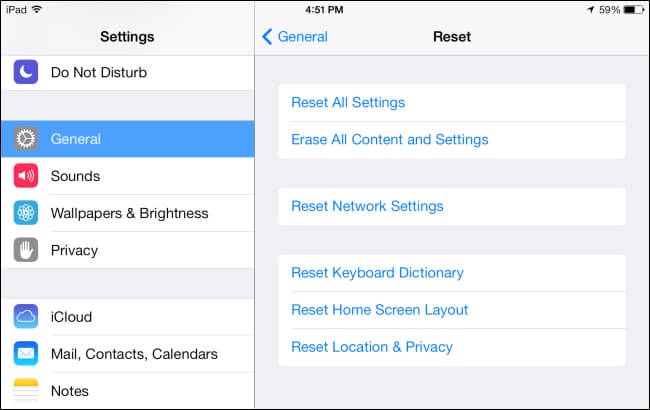
Step 1: Open Settings
Before you could wipe and unlock a disabled iPad without iTunes using manual restore, you must check that your device is fully charged. Now, open “Settings” and go to “General.” After that, choose “reset.”
Step 2: Erase everything
Choose “Erase All Content and Settings” and type your Apple ID and password when asked. The password must be that one linked to your email address. Also, ensure that it’s the same that you use to access the App Store. At last, confirm that you want to erase everything.
Part 3: How to unlock disabled iPad without iTunes via the “Find My iPhone” feature?
The “Find My iPhone” is an in-built feature of iPads and iPhones. It is used for finding a phone, lock it, or reset the device completely. If you are unable to unlock a disabled iPad and don’t want to use iTunes, then this is the best solution. It’s not only for your phone’s security but also for fixing the disabled iPad problem. Even the other methods are not working in favor of you, go with this solution. You will learn how to unlock disabled iPad without iTunes by following the given steps:
Step 1: Log in to your iCloud
Before unlocking disabled iPad, you have to log in to your iCloud account using a web browser by typing Apple ID and password. It would be better if you will use “Google Chrome.” Go to the “Find my iPhone” and press the “Devices” option. It will start showing you a devise list that is associated with your Apple ID. Choose the disabled iOS device.
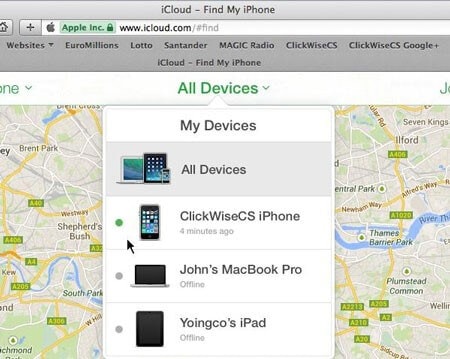
Step 2: Erase data on your iPad
In the chosen option, you get the power to find the location of your device, erase the data, or lock it. For fixing disabled iPad issue without the use of iTunes, you need to erase the device. So, click “Erase iPhone” and confirm it. Wait because your device has started deleting the entire data from your iPad.

Conclusion
You can assay any of the methods given in this content to unlock disabled iPad without iTunes but always remember that there is a risk of data loss, so you have to do it carefully. In some cases, it is not possible to unlock disabled iPad without losing data so be prepared for that. Besides, if you are using Dr. Fone Screen Lock, then it would be worth it for you to know that it can help in removing the iCloud activation password too. Besides, we all know the power of iTunes and what can we do with that. We hope you have come to know everything about how to unlock a disabled iPad without iTunes.


iPad Unlock
- Activation Lock Unlock
- 1. Bypass Activation Lock on iPad
- 2. Bypass iPad iCloud Activation Lock
- 3. Unlock an iCloud Locked iPad
- 4. Bypass iPad iCloud Activation Lock
- 5. iPad Stuck On Activation Lock
- 6. Reactivate iPad after iOS Upgrade
- 7. Remove iPad Activation Lock
- Apple ID Remove
- iPad MDM Unlock
- 1. iPad MDM
- 2. Bypass iPad MDM on iOS 16
- 3. MDM Bypass Tools for iPad
- 4. MDM VS. MAM
- 5. Jailbreak Remove MDM
- 6. Apple MDM
- 7. MDM Bypass on iOS 15/14
- 8. Remove MDM without Data Loss
- 9. Best MDM Bypass Tools
- 10. 10 Best MDM Solutions for You
- 11. Remove MDM from iPad
- iPad Screen Unlock
- 1. Unlock iPad without iPad Password
- 2. Unlock Disabled iPad without iTunes
- 3. Unlock Disabled iPad
- 4. Unlock iPad without Passcode
- 5. Fix locked iPad
- 6. unlock Passcode without Restore
- 7. Unlock iPad Without Passcode
- 8. Unlock iPad and Recover Data on it
- 9. Reset iPad Password
- 10. Reset iPad without Password
- Screen Time Lock
- ● Manage/transfer/recover data
- ● Unlock screen/activate/FRP lock
- ● Fix most iOS and Android issues
- Unlock Now Unlock Now Unlock Now
Selena Lee
chief Editor