How to Access and Download iCloud Backup in 2024: Three Ways

Feb 29, 2024 • Filed to: Manage Device Data • Proven solutions
Apple Inc. introduced iCloud storage system for iDevice users to store digital data and settings. Users get 5GB free storage with Apple ID, or can expand the storage by paying monthly fees.
Most importantly, data and settings are backed up to iCloud storage without connecting to a personal computer, on a day-to-day basis. Therefore, iCloud can be used to download the iCloud backup files to restore erased data and settings.
But how to download iCloud backup files?
Here are the 3 common methods to download iCloud backup files:
Method 1: How to Download iCloud Backup Using an iCloud Extractor
Apple has some self-developed tools to access iCloud backup files. But they are by no means the dedicated iCloud downloading tools. For example, users cannot download all types of backup files or preview what is stored in the iCloud backup.
It's time to get rid of these limitations!
Many veteran iOS users recommend Dr.Fone - Data Recovery (iOS), a dedicated iCloud Extractor to access and download data from iCloud synced files to the computer.
Dr.Fone - Data Recovery (iOS) provides you with an easy way to access the synced files in iCloud. Including Videos, Photos, Remind, Notes and Contacts.
Dr.Fone - Data Recovery (iOS)
Access and download iCloud backup easily & flexibly.
- Easy-to-follow interface and secure operations.
- Access and extract data from iCloud backup within 10 minutes.
- Download Videos, Photos, Remind, Notes and Contacts from iCloud synced files.
- Compatible with the latest iOS devices like iPhone 13 series and iOS 15.
- Preview and selectively download what you want from iCloud synced files.
- Users can select the specific data to download and save to PC.
- Restore the Contacts, Photos, Notes to your iPhone or iPad directly.


Steps to access and download iCloud backup using the iCloud extractor
Step 1: Download and install Dr.Fone, and connect your iPhone or iPad to the PC.
Step 2: Open the Dr.Fone toolkit and select "Recover" from all the features.
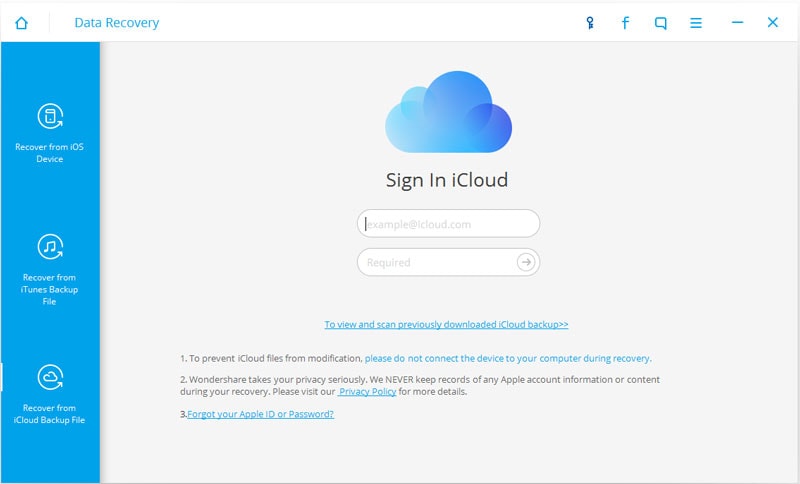
Step 3: Choose "Recover from iCloud Synced File" mode and enter your iCloud account information to log in.
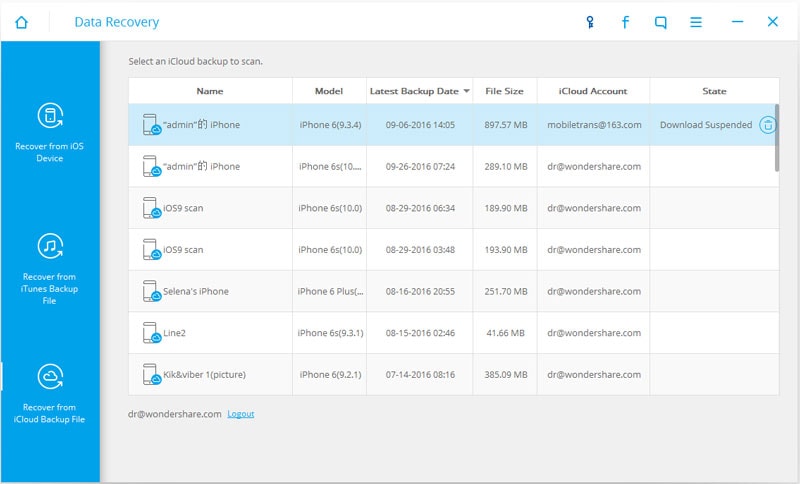
Step 4: After logging in, select one of the iCloud synced files and click "next" to download it first.
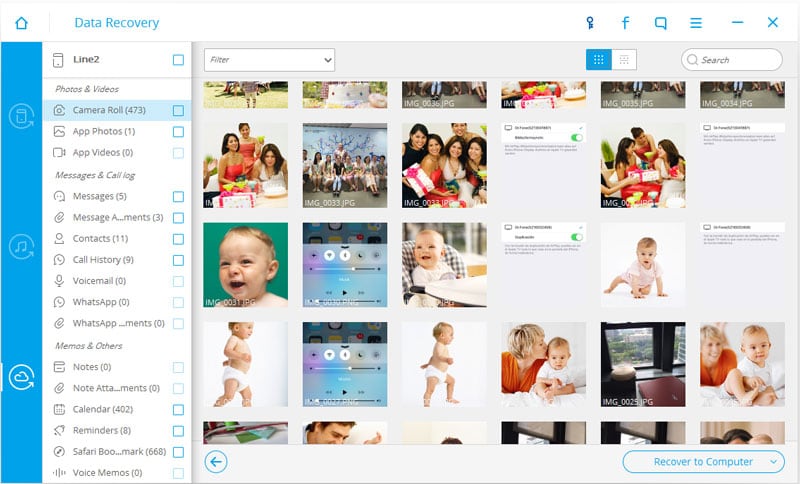
Step 5: After you've downloaded the iCloud synced file, select the file types, which will help you save the time to download and scan the data you actually don’t need.

Step 6: Preview and save the data you need to your computer.
After the scan process is finished, select the required data type and preview the details (almost all types of data in iCloud can be previewed). Select the data types you need, and click "Recover to Computer".
Editor's Picks:
Method 2: How to Download iCloud Backup from iCloud.com
Despite some limitations, the iCloud website is a common Apple-provided method to access and download iCloud backup files.
Follow these steps to download iCloud backup from the iCloud website:
Step 1: Sign in to icloud website with apple ID user name and password.
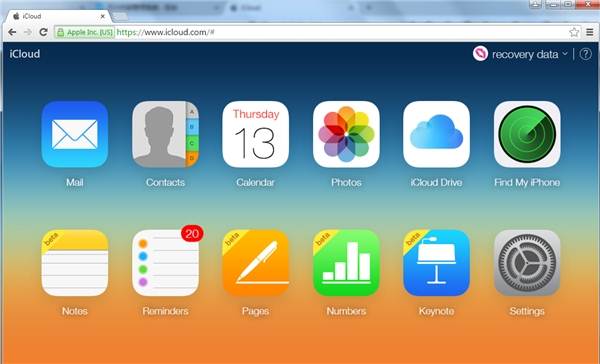
Step 2: To download photos from iCloud backup, click on the "Photos" icon, select a photo and then click the "Download" icon in the upper right corner.
Step 3: For other data like Mail, Contacts, Calendar, Notes, etc., you can only preview the details and keep note of the important ones. There are no Download buttons offered for these data types.
Pros:
- Secured way of downloading personal data from iCloud backup.
- Primary types of data can be previewed from the iCloud website.
Cons:
- Cannot access the stored digital data and settings.
- Important data like WhatsApp attachments, photo stream or call history are unavailable from iCloud website.
- Only photos can be downloaded.
Editor's Picks:
Method 3: How to Download iCloud Backup via iCloud Control Panel
The second Apple-provided way to access and download iCloud backup data is to install iCloud Control Panel. Here are the easy steps to do it:
Step 1: Download the iCloud control panel software from the official Apple website.
Step 2: Install this software and sign in with Apple ID user name and password.
Step 3: Then you will be able to access and download iCloud backup as the picture shown below. Choose the features you like and click "Apply".
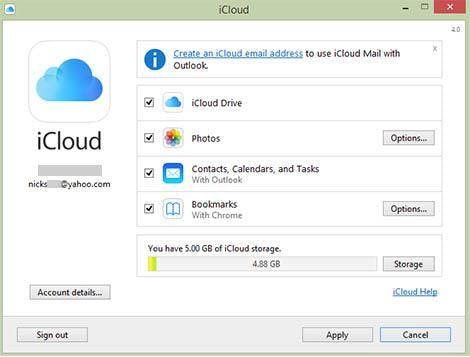
Step 4: To access and download photos or photos from iCloud backup, take out your iPhone, choose Settings > iCloud > Photos , and select "Download and Keep Originals".
Step 5: You can then view the photos downloaded from iCloud backup in the PC iCloud Photos folder.
Pros:
Apple-recommended way of downloading data from iCloud backup.
Cons:
- The data that could be downloaded is limited to photos, videos, etc.
- The photos or videos can be viewed only after they are downloaded.
Editor's Picks:
Which Method Shall I Choose to Download iCloud Backup?
After learning all the methods about how to download iCloud backup files, you may be baffled: which one to choose?
Here is a brief review of the three methods.
| Methods | iCloud Extractor | icloud.com | iCloud Control Panel |
|---|---|---|---|
| Downloadable File Types | |||
| One-Click Download | |||
| iCloud Backup Preview | |||
| iTunes Backup Download |
Video Tutorial: How to Download iCloud Backup in 3 Ways


iCloud Backup
- Backup to iCloud
- Extract iCloud Backup
- 1. Access iCloud Backup Files
- 2. Retrieve Data From iCloud
- 3. Access and Download iCloud Backup
- 4. Top 6 Free iCloud Backup Extractor
- Restore from iCloud
- 1. Restore from iCloud Backup
- 2. Recover Photos from iCloud
- 3. Restore WhatsApp from iCloud
- 4. Restore iCloud Backup to iPhone
- 5. Restore Text Messages from iCloud
- 6. Restore Notes from iCloud
- 7. Restore WhatsApp from iCloud
- 8. Can't Restore an iCloud Backup
- 9. Retrieve Photos from iCloud Backup
- iCloud Backup Issues
- ● Manage/transfer/recover data
- ● Unlock screen/activate/FRP lock
- ● Fix most iOS and Android issues
- Start Backup Start Backup Start Backup
Bhavya Kaushik
contributor Editor