
• Filed to: iPhone Recovery • Proven solutions
As we all know that Apple doesn't allow anyone to access iCloud backup data, and no one can selectively choose data from iCloud backup to restore to your iPhone, iPad or iPod touch. It works in the same way as iTunes does. In order to only restore photos from iCloud to Mac, you need to reply on a third-party tool which lets you download and extract iCloud backup data.
Part 1: The Best Way to Restore Photos from iCloud Backup
Why Choose This Software to Restore Photos from iCloud:
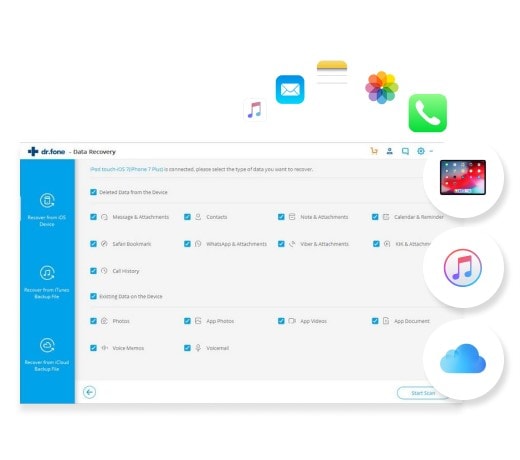
- dr.fone - Data Recovery (iOS) is an instrument that provides an easier interaction between your Mac, your iCloud account and your data.
- Recover your deleted contacts, photos, videos, messages, call log, bookmark, apps, app data, etc.
- You can Selectively preview and restore your lost data, instead of restoring the whole backup files.
- There are 3 recovery modes. You can choose to recover from iPhone, iTunes and iCloud backups.
Step-by-Step Guide to Restore Photos from iCloud
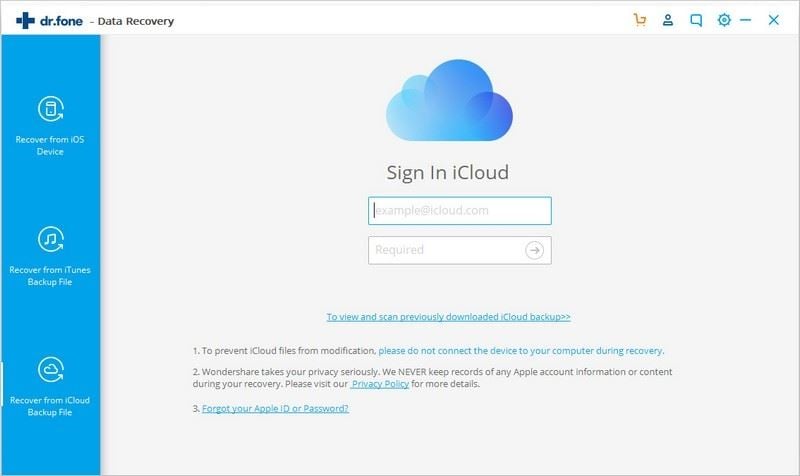
Step 1. Sign Into Your iCloud Account
First step is to log in into your iCloud account with your Apple ID and password. If you have not yet done some backup with your photos from your devices, like iPhone and even Mac, it is time now to do it. When you have saved and you made a backup with all your data, just be sure that this backup exist in your iCloud.
In any case, all backups (usually the last three backups) can be viewed into your iCloud account. You are the right person who knows the backup with your own saved photos. In content of your iCloud it can be seen the backups with their names and time when they were done.
Step 2. Choose the Backup with Your Photos to Download and Extract
You will see in your iCloud account all backups already done by you and you will be able to download it by clicking "Download" button. When you do this, make sure that the internet connection is in good condition. After that, you can continue to click "Next" button in the pop-up window to extract the downloaded iCloud backup file, so that you can preview and read the whole content in detail, including previewing photos.

Step 3. Restore Photos from iCloud on Your Mac
Once the extraction is done, you can preview all data one by one. After you have selected the photos, just click on "Export to Mac" button and all of your pictures are downloaded, restored on your Mac. The time for restoring them is depending on your photos size and number of pictures. You will have again all of your photos stored in your iPhoto Library and that will be in your Pictures Folder or in your selected place for saving them.

Normally, when you take a photo on one device, it automatically appears on all of your other devices with My Photo Stream. We talk here about devices like Mac, iPhone, iPad, iPod. Anyway, the photos in My Photo Stream are saved on the iCloud server for a limited time (30 days). In order to use My photo stream, you must to enable this feature on all your Apple devices or Windows PC.
But in some cases, it might occur an event that produces damages with irreversible effects and you are in the situation having all your data lost. Thus, the recommendation is to save your important data in a backup.
Part 2: Other 3 Common Ways to Recover Photos from iCloud Backup
Method 1: How to Retrieve Photos iCloud Using iCloud.com or iCloud Drive
If you are worried and wondering that ‘how do I recover photos from iCloud?’ then we have the right answer for you. Recovering photos from iCloud is pretty simple using iCloud.com or the iCloud Drive, but one should remember that iCloud preserves your data only for 30 days. So, while you want to restore your iPhone pictures keep this 30 day window in your mind.
Step 1: To recover photos from iCloud you need to browse and visit iCloud.com and log in with your iCloud credentials (Apple ID and password).

Step 2: Once you have signed into your iCloud account, choose the data type you want to retrieve. Here, you need to select photos, as you want them to get restored from iCloud.

Step 3: Data retrieval can also be done for videos, contacts, as well as calendar, using iCloud Drive. All you need to do is, tap on the corresponding link, then tap on Download icon and you are good to go.

Method 2: Official Way to Restore Photos from iCloud
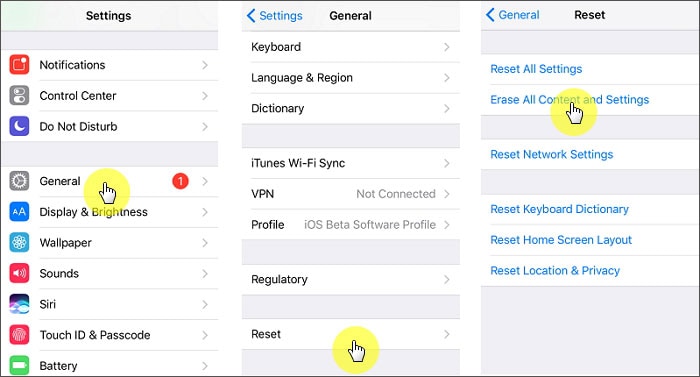
When you are unsure about how to recover photos from iCloud, try using the native interface of iOS for restoring the pictures from iCloud. This feature needs to be configured during setting up of an iOS device, so in case of an old device it might require resetting. Resetting your device implies that there is risk of device data loss. Hence you should backup your device prior to carrying out reset of your iPhone. Here are the steps to recover photos from iCloud along with other crucial device data.
Step 1: Reset your device in case it’s an old one by browsing to ‘Settings’, and then ‘General’. Tap ‘Reset’ and then ‘Erase All Content and Settings’ option over there. Confirm your selection by clicking the ‘Erase iPhone’ button again.
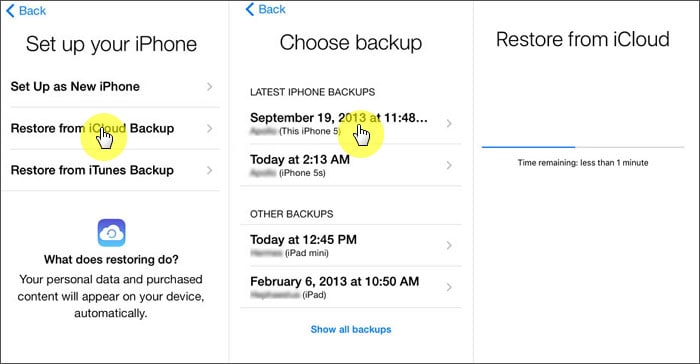
Step 2:Your device gets restarted soon after and you need to setup your device again in order to comply with the settings required to recover photos from iCloud. For a brand new device you need to configure the settings as soon as you turn your iPhone on for the very first time.
Step 3: During your device setup, click on ‘Restore from iCloud backup’ and use your iCloud credentials (Apple ID) for logging into your account. You will find a list of old iCloud backup files there. Pick the desired file that contains your photos and then let the system do the recovery action. It will take some time to restore all photos into your iPhone from the iCloud backup file.
Method 3: Download Photos and Restore from iCloud Library on Windows PC
You can recover pictures from iCloud and store them on your Windows computer. These photos along with videos will get downloaded from the iCloud Photo Library. The new photos and videos that you upload on your iCloud Photo Library then gets downloaded on your computer automatically, saving your manual intervention. The collection of photos and videos can also be downloaded year wise. Here are the steps to understand how to recover photos from iCloud.
Step 1: First of all download and install ‘iClouds for Windows’ on your windows computer.

Step 2:Now, launch the ‘iCloud for Windows’ and then sign in to your iCloud account. Next, hit on Options button available besides the Photos section to bring up the iCloud Photos Settings.
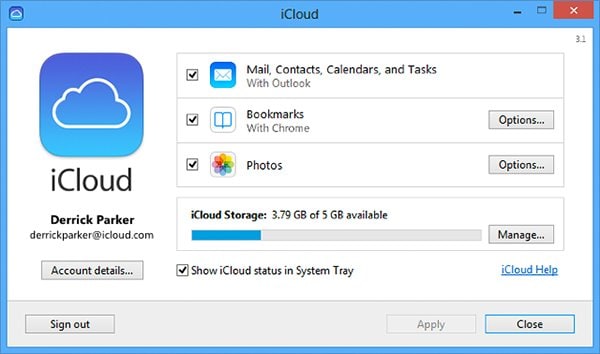
Step 3: Ensure that iCloud Photo Library is selected already. Now tap on ‘Done’ and then ‘Apply’.

In a short while your photos will be automatically downloaded to the ‘iClouds Photos’ folder. Lastly, locate your downloaded photos in the location specified under ‘iCloud Photos’ option.
Part 3: The Differece among the 4 iCloud Recovery Methods
Here in this section, we have brought to you a quick snapshot comparison of all the ways mentioned about ‘how to recover deleted photos from iCloud’ in this article. For your convenience, we have test all of the aforementioned ways on the basis of time efficiency, ability to preview data prior to restoration or recovery, ease of use and whether or not is there any chance of data loss using these methods. Go ahead take a look at the comparison table below.
| Features | dr.fone - Data Recovery (iOS) | iCloud.com Website | Full iCloud backup Restore | iCloud App for Windows |
|---|---|---|---|---|
Preview data before restoration/recovery |

|
|

|
|
Chances of Data Loss |
No Chance | No | Erases all data on device and restores the iCloud backup | No |
Restore corrupted, lost or deleted data |
|
|
|
|
Time efficiency |
Fast | Slow | Extremely Slow | Medium (depending on Wi-Fi speed) |
Elva
staff Editor