
iPad Is Disabled? Here's How You Can Unlock Disabled iDevice

Mar 08, 2024 • Filed to: Remove Screen Lock • Proven solutions
Though your iPad is disabled and you can’t seem to restore it, you can resolve the issue without much trouble. Even if Apple has come a long way by producing highly advanced iPad versions, there are times when users suffer from issues like iPad disabled forgot passcode. Since iPad are disabled whenever users cannot remember their passcode, they need to walk the extra mile to resolve this problem. To help you, we have come up with this extensive post to restore a disabled iPad in no time.
Part 1: Why did my iPad get disabled?
There could be plenty of reasons for your iPad to malfunction. Most of the time, the disabled iPad problem occurs when users cannot remember their passcode and have entered the wrong one several times. This resulted in the iPad disabled forgot passcode problem that requires some added measures to be resolved.
Though, the iPad disabled case can also happen if there is malware in your device. Additionally, if an iOS update has gone wrong or the device is running on an outdated iOS version, it can also cause this problem. Luckily, if your iPad is disabled, then you can fix it by following these suggestions.
Part 2: How to unlock disabled iPad with Dr.Fone - Screen Unlock (iOS)?
Dr.Fone has a dedicated tool to fix disabled iPad in seconds. The >Dr.Fone - Screen Unlock (iOS) can fix almost every major issue related to your iOS device without causing any damage to it. An easy-to-use application, it is known for its high success rate in the industry. The only thing you should pay attention to is that your data will be erased after unlocking.
Dr.Fone - Screen Unlock (iOS)
Get Rid of iPhone/iPad Lock Screen Without Hassle.
- Click-through process. Anyone can operate.
- Unlocks the disabled iPad. It can also remove the activation lock.
- Allows to factory reset your iPhone even when the passcode is forgotten.
- Fully compatible with the latest iOS version.
Step 1. Download Dr.Fone - Screen Unlock (iOS), launch the application, and select the "Screen Unlock" option to fix it if your iPad is disabled.

Step 2. Connect your iPad to the system and click on the “Unlock iOS Screen” button.
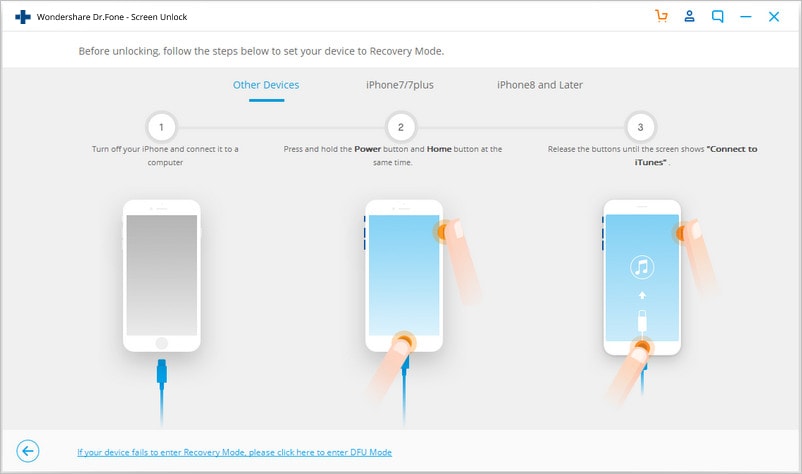
Step 3. Then, Dr.Fone will ask you to follow some steps to set your device in DFU mode, allowing it to be detected.
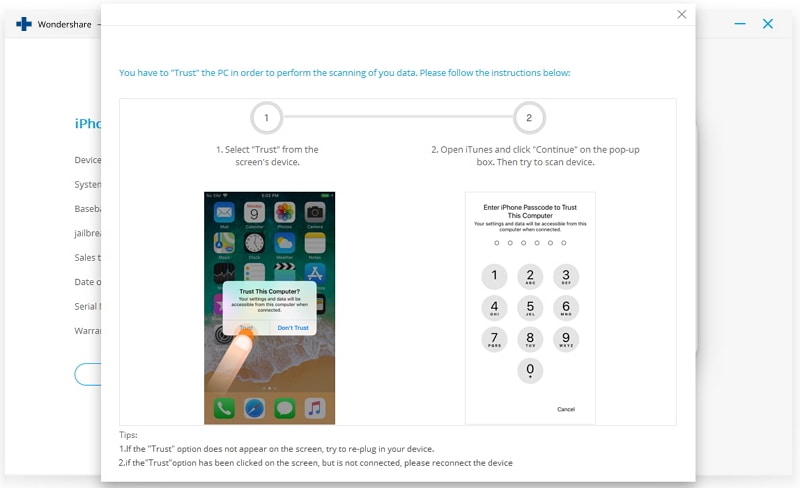
Step 4. As the system would detect your iPad, it will generate the “Trust this Computer” prompt. close it by tapping on the cross icon.
Step 5. To download the relevant firmware update, you need to provide some crucial information about your iPad.

Step 6. Click on the “Download” button and wait for a few minutes as the application downloads the relevant firmware update of your device.
Step 7. After completing the download, you can start the recovery process. Uncheck the option of “Retain Native Data” and click on the “Unlock Now” button.

Step 8. In addition to that, you need to confirm your choice by entering the on-screen confirmation code.
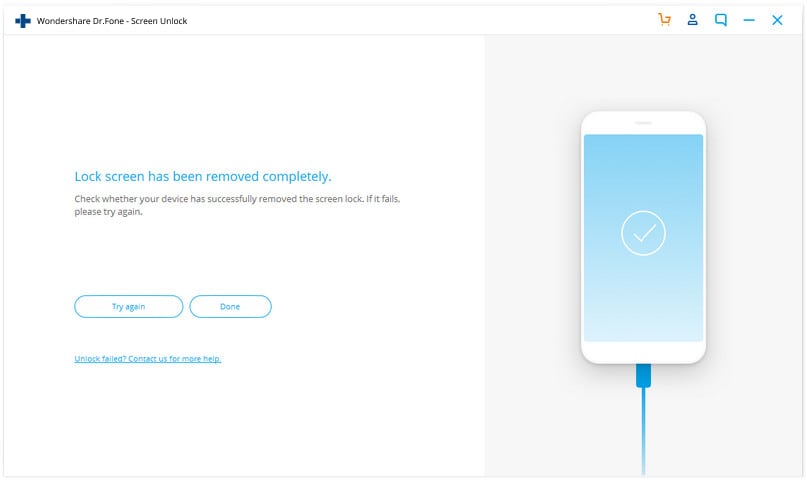
Step 9. Wait for a while as the application will resolve the iPad disabled forgot passcode problem and restart your device in the normal mode.
Part 3: How to fix iPad disabled with iTunes?
If you have previously synced your device with iTunes and have taken its backup, then you can go with this solution. Also, it is recommended for those users who haven’t activated the Find My iPhone feature of iCloud. To fix a disabled iPad, your device will be restored entirely. Therefore, you need to restore it from iTunes backup afterward.
1. Start by connecting your iPad to your system and launch an updated iTunes version on it.
2. Select your iPad from the devices option and go to its Summary page.
3. Click on the “Restore iPad” button and agree to the pop-up message to confirm your choice.

Part 4: How to fix iPad disabled with iCloud?
There are times when users don’t prefer using iTunes to resolve the iPad disabled forgot passcode problem. If you have enabled the Find My iPhone feature on your device and remember your iCloud credentials, then you can fix the iPad disabled issue in no time. All you need to do is follow these steps:
Step 1. Go to iCloud’s official website and log in using the credentials of your account (which is already in sync with your iPad).
Step 2. You can view various features on its home page. If your iPad is disabled, click on the “Find iPhone” option.

Step 3. From the next window, you can select the iPad you wish to unlock by clicking on the “All Devices” option.

Step 4. As it will display all the linked iOS devices, choose your disabled iPad.
Step 5. From here, you can choose to erase your iPad remotely. This will restart your iPad by restoring it to factory settings.

Part 5: How to fix iPad disabled with Recovery Mode?
If you don’t remember the iCloud credentials of your account or haven’t synced your device with iTunes as well, this would be your last resort. By putting your iPad into recovery mode, you can use iTunes to restore it entirely. To unlock this disabled iPad, follow these instructions.
Step 1. Firstly, launch an updated version of iTunes on your system and turn off your iPad.
Step 2. Instead of restarting it, you need to press the Home and Power button simultaneously for another 10 seconds.
Step 3. Hold the buttons till the Apple logo would appear on the iPad’s screen. Keep holding the Home button and let go of the Power button.
Step 4. This will display an iTunes symbol on your iPad screen. This means your iPad is not in recovery mode.

Step 5. Connect it to your system and let iTunes detect it.
Step 6. As iTunes will detect your device in recovery mode, it will display the following prompt to restore the device.
Step 7. Confirm your choice by clicking on the “Ok” button and let iTunes fix your disabled iPad by restoring it.

When you know how to proceed when your iPad is disabled, you can easily fix it without much trouble. We recommend going with Dr.Fone - Screen Unlock (iOS) out of all the provided options. It can fix the iPad disabled problem with various other issues related to your iOS device in minutes. Go ahead and give this remarkable tool a try and let us know about your experience in the comments below.


iPad Unlock
- Activation Lock Unlock
- 1. Bypass Activation Lock on iPad
- 2. Bypass iPad iCloud Activation Lock
- 3. Unlock an iCloud Locked iPad
- 4. Bypass iPad iCloud Activation Lock
- 5. iPad Stuck On Activation Lock
- 6. Reactivate iPad after iOS Upgrade
- 7. Remove iPad Activation Lock
- Apple ID Remove
- iPad MDM Unlock
- 1. iPad MDM
- 2. Bypass iPad MDM on iOS 16
- 3. MDM Bypass Tools for iPad
- 4. MDM VS. MAM
- 5. Jailbreak Remove MDM
- 6. Apple MDM
- 7. MDM Bypass on iOS 15/14
- 8. Remove MDM without Data Loss
- 9. Best MDM Bypass Tools
- 10. 10 Best MDM Solutions for You
- 11. Remove MDM from iPad
- iPad Screen Unlock
- 1. Unlock iPad without iPad Password
- 2. Unlock Disabled iPad without iTunes
- 3. Unlock Disabled iPad
- 4. Unlock iPad without Passcode
- 5. Fix locked iPad
- 6. unlock Passcode without Restore
- 7. Unlock iPad Without Passcode
- 8. Unlock iPad and Recover Data on it
- 9. Reset iPad Password
- 10. Reset iPad without Password
- Screen Time Lock
- ● Manage/transfer/recover data
- ● Unlock screen/activate/FRP lock
- ● Fix most iOS and Android issues
- Unlock Now Unlock Now Unlock Now
Alice MJ
staff Editor