How To Recover Deleted Voicemail iPhone [iOS 17 Included!]

Nov 16, 2023 • Filed to: Data Recovery Solutions • Proven solutions
It is not unusual for iPhone users to delete their voicemails accidentally or mistakenly after listening to them. This deletion could also be due to any recent update in the operating software, any virus attack, or a software crash. If you are facing the same issue and are trying to recover those voicemails for any reason, then don’t worry.
In this article, we’ll walk you through the process to recover deleted voicemails on your iPhone. You can get back those voicemails that you need to refer to later on by implementing some convenient methods.
Part 1. 3 Basic Methods to Recover Deleted Voicemail on iPhone
Deleting important voicemails can be frustrating when there is critical information at risk. Do not worry because we are providing you with various effective ways on how to recover deleted voicemails on your iPhone. Discover the following 3 techniques that can assist in the recovery of deleted voicemails on your iPhone.
Method 1. Using the Phone App
If your deleted voicemails have not passed thirty days of span, you are lucky in this context. iPhones are designed to save a deleted voicemail for up to 30 days after its deletion. However, you cannot recover your voicemail on your device after this time period. You can apply these simple steps for how to recover deleted voicemail iPhone:
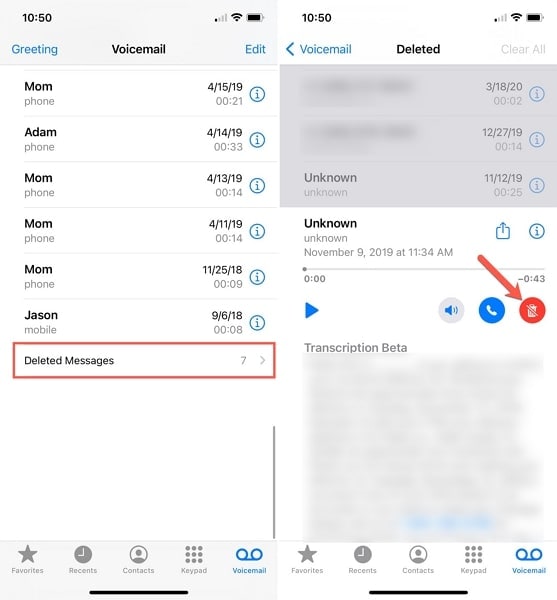
- Step 1: To begin with, you will have to turn on your iPhone and open the "Phone" app on it. Then, proceed to the "Voicemail" option down in the right corner of the app interface.
- Step 2: After doing that, continue to scroll down to the bottom of your voicemail and tap the “Deleted Messages” section. There, you will find all of your deleted messages within 30 days of span.
- Step 3: In the final step, proceed by tapping on the particular voicemail you want to recover. Details of the voicemail would open along with different options. You just have to tap the “Undelete” icon to get your voicemail back into your main voicemails.
Method 2. Restoring the iCloud Backup
If iCloud is enabled on your iPhone, your voicemails are automatically backed up when connected to Wi-Fi. It enables you to recover them in case of data loss or device problems. Here's how you can iPhone recover deleted voicemails using the iCloud Backup restoration feature.
- Step 1: Start by opening up "Settings" on your iPhone and continue to move into the "General" settings. From there, scroll down to reach the "Transfer or Reset iPhone" option and tap on it.
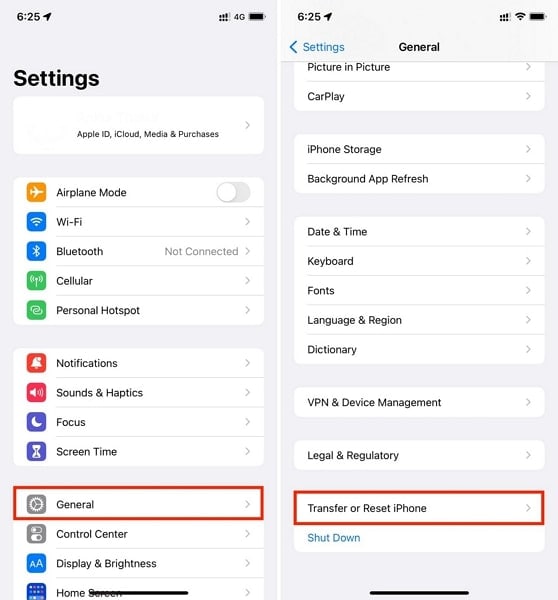
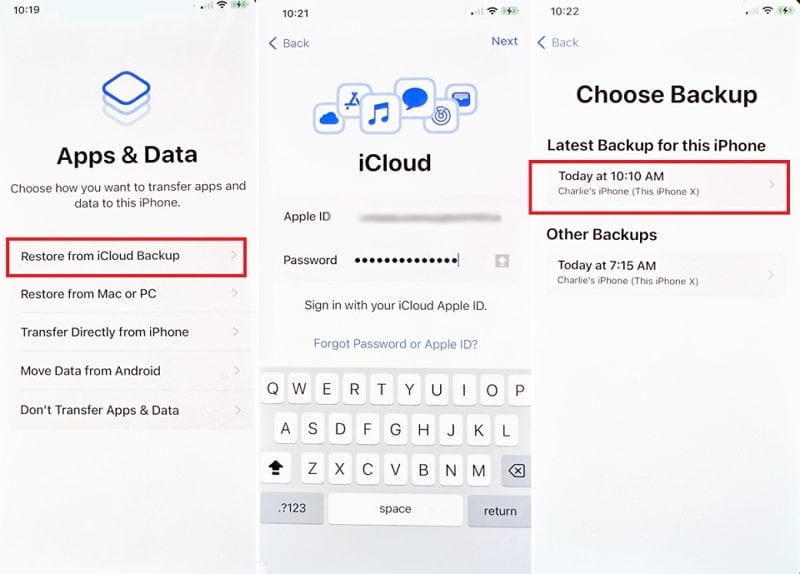
- Step 2: In the next step, tap the "Erase All Content and Settings" option and continue following the on-screen instructions to factory reset your iDevice. Once the process is complete, start setting up your device, and when you reach the "Apps & Data" screen, select the “Restore from iCloud Backup.” option.
- Step 3: To finalize this method, sign into iCloud with Apple ID and its password. Then select the desired iCloud backup from the backups with your voicemails and proceed with the "Continue" option.
Method 3. Use iTunes/Finder to Restore Backup
If you have saved your iPhone data to your PC or MacBook using iTunes/Finder, you can choose to recover the deleted voicemails. This useful iTunes/Finder function enables Apple users to store their device data on a separate device, offering an additional level of protection. Below is a simple guide on how to recover deleted voicemails on iPhone via iTunes/Finder.
- Step 1: In the beginning, proceed with connecting your iPhone to the computer via USB cable, followed by iTunes/Finder launching on the system. Then, you have to select your iPhone when it appears on it.
- Step 2: After that, continue with the "Summary" tab on the left side of the window. Here, move to the "Backups" section and go on to tap the "Restore Backup" option. The backup you choose should be the one with your voicemails in it.
- Step 3: As a final step, you need to choose the “Restore” option again, which will initiate the restoring process. After the process is complete, you can check your iPhone to see if the deleted voicemails are back in the voicemail box.

Part 2. How To Recover the Permanently Deleted Voicemail From iPhone – Wondershare Dr.Fone
There is no denying that backups are a great way to recover lost data. However, what to do if you have no backup with the desired voicemail? In such situations, you can use third-party data recovery tools for iPhone deleted voicemail recovery. When it comes to the best iOS data recovery tool, Wondershare Dr.Fone is acclaimed as the world's finest iPhone data recovery software.
Dr.Fone boasts a top-notch reputation for its exceptional success rate in recovering lost data. This versatile software can retrieve various types of data from iOS devices, iTunes, and iCloud. Users can count on it to recover deleted photos, WhatsApp messages, text messages, and up to 18 other data types. Moreover, Wondershare Dr.Fone is designed to be fully compatible with the latest iPhone models and iOS versions.
Key Features of Wondershare Dr.Fone
- With Wondershare Dr.Fone, you can recover selective data, and it also allows you to preview the files before recovery.
- It also allows you to restore the recovered data on your iOS device directly.
- This iPhone deleted voicemail recoveryapp provides a system repair feature to resolve 150+ iOS issues without data loss.
Steps To Recover the Permanently Deleted Voicemail From iPhone via Wondershare Dr.Fone
Wondershare Dr.Fone has a user-friendly interface for each type of user, so they can perform the data recovery action with ease. Here is how to use Wondershare Dr.Fone to recover deleted voicemails from your iPhone:
- Step 1: Proceed With the Data Recovery Tool
To start with, you have to open Wondershare Dr.Fone on your system. Now, from the "Toolbox" section, select the "Data Recovery" option. From there, you will have to select your smartphone OS by clicking the "iOS" option, as we are recovering voicemails from your iPhone.

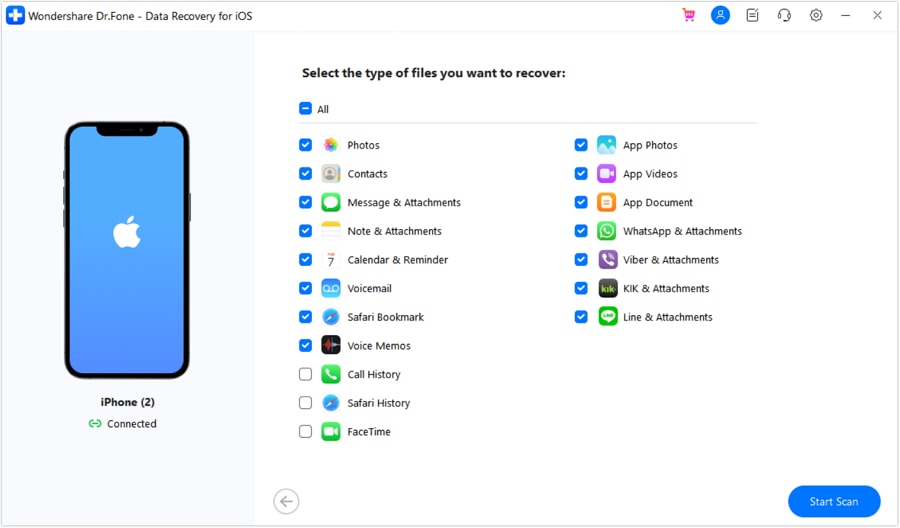
- Step 2: Initiate the iOS Recovery and Select Voicemail Option
In the following step, choose the "Recover Data from iOS Device" option to start the iDevice recovery process and connect your iPhone to your system. After that, you need to select the file types you want to recover, such as voicemail, and hit the "Start Scan" button on the bottom right of the screen.
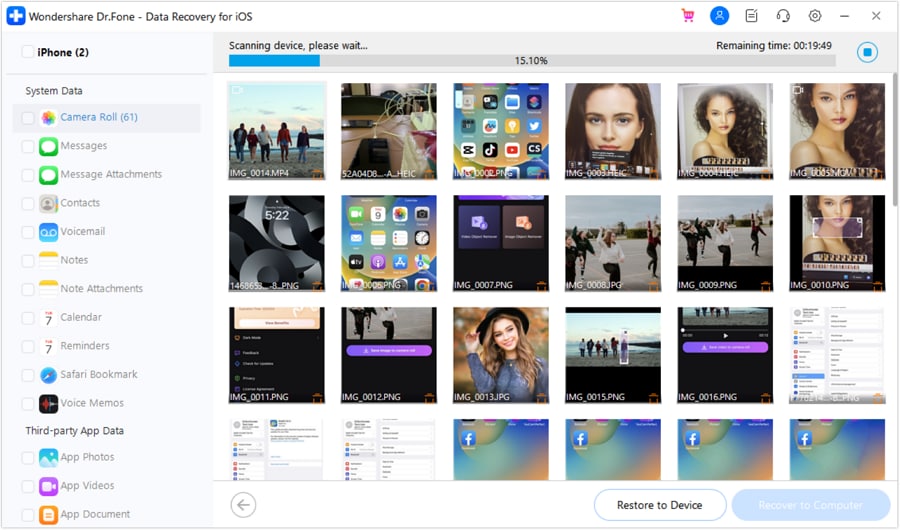
- Step 3: Complete the Voicemail Recovery Process
The scanning process will continue, and after that, you can preview and select the voicemail data you want to recover from your iDevice. Continue to press the "Restore to Device" button on the bottom if you want to send the retrieved voicemails directly to your iPhone. You also have the option to select "Recover to Computer" to create a backup of your recovered voicemails.
Conclusion
In a nutshell, iPhone users often face the issue of getting their voicemails deleted. It can occur either by accident or due to any unintentional mistake. But we have solved this issue by providing you with different methods to recover deleted voicemails on your iPhone. Needless to say, Wondershare Dr.Fone is the best solution among them to tackle this problem as it provides easy and simple steps.
Users with a variety of technical exposure can operate this easy-to-use software with much convenience. Moreover, Wondershare Dr.Fone does not take much time compared to the solutions mentioned above because it is a quick and fast solution to your problems.


iPhone Recovery
- Deleted Data Recover
- 1. Recover HEIC Photos on iPhone
- 2. Recover Deleted Calendar Event
- 3. Retrieve iPhone Deleted Reminders
- 4. Retrieve iPhone Deleted Voicemail
- 5. Recover iPhone Deleted Photos
- 6. Recover iPhone Deleted Note
- 7. Recover Call History from iPhone
- 8. Recover iPhone Deleted Contacts
- 9. Recover iPhone Voice Memos
- 10. Recover Deleted iOS Files
- iPhone Passwords Recover
- 1. Retrieve iPhone Email Password
- 2. See iPhone Saved Password
- 3. Access iPhone Password
- 4. Get iPhone Password Back
- 5. iPhone Passcode Requriement Pops
- 6. Find iPhone Wi-Fi Password
- iPhone WhatsApp Recover
- 1. Recover WhatsApp Messages Apps
- 2. Recover Deleted WhatsApp Messages
- 3. Recover WhatsApp Messages Online
- 4. Retrieve Deleted WhatsApp
- Recover from Stolen iPhone
- Recover from Broken iPhone
- 1. Recover Data from Broken iPhone
- 2. Water Damaged iPhone Data Recovery
- 3. Recover Data from Dead iPhone
- iPhone Recovery Tips
- 1. GT Recovery Undelete Restore
- 2. Recover Data from Memory Card
- 3. Recover iPhone Lost Data
- 4. Recycle Bin on iPhone
- 5. Recover Data on iPhone in Recover Mode
- 6. Recover Data from iPhone in DFU Mode
- 7. iTunes Data Recovery
- 8. Recover iPhone Data Without iTunes
- iPhone Recovery Tools
- ● Manage/transfer/recover data
- ● Unlock screen/activate/FRP lock
- ● Fix most iOS and Android issues
- Recover Now Recover Now Recover Now
Daisy Raines
staff Editor