4 Ways to Sync Contacts from iPhone to iPad Easily

Feb 27, 2024 • Filed to: Data Transfer Solutions • Proven solutions
One of the key elements within the Apple ecosystem is its capacity to synchronize data across various devices. In this age of interconnectivity, the importance of harmonizing contacts across multiple devices has emerged as vital. With the prevalence of iPhones and iPads, the demand for an efficient method to sync contacts between these two devices has surged.
For better contact management, the contacts syncing between iPhone and iPad is critical. This article discusses how do you sync contacts from iPhone to iPad. It will go through 4 effective methods to sync contacts from an iPhone to an iPad.
Part 1: Sync Contacts from iPhone to iPad Using Wondershare Dr.Fone
Wondershare Dr.Fone can be used to transfer contacts from iPhone to iPad/iPhone. You can back up iPhone contacts using Dr.Fone and then restore the contacts to the iPad without losing any data.
Wondershare Dr.Fone
Back up & Restore iOS Data Turns Flexible.
- One-click to back up the whole iOS device to your computer.
- Allow to preview and restore any item from the backup to a device.
- Export what you want from the backup to your computer.
- No data loss on devices during the restoration.
- Selectively restore any data you want.
- Supported the newest iPhone and Android phones.


Here's how to sync iPhone contacts to iPad:
- Step 1: Connect the iPhone to the computer
Launch Wondershare Dr.Fone on the computer and then select "My Backup" from among various options. Now, using a cable, connect the iPhone to the computer and then allow Dr.Fone to automatically detect your connected iPhone device.

- Step 2: Click "Back Up Now" to Back up
After the iPhone is connected successfully, Dr.Fone will automatically detect the file types in it. Click on "Back Up Now" to back up your iPhone.

The backup process will start and take a few minutes to complete depending on the volume of data to be backed up. Dr.Fone will display all the data that are supported after the backup is completed.

Now that you have backed up all the contacts on the iPhone and then restoring them to the iPad is the way to it.
- Step 3: Select Restore to Device
Once the backup is completed, connect your iPad using a USB cable. Select the backup file and hit "Restore to Device". It's as simple as it sounds, and anyone can back up your contacts and sync them to your iPad.

In addition to manual backup, you can also back up contacts on iPhone automatically.
How to back up contacts automatically and wirelessly?
Step 1: Click "Backup Preference" to set up the backup frequency and backup period.
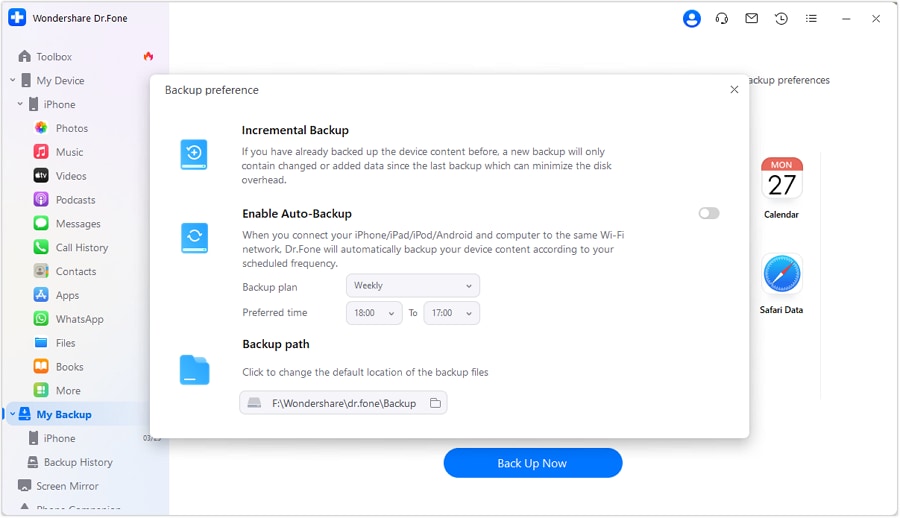
Step 2: Connect your iPhone and PC with the same wifi, the contacts on iPhone will be backed up automatically. You don't need to use a USB cable to connect the iPhone to the PC in this step. Next time, if you would like to back up contacts again, it will only be for newly added data or modified files, which helps you save storage space and backup time.
Step 3: Restore the backup file to iPad/iPhone. You can preview the backup data and select the data you want to restore.

Bonus Tip: Sync Contacts from iPhone to iPad with 1 Click!
Except the Phone Backup feature can help you sync contacts from iPhone to iPad easily, there is another tool that can also help you. If you have downloaded the Wondershare Dr.Fone, you may see this tool on the homepage, too. Yes! It is Dr.Fone - Phone Transfer.
Features of Dr.Fone - Phone Transfer tool:
- Easily share contacts and other types of data on iPhone to iPad/another iPhone.
- Just 1 click to transfer contacts to the iPad.
- Sync the data from iPhone to iPad within less than 3 minutes, the time of a cup of coffee!

Part 2: Sync Contacts from iPhone to iPad Using iCloud
If you're heavily invested in the Apple environment, choosing iCloud is the optimal route. It serves as a convenient tool for synchronizing contacts between your iPhone and iPad. Leveraging iCloud's powerful synchronization features, you can effortlessly maintain updated contact lists across all your Apple devices. Follow the simple steps outlined below to sync contacts from iPhone to iPad:
Step 1: After ensuring that the same Apple ID is logged in on both iPhone and iPad, first move to iPhone's Settings. Here, tap "Apple ID," and on the following screen, choose "iCloud." In the "iCloud" tab, move to the "Apps Using iCloud" section and ensure the "Contacts" app is toggled on. Afterward, transfer to your iPad and access the device's Settings.

Step 2: Within the Settings app, tap "Apple ID” and follow it by pressing "iCloud" on the following screen. Here, move to the "Apps Using iCloud" section and toggle on the "Contacts" app. Wait a few moments, and your contacts will be synced across devices.

Part 3: Sync Contacts from iPhone to iPad Using AirDrop
AirDrop is a convenient feature native to Apple devices. It presents a convenient wireless solution for seamlessly transferring contacts between an iPhone and an iPad. With its user-friendly configuration, AirDrop enables the easy sharing of diverse data, including contacts, among nearby Apple devices. Follow the instructions below for how do I sync contacts from iPhone to iPad using AirDrop:
Step 1: Begin by ensuring that Bluetooth and Wi-Fi are enabled on both iPhone and iPad. Afterward, access Control Center by swiping down from the top right corner of the device.

Step 2: Here, enable AirDrop and set its visibility to "Everyone." Now, open the 'Contacts' app on your iPhone, select the contacts you want to transfer and tap the "Share" button.

Step 3: Tap on "AirDrop" from the list of sharing options provided. After selecting "AirDrop," choose your iPad as the receiving device. A prompt will appear on your iPad to accept the incoming contacts. Tap "Accept" to initiate the transfer.

Part 4: Sync Contacts from iPhone to iPad Using iTunes/Finder
iTunes/Finder serves as a robust option for users who prefer a traditional and reliable method. It is a tested and trusted way of syncing data between their Apple devices. This software offers comprehensive backup and sync functionalities. That's why iTunes/Finder provides a secure and efficient way to transfer contacts from an iPhone to an iPad. Follow the steps below to sync your contacts using iTunes or Finder:
Step 1. Begin by launching the most recent version of iTunes/Finder on your computer. Connect your iPhone and navigate to the "Summary" tab by clicking the “iPhone” icon. Here, enable the "Sync with this iPhone via Wi-Fi" feature.

Step 2. Subsequently, disconnect the iPhone and link your iPad to the computer. In iTunes/Finder, select the “Device” icon and switch to the "Info" tab. Here, ensure that the "Sync Contacts" box is checked, and then choose either "All Contacts" or "Selected Groups."

Step 3. Once you have made your selection, click on "Apply" to initiate the contacts synchronization process. Upon completion, you can disconnect the iPad and access the synced contacts from your iPhone.

So, these are four ways in which you can transfer contacts from iPhone to iPad. Since these methods are the outcome of thorough research, all the methods are absolutely safe, and there is absolutely no data loss in the process. However, we would recommend Wondershare Dr.Fone, considering its robust and efficient working design. It is one of the best and most popular tools to transfer data from iPhone to iPad and offers an amazing overall experience with a simple interface and fast process. What's imperative is to ensure that you follow all the steps properly and that's all, there you have it; all the contacts on the iPad.


Other Popular Articles From Wondershare
iPhone Contacts
- Back up iPhone Contacts
- Manage iPhone Contacts
- 1. Export Contacts from iPhone
- 2. Manage iPhone Contacts
- 3. Find and Merge Contacts on iPhone
- 4. Share Contacts on iPhone
- 5. Get iPhone Contacts from iTunes
- 6. Export iPhone Contacts to CSV
- 7. How to Export iPhone Contacts to a VCF|vCards
- 8. Delete Contacts from iPhone
- 9. Full Guide on Managing iPhone Contacts
- 10. Print Contacts from iPhone
- 11. View iPhone Contacts on Computer
- 12. Edit/Delete/Merge Contact on PC
- Recover iPhone Contacts
- 1. Recover Deleted Contacts on iPhone
- 2. Recover iPhone Deleted Text Message
- 3. Recover iPhone Deleted iMessages
- 4. Recover iPhone Deleted Photos
- 5. Recover Permanently Deleted Data
- 6. FonePaw VS Dr.Fone
- 7. See Blocked Messages on iPhone
- 8. Recover Data from Dead iPhone
- 10. Recover iPhone Deleted Text Message
- 11. Recover Contacts Without Backup
- Transfer Contacts from iPhone
- 1. Sync iPhone Contacts to Outlook
- 2. Transfer Contact without iCloud
- 3. Transfer from iPhone to iPhone
- 4. Transfer Contact With/Without iTunes
- 5. Transfer Contact from iPhone to Android
- 6. Sync Contacts from iPhone to iPad
- 7. Export from iPhone to Excel
- 8. Transfer Contact from iPhone to PC
- 9. Copy Contacts from iPhone to SIM
- Transfer Contacts to iPhone
- 1. Android to iPhone Transfer Apps
- 2. Transfer from Android to iPhone
- 3. Transfer from Android to iPhone XS
- 4. Transfer from Huawei to iPhone
- 5. Transfer from Sony Xperia to iPhone
- 6. Transfer from Samsung to iPhone
- 7. Import Contact from Excel to iPhone
- 8. Import Contact from Gmail to iPhone
- 9. Import Contacts to iPhone
- 10. Sync Outlook Contacts to iPhone
- 11. Transfer Contact from PC to iPhone
- iPhone Contacts TiPs
Selena Lee
chief Editor