2 Methods to Transfer Playlists from iTunes to iPhone

Feb 26, 2025 • Filed to: Manage Device Data • Proven solutions
How do I transfer music from iTunes to iPhone?
Store huges of songs and playlists in iTunes library and want to transfer to your iPhone? It's not a big deal. You can do it yourself. This article shows you two easy ways to transfer playlists from iTunes to iPhone. One is to use iTunes, the other is to turn to an third-party tool for help.
Method 1. Transfer Playlists from iTunes to iPhone using iPhone Transfer Tool Dr.Fone - Phone Manager (iOS)
Dr.Fone - Phone Manager (iOS) is a professional music tool for music lovers, it can transfer music and playlists between any device, manage and organize your music library or iTunes library. It is a very good choice to tranfer playlists from iTunes to iPhone and manage your iOS devices without iTunes.
Dr.Fone - Phone Manager (iOS)
Transfer Music/Playlists from iTunes to iPhone/iPod/iPad without iTunes
- Transfer, manage, export/import your music, photos, videos, contacts, SMS, Apps etc.
- Backup your music, photos, videos, contacts, SMS, Apps etc. to computer and restore them easily.
- Transfer music, photos, videos, contacts, messages, etc from one smartphone to another.
- Transfer media files between iOS devices and iTunes.
- Support all iPhone, iPad, and iPod touch models with any iOS versions.


How to Transfer Playlists from iTunes to iPhone easily
Step 1 Connect the iPhone to the computer
First, install and run Dr.Fone - Phone Manager (iOS) on your computer. Use the USB cable that comes with the iPhone to connect the iPhone to the your computer. Choose the "Phone Manager" funtion, once it's connected, Dr.Fone - Phone Manager (iOS) will instantly detect your iPhone.
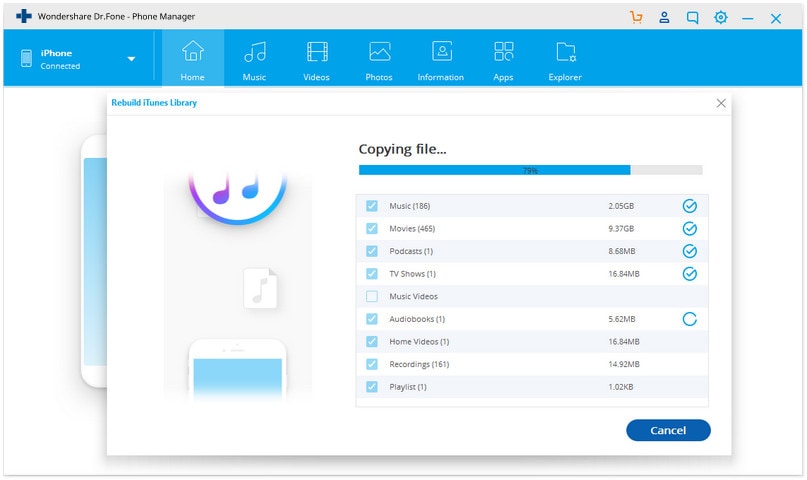
Step 2 Transfer playlists from iTunes to iPhone
Simply click "Transfer iTunes Media to Device".

Step 3 Check the playlists which you want to transfer from iTunes to iPhone. Then click "Start" to transfer to iPhone. It will begin the transfer of your iTunes playlist to your iPhone. During the transfer, make sure you keep your iPhone connected with your PC. Don't worry about losing music tags and album covers during transfering, Dr.Fone - Phone Manager (iOS) can add the losing music informations automatically.
Method 2. Transfer Playlists from iTunes to iPhone using iTunes
You can transfer playlists from iTunes to iPhone via iTunes, but you have to open the manual manage mode first: Settings > Summary > Options > Manuary manage music and videos.

The biggest problem with the way is that you must manage manually your iPhone vie iTunes in the furture. If you close the manual manage mode, all exiting content on the iPhone will be replaced with the content from your iTunes library. Now show you the steps to transfer playlists from iTunes to iPhone using iTunes

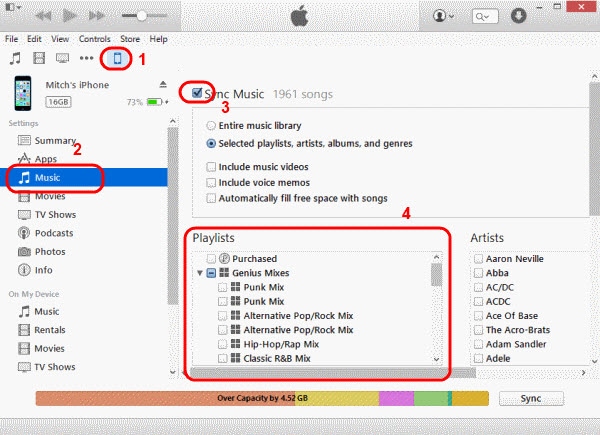
For iTunes 12
You have 2 options to transfer playlists from iTunes to iPhone. The Option 1 for iTunes 12 is below:
- Click the “Music” on the left pane.
- Tick the “Sync Music” check-box.
- Check the playlists you wish to sync.
- Select “Sync” and your playlist should sync.
The option 2 for iTunes 12:
- select the “Sync Music” check-box under device icon > “Music“.
- Click the music note icon located at the upper-left portion of the screen.

- Check the playlist(s)you wish to sync, then drag them to your device listed in the “Devices” section on the left pane. They will then sync to your device.

Note: If you drag a playlist which has existed in your iPhone to your device, it will be replaced to the one you are moving.

Related topics:


iPhone Transfer


Alice MJ
staff Editor