iPhone transfer
- iPhone transfer methods+
-
- Transfer Notes from iPhone to iPhone
- Transfer Photos from Phone to Computer
- Transfer iPhone Files via Bluetooth
- Sync iPhone Text Messages
- Transfer Music between Phone and Computer
- Backup iPhone Data without iTunes
- 5 Easy Ways to Add Contacts to iPhone
- How to Sync iPhone to Car Bluetooth
- Transfer Playlist from iPhone to iTunes
- Transfer Playlist from iTunes to iPhone
- How to sync Fitbit with iPhone
- Sync Outlook Calendar with iPhone
- How to Sync iPhone with Ford Sync
- Sync Facebook Contacts With iPhone
- Sync Outlook Contacts with iPhone
- How to Sync iCal with iPhone
- Best Ringtone Apps for iPhone
- How to Sync Ringtones to iPhone
- How to Sync Email to iPhone
- Transfer Movies to iTunes from iPhone or Computer
- Sync iPhone Contacts to Gmail Account
- iPhone to iPad+
- iPhone to iPhone+
- iPhone to Android+

• Filed to: iPhone Transfer • Proven solutions
I have been using both iPhone and Mac for more than 5 years now and have tried numerous ways to transfer videos from iPhone to Mac (or vice versa). Since Mac and iPhone are so seamlessly connected, users can easily move their data from one source to another. Not just native solutions, there are also third-party tools that can be used to copy videos from iPhone to Mac. After trying a handful of these methods, I have decided to pick the 9 recommended options. Read on and learn the best way to transfer videos from iPhone to Mac right here.
- Part 1: Transfer Videos from iPhone to Mac with dr.fone – Phone Manager (iOS)
- Part 2: Copy Videos to a Folder on Mac Using Image Capture
- Part 3: Import Videos Into Photos App On Mac
- Part 4: Copy Videos from iPhone to Mac by using AirDrop
- Part 5: Import Videos from iPhone to Mac using iCloud Photo Stream
- Part 6: Sync Videos from iPhone to Mac using iCloud Photo Library
- Part 7: Transfer Videos from iPhone to Mac with iPhoto
- Part 8: Get Videos from iPhone to Mac with Preview
- Part 9: Move Videos from iPhone to Mac with Email or iMessage
- Part 10: The Best Way to Transfer Videos from iPhone to Mac
Part 1: Transfer Videos from iPhone to Mac with dr.fone – Phone Manager (iOS)
To start with, I would like to introduce the best way to transfer videos from iPhone to Mac. Since dr.fone is a complete toolkit, its Transfer (iOS) application can be used as an iPhone data manager. It is a user-friendly and secure application that can move videos from iPhone to Mac in seconds. The interface will first let you preview the stored data, so that you can select the videos you wish to transfer. It can also help you transfer photos, music, contacts, messages, and more.

dr.fone - Phone Manager(iOS)
1-Click to Transfer Files between iOS and Mac
- dr.fone – Phone Manager (iOS) can transfer data between Mac and iPhone, iPhone and iTunes, and even iPhone and other smartphones.
- It is a 100% secure solution and would not access or store your data in between.
- The interface is extremely user-friendly and features different tabs for distinctive data types.
- It supports every leading video format like MOV, AVI, MPEG, FLV, 3GP, and so much more.
- Apart from videos, you can also transfer photos, audios, contacts, messages, etc.
- There is an inbuilt file manager that will let you access all kinds of data stored on your phone.
- Not just from Camera Roll videos, you can also move videos from third-party apps and other sources as well.
You don’t need to jailbreak your iPhone to use dr.fone – Transfer (iOS). Just download and install the tool on your Mac by visiting its website and follow these steps to get videos from iPhone to Macbook.
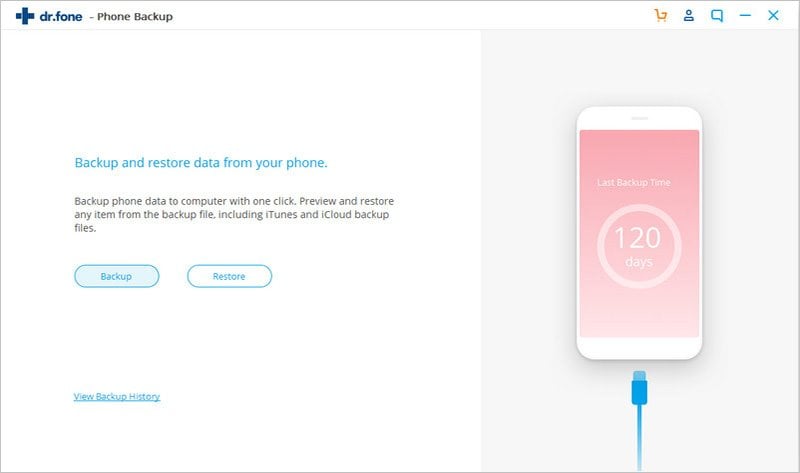
Step 1 Launch the dr.fone on your Mac and from its home, visit the “Transfer” module. Also, connect your iPhone to your Mac and make sure that the device trusts the system.

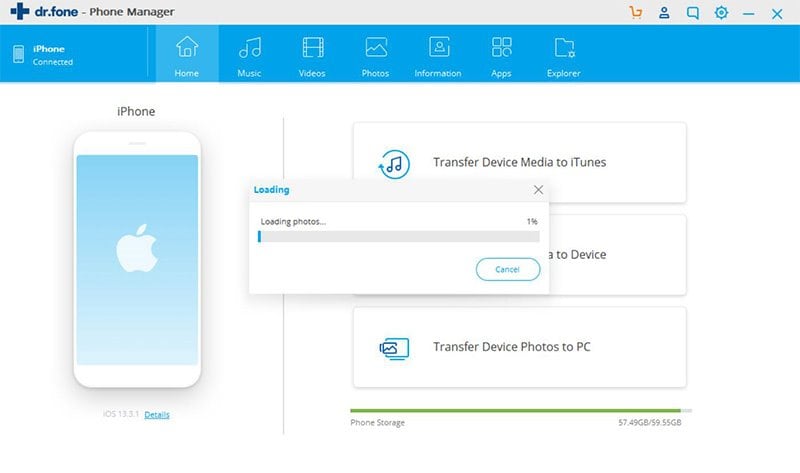
Step 2 Wait for a while as your device would be detected by the application as its snapshot would be provided. You can view some shortcuts on the screen and different data tabs. Visit the “Videos” tab from the main navigation bar to continue.
Step 3 Here, you can view all kinds of videos that are stored on your iPhone. These videos will be segregated into different categories and folders.
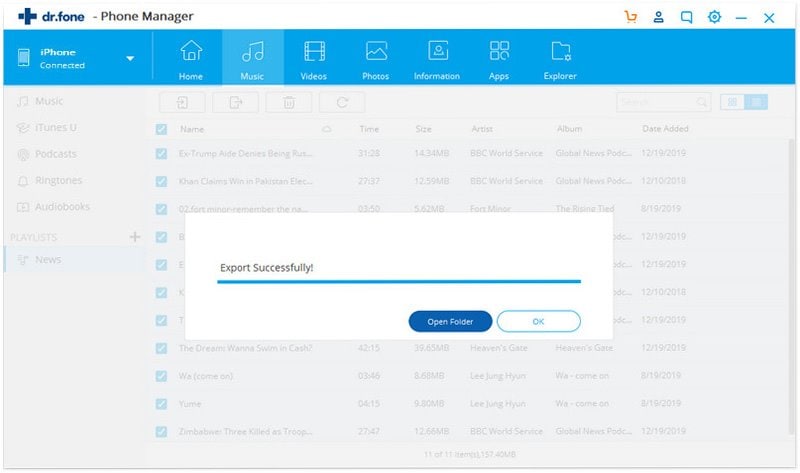
Step 4 You can preview the videos from here and select the files you wish to save. Once it is done, click on the export icon on the toolbox and select the option to export files to Mac.
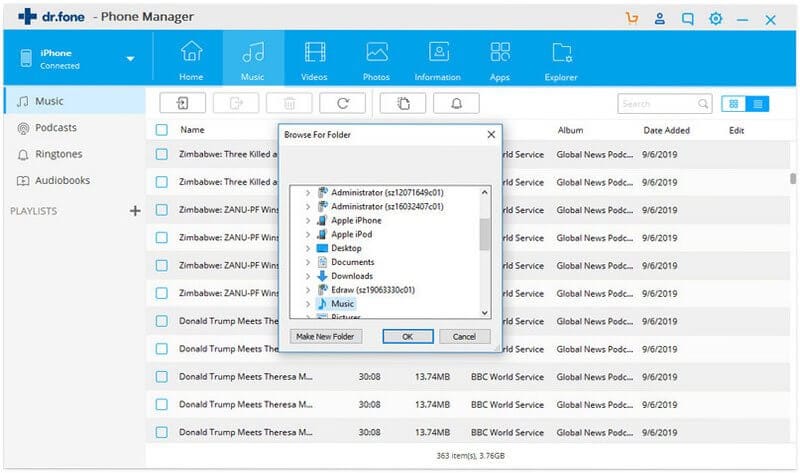
Step 5 Browse to the location where you wish to save the videos and start the process. It is recommended not to close the application in between.
Step 6 That’s it! Once the videos are saved, you can safely remove your iPhone and access the transferred videos on your Mac.
In this way, you can import videos from iPhone to Mac in minutes. The application can also be used to import photos, audios, contacts, and numerous other data files as well. You can also move data from Mac to iPhone too and even rebuilt your iTunes library from iPhone (without using iTunes).
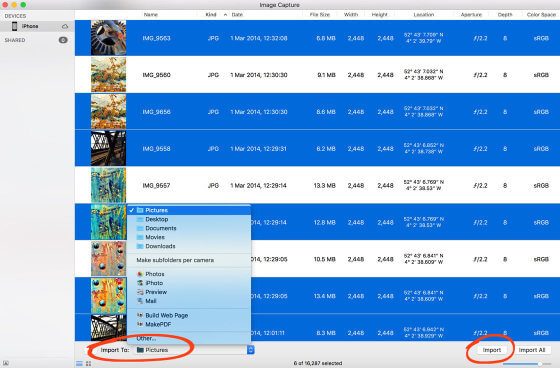
Part 2: Copy Videos to a Folder on Mac Using Image Capture
Image Capture is one of the most widely used native apps for Mac. It can be used to manage your photos and videos without much trouble. Using the native app, you can export videos from iPhone to Mac for free. Though, you can only access videos that are shot on your iPhone (from its Camera Roll). You cannot import videos from iPhone to Mac from third-party apps.
Step 1 To start with, connect your iPhone to Mac using a working cable and trust the system if you haven’t connected it before.
Step 2 Launch the Image Capture app on your Mac and wait for a while as your phone’s icon would appear on the left panel.
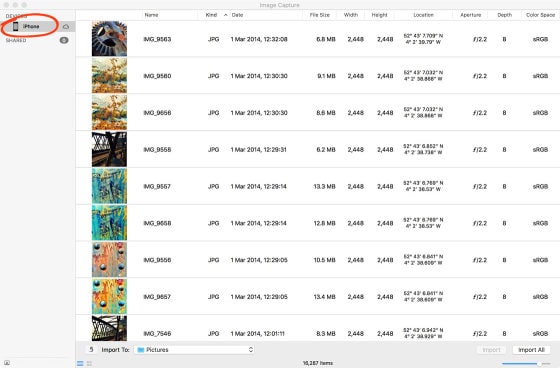
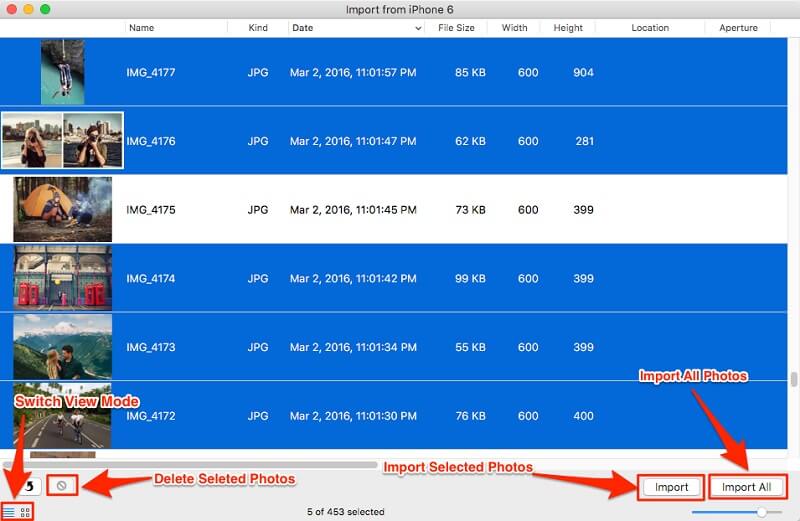
Step 3 Click on the phone’s icon to view its stored photos and videos on the right. Now, select the video files you wish you to move.
Step 4 In the end, click on the “Import” button to copy movies from iPhone to Mac that you have selected. To move all files in one go, you can click on the “Import All” button. Furthermore, you can select where you wish to save the videos from the “Import to” option.
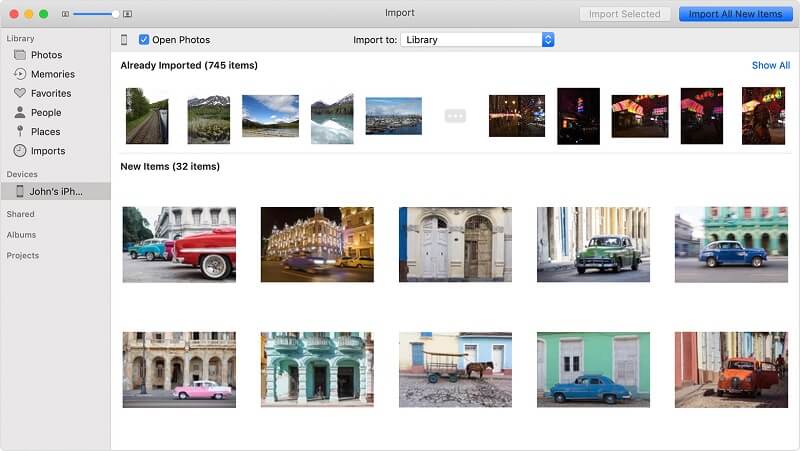
Part 3: Import Videos Into Photos App On Mac
This is another application that you can try to get videos from iPhone to Macbook. Though, the Photos app is mostly available on the newer macOS versions. Also, before proceeding, consider updating the iTunes version on your system as the Photos app only supports iTunes 12.5.1 and later versions. Once it is done, follow these steps to copy videos from iPhone to Mac.
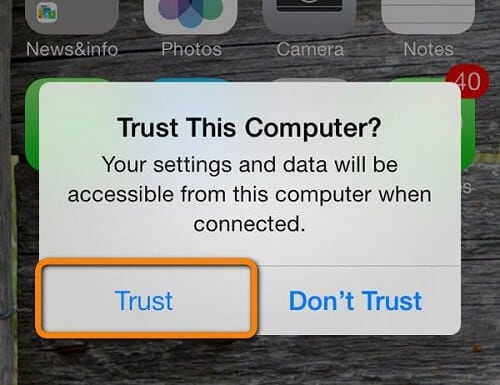
Step 1 Connect your iPhone to Mac using an authentic cable whenever you wish to move videos from iPhone to Mac. If you are connecting it for the first time, then unlock your device and tap on the “Trust” button.
Step 2 Once your device is detected, launch the Photos app on your Mac. Mostly, the app is automatically launched once iPhone is connected.
Step 3 Select your iPhone from the left and view the stored data on the right. You can find all the albums here to browse the stored videos.
Step 4 There is an option as “Import to” which will help you select where the imported videos would be saved on your Mac’s storage.
Step 5 In the end, simply select the videos you want to transfer and click on the “Import Selected” button to start the process.
Part 4: Copy Videos from iPhone to Mac by using AirDrop
If you wish to transfer videos from iPhone to Mac wirelessly, then this would be an ideal solution. You can easily connect your iOS device with Mac via AirDrop. Once the wireless connection is established, you can transfer videos, photos, notes, and other kinds of content too. While it might take slightly more time, you don’t have to go through the hassle of connecting your iPhone with Mac via a cable. Here’s how you can quickly sync videos from iPhone to Mac wirelessly.
Step 1 To start with, place both the devices in close proximity (less than 9 meters away) and turn on their Bluetooth and WiFi settings.
Step 2 Go to the AirDrop settings on your iPhone and turn it on. Similarly, click on Finder > Go > AirDrop to enable it.
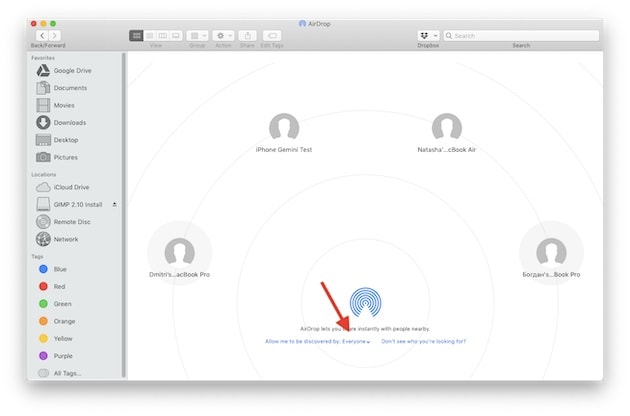
Step 3 On the AirDrop app on your Mac, you can see an option listed as “Allow to be discovered by”. Change it to “Everyone” to make your Mac visible. In the same way, change the visibility settings on your iPhone too.
Step 4 Once it is done, you can go to the Videos app on your iPhone and select the files you want to transfer.
Step 5 Tap on the share button and from the provided list of the available devices, select your Mac.
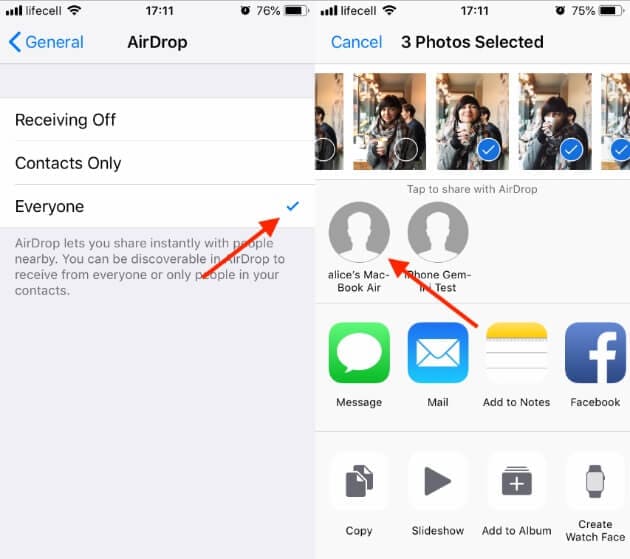
Step 6 As you would start sending videos, you will get a prompt on your Mac like this. Just accept the incoming content and save it on your Mac.

Part 5: Import Videos from iPhone to Mac using iCloud Photo Stream
If you are familiar with iCloud, then you can try My Photo Stream to transfer your videos from iPhone to Mac as well. This is an inbuilt feature in iCloud and can transfer the recent videos and photos (taken in the last 30 days). In this way, all the newly shot videos from your iPhone will automatically be available on the connected devices. Though, the quality of the videos might be compromised in the process. Also, the option is only available on macOS 10.7 and later versions. To copy videos from iPhone to Mac via Photo Stream, follow these steps:
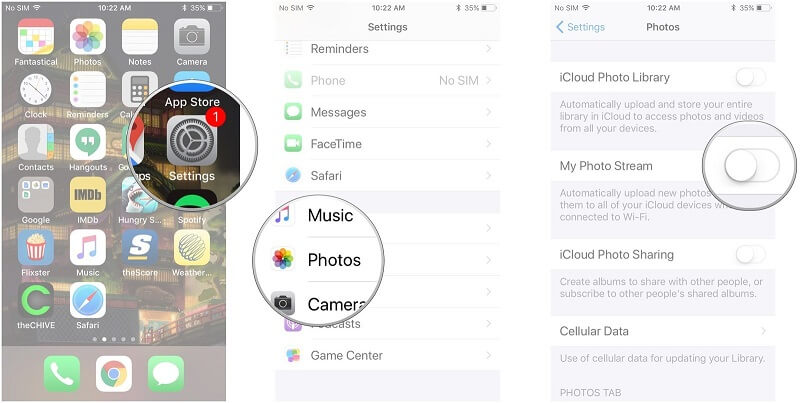
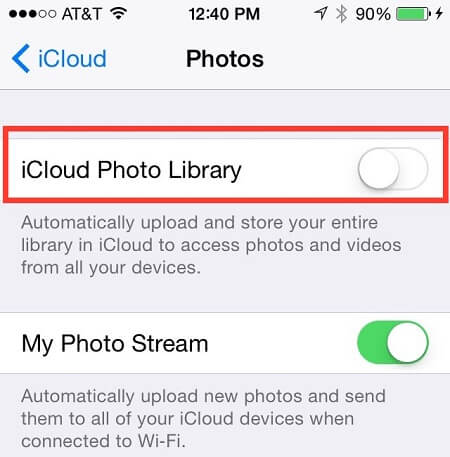
Step 1 To start with, unlock your iPhone and go to its Settings > Photos to turn on the “My Photo Stream” option. Just make sure that the iCloud sync option is already turned on.
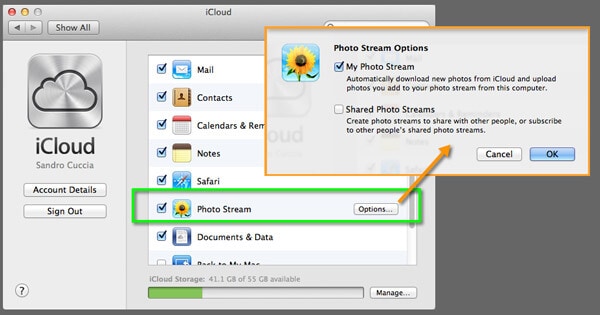
Step 2 Once it is done, launch the iCloud app on Mac and enable the Photo Steam option. You can also go to its Options and turn on the “My Photo Stream” feature.
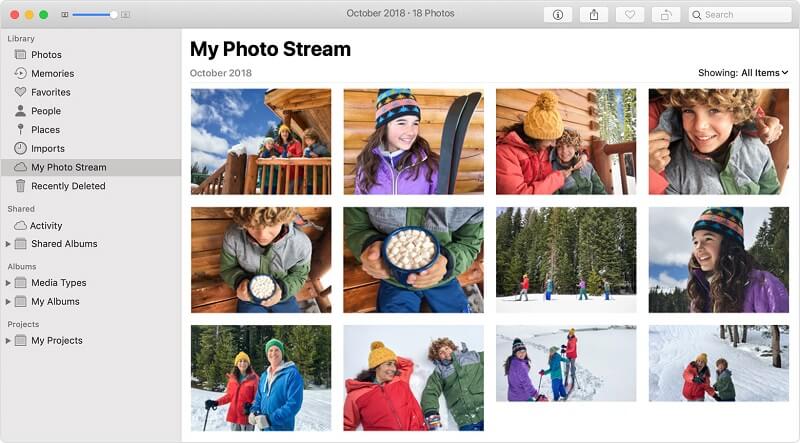
Step 3 Sit back and wait for a while as it will sync videos from iPhone to Mac. To view these videos, you can go to Photos > Albums > My Photo Stream. Here, all the synced videos can be accessed on your Mac.
Part 6: Sync Videos from iPhone to Mac using iCloud Photo Library
As you can see, iCloud Photo Stream doesn’t provide complete data transfer solutions. For instance, the video quality would be compromised and only the recent videos would be synced. To overcome this, you can take the assistance of iCloud Photo Library. This will upload all photos and videos from your phone to iCloud. Later, you can sync iCloud to your Mac to access your videos. Just make sure that you have enough space on iCloud as the free version only provides 5 GB of storage.
Step 1 Firstly, go to your iPhone’s iCloud settings and turn on the “iCloud Photo Library” option.
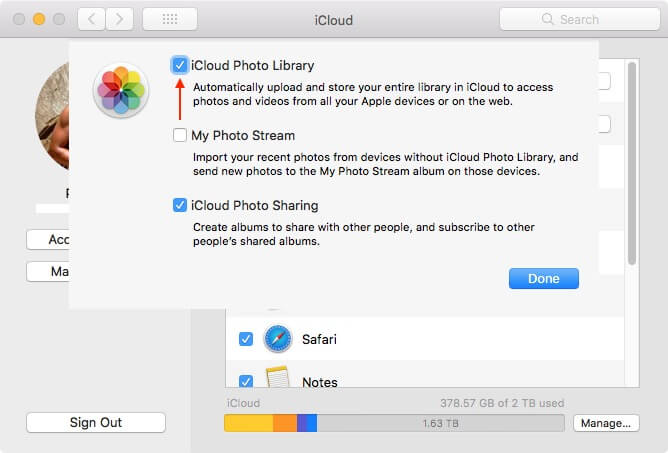
Step 2 After when your photos are uploaded, open the iCloud app on your Mac. Just make sure that your iPhone and Mac both are linked to the same iCloud account.
Step 3 Now, turn on the syncing option for Photos. Also, click on the Options button adjacent to it and enable the “iCloud Photo Library” feature from here.
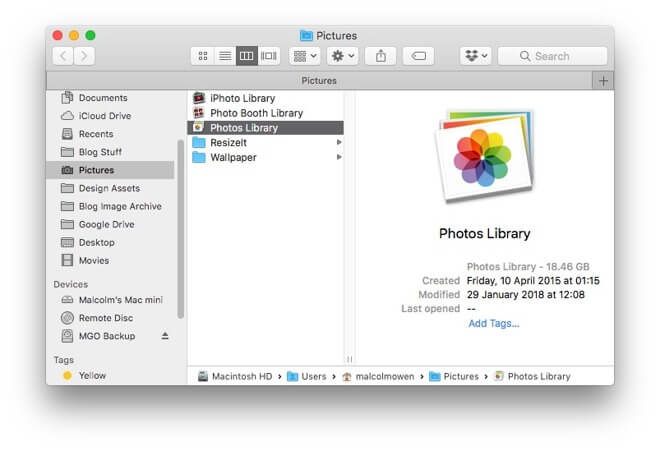
Step 4 Maintain a stable connection and wait for a while for your videos to be synced. To access them, go to the Pictures app on your Mac and visit the iCloud Photo Library album.
Part 7: Transfer Videos from iPhone to Mac with iPhoto
If you want to connect your iPhone and Mac wirelessly, then you can also take the assistance of the iPhoto app. Though, it can also be used when your phone is connected through a cable to your Mac. The iPhoto app has been a native solution to manage photos and videos on Mac for a while. To move videos from iPhone to Mac via iPhoto, follow this basic drill.
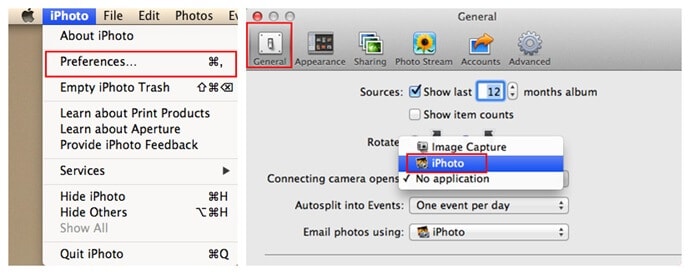
Step 1 To start with, go to the “Preferences” option of iPhoto and visit its General tab. Now, select iPhoto as the default app to connect media devices.
Step 2 With the help of WiFi direct, you can connect your iPhone to Mac. If needed, you can also use a lightning cable to connect your iPhone.
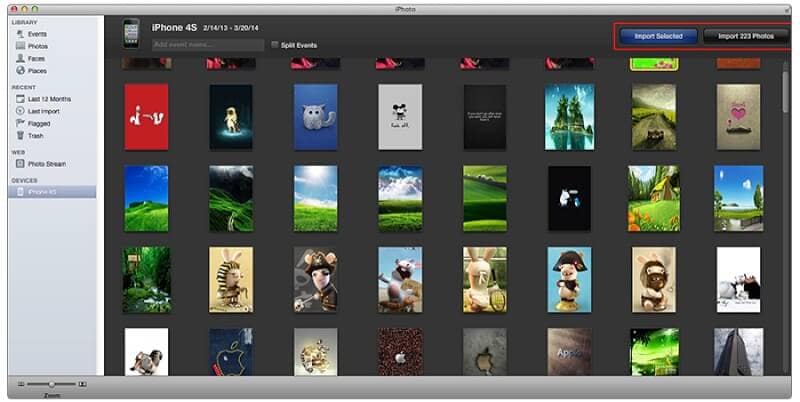
Step 3 The iPhoto app will automatically be detected after connecting your iPhone. If not, you can also launch the iPhoto app manually on your Mac as well.
Step 4 Select the connected iPhone and choose the videos that you want to move. Click on the “Import” button in the end to copy videos from iPhone to Mac.
Part 8: Get Videos from iPhone to Mac with Preview
As the name suggests, the app is used to get a preview of the connected device and to import media files to Mac. Therefore, if nothing else would seem to work, then you can launch the Preview app to import videos from iPhone to Mac. Though you should know this will only transfer videos that are stored in Camera Roll.
Step 1 Firstly, connect your iPhone to your Mac wirelessly or via a wired connection.
Step 2 If Mac won’t launch the Preview app, then you can open it manually. Now, you can view the stored photos and videos on iPhone’s camera roll.
Step 3 Select the videos that you wish to move and click on the “Import” button. To move all photos and videos in one go, you can click on the “Import All” button.
Part 9: Move Videos from iPhone to Mac with Email or iMessage
Lastly, you can just export videos from iPhone to Mac via email or iMessages as well. This is the most time-consuming and restricted technique. You need to select one video at a time that you wish to transfer. Also, it would take some time for your videos to upload (or download). Most importantly, email hosts have a limit of 20-25 MB per message, which will restrict the number of videos you can attach. If you wish to get videos from iPhone to Macbook via emails or iMessages, follow these steps:
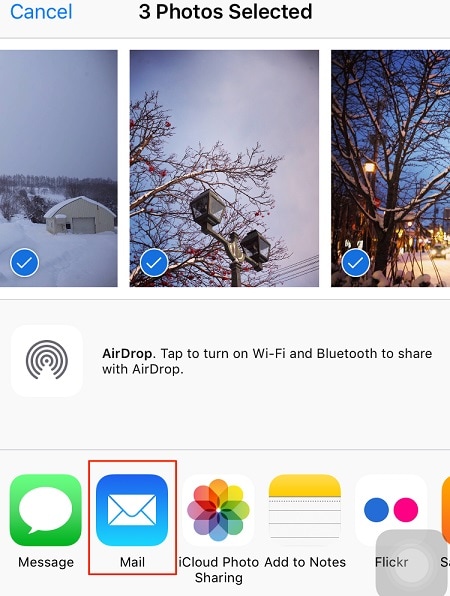
Step 1 Simply go to the native videos app on your iPhone and select the videos you wish to transfer.
Step 2 After making the appropriate selections, tap on the share icon. From the provided list, choose either the Mail or Message option.
Step 3 Enter the recipient number or email id and wait for your videos to be attached. In the end, simply send yourself the mail. Access your email on your Mac and download the attached video files.
Part 10: The Best Way to Transfer Videos from iPhone to Mac
We have discussed not one, but 9 different ways to copy videos from iPhone to Mac. To help you pick the best option, we have come up with this quick comparison.
| Features | Ease of use | Mode of transfer | Quality | Speed | Rating | |
| dr.fone – Transfer (iOS) | Users can preview their videos and transfer them selectively to Mac | Extremely easy to use | Wired connection | Original quality is retained | Ultra-fast speed | 9.5 |
| Image Capture | Selective transfer of videos (from Camera Roll) | Moderate | Wired connection | Original quality | Fast | 8 |
| Photos App | Will only transfer camera roll videos to Mac | Moderate | Wired connection | Original quality | Fast | 8 |
| AirDrop | Direct transfer of videos from iPhone to Mac | Easy | Wireless | Original quality | Moderate speed | 7.5 |
| Photo Stream | Transfer of the latest videos over iCloud | Moderate | Wireless | Optimized quality | Slow | 7.5 |
| iCloud Photo Library | Videos are uploaded to iCloud and synced across connected devices | Tough | Wireless | Optimized or original quality | Slow | 7.5 |
| iPhoto | Can transfer Camera Roll videos from iPhone to Mac | Tough | Wireless or Wired connection | Original quality | Moderate | 7 |
| Preview | It can transfer all or selective videos | Moderate | Wireless or Wired connection | Original quality | Moderate | 7 |
| Email/iMessage | Transfer videos of small size selectively | Tough | Wireless | Optimum quality Extremely time consuming | 6 |
After learning all these methods, you can easily copy movies from iPhone to Mac or other videos. As you can see, dr.fone – Transfer (iOS) provides the best way to transfer videos from iPhone to Mac. It is a user-friendly, secure, and highly professional tool that doesn’t require any technical experience. You can easily use it to manage your iPhone data and move it from one source to another like a pro.
Basil Rathbone
Editor