Mac Data Recovery
- Mac Data Recovery+
-
- Undo Empty Trash Mac (macOS Mojave Supported)
- Recover Overwritten Files on Mac
- Recover Lost Data on Mac after Upgrading to macOS Mojave
- How to Show Hidden Files on Mac
- Top 10 Mac Data Recovery Software Reviews
- How to Recover Deleted Files on Mac
- Recover Deleted Files on Mac Without Software
- How to Delete Partition on Mac
- Mac Hard Drive Recovery
- Top 6 Ways to Recover Deleted Photos on Mac
- Word Not Responding on Mac? Fixed Now!
- Recover Files from Recycle Bin or Trash Folder on Mac
- 5 Best Methods to Recover Deleted Word Files on Mac
- Effective Solutions for “Desktop Files Disappeared on Mac”
- Recover Overwritten Files on Mac
- Apple Email Recovery
- Free Mac Data Recovery+
- Mac Repair and Restore+
-
- Format FAT32 and NTFS Drives on Mac
- All You Need to Know about MAC Recovery Mode
- A Detailed Guide on Mac Repair [2019]
- How to Perform Internet Recovery on Mac
- How to Restore MacBook Pro?
- How to Restore Mac to Factory Settings?
- How to Restore Mac from Time Machine? [2019]
- How to Restore Mac and Get All of Your Files Back
- How to Boot Mac into Recovery Mode?
- How to Restore MacBook Air Safely Without Loosing Data
- How to Securely Do a System Restore on Mac
- How to Restore iMac without Data Loss
- Best Mac Recovery Partition App
- Best Way to Perform Disk Recovery on Mac
- The Best Mac USB Recovery Tool

• Filed to: Mac Recovery • Proven solutions
Most Asked Question – How to restore MacBook Air?
Many of you have been asking us the same question from a long time, how to restore MacBook air? And we are very eager to solve this query of our readers.
Restoring the MacBook Air isn’t a very tough task, but it isn’t very easy either, one wrong click and you will end up in the service centre with your MacBook. So, you need to be careful with it, and also, once you restore it, you will lose all the current saved data, especially your configured settings will be reset to default, so this should be a very calculated decision of yours. Once you restore the MacBook Air, you will not be able to undo it at any cost, and neither you will be able to get your files back without a MacBook recovery tool. So, stick with us till the end, as we tell you about the way to restore your MacBook Air, and we will also tell you about the tool you can use to recover your data once you have restored your MacBook Air.
Part 1. Why Do You Need to Restore MacBook Air?
So, you have finally decided to restore your MacBook Air? That’s great, it becomes necessary to restore MacBook Air after a time, or after facing a certain kind of issues with it. You might not be aware of all the benefits of restoring MacBook Air, or you might not be aware of the actual need to restore MacBook Air, and that’s what exactly we will be telling you about.
Let’s discuss the main needs and benefits of restoring MacBook Air.
- Improves Performance
The best thing it can do to your MacBook Air is to boost its performance. It will clean everything that is slowing your MacBook down and will bring its performance back on track, as it was when you brought it brand-new.
- Increase the Storage Space
As you already know that it will clean your MacBook, and that means it will also clean your drives, so that will result in empty drives to start over with. Now, when you again start recovering your data on Mac, you will not have the unwanted files.
- Bug and Virus Free Mac
We know that your iOS is one of the securest OS out there, but most secure doesn’t mean 100%. As you are using your MacBook air for a long time, it’s obvious that it might have many bugs and viruses resting inside, and they might be bringing your user experience down. Restoring MacBook Air will deep clean everything from your software and disk, thus, clearing out the bugs as well, and giving you better user experience.
- Make it new
The best use of restoring your MacBook Air is when you want to make it new or fresh, and want to restore it to default settings. That might be necessary when you are trying to sell your MacBook Air, or you want to clean it up totally and start from scratch.
Part 2. How to Take Backup Before Restoring?
It’s all good about restoring your MacBook Air, but only till you don’t lose your data, because if you lose your data, it will be serious trouble for you. One thing about restoring your Mac is that it is configured to erase all of your data, not a single file will be left after restoring, and that’s why it’s always recommended to backup all of your files and data from Mac before restoring. Now, there are multiple ways to back up your data on Mac, one of them being the best backup option for Mac, the Time Machine.
Step 1 Connect your MacBook Air with a large capacity external hard drive, with the help of a cable or the provided adapter.
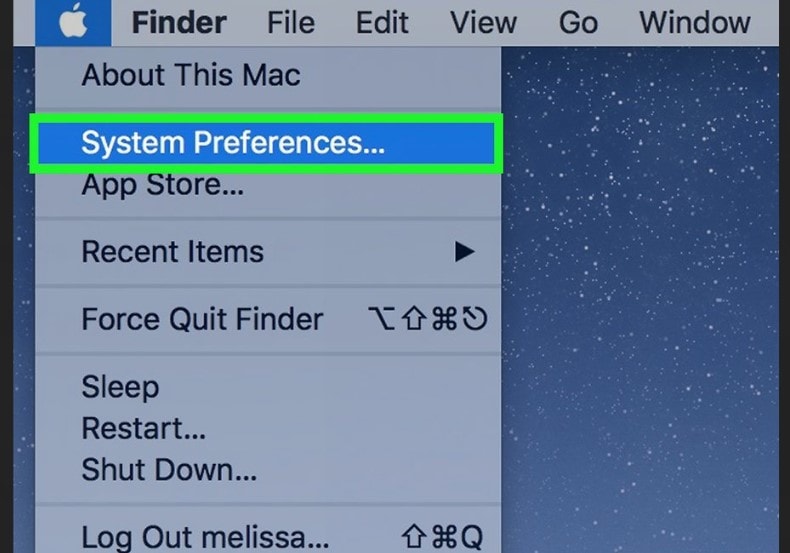
Step 2 Now, go to “System Preference” through the “Apple Menu”, and then in the new window, find the time machine app icon and click on it to enter the Time Machine.
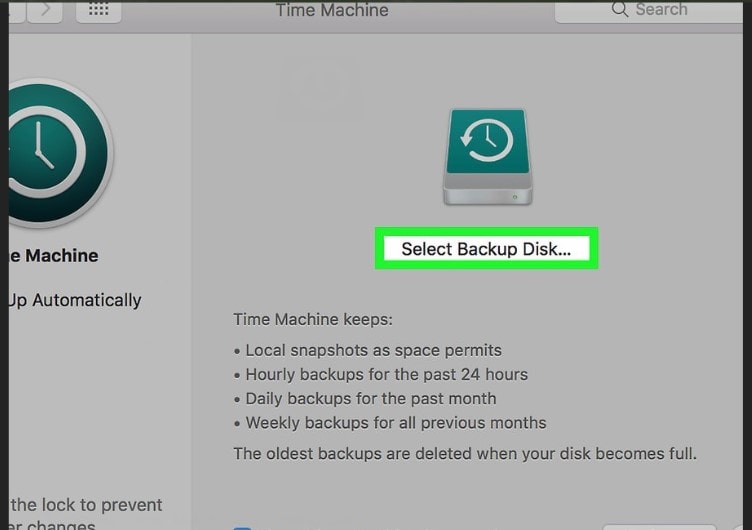
Step 3 Now in the Time Machine Window, if you see a switch under “Backup Automatically” section in the right panel, make sure it’s enabled, and in the left panel go to “Select Backup Disk”, and choose your connected hard drive from a popup window, and click “Use Disk”. If you want, you can configure it further by going into “options” from the main Time Machine Window.
This should be enough, give little time and Time Machine will automatically back up everything from your MacBook Air to the External hard drive, allowing you to restore your MacBook Air without any worries.
Part 3. Restore Your MacBook Air – The Easy Integrated Way
To restore your MacBook Air you don’t need to go anywhere, you can simply use an integrated method to do so, and that would be extremely simple. To be able to restore your MacBook Air once you are done with your backup and all, you can simply go through the steps below.
Step 1 At first, go to the “Apple Menu” on your MacBook Air, and click on “Restart” to initiate the Reboot process. Now, as soon the reboot process of your Mac completes and it Restarts, press and hold the “Command + R” keys for a while.
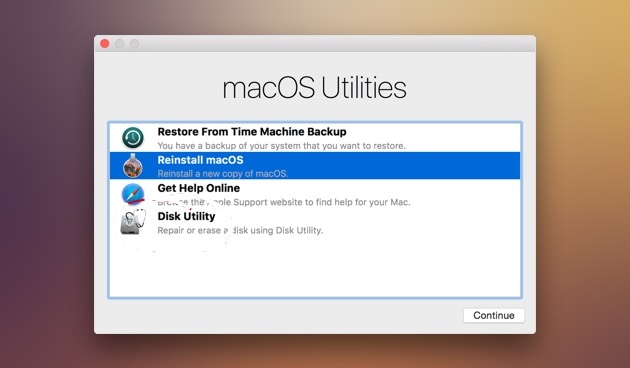
Step 2 After the command key holding step, you will see a “MacOS Utilities” menu appearing on your screen. The menu will consist of multiple options, click on “Reinstall MacOS”, this will initiate the downloading of all the required software, and will also initiate the system restore process. (Make sure that your Mac is connected to WIFI)
Step 3 If asked, insert your Apple login information to confirm the restore. Once done, your system restore of MacBook air should start taking place automatically. Once the MacBook Air is restored, you can restart your MacBook to see the changes, you will see your MacBook is back at its default state.
Well, following these steps carefully should bring back your MacBook Air to a new life, and we hope that you had the backup of your data on Mac. Because, if you didn’t have, then you have lost all of your data, and it’s not coming back until you know how to restore it.
Part 4. Recover Deleted Files from MacBook Air – Recoverit (IS) Tool for Mac
Well, it’s good that you have restored your MacBook Air to its default configuration and have boosted its performance. But isn’t it sad that you lost all of your important data and files, just because you forgot to backup your Mac? But don’t worry, even if you restored your Mac and have lost all of your data and files, you can still get them back. All you need to do to recover deleted files on MacBook Air is to perform MacBook Air Recovery, and we can tell you the tool which can help you to recover deleted MacBook files easily.
You can use Recoverit (IS) for Mac, it’s simply one of the best recovery tools out there for Mac, there aren’t many tools as powerful and as featureful as Recoverit (IS). It can recover all of your MacBook Air’s data in one go, and it will recover everything, as it guarantees a 98% recovery rate, which is the highest among the recovery tools right now. There are more than enough useful features in iSkysoft to convince you that you won’t get any better recovery tool than this.

Recoverit (IS) for Mac
The List of Some Great Useful Features:
- Tthe Recoverit (IS)y tool comes with multiple recovery modes to suit your different recovery needs. And “All Around Recovery” mode among those all modes will suit your need to all over recovery very well.
- It can recover each and every type of files for you. The Recoverit (IS) tool is powerful enough to recover deleted Images, Videos, Audio Files, Zip file, etc.
- It can recover from all kinds of devices and operating systems. The Recoverit (IS) tool is flexible enough to recover deleted files from MacBook Air, Windows, Android, Camera, External Hard Drives, etc.
- iSkysoft lets you choose which files you actually want to recover once the scanning is done; You can select specific files by identifying them through the previews.
- What makes it best is that even after so many features it brings to you, it still remains very easy and straightforward to use and to perform recovery. Recoverit (IS) for Mac is one of the easiest to use recovery tool, it has only a 3-step process.
How to Recover Deleted Files Using iSkysoft?
Step 1 Once you have downloaded the Recoverit (IS) for Mac from the official website, all you need to do is to install it like any normal program, and then run it. Once you are into the program, it’s only 3-step recovery process ahead.
Step 1 Now, when you are at the first window, you will see all of your MacBook Air’s drive or Partitions listed, if you have any external drive connected to your Mac, you will see that as well. Select the Drive on which you want to perform recovery, and click “Start”.
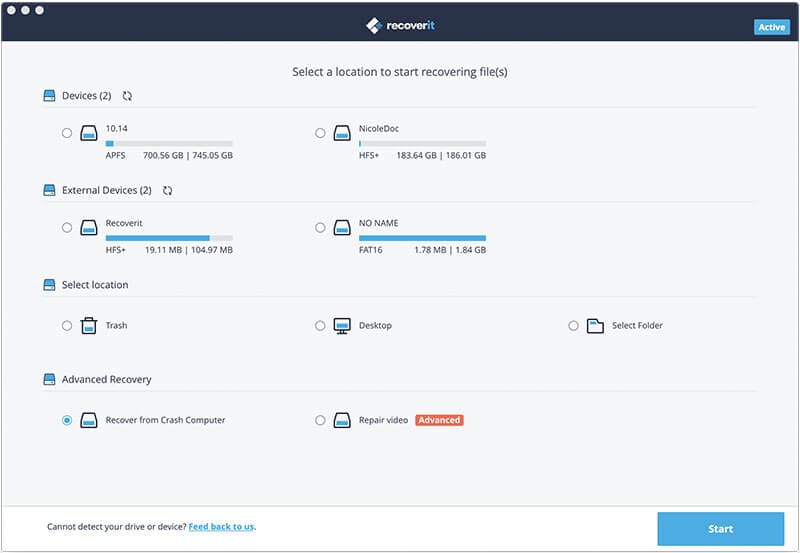
Step 3 As soon you click the “Start”, the program will initiate the scanning of your selected drive in terms of restoring deleted files on your MacBook Air. The scanning might take a few minutes, but once it’s successfully done, you will see a preview of all the files that the program has recovered from that drive. Now, you can simply go through the previews and find the files that you want to restore on your Mac, and then select all those files, and click “Recover”. Select the store location on your MacBook Air, and store all of your recovered files.

Just follow these three above-mentioned simple steps carefully, and you will be able to recover all of your deleted files on MacBook Air in one go. No hassle of getting files from different drives, and no hassle of recovering them one by one. Use iSkysoft and recover everything in one click.
Conclusion:
It’s good to restore MacBook Air from time to time. Restoring MacBook Air is very beneficial and keeps the performance of your MacBook Air fluid, especially if done after a particular time period. It isn’t hard to restore MacBook Air, it only takes 3-4 steps, but what’s difficult is to deal with the accidental loss of files during restoration, thus, you should know how to recover deleted files from MacBook Air. As we have recommended in this article, you can simply take the help from Recoverit (IS) tool, it will make your recovery work on MacBook Air very easy and effective.
Elva
staff Editor