Mac Data Recovery
- Mac Data Recovery+
-
- Undo Empty Trash Mac (macOS Mojave Supported)
- Recover Overwritten Files on Mac
- Recover Lost Data on Mac after Upgrading to macOS Mojave
- How to Show Hidden Files on Mac
- Top 10 Mac Data Recovery Software Reviews
- How to Recover Deleted Files on Mac
- Recover Deleted Files on Mac Without Software
- How to Delete Partition on Mac
- Mac Hard Drive Recovery
- Top 6 Ways to Recover Deleted Photos on Mac
- Word Not Responding on Mac? Fixed Now!
- Recover Files from Recycle Bin or Trash Folder on Mac
- 5 Best Methods to Recover Deleted Word Files on Mac
- Effective Solutions for “Desktop Files Disappeared on Mac”
- Recover Overwritten Files on Mac
- Apple Email Recovery
- Free Mac Data Recovery+
- Mac Repair and Restore+
-
- Format FAT32 and NTFS Drives on Mac
- All You Need to Know about MAC Recovery Mode
- A Detailed Guide on Mac Repair [2019]
- How to Perform Internet Recovery on Mac
- How to Restore MacBook Pro?
- How to Restore Mac to Factory Settings?
- How to Restore Mac from Time Machine? [2019]
- How to Restore Mac and Get All of Your Files Back
- How to Boot Mac into Recovery Mode?
- How to Restore MacBook Air Safely Without Loosing Data
- How to Securely Do a System Restore on Mac
- How to Restore iMac without Data Loss
- Best Mac Recovery Partition App
- Best Way to Perform Disk Recovery on Mac
- The Best Mac USB Recovery Tool

• Filed to: Mac Recovery • Proven solutions
Most Asked Question: "How to recover deleted documents or Word files on Mac?"
Well, the question related to the recovery of Word files on Mac, or about the Mac document recovery methods, have been filling up our comment section in the last few articles. So, we thought that we should answer it with an article only, and here is your answer.
Losing your Word files and other documents from Mac is becoming more and more common due to the increase in Malware attacks, faulty hardware, and accidental crashes due to bugs in the system. Other reasons for the loss of files might be accidental delete or interrupted transfer. Whatever might be the reason for the loss of your documents and files, it ultimately results in your loss, the documents that you just lost might be of very much importance. So, to stay out of such troubles, you should know the ways to recover deleted documents on Mac, so that even if you lose your files, you can instantly recover them without any loss.
There are plenty of methods you can use to recover Word files on Mac, some of them are integrated ways to do so, and some includes recovery tools to help you with Mac document recovery. We have listed all those best ways to recover Word files on Mac in this article. All you need to do is to select a method that you think will work best for you, and then follow the step-by-step procedure from the article to do a successful recovery. So, let’s get started with our first method.
- Method 1. iSkysoft Word File Recovery for Mac – Highly Recommended
- Method 2. Try to Recover the Deleted Word Files from Trash Bin on Mac
- Method 3. Try to Recover Lost Word Files on Mac from Temporary Folder
- Method 4. Try to Recover the Unsaved Word Files on Mac with AutoRecovery
- Method 5. Recover Deleted Word Files - Time Machine Backup
Method 1: iSkysoft Word File Recovery for Mac – Highly Recommended
Our very first method includes a recovery tool, and it’s probably the only method with a recovery tool in this article. It’s so because this recovery tool is good enough to fulfil all of your recovery needs, there won’t be any need to go for another tool once you try this.
The tool we are so confident about is Recoverit (IS) Tool for Mac. In recent times, it has proved to be the most reliable choice for the people in an extreme need for a recovery tool. iSkysoft for Mac comes packed with great features, Interactive UI, powerful scanning modes, easy to follow the 3-step method, and much more. You can simply recover anything with the help of iSkysoft recovery tool, and that too in the matter of few clicks. The other things that worth telling about it is that it carries the highest recovery rate of 98%, it’s higher than almost any recovery tools out there.

Recoverit (IS) for Mac
Features That Makes iSkysoft the Best Recovery Tool for Mac:
- You can use the iSkysoft tool to recover, Images, Audio Files, Video Files, Documents, ZIP files, App data files, and also to recover deleted Word files on Mac. It recovers all types of Data.
- iSkysoft tool for Mac allows you to recover data from all kinds of devices such as PC, Mac, Laptop, Mobile Phone, Hard Drives, USB Drives, Pen Drives, Digital Cameras, SSD, SD cards, and many more.
- iSkysoft supports more than 1000+ files types under different kinds of Data. Thus, you can recover all types of files.
- The tool comes with 2 scanning modes, a Quick scan mode, and a Deep scan mode. The two scanning modes help you to recover each and every file.
- The iSkysoft recovery tool comes in different versions for MacOS, Windows, and Android. You can use it on any OS to recover deleted Word files.
- It allows you to preview and select the files before you finally recover them so that you don’t recover any unwanted files.
- the iSkysoft toolbox is very affordable compared to other tools. It also comes with different types of Standard and Ultimate licence priced differently.
How to Recover Deleted Word Files on Mac Using iSkysoft?
Step 1 Download and install
Download the tool and simply install it, and once it’s installed, you can launch the software to proceed with the 3-Step recovery process.
Step 2 Choose the Storage Drive
On the main window, you will be required to select a storage drive on which you want to perform recovery for deleted word files on Mac. Choose a storage drive or partition among the many listed drives of your Mac, and click “Next” to proceed with the scanning. The program will scan the storage drive that you selected.
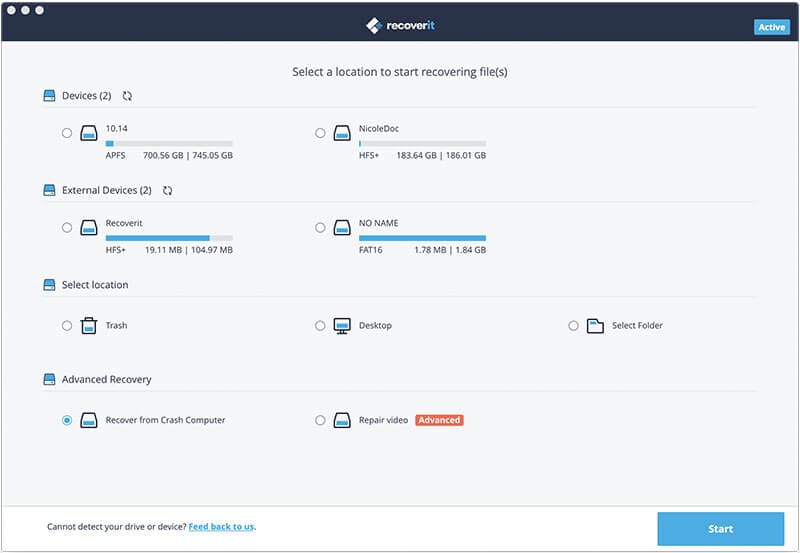
Step 3 Select and Recover Word Files
Once the program scans all the recoverable files present in your drive, it will allow you to preview all those files in a new window, the files will be sorted as per the names or dates. You can search through all the files for the Word files you want to recover on Mac. Once you find the word files for recovery, simply select all those files, and click the “Recover” button on the bottom of the window. You will be asked to choose a storage location on your Mac to finally perform the recovery. Choose a location and click “Ok”.

Method 2. Try to Recover the Deleted Word Files from Trash Bin on Mac
If you have accidentally deleted any documents from Mac, the possibilities are that it might be hidden inside the Trash Bin. Your Mac’s are configured in such a way, that anything you normally deleted will stay in Trash Bin for few coming weeks if you don’t delete them from Trash as well. Now, if the document files are in Trash Bin, you can simply follow the method below and retrieve deleted documents on Mac from Trash. Follow the Steps Below:
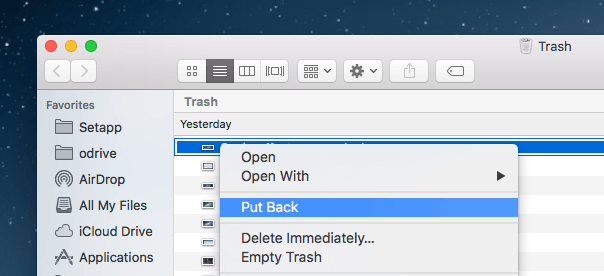
Step 1 To recover Word files on Mac from Trash Bin, first, go to your Home Screen of Mac, and then navigate to the Trash Bin located in the Dock of your Home Screen. Simply enter the Trash Bin by clicking on it, and then proceed with the next step.
Step 2 Once you are inside the Trash Bin, all the files that you have deleted till now or got deleted by you accidentally, you will see them in the bin. Now, try to find the Word files that you want to recover by going through the Trash Bin, or by simply sorting the files by their name of date.
Step 3 Now, once you have all the Word files to recover in front of you, you can do two things:
- You can simply select the Word files that you want to recover from Trash Bin, and then drag and drop them to the Home Screen.
- Or, you can select the Word files to recover, and then use the “Right Click” to get the drop down menu, and then select the “Put Back” option from the drop-down menu. This will recover Word files on Mac from trash and will put all the files back at their original place.
This method to recover document files on Mac from Trash can prove to be your lifesaver, but only if the files are there in the Trash Bin. There might be other cases in which you actually emptied the Trash Bin, or you had the Immediately Delete feature enabled on your Mac, which resulted in a permanent delete of your documents.
Method 3. Try to Recover Lost Word Files on Mac from Temporary Folder
If you are aware, your Mac has a Temporary Folder. The Temporary folder saves all of your recent works in case you forgot to save them, or if you were working on the files and system crashed. It keeps those files saved for a while. If you know the way to find the temporary folder on your Mac, and the way to recover lost Word files on Mac from that folder, then it shouldn’t be hard for you. Follow the Steps Below:
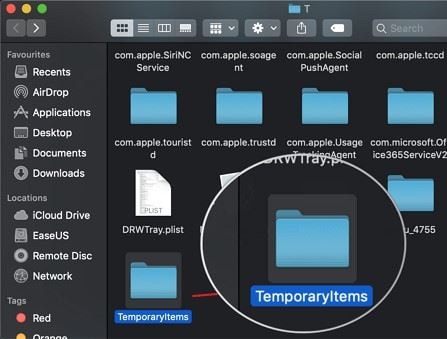
Step 1 To perform Mac document recovery, or recover word files on Mac from Temporary Folder. Go to the “Finder Window”, and click on the “Go” option you will see in the Finder menu. A drop-down menu will appear, in that menu, select the second last option stating “Go to folder”.

Step 2 Once you are in, you need to reach to the Temporary Folder by navigating via “Private > Var > Folder Path”, and then enter into the Temporary Folder. Once you are into the folder, try to find the files named as “Word Work File”. These are those temporary saved files that you are looking for.
Step 3 Once you find all the Word Work Files, you need to move or copy all of them to your Mac’s desktop. Once you have all the files on the home screen, you need to right click on any of those files and open them with Word for Mac.
Step 4 As the file will open, you will know that it’s the same word file that you wanted to recover or not. If it is the same word file that you want to recover, then, go to the “File Menu” on the top left if the Word window, and choose “Save As” option. Give the file a name that you want, as choose a location where you want to store it. Your word file will be recovered to Mac.
Note: If the Word Work File you opened with the Word for Mac, is not the same file that you want to recover, you are suggested to keep repeating the Step-3 and Step-4 with all the other Word Work Files that you copied to your desktop from the temporary folder, until you recover the Word file on Mac that you lost.
Method 4. Try to Recover the Unsaved Word Files on Mac with AutoRecovery
The similar, but more reliable alternative to the Temporary Folder method is the Auto Recovery Method. If you don’t know, your Word for Mac has a feature called AutoSave. The feature, if enabled, is meant to save the Word files you are working on automatically at a selected time interval. Those files get saved on your drive, so that, if you accidentally lose your Word files without saving them, you can recover Word files on Mac with the AutoRecovery process. Follow the Steps Below:
Step 1 To recover Word files on Mac with Auto Recovery, you need to go to the Finder Window on your Mac. Once you are into the Finder Window, select the whole Mac as the location by choosing “This Mac”, this will allow the files from the entire Mac to appear when you search for them.

Step 2 Now, in the search box on the top right corner of the window, type in “AutoRecovery”, and search for it. Once the search is done, you will see many files having the names starting with “AutoRecovery Save of”, and the name of the document being at the last part.
Step 3 Now, as you have all the files from AutoRecovery in front of you, try to find the Word files to be recovered. Once you have those Word files that you want to Recover, “double click” on those files.
Step 4 As soon as you double click on the file, it will open in the Microsoft Word. Now, to recover Word files on Mac, go to “File Menu” at the top left corner, and choose “Save As” from the options. You will be asked to give the file a name, and choose a storage location on your Mac, choose the location and click on “Save”. This will recover deleted Word file on Mac.
You can easily recover Word files on Mac with this AutoRecovery method, but only if you had the AutoSave option enabled in your Microsoft Word. If you didn’t have the AutoSave option enabled, your files won’t be automatically saved, and you will lose them in case of a system crash.
Method 5. Recover Deleted Word Files - Time Machine Backup
Unlike the other two previous methods, it’s not any kind of half backed trick to recover Word files on Mac. Your Mac comes with a backup tool called Time Machine; you need to use it to take a backup of all your important files so that you can restore them if you accidentally lost your files from Mac. So, if you had a backup of your lost Word files in Time Machine on your Mac, you can simply use Time Machine to recover deleted Word files on Mac. Follow the Steps Below:
Step 1 When you are on the home screen of your Mac, go to the Spotlight, and search for the Time Machine, once you see the icon of Time Machine in the results, just click on it to enter the Time Machine.
Step 2 Now, as you are in the Time Machine on Mac, you will see the back up of all of your files and folders that you have taken till date. Use the arrows keys to navigate through the files and folders, or simply search for the backup of Word files you are looking for by their names. Once you find the files, proceed with the next step.
Step 3 As you now have the lost document to recover on Mac in front of you under your Time Machine back up. Press and hold the “Command” key, and select all the Word files to recover on Mac or any other documents to recover on Mac. Once selected, click on the “Restore” button at the bottom of the window, and recover deleted Word files on Mac.

Bonus Tip: How to Avoid Word Files Loss on Mac?
- Keep the AutoSave Feature Enabled
The Microsoft Word has a built-in feature called AutoSave, which if enabled, will automatically save the files you are working on. So, in case you haven’t saved your file while you are working on it, and your Mac crashes without any prior sign, now, you are supposed to lose your unsaved files. But because the AutoSave option was enabled, it had saved the recent version of your files, so that you don’t actually lose it, and can recover Word file on Mac.
- Keep Your Mac Away from Malware Attacks
As your Mac stays connected to the internet throughout the day, it becomes very prone to any kind of malware or virus attacks, that can harm the data inside your Mac, including your Word files. So, keeping your Mac protected from such Malware attacks can be a good way to avoid data loss.
- Take instant action
To actually avoid data loss after you deleted your files accidentally, and to be able to recover Word files on Mac, you need to take instant action once you notice the loss of data. If you keep using your Mac, even after you have lost your files and will keep wasting time, the data of deleted files will get overwritten, and that will make it impossible for you to recover deleted Word files on Mac.
Conclusion:
We told you five good ways to recover Word files on Mac. All of these ways to recover deleted documents on Mac works very well in their particular needs. The 5 ways include two ways to recover deleted Word files on Mac which were somehow still inside your Mac, the one way that takes help from Time Machine is based on Backup and restore method. The very first and the best way is in which we have suggested you to use Recoverit (IS) for Mac and perform a proper Word recovery on Mac. This way ensures the recovery of all lost word files without any hassle, and also you get many features to configure your recovery process for more specific recovery. Also, other than just recovering deleted Word files on Mac, you can recover almost all of your deleted files.
Elva
staff Editor