
Boot Camp is an excellent tool for running Windows OS on an Intel-based Mac system. However, boot Camp partitions can eat up a sizable portion of your Mac's storage. Suppose you have stopped using it; you should know how to delete Boot Camp partitions. Below, we will show you how to do just that. Here is how you remove Boot Camp partitions on Mac.
In this article
What Is Boot Camp/Boot Camp Partition
Boot Camp originated when the PowerPC began transitioning to Intel-based Mac computers. One of the advantages of transferring to Intel’s architecture was that it was much smoother for Mac systems to run Windows. It eliminates the need for any emulation software or special programs.
Apple then took advantage of this by structuring a tool they called Boot Camp into macOS, enabling users to partition their boot drive and install Windows directly onto one partition. Using Boot Camp, they can boot directly into Windows through their Mac devices.
Boot Camp is the tool users use to run Windows OS on any Mac device. Boot Camp Assistant, meanwhile, is the tool used to create and promptly manage partitions. For example, using the Boot Camp Assistant, you can download a Windows ISO and install it on the partition you want, thus creating a Boot Camp partition. Please note that you need a license code for the version of Windows you want to install to use it.
However, there are a few disadvantages as well to using Boot Camp.
- Windows and its associated applications and files take up significant space from any Mac storage.
- You need to restart your system whenever you switch OS - from Mac to Windows, and vice versa.
Those who want to eliminate this nuisance may wish to remove the Boot Camp partition they once used or already exist within their devices. Later, we will discuss removing Boot Camp partitions in your Mac device.
Notice Before Removing the Boot Camp Partition From Mac
Before we even begin discussing how to remove Boot Camp partitions in your Mac, it is crucial to remember that you will lose content on the Windows partition once you remove it.
The uninstallation of Windows created using the Boot Camp assistant on Mac erases the whole partition and all its contents. All the documents, videos, photos, important files, sensitive materials, etc., will be erased permanently alongside the deleted Boot Camp partition. It will effectively return the once-occupied disk space and restore your boot disk as a single macOS volume.
Considering that, it is vital to back up the files you want to keep currently stored in the Boot Camp partition you wish to delete. Always double-check before taking any further steps.
You can back up files by running Windows OS, copying or dragging them to an external hard drive, or uploading them to any cloud storage for you to retrieve later. Remember that you should keep Boot Camp open while it repartitions your Mac. There is a significant chance that the partitions will be corrupted if you close them mid-process.
Now that you have been reminded of the steps you must first take before removing Boot Camp partitions, below are 3 ways to delete Boot Camp partitions from Mac devices.
3 Ways to Remove Boot Camp Partition/Windows From Mac
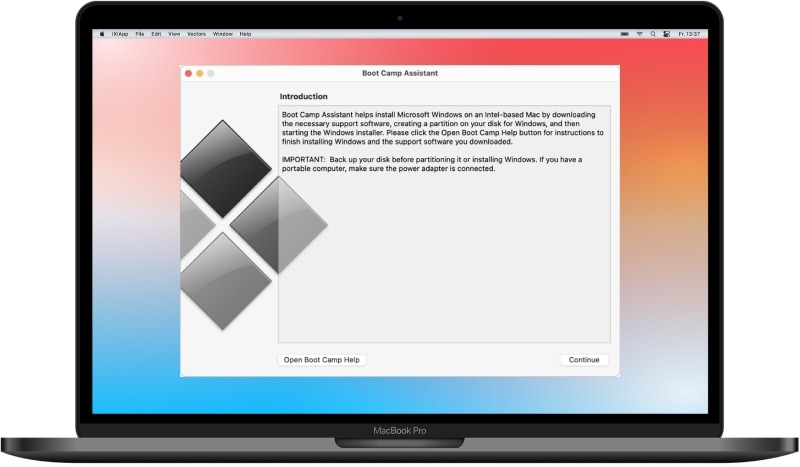
Way #1: Uninstall Using Boot Camp Assistant
Boot Camp Assistant is the first and usually the most common method people use to delete Boot Camp partitions on their Mac devices. Since Boot Camp Assistant is built into Mac devices, you should be fine accessing and promptly using it to remove Boot Camp partitions.
Here is how you remove the Boot Camp partition using Boot Camp Assistant:
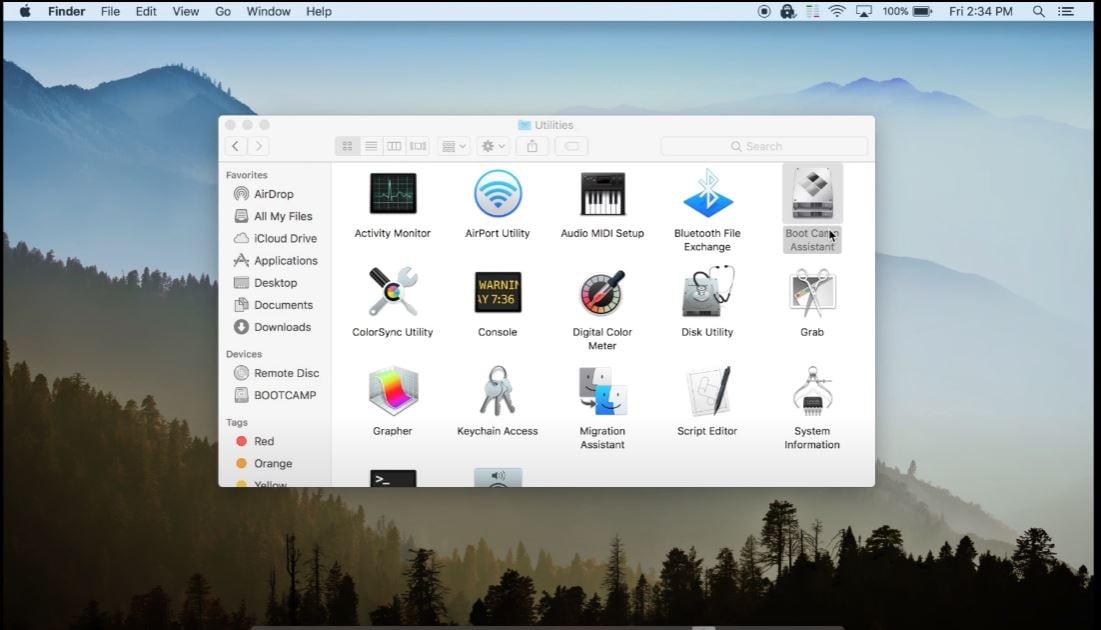
Step 1. Open your Mac device and search for Boot Camp via its Finder.
Note: Back up any data stored on the Windows OS or other partitions you may need before removing them.
Step 2. Close all running applications and log out all other users.
Open the Boot Camp Assistant, then click Continue.
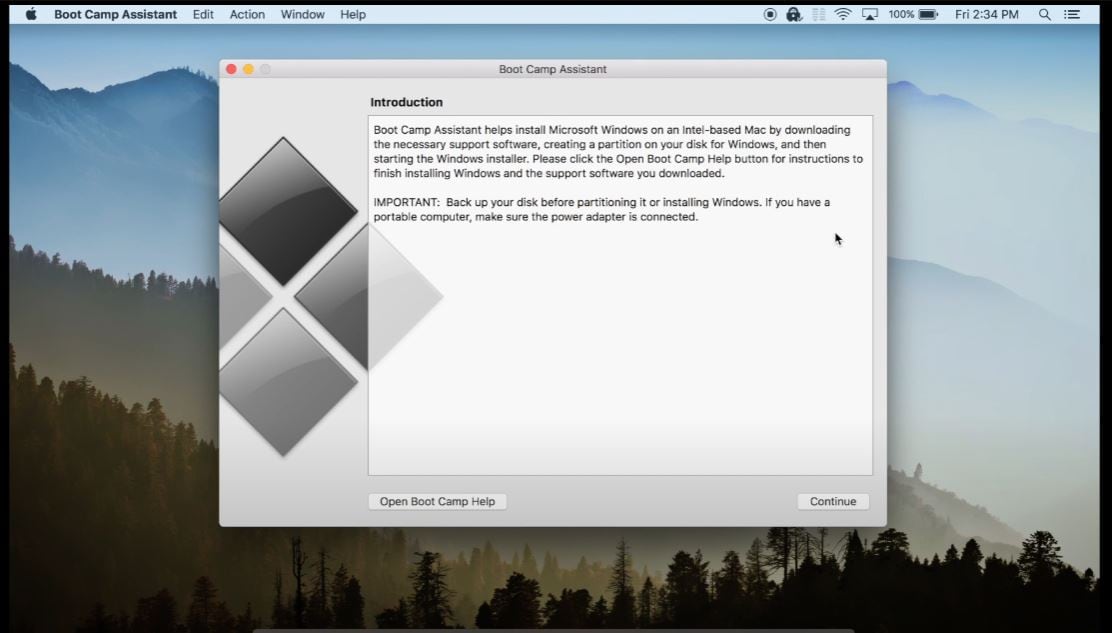
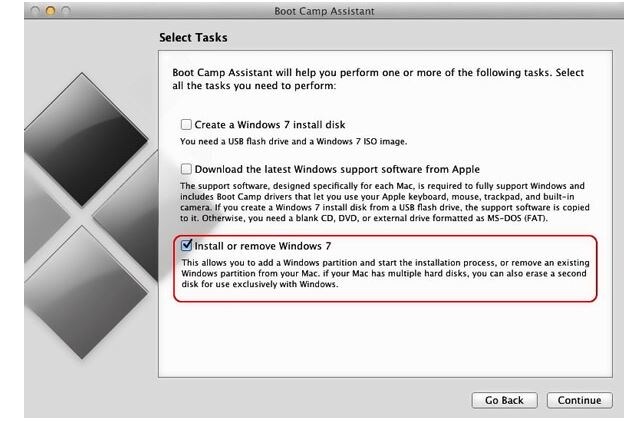
Step 3. When the Select Tasks prompt appears, click on Remove Windows 10 or later version before clicking Continue.
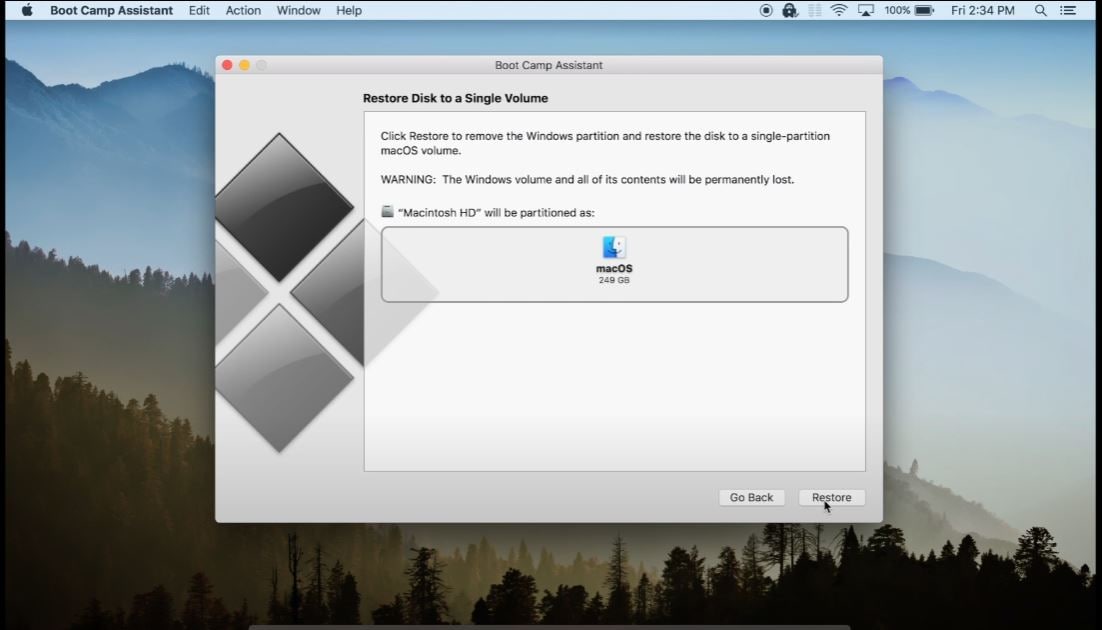
Step 4. Click Restore if your Mac device has a single internal disk.
Say that you have multiple disks; you would need to click Restore Disk to a Single MacOS Partition before clicking Continue for the last time.
Way #2: Delete Boot Camp Partition Using Disk Utility
With the Disk Utility, Mac's disk manager, you can opt for First Aid to repair disks, add, or delete volumes, restore, partition disks, and erase internal and external storage devices. You can also remove Boot Camp partitions using Disk Utility. Here's how to do it:
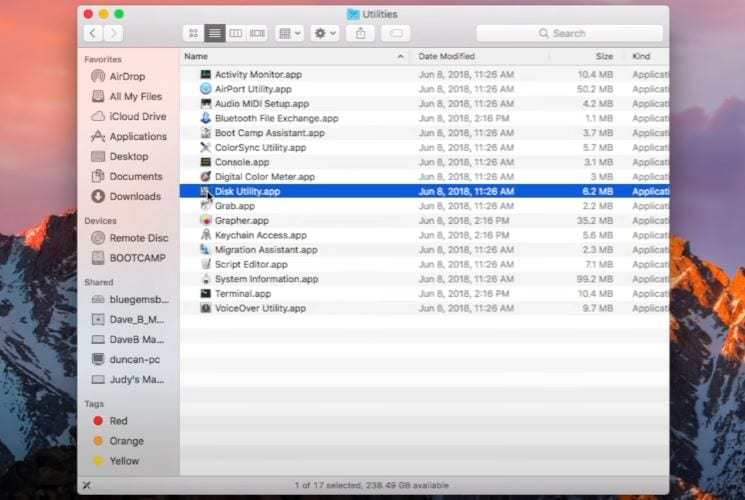
Step 1. Open your Mac device and run its macOS. Remember to close all unnecessary applications.
Then, open the Disk Utility on your Mac. Press command + spacebar to launch Spotlight, search for Disk Utility, and double-click to open it.
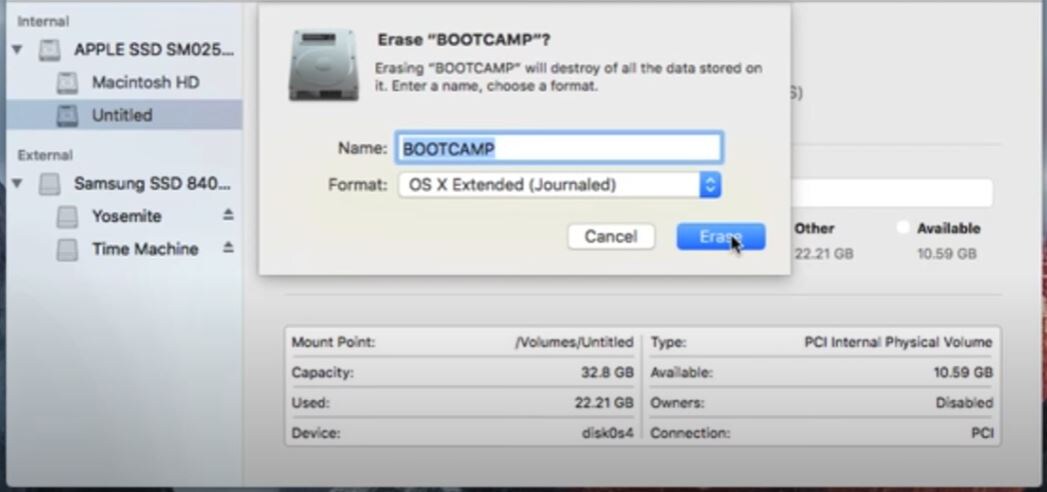
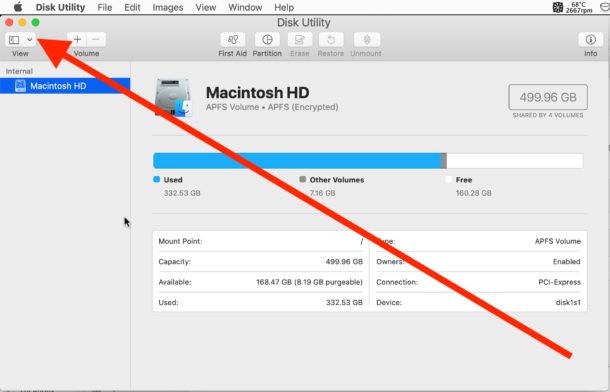
Step 2. Select the Boot Camp partition you want to delete on the left sidebar.
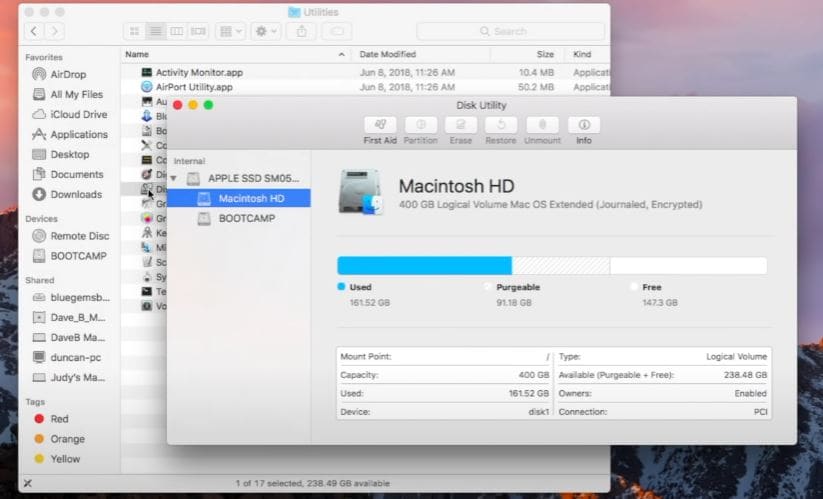
Step 3. Click Erase on the toolbar.
If the Erase button is greyed out, you may boot the Mac device in Recovery Mode and try repeating the same method. Then, choose the same Mac file system as the macOS partition, APFS, or Mac OS Extended.
Way #3: Delete Boot Camp Partition Using Terminal
The third and final option to remove Boot Camp partitions is via the Terminal on your Mac device. This method is the last resort for most people and is only done when all else fails because it involves running complex commands.
Below are the necessary steps to delete Boot Camp partitions via the Terminal:
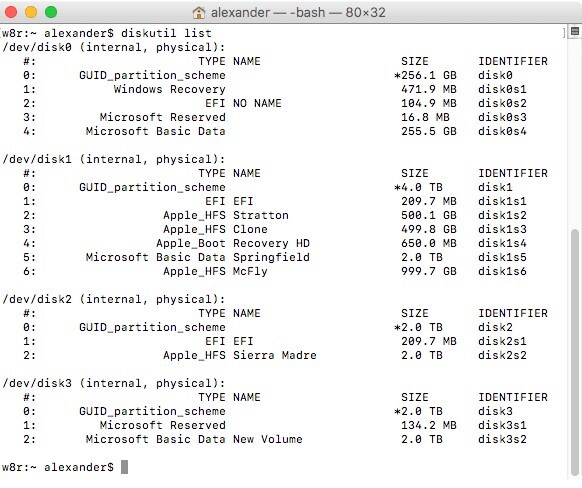
Step 1. Open the Terminal app on your Mac.
Press command + spacebar to launch Spotlight. When prompted, write the following command:
diskutil list
Step 2. Assuming that the command has been executed properly, it should display a list of disks and partitions:
Sudo diskutil eraseVolume JHFS+ deleteme/dev/disk0s3
Step 3. Look for the disk name and partition you wish to delete.
You can find them under the IDENTIFIER column. Replace disk0s3 with the name of the partition you wish to delete. Enter the necessary login admin details, then click Action.
How To Check if the Boot Camp Partition Has Been Deleted From Mac Successfully?
You will often receive a corresponding message alerting you that the Windows OS has been successfully removed from your Mac device. It usually comes in a message stating: “Partition Removed” in Boot Camp Assistant.
To those that want to make extra sure that the Boot Camp partition is truly removed, there are two ways for you to do just that:
Method 1:
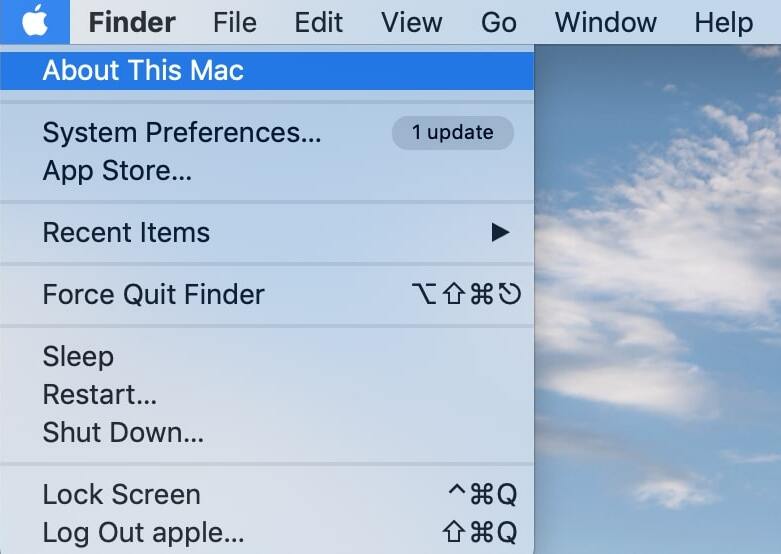
Step 1. Click the Apple logo. Then, select About this Mac.
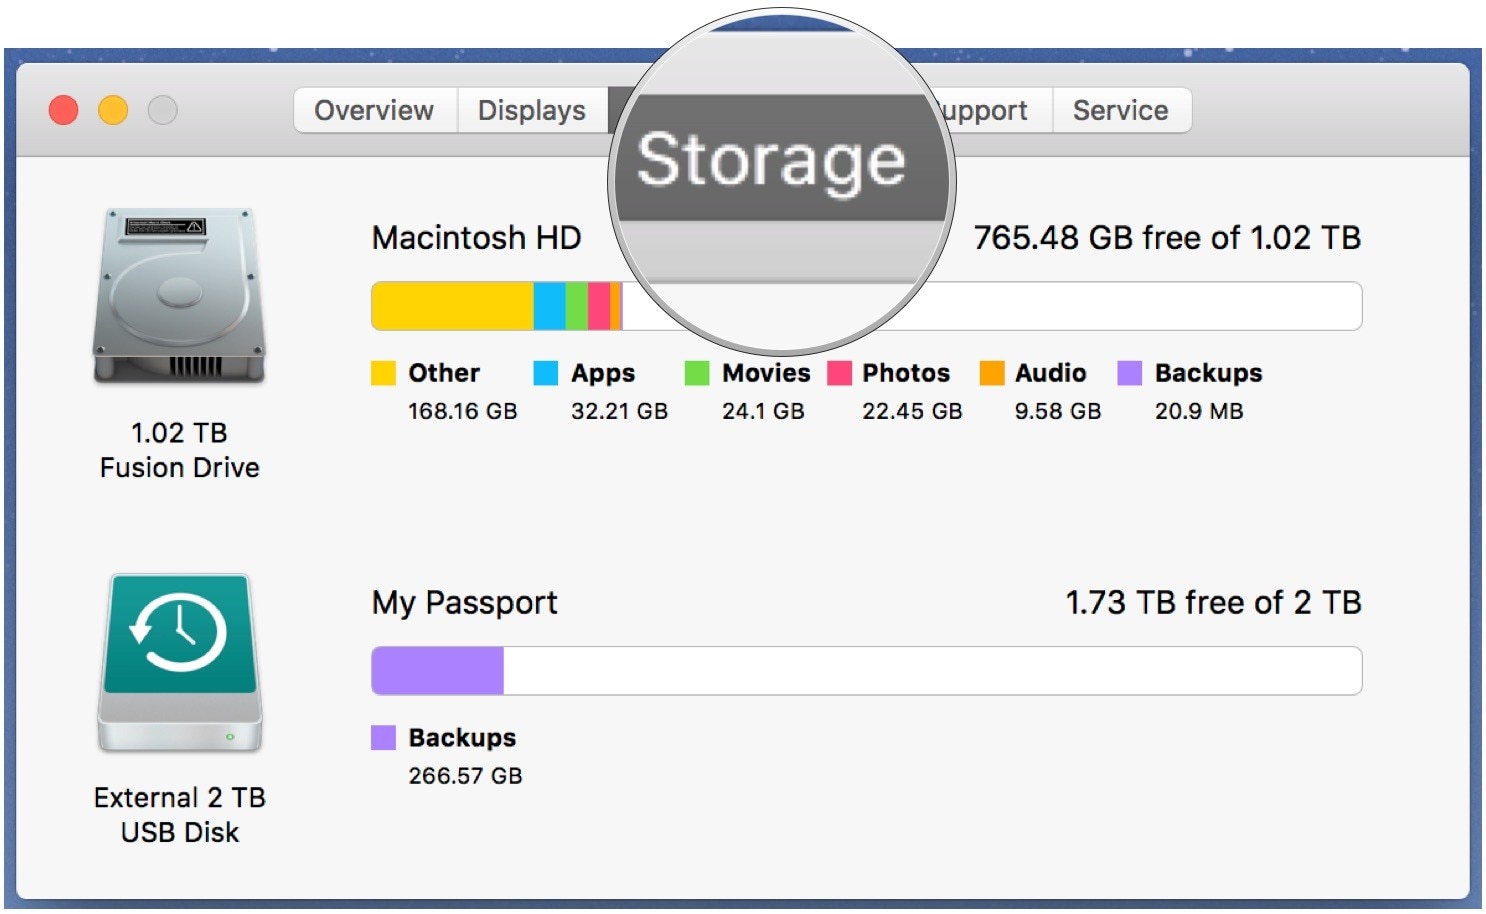
Step 2. Click Storage to check whether the Boot Camp partition you deleted is longer there.
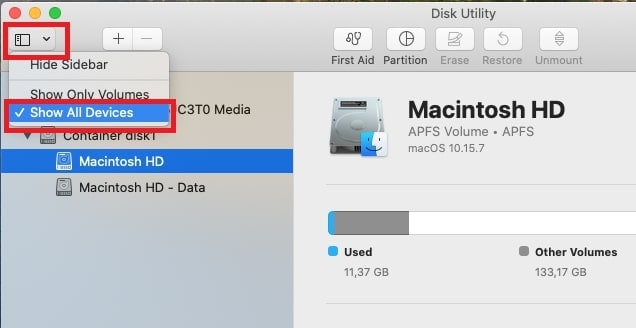
Method 2:
Step 1. Click Disk Utility, then click View.
Step 2. Select Show All Devices.
On the left list, see if the Boot Camp partition you deleted is no longer there.
How To Recover Data if You Find Data Lost After the Deletion of Boot Camp
As we have briefly established above, deleting Boot Camp partitions may sometimes lead to unnecessary file deletions. Sometimes, you forget to back up files that you still need. Thankfully, there are several ways to rectify such mistakes, such as using various data recovery applications found on the web, such as Wondershare Recoverit for Mac.
Wondershare Recoverit Data Recovery can restore over 1000 types and formats of data, even accidentally deleted Boot Camp partitions. Here are some of the features you can get out of using Recoverit:
Recover over 1000 types of data types, like photos, videos, emails, files, audios, etc.
Recover data from numerous scenarios. Be it due to files being overwritten, a system crash, accidental formatting or virus attack, Recoverit is able to make a total recovery.
Support recovery of data from 2000+ storage devices, including computer/laptop, USB flash drive, SD memory card, external hard disk, digital camera, etc.
Ensure 100% data safe and easy operations.
Here is a step-by-step guide to recovering deleted Bootcamp partition data using Recoverit on Mac devices:
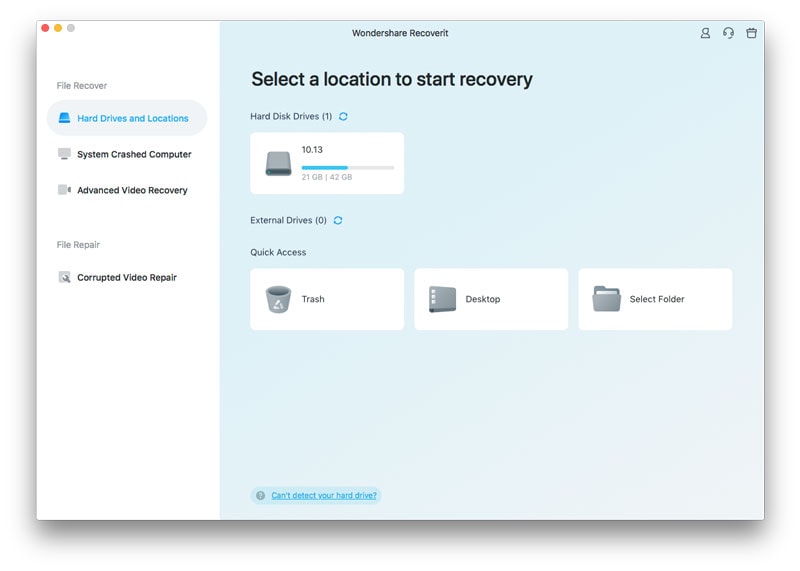
Step 1. Select the Location
Open Recoverit for Mac after the installation and select the hard drive or folder on which the data was lost after the deletion of the Boot Camp partition.
Step 2. Scan the Selected Location
The partition recovery software will start scanning the chosen location on your Mac for any missing files.
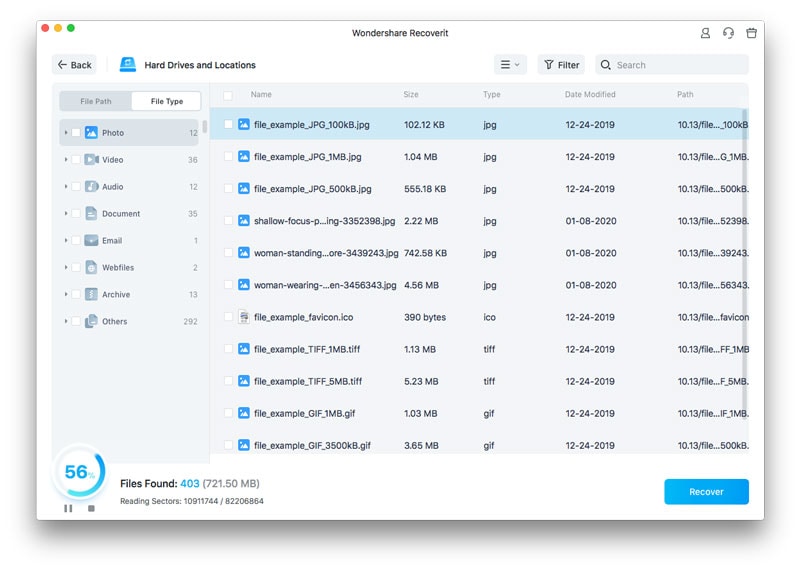
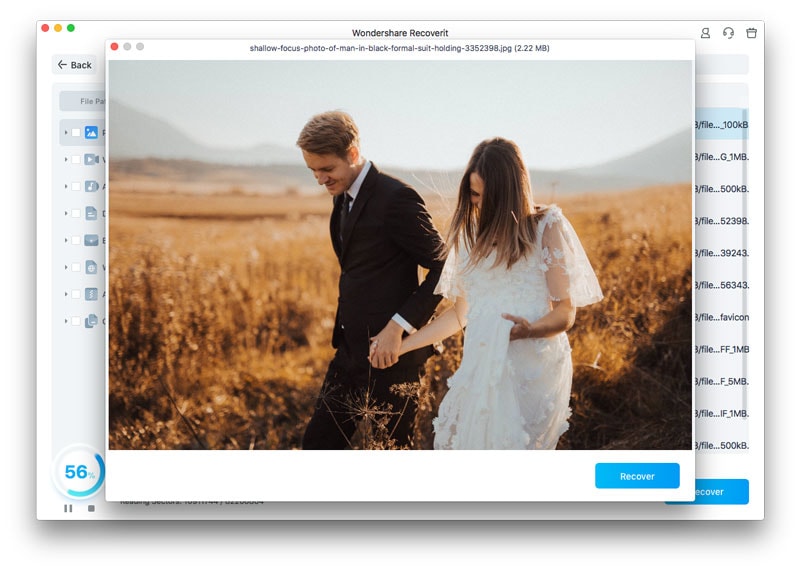
Step 3. Recover the Files
A list of files in the selected location will be displayed on the screen. You can preview all the files to ensure they are the ones you need. Finally, by selecting the files and clicking Recover, you can restore lost data after the deletion of the Boot Camp partition.
Conclusion
As convenient as it may be to have a usable Windows OS on your Mac device via a Boot Camp partition, sometimes you get to the point where you have no choice but to get rid of it. Thankfully, there are now several ways to do just that.