
Recoverit UltimateV13.5
Data Recovery for Mac
- Supports 500+ scenarios, such as accidental or permanent deletion, system crashes, virus attacks, or formatting.
- Recover 1000+ file types, including documents, photos, videos, audio and Emails.
- Success recovery rate of 99.5%.
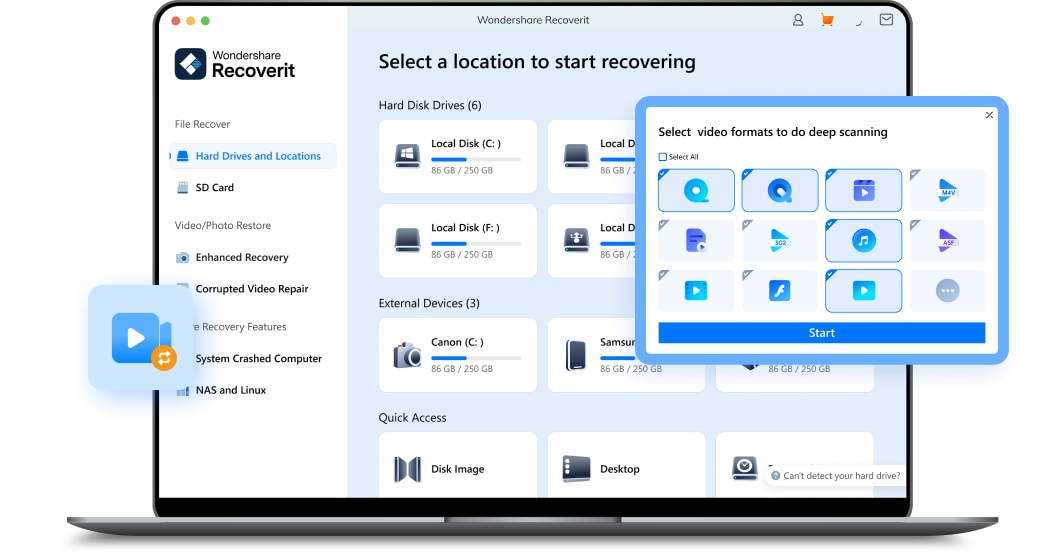
- 3 simple steps to recover unlimited data from Mac system.

4.6 out of 5 based on 4095 reviews
|100% Secure


Recover Lost Data from Mac or External Devices Easily, Quick, and Securely

This high-tech data recovery tool can get back all leading file types & formats associated with Mac, such as Office File, Photo & Image, Video, Audio, Email & Archive, Document File, etc.
| Office files | RTF, DOC, DOCX, XLS, XLSX, XLSB, PPT, PPTX, PPS, PDF, DOT, DOTX, XLSB, XLT, XLTX, POT, PPSX, etc. |
|---|---|
| Graphics | CRW, JPEG, JPG, PNG, PSD, RAW, RGB, 3DM, 3DMF, 3FR, ABM, AFX, ANI, ART, ARW, BIZ, BLD, etc. |
| Videos | AVI, FLA, FLV, M4V, MOV, MP4, WMV, 3G2, 3GP, 3GP2, 3GPP, AMV, ANM, ASF, ASX, ARI, ARX, R3D, BRAW, etc. |
| Audios | AIFF, ALAC, FLAC, MP3, OGG, PCM, WAV, WMA, A52, AA, AA3, AC3, ACC, AMR, AFC, AIF, etc. |
| Outlook & Archive | Email: MSG, PST, OST, EML, EMLX, MBOX, etc. Archive: 7Z, WAR, ZIP, exe, 7zip, etc. |
| Documents files | EPUB, JIS, KEY, LOG, MPS, NUMBERS, ODS, ONE, PAGES, PPS, PS, 12M, 1ST, 3DA, 3DS, 3TF, 3WS, ABD, etc. |
| Unsaved files | Win: .asd/.tmp/.xlsb, etc. Mac: .page/.number/.key etc. |

You can use Recoverit for Mac to retrieve all files from various devices or storage media such as hard drive, USB flash drive, SD card, external hard drive, iMac/Macbook, digital camera, action cam, camcorder, drone, etc.
| USB Flash Drives | USB flash drive, pen drive, thumb drive, flash memory stick, regardless of the file systems
(FAT16/FAT32/exFAT/ NTFS/HFS/APFS) |
|---|---|
| Memory Cards | CF card, SD card, MMC, SmartMedia, xD-Picture card, MiniSD card, MicroSD card, etc. |
| Internal Hard Disks | Hard Disk Drive (HDD), Solid-State Drive (SSD, even with T2 and M1/M2/M3/M4 chip encryption), Zip drive, etc. |
| Cameras | Various brands of digital cameras, DJI/GoPro Drone cameras, action cameras, camcorders, home surveillance, DVR, etc. |
| SD Cards | An SD/SDHC/SDXC card or a device with an SD card slot, such as an Android phone, audio recorder, music/video player, etc. |
| External Hard Drives | All brands of external disks or lost data on an external drive that is corrupted, formatted, or undetected. Also support Time Machine backup recovery. |
Access Your Data from A Crashed Mac System
Recoverit data recovery software for mac can assist you in fixing the problem of computer system crash, blue screen of death, and black screen of death by creating a USB drive.


Perform Quick and Secure NAS/Linux Data Recovery

NAS Recovery has been added to this incredible data recovery software for Mac! Now, whether you lost files due to accidental deletion, server overheating, hardware failure, or virus attack, you can recover them from NAS devices on your Mac without unplugging the NAS drive.

The newly released Linux Recovery helps you restore your deleted or lost Linux data files on your Mac computer through remote connection. It is compatible with the EXT4, BTRFS, XFS, and BFS file systems and works well with 600+ Linux distros like Ubuntu, Debian, Linux Mint, etc.
#1 Position in The Mac Video Recovery Software Market to
Restore Deeply Hidden Videos with Ease


Meet The Enhanced Video Repair Feature


No Matter What Caused Your Data Loss, Wondershare Recoverit Can Help
Recoverit Mac data recovery software can solve 500+ data loss scenarios and
deleted files, no matter what sizes they are,
from a single Office document to
tons of photos, music, and videos stored on your Mac.
Human error is the root cause of most data loss. Accidentally spilling water on your MacBook is a common occurrence. Recoverit can help you recover data from any human errors.
It sometimes occurs that your Mac hard drive won't mount and prevents your system from booting. Recover data from an unmountable Mac drive with this reliable recovery software.
Software malfunctions take a place in the list of data loss causes. You can easily recover lost files while editing or saving them on a Mac with Recoverit.
After thousands of tests by the Recoverit team, this Mac data recovery program is a proven solution to restore lost files from 500+ loss scenarios.
Accidentally deleted a file? No Panic. Recoverit deleted file recovery software for Mac can quickly get back lost files after deletion or emptying the recycle bin.
Accidentally formatted a hard drive? Whether it's an HDD, SSD, SD Card, USB Drive, or Pen Drive, the Mac data recovery software can bring your data back.
Virus infection or malware can hit you unexpectedly at any time. Use this versatile data recovery program to restore files deleted by malicious software on Mac.
Is your macOS stuck on a black screen? The Recoverit USB bootable data recovery allows data recovery even when your Mac computer crashes.
Losing a disk partition can result in a catastrophic loss of data. The powerful Mac partition recovery tool can recover all of your lost files and folders.
Logical errors or physical damage can cause the hard disk to be inaccessible. With this hard drive recovery tool for Mac, you can retrieve data from corrupt hard drives easily.
Partitioning a hard drive without technical expertise may lead to devastating data loss. Try Recoverit to recover lost data from the hard disk while repartitioning.
Reinstalling macOS or factory resetting a Mac may be necessary following a computer crash or slowdown. If you are faced with this issue, let this recovery tool save your data.
Human error is the root cause of most data loss. Accidentally spilling water on your MacBook is a common occurrence. Recoverit can help you recover data from any human errors.
It sometimes occurs that your Mac hard drive won't mount and prevents your system from booting. Recover data from an unmountable Mac drive with this reliable recovery software.
Software malfunctions take a place in the list of data loss causes. You can easily recover lost files while editing or saving them on a Mac with Recoverit.
After thousands of tests by the Recoverit team, this Mac data recovery program is a proven solution to restore lost files from 500+ loss scenarios.
Accidentally deleted a file? No Panic. Recoverit deleted file recovery software for Mac can quickly get back lost files after deletion or emptying the recycle bin.
Accidentally formatted a hard drive? Whether it's an HDD, SSD, SD Card, USB Drive, or Pen Drive, the Mac data recovery software can bring your data back.
Virus infection or malware can hit you unexpectedly at any time. Use this versatile data recovery program to restore files deleted by malicious software on Mac.
Is your macOS stuck on a black screen? The Recoverit USB bootable data recovery allows data recovery even when your Mac computer crashes.
What Makes Recoverit for Mac Your Best Choice for Data Recovery
Recoverit file recovery software offers more than you notice at first
sight. There are underlying features that would help
you distinguish Recoverit
Data Recovery for Mac better from its rivals and utilize it more efficiently.
One of the best data recovery software for Mac with the highest success rate to restore from all data loss scenarios. It even supports macOS 15 Sequoia.
Scanning wears down your hard drive. Recoverit Mac V13 can directly restore data from a disk image file without causing wear on the source disk.
Wondershare Recoverit was awarded 35 Patents for its innovative data recovery methods and device and video fragment file recovery.

The quickest way to sort the desired files from the thousands to millions of results is "Filter." It gives you fast access to what you need.
In the Recoverit for Mac Premium, you can preview all supported file types with no size and time limits, providing a convenient experience during the recovery process.
Recoverit can automatically identify and repair corrupt pictures and document files, and provide you with the repaired results while previewing them.
3 Steps to Get Back Your Lost Mac Files - Quick, Simple, and Secure
Recoverit is dedicated to simpler, easier, safer, and more straightforward technology for Mac computer/laptop data recovery.


Trusted By Over 100 Million Users & Leading Brands
"Wondershare Recoverit is a great backup and data recovery software that works on practically any device. Even if you want to restore video on your old camcorder, you can use Recoverit. If you want to protect data because you work from home, or just want to know your photos and videos are safe, then you can easily try the free download to see if it’s the right software for you." Read full review>>

IT Professional
"As a computer expert of 40 years, I can't believe I accidentally formatted the wrong HDD. 30 years of personal recorded music gone. Of course, I knew how to recover it but I didn't have the tools with me. Logged on to Wondershare, downloaded their software and ran it immediately. Worked EXACTLY as expected. Thanks guys."
"Data loss is a reality given that most people have accidentally deleted documents from their computer's hard drive, as well as lost files either from lost partitions or malware corrupting data after an infection. Wondershare Recoverit did its job properly throughout our testing period, and it did manage to recover all of the files we deleted on both internal and external disks." Read full Reviews>>

Photographer
"Saved by Recoverit I am a pro photographer and I had taken photos of some friends I haven't seen in years and somehow lost the files on my card. in a frantic to find a way to recover them I found wondershare and well the rest is history and I am super glad that all of the photos are back and great to see those smiles again. Thanks."
"We found Recoverit to be an intuitive tool that’s most suitable for Windows and Mac computers. Phones are an afterthought, though. Scanning is fast and doesn’t slow down your system, while every feature can be carried out with a few clicks. The large file previews are useful when you’re not sure you’ve found the correct item."

CEO/Managing Director
"I tried this on my Mediaplayer after accidentally deleting a whole folder. Does a good job recovering recently deleted or corrupted files, but don't expect miracles if you have continued using a drive before trying to recover. Older media files were sometimes recognized by title but when recovering it turned out to be a different file altogether."
"Wondershare Recoverit is a great backup and data recovery software that works on practically any device. Even if you want to restore video on your old camcorder, you can use Recoverit. If you want to protect data because you work from home, or just want to know your photos and videos are safe, then you can easily try the free download to see if it’s the right software for you." Read full review>>
IT Professional
"As a computer expert of 40 years, I can't believe I accidentally formatted the wrong HDD. 30 years of personal recorded music gone. Of course, I knew how to recover it but I didn't have the tools with me. Logged on to Wondershare, downloaded their software and ran it immediately. Worked EXACTLY as expected. Thanks guys."
"Data loss is a reality given that most people have accidentally deleted documents from their computer's hard drive, as well as lost files either from lost partitions or malware corrupting data after an infection. Wondershare Recoverit did its job properly throughout our testing period, and it did manage to recover all of the files we deleted on both internal and external disks." Read full Reviews>>
Photographer
"Saved by Recoverit I am a pro photographer and I had taken photos of some friends I haven't seen in years and somehow lost the files on my card. in a frantic to find a way to recover them I found wondershare and well the rest is history and I am super glad that all of the photos are back and great to see those smiles again. Thanks."

See How We Are Priced
| Features | Premium |
|---|---|
| Unlimited Data Recovery | |
| Supported Multiple File Formats and Storage Devices | |
| Preview Available Before Recovery | |
| Corrupted Photo/Document Repair in Preview | |
| Disk Image Recovery | |
| Crashed Computer Recovery | |
| NAS and Linux Recovery | |
| Enhanced Recovery | |
| Corrupted Video Repair | |
$79.99Select
|
| Features | Premium | Standard | Essential |
|---|---|---|---|
| Unlimited Data Recovery | |||
| Supported Multiple File Formats and Storage Devices | |||
| Preview Available Before Recovery | |||
| Corrupted Photo/Document Repair in Preview | |||
| Disk Image Recovery | |||
| Crashed Computer Recovery | |||
| NAS and Linux Recovery | |||
| Enhanced Recovery | |||
| Corrupted Video Repair | |||
$139.99Select
|
$79.99Select
|
$79.99Select
|
| Features | Premium | Standard | Essential |
|---|---|---|---|
| Unlimited Data Recovery | |||
| Supported Multiple File Formats and Storage Devices | |||
| Preview Before Recovery | |||
| Corrupted Photo/Document Repair in Preview | |||
| Disk Image Recovery | |||
| Crashed Computer Recovery | |||
| NAS and Linux Recovery | |||
| Enhanced Recovery | |||
| Corrupted Video Repair | |||
$79.99Select
|
$79.99Select
|
$69.99Select
|
See What Else We Support

-
Supports macOS10.13-macOS15(Sequoia)
-
Compatible with T2/M1/M2/M3/M4 Security Chip
-
Success recovery rate go up to 99% from 98%
-
Supports consecutive scan from breakpoint, Improved preview, file search & multiple recovery.
-
Supports Dark mode, depend on computer systems color
Computer Operating Systems
-
Windows 11/10/8.1/8/7/Vista
-
Windows Server 2003-2022
-
macOS 10.13-15(Sequoia)
Computer File Systems
-
ExFAT, FAT16, FAT32, NTFS, ReFS, Raid, RAW, JFS, APFS, HFS, HFS+, and ext4 under the Linux OS
Hard Disk Space
-
56MB minimum space for installing


support
See What Our Users Ask Frequently
?
How to recover deleted files from a Mac hard drive?
- Download and install Recoverit on a different disk than the one you will recover.
- Launch the app and select the drive.
- Click Recover to start scanning the drive for files.
- Review the list of recoverable files.
- Select the files you want and click Recover to restore them.
?
What is the best hard disk recovery software for Mac?
?
How to recover files from an external hard drive on a Mac?
- Download, install, and launch Recoverit.
- Connect the external drive to your computer.
- Select the external drive from the disk list.
- Click the Recover button to look for files.
- Preview the files that can be restored and make your selections.
- Click Recover again to retrieve the selected files.
?
How can I recover hard disk data when it is not detected?
- Reconnecting the device to another port;
- Rebooting your Mac;
- Checking for a damaged cable or interface;
- Using a direct connection rather than a hub;
- Updating your Finder preferences to show external drives;
- Running Disk Utility and attempting to mount and verify the drive.
?
How do I recover permanently deleted photos from my Mac?
- Recover deleted pictures and photos from Mac with Mac data recovery software-Recoverit.
- Recover deleted photos in the Photos App on Mac.
- Recover deleted photos from Trash/emptied Trash.
- Recover deleted photos from Time Machine backup.
?
How can I recover permanently deleted files from Mac without the software?
- Launch Time Machine on your Mac.
- Locate the deleted files you want to restore using the on-screen up-and-down arrows.
- Click the Restore button, and then the deleted file will be returned to its original location.


