Photo Recovery
- Photo Recovery+
-
- Top 10 Best Photo Recovery Software
- Best Way to Do the Lost JPEG Photo Recovery
- How to Recover Photo on Google Backup
- How to Restore Lost Photos
- How to Restore Deleted Pictures
- Photo Backup Strategies
- 5 Free Photo Recovery Softwares
- Best Stellar Phoenix Photo Recovery Alternatives
- Restore Damaged Photos in Seconds
- Photo Recovery After Factory Reset
- How to Recover Corrupted Images
- Recover Lost Photos from A Formatted Drive
- Camera Photo Recovery+
- Computer Photo Recovery+
- Mac Photo Recovery+
- Phone Photo Recovery+
- SD Card Photo Recovery+

• Filed to: Photo Recovery • Proven solutions
Adroit Photo Recovery software is an essential tool for all the photo lovers. It specially discovers the images stored on your Mac and Windows PC. However, there are certain limitations that make it impossible for the program to function to the maximum potential and provide the output that a user would expect from a recovery tool. In this relation, we will look at the best alternative to the program, which is offering much more options, features, and necessary settings.
Data recovery is a serious issue in the current generation, as hard drives are experiencing troubles that are affecting the way we are storing the content. For instance, a physical impact to the disk will cause a disturbance within the platter that will hamper the moment of the spinning wheel that reads the sectors containing the data. A way to recover data from such sectors is by using Recoverit (IS) for Mac (or Recoverit (IS) for Windows). It functions efficiently in the recovery of data from both Mac and Windows operating system.
The major recognition of the program is the layout of the software and the robust mechanism that penetrates into the platter of the hard disk for recovering maximum data from the sectors. The software ensures that it will accurately get the data from the corrupted layer with ease, which you can save to a different drive.

Recoverit (IS)
Why Choose This Adroit Photo Recovery Alternative Software:
- A simple button that allows you to start or stop a scan and resume the same when needed.
- The possibility to save the information of a scan that you can later use to retrieve directly, which is helpful if you do not have the time to continue the entire process in a single go.
- You can hunt for files utilizing their names or folder name (if you remember) to speed up the search and retrieve them directly rather than recovering an entire partition.
- File attribute system will ensure that the data that you would be recovery have good sectors, making it easy for it to retrieve at a faster rate while skipping the invalid files.
Step-by-Step Guide to Use Adroit Photo Recovery Alternative Software
Step 1. Download Adroit Photo Recovery Mac Alternative
Get the Recoverit (IS) for Mac from the original website. Download the file, and move it to the Applications folder. Start the executable file to complete the installation. Click the icon from the same folder to launch the program.
Step 2. Scan the Hard Drive
The data recovery mode analyzes and gives complete support in finding all the files that are recoverable from the drive. Opening the option will show you the current partitions along with the size and file systems. From the list, choose the one that will undergo the recovery process, and click "Start" on the bottom.

Step 3. Recover Lost Data from Mac
The time required to complete the scan is dependent on the size of the partition. Wait for the program to complete the same and display the results. It will arrange the files according to file formats, and you can pick a file to see its content in the preview screen. Using this option is helpful in choosing the essential files for recovery rather than placing the entire partition for recovery. Use the "Recover" button in the menu bar to save the files. When the program asks for saving location, choose an external storage device.

Step-by-Step Guide to Recover Lost Photos Using Adroit Photo Recovery
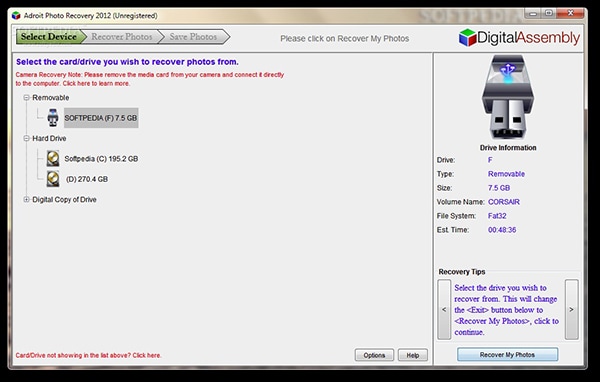
Step 1. Download the software from the website. Install it like any other program and launch it by clicking the icon. The primary screen will display the contents/partitions of the drive of your system. It will also show you any externally connected mass storage devices. Choose the drive that you wish to recover data and press the Options button at the bottom.
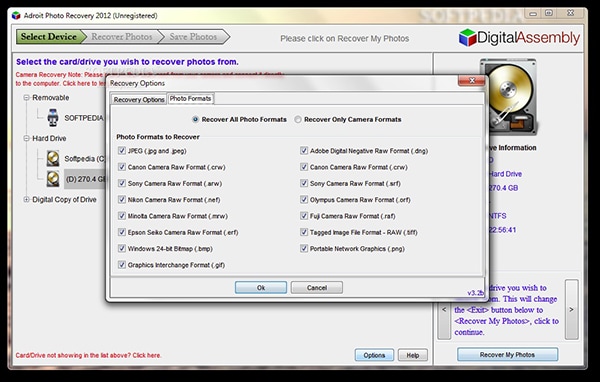
Step 2. The options button will give you the different settings that you can perform. By default, the program sets the best parameters. Nevertheless, you can switch them according to your need. You further have the choice to pick up certain formats such as JPEG or RAW. Make the necessary changes and press ok.
Step 3. The program will scan for the photos on the selected drive. The time it consumes is dependent on the settings and the data present within the partition. After the conclusion, it will dispense the successfully recovered images and unsuccessful photos. You can further sort the files according to the resolution, and full or partial recovery. Choosing either of choice is the user option. Therefore, depending on the importance of the photos, you can choose the mode.
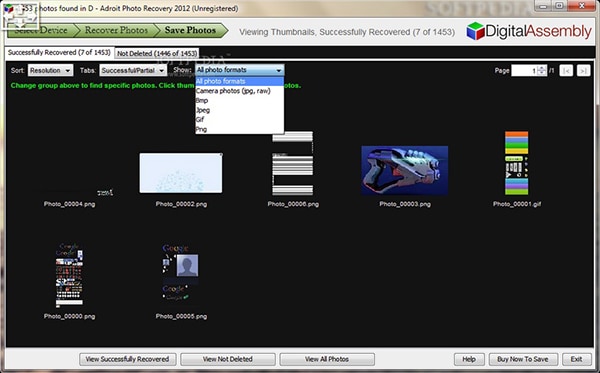
To save the successfully recovered pictures, you will have to register the program. After registering the program, click the “Save” button to save them to a folder on your computer.
1. As you can see, the program does not offer a full-fledged trial version to understand its capacity in recovery the data.
2. The success of recovery rate is only 2%, which is not good enough if you have a large collection of pictures in your system.
3. It does not offer a user-friendly interface to choose the options quickly and proceed with the recovery.
Solution: A better solution to overcome the troubleshooting of Adroit Photo Recovery is by using Recoverit (IS) for Mac and Window, which offers excellent features for quick recovery of data.
| Software | One-click Operation | File Search | Deep Scan Search | Save Scan Information | Preview Ability |
| Recoverit (IS) for Mac | Yes | Yes | Yes | Yes | Yes |
| Adroit Photo Recovery | No | Yes | No | No | No |
Elva
staff Editor