How Do I Move Photos From Google Photos to My Gallery (Android)

Mar 19, 2024 • Filed to: Data Transfer Solutions • Proven solutions
Google Photos has become our go-to solution for managing our digital pictures. This powerful tool from Google offers a seamless experience for storing, organizing, and sharing not just photos or screenshots but also videos.
As we accumulate memories in Google Photos, many of us want to transfer them to our device's gallery seamlessly. Why? Because we often want offline access to our favorite moments or simply prefer to have all our media in one place.
If this relates to you, let’s dive into our discussion on how to transfer Google Photos to your gallery on Android.
- Part 1. Why Android Users Need To Transfer Google Photos to Gallery
- Part 2. How To Download A Photo From Google Photos to Gallery on Android
- Part 3. How To Transfer Multiple Photos From Google Photos to Your Gallery
- Part 4. How To Transfer All Photos From Google Photos to Gallery Using Google Takeout

- Part 5. Alternative: Transfer Photos from Computer to Gallery on Android with Easy Software
- Part 6. Why Can’t I Transfer Google Photos to the Gallery?
Part 1. Why Android Users Need To Transfer Google Photos to Gallery
For Android users, Google Photos is typically used as a backup solution for their media files. This backup functionality offers a safety net, ensuring that their precious photos are securely stored in the cloud and easily accessible from any device with an internet connection.
However, while Google Photos excels in providing a reliable backup service, many users still value the convenience and familiarity of having their media files readily available in their device's gallery. They particularly want to know how to transfer pictures from Google Photos to their gallery for these reasons:
1. Offline access
Despite the convenience of cloud storage, there are times when internet connectivity may be limited or unavailable. By learning how to transfer from Google Photos to the gallery, Android users can ensure that their favorite memories are accessible offline, allowing them to relive special moments anytime, anywhere.
2. Seamless integration
While Google Photos offers a comprehensive platform for organizing and managing media files, some users prefer the simplicity and familiarity of their device's native gallery app. Transferring photos from Google Photos to the gallery enables a seamless integration between online and offline media.
3. Quick access
Accessing photos directly from the device's gallery can be quicker and more convenient than going through an app or website. There's no need for additional steps when accessing their favorite photos if they transfer their photos from Google Photos to the gallery
4. Easy upload to social media
While Google Photos offers built-in sharing features, transferring photos to the gallery simplifies the process of uploading them to social media. With photos readily available in the device's gallery, users can quickly share their favorite moments on platforms like Instagram, Facebook, or Twitter without having to navigate between multiple apps.
Part 2. How To Download A Photo From Google Photos to Gallery on Android
Now, let’s get into the main topic of this article—how to move photos from Google Photos to your gallery. In this section, we'll walk you through the process of downloading an individual photo from Google Photos to your device's gallery.
See the process on how to transfer a photo from Google Photos to your gallery:
Step 1: Open Google Photos on your Android phone and sign in to your account.
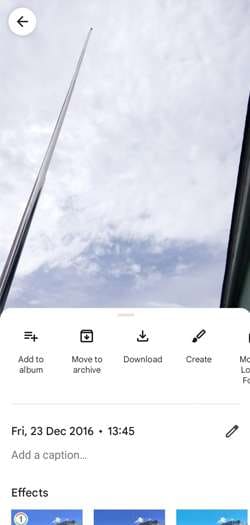
Step 2: Locate the photo you wish to download. Tap the photo to open it.
Step 3: Once opened, tap the three-dot menu icon.
Step 4: From the options, select "Download" or "Save to device." The selected photo will be downloaded and saved to your phone's local storage.
Part 3. How To Transfer Multiple Photos From Google Photos to Your Gallery
Meanwhile, when looking for how to transfer multiple photos from Google Photos to your gallery, there's a convenient feature called 'Copy to Files' that can streamline the process. This way, you can copy and transfer multiple photos from Google Photos to your phone.
How to copy photos from Google Photos to your gallery:
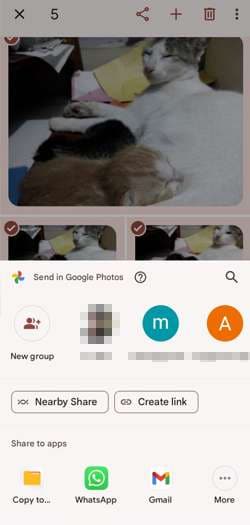
Step 1: Open Google Photos on your Android and sign in to your account.
Step 2: Tap and hold on one photo to initiate the selection of multiple photos. Simply long-press and tap on each photo you wish to download.
Step 3: After selecting the desired photos, tap on the three-dot menu icon and opt for 'Copy to Files.'
Step 4: You'll then be prompted to choose the destination for the copied photos. Navigate to the desired folder within the Files app where you want to save the photos.
Finally, tap 'Paste' or 'Save' to transfer the selected photos to your device.
Part 4. How To Transfer All Photos From Google Photos to Gallery Using Google Takeout
What about how to transfer all photos from Google Photos to your gallery? If you want to transfer all your photos from Google Photos in one go, you can efficiently do it through Google Takeout. This platform offers a seamless process to export your entire Google Photos library to your computer, from where you can easily transfer them to your device.
Follow these steps for how to move all photos from Google Photos to your gallery:
Step 1: Begin by visiting the Google Takeout website using your computer browser.
Step 2: Upon reaching the site, select the data you want to export. In this case, choose Google Photos and proceed by clicking "Next Step". Google Takeout provides the flexibility to export various data types, including approximately 55 different options.
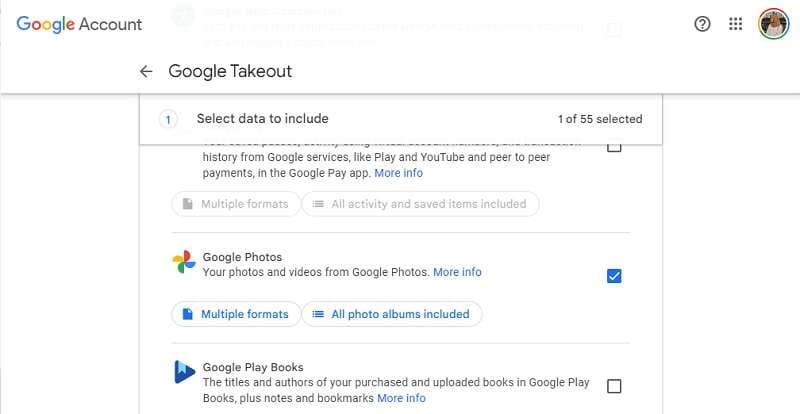
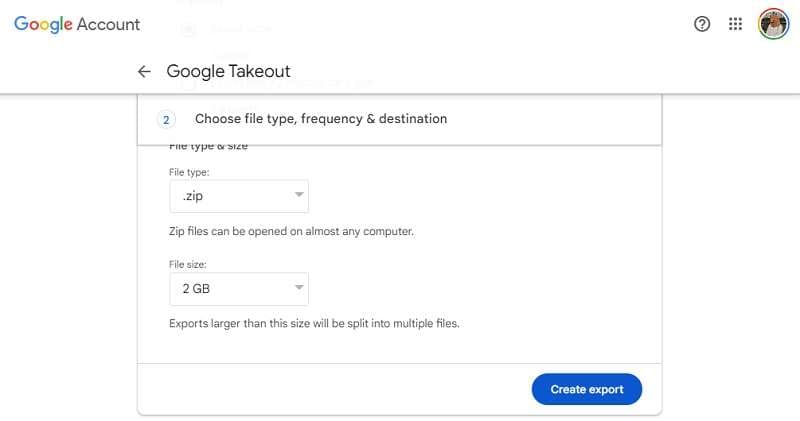
Step 3: After selecting Google Photos, specify the destination for your exported files. You can opt to receive the download Image name via email or choose direct download. Then, define the file type, size, and frequency. Once satisfied with your choices, click "Create Export.”
Step 4: Monitor the progress of your export. Once complete, Google Takeout will send the exported data, containing your Google Photos, to your email.
Step 5: Check your email inbox for the notification regarding your exported data. After receiving the email, simply click on the provided download Image name.
Step 6: Finally, extract the downloaded ZIP file on your computer, and your photos will be transferred to your Samsung device.
Part 5. Alternative: Transfer Photos from Computer to Gallery on Android with Easy Software
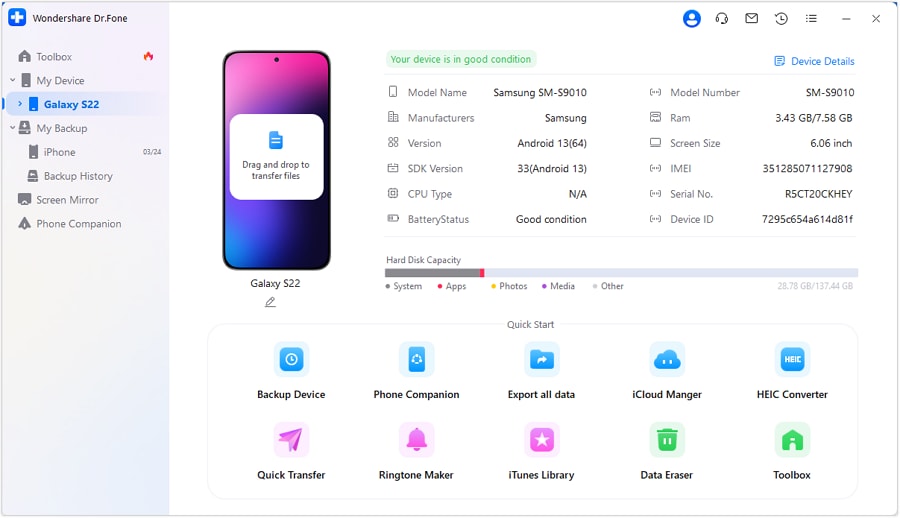
While Google Photos can be a great tool for storing or transferring your photos, you can also use reliable and easy third-party software such as Wondershare Dr.Fone. This software can be an alternative when trying to transfer photos from your computer to your device’s gallery.
Dr.Fone's Phone Manager feature stands out for its quick and efficient transfer capabilities, allowing users to seamlessly move photos between devices without any problems. Here’s how to transfer photos from your computer to the gallery on Android:
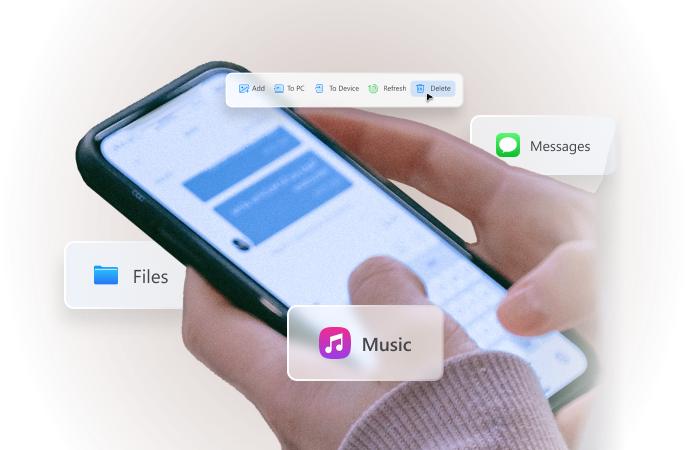
Dr.Fone - Phone Manager (Android)
Transfer Photos from Google Photos to Gallery
- Transfer files between Android and computer, including contacts, photos, music, SMS, and more.
- Manage, export/import your music, photos, videos, contacts, SMS, Apps, etc.
- Transfer iTunes to Android (vice versa).
- Manage your Android device on the computer.
- Fully compatible with the newest Android OS.


Step 1: Establish device connection and launch Dr.Fone
Begin by making a device connection to your computer and launching Wondershare Dr.Fone. Once your device is detected by the software, navigate to the Quick Transfer option located at the bottom of the home screen.
Step 2: Select files for transfer
A new window will let you to choose the files you want to transfer to your phone. You can either select "Select Files" to browse for specific photos or simply drag and drop them for a faster process.

Step 3: Choose Dr.Fone Image name as the destination
Once you’ve selected the photo files, opt for "Dr.Fone Image name" to proceed with the transfer process.
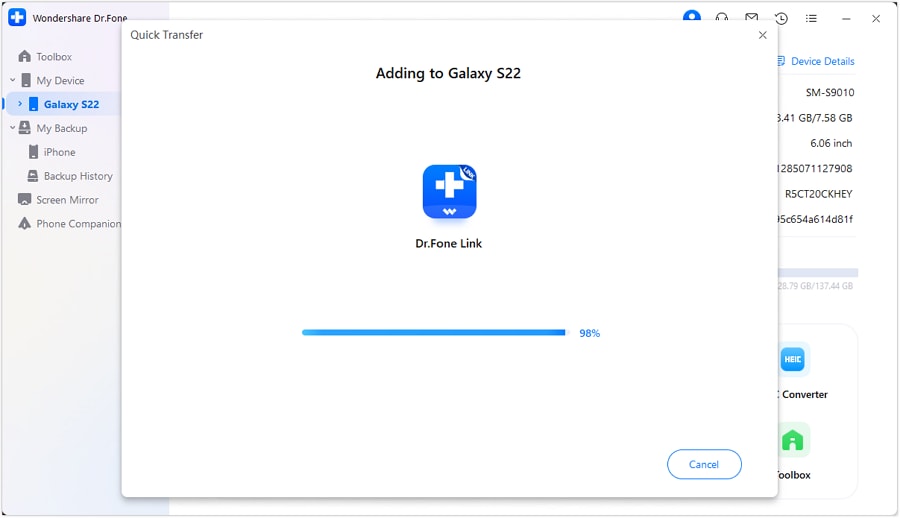
Step 4: Confirm transfer completion
Once the transfer is complete, Dr.Fone will provide a notification confirming the successful transfer.

Part 6. Why Can’t I Transfer Google Photos to the Gallery?
After learning how to transfer photos from Google Photos to your gallery, are you having no luck in the process? There are several reasons why you may encounter difficulties transferring Google Photos to your phone’s gallery. Let's explore some common issues that users may face.
1. Permissions
Make sure that you have the necessary permissions to access and transfer photos between apps. Sometimes, restrictive permissions settings or security configurations can prevent the seamless transfer of photos.
2. Storage space
Check if your device has enough storage space available to accommodate the transferred photos. If your device's storage is full, you may encounter errors or be unable to complete the transfer process.
3. File format compatibility
Confirm that the file format of the photos you're attempting to transfer is compatible with your device's gallery app. Some gallery apps may have limitations on the types of files they can display or import.
Conclusion
Transferring photos from Google Photos to your device's gallery is a convenient way to ensure offline access and seamless integration with your local media library. Depending on how many photos you want to download and transfer, the methods can be different. But fear not—you can always refer to this article whenever you need guides on how to move Google Photos to your gallery.
In addition to transferring photos from Google Photos, you can also use reliable software such as Wondershare Dr.Fone to transfer photos from your computer to your gallery with no problem. With the right approach and tools, you can ensure that your favorite memories are always accessible, no matter where you are.


Other Popular Articles From Wondershare
Android Transfer
- Android to Android
- 1. Transfer Files to Android
- 3. Transfer Contacts to Android
- 4. Data Transfer Apps to Switch Phone
- 5. Transfer Data to Android
- 6. Transfer Text Messages to Android
- 7. Transfer Music to Android
- 8. Transfer Contacts Using Bluetooth
- 9. Transfer Apps to Another Android
- 10. Migrate Data to New Android
- 11. Best Clone Apps for Android
- Android to iPad/iPod
- Android to iPhone
- 1. Transfer Files to iPhone 13
- 2. Transfer Contacts to iPhone 13
- 3. Transfer Music to iPhone
- 4. Transfer Contacts to iPhone
- 5. Android to iPhone Transfer Apps
- 6. Transfer Text Messages to iPhone
- 7. Transfer Photos to iPhone
- 8. Transfer Messages to iPhone 13
- 9. Transfer Contacts to iPhone XS/11
- 10. Transfer Messages to iPhone 12
- 11. FaceTime for Android and iPhone
- 12. Move Data From Android to iPhone After Setup
- 13. Transfer Data from OnePlus to iPhone
- 14. Move Contacts From Android to iPhone
- 15. Transfer Data From Android To iPhone
- 16. Top Apps To Transfer Data From Android To iPhone
- Contacts Transfer
- 1. Sync Contacts to Gmail
- 2. Transfer Contacts from Outlook
- 3. Transfer Contacts to Outlook
- 4. Import Contacts from Excel
- 5. Import Contacts to Android
- 6. Export Contacts to Android Phones
- 7. Merge Contacts in Phones
- 8. Export CSV Contacts for Android
- iOS to Android
- 1. Transfer Files from iPad
- 2. Move Custom Ringtones from iPhone
- 3. Transfer Data from iPhone
- 4. Transfer Music from iPhone
- 5. Transfer Contacts from iPhone
- WhatsApp Transfer
- 1. Transfer WhatsApp from Android
- 2. Transfer WhatsApp Messages
- 3. Transfer WhatsApp Messages to PC
- 4. Transfer Messages to Android
- 5. Transfer WhatsApp Data to Android
- Transfer Tips
- 1. Android USB File Transfer Software
- 2. Android Apps to Transfer Files
- 3. Android Sync Managers
- 4. Android File Transfer Apps
- 5. Fix Transfer Files Not Working
- 6. Simplify Android File Transfer
- 7. Transfer Photos to USB
- 8. Transfer Data to BlackBerry
- 9. Transfer Data From ZTE
- 10. Transfer Data From Windows phone
- 11. Clone Phone and Copy Data
- 11. 12 Best Phone Clone Apps
- 12. Move Google Photos to My Gallery
- 13. Send Large Files Through Outlook
- ● Manage/transfer/recover data
- ● Unlock screen/activate/FRP lock
- ● Fix most iOS and Android issues
- Transfer Now Transfer Now
James Davis
staff Editor