
• Filed to: Photo Transfer • Proven solutions
Memories are an important part of life for people to cherish. In the modern world that we live in, technology has presented us with multiple methods of saving memory amongst the people with who you spend time. Capturing photos is one of the most conventional techniques; however, with the availability of multiple devices, people have started taking photos and keeping them for the future.
As you look into several techniques involving photo transfer, this article intends to provide you with a detailed guide on how to transfer photos from iPhone to Chromebook through various means.
Part 1. Start with Google Drive
If you are in search of optimal sources and techniques for sustaining and transferring photos, Google Drive can present you with the best model that allows the user to transfer photos and videos across the platform with ease.
When it comes to using Google Drive, the user can practice multiple procedures that involve this platform. This would allow you to easily transfer your desired photos from your iPhone onto the Chromebook without any subtle wired connection.
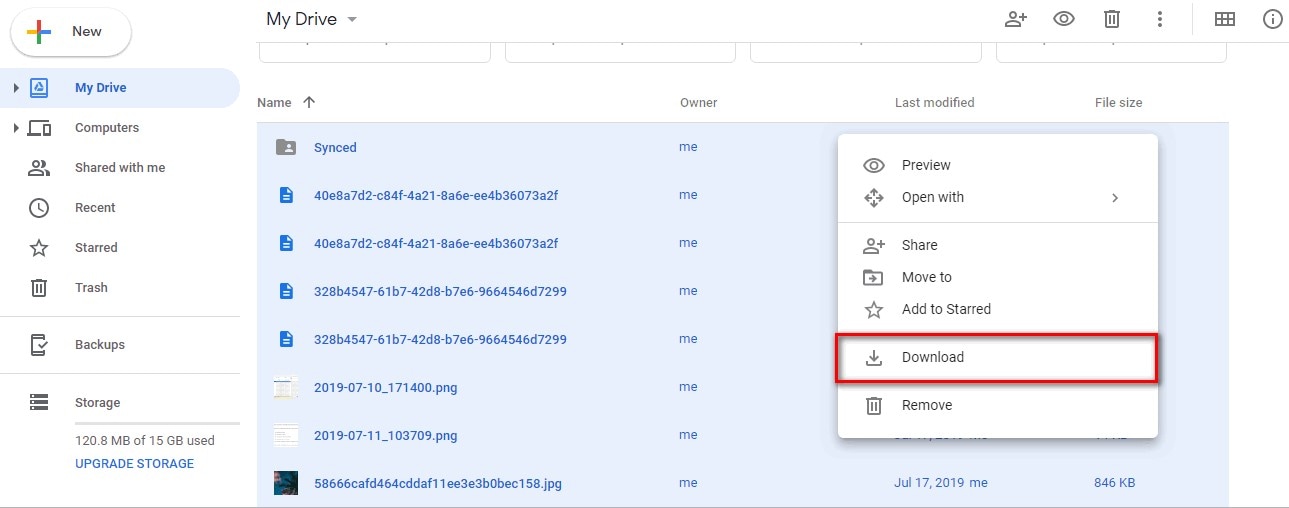
1. Downloading and Uploading
Step 1 At first, you need to open Google Drive on your iPhone and create a new folder with the images that are to be imported from the Camera Roll of your device.
Step 2Once done, open a similar Google Drive account on your Chromebook and download the folder containing the images on the device.
2. Enabling Google Drive in Photos
Conversely, as Google Drive can be easily connected with Google Photos containing all your images, this requires simple synchronization of galleries with these platforms. For this,
Step 1 Open the official Google Photos application or website and access its "Settings."
Step 2 Enable the option showing "Google Drive – Synch photos & videos from Google Drive" to connect your local gallery with Google Drive.
Step 3 This would allow you to easily export the folder of photos once opened on Chromebook.
Part 2. How to Transfer Photos from iPhone to Chromebook Using Google Photos
Google Photos can be another wireless option when considering a means to transfer photos onto a Chromebook. While using your iPhone, you can easily acknowledge the utility of Google Photos by issuing through the following guide.
Step 1 You need to have had the Google Photos application on your iPhone. Install it from App Store if not available.
Step 2 Launch application and log into it with your account credentials to gain access for transferring images to the iPhone's media folder.
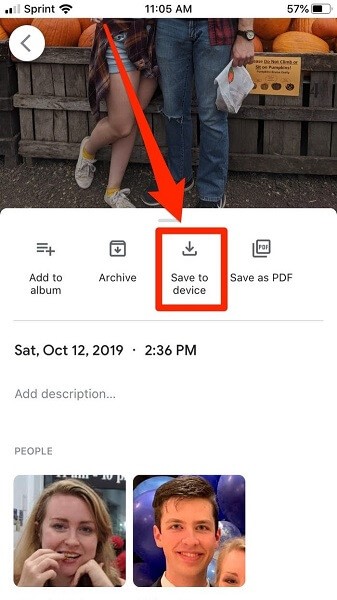
Step 3 With the account containing the photos, you can open any specific image and tap on the "three-dots" present on top of the window. Tap on the "Save to Device" option to download the image across the gallery of your iPhone. This function can also be performed across multiple images within Google Photos.
Part 3. How to Transfer Photos from Android to Chromebook Using USB Cable
Conversely, if you are an Android user and wish to transfer your photos from your device onto the Chromebook through a USB cable, it follows a very simple and efficient procedure that can be covered through the following steps.
Step 1 Connect the Android device with the aid of a USB cable onto your Chromebook.
Step 2 Turn on the device and select the option of "Transfer Files (MTP)" or similar options from the prompt.
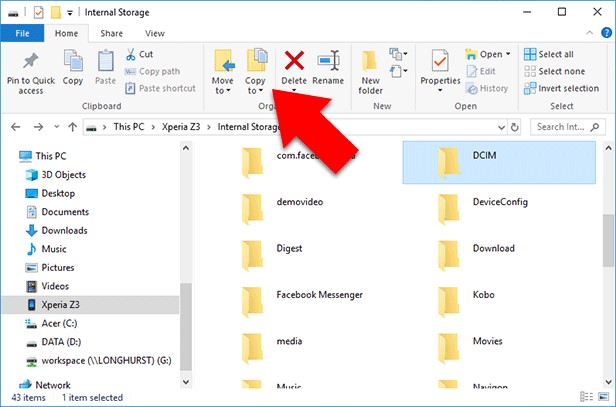
Step 3 Open Windows Explorer on Chromebook and open the folder displaying the Android from the left panel on the window.
Step 4 Open the folder containing the images and select them with the aid of a mouse or a keyboard: Right-click and select "Copy" from the available options. Lead to the folder on your Chromebook where you wish to save the memories and right-click to select "Paste" for executing the safe transfer.
Part 4. Another Way to Backup Photos from iPhone/Android
Out of all these methods that you have gone through, they provide you with a guide that can easily manage the photos present on your iPhone and Android and have them saved across your desired Chromebook.
However, if you are up for robust methods and techniques that would guide you in managing all the photos and backing them up for future purposes, you can always look over the dedicated third-party tools that allow you to back up photos from your iPhone or Android with ease. dr.fone – Phone Backup, a proficient tool that allows you to transfer and backup photos from your smartphone to the PC. There are several reasons that would tempt you into using Phone Backup as a basic tool, which are:
dr.fone - Phone Manager (iOS)
Download dr.fone - Phone Manager (iOS) to have a try!
- It focuses on a one-click backup from your device to the computer.
- Helps to preview, restoring, and exporting all kinds of backed up data from the device.
- There is no data loss reported over restoration.
- Compatible across thousands of Android devices, all latest models of iPhone and iOS versions.
To understand its simple and efficient function, you need to look over the guide declared as follows.
Step 1 Install dr.fone
Initially, you are advised to download dr.fone on your computer and install it. Following its launch, select the "Phone Backup" tool from the home window. Connect your iPhone or Android through a USB cable on the Chromebook.

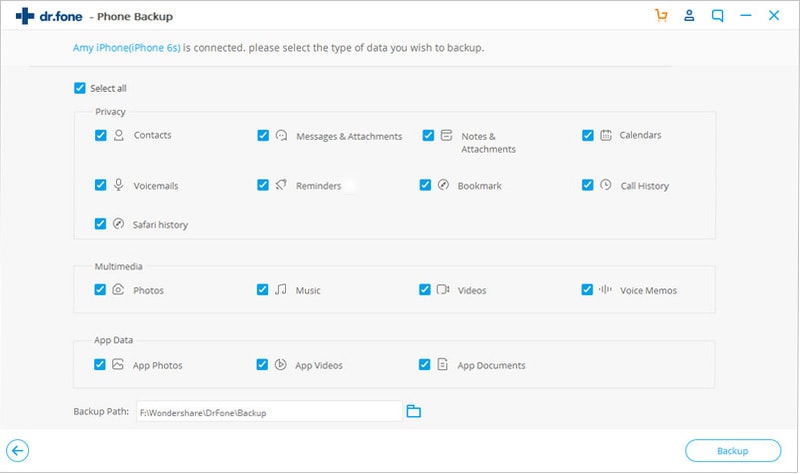
Step 2 Select Files for Backup
The platform automatically detects the device and displays a new screen with the option to select the files that you wish to backup. Tap "Backup" after selecting and proceed towards its execution.
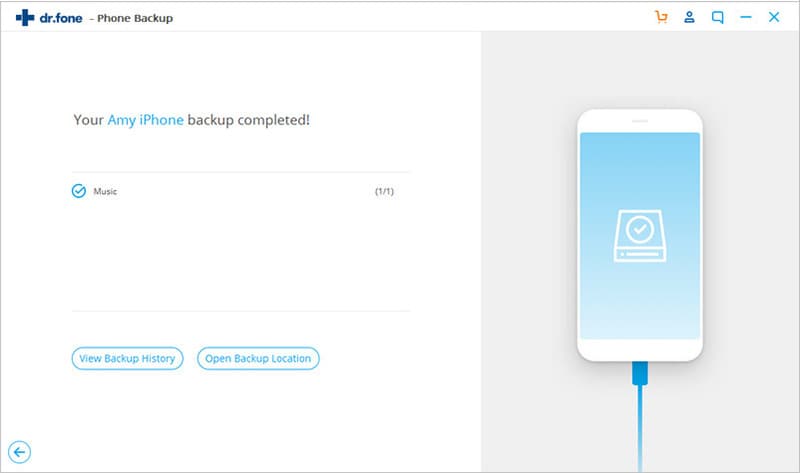
Step 3 Preview, Export, and Restore
Once done, the files can be easily previewed across the platform and can be easily select the export to PC or restore back to the device.
Conclusion
If you wish to transfer photos from your iPhone to Chromebook, you can follow these steps in detail to gain a better understanding of the system involved.
Elva
staff Editor