
Over the decades, the progress of technology has become less about innovation and more about consumerism. Sure, the competition between large corporations pushes the boundaries of science, but it is usually for increasing profits instead of goodwill for the consumers.
Consider file systems for once. Apple wants you to use AFS so that you restrict yourself to their ecosystem. On the other hand, Microsoft wants you to go with NTFS, keeping you constrained to Windows products. You may face a situation where they need to format USB drive to NTFS. Fortunately, this guide shall help you through it and the viable troubleshooting if your computer can't format USB to NTFS.
Note:You'll most likely lose all your data when formatting a storage device, like a USB drive. So, it's a good idea to back it up on another drive or use a reliable cloud storage service. Even if you do forgo this step, there is little reason to remain nervous. You can use recovery software like Wondershare Recoverit to retain the data after you format USB drive to NTFS
In this article
Method 1: Format USB Flash Drive to NTFS Using Disk Management
Disk Management is an in-built application that you can use for various drive-related functions on Windows. It can even assist you in case you want to change USB to NTFS. You don't need expertise in IT to utilize this method, as the interface is graphics-based, with all the available functions laid out in neat menus.
Disk Management has been operational since Windows 95. With its latest iteration of Windows 10/11, the program is optimized to run smoothly with flash-based memory devices such as SSDs. So, formatting USB drives to NTFS is pretty straightforward. You can use the following steps for the same.
Step 1. Open Windows Disk Management from the Search function in the Taskbar.
You can also launch the Run function and type in compmgmt.msc. It is located in the Manage section under the My Computer icon.
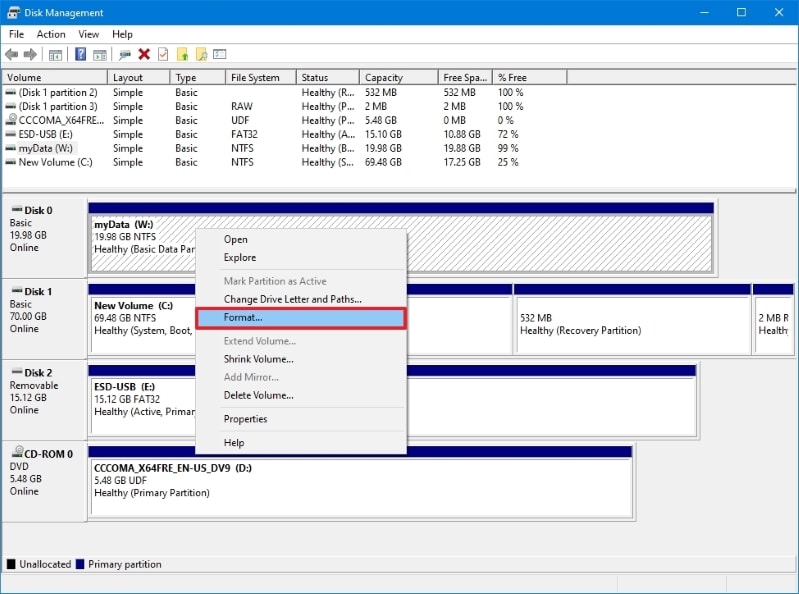
Step 2. Right-click the appropriate flash drive from the list and choose the Format option.
If a warning pop-up appears, click Yes.
Step 3. In the following dialog box, insert the name for the drive.
Step 4. Next to the File System tab, set the file system as NTFS.
You may leave the file allocation size as Default.
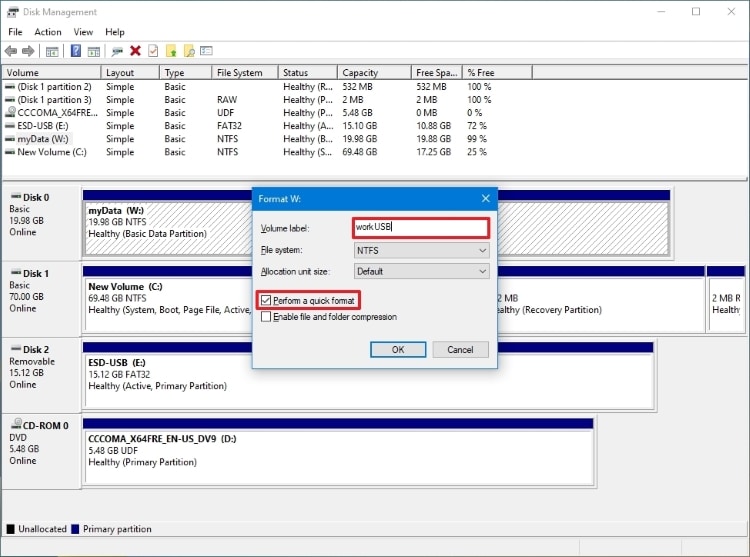
Step 5. Tick the Quick Format checkbox.
Step 6. Click the OK button.
Disk Management should take only a few minutes to convert USB to NTFS. You can minimize the process and perform other tasks on your computer if you so choose.
Method 2: Format USB Flash Drive to NTFS Using Windows File Explorer
File Explorer's context menu houses several useful utilities, including the option to format your USB drive. It is the easiest way as it only requires a few clicks and is available as you're browsing through the drive.
To format your USB drive using File Explorer:
Step 1. Connect your USB drive to your PC and make sure it is detected from File Explorer.
You can open it using Win+E or the Taskbar's Search function.
Step 2. From the left pane, click on This PC to view all the connected devices and drives.
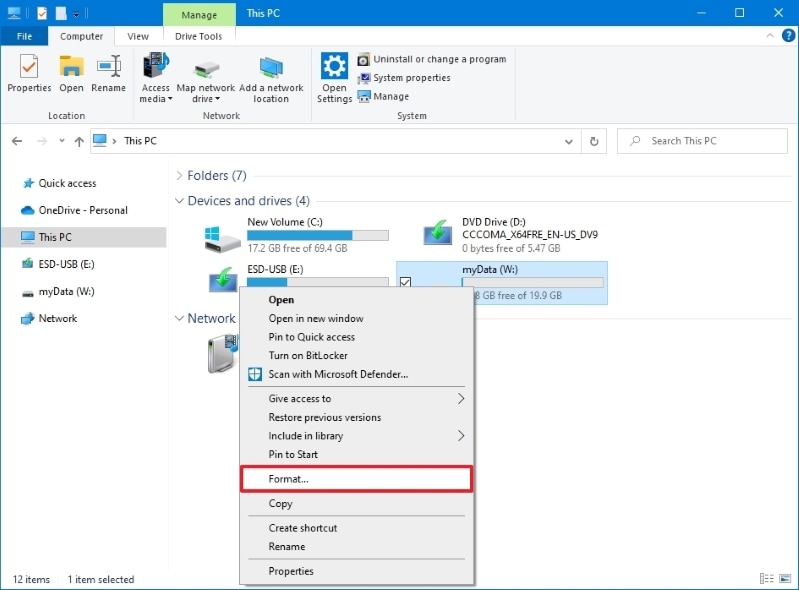
Step 3. Next, right-click on your desired USB drive and select Format.
Step 4. Click the File System drop-down in the following dialog box and select NTFS.
Step 5. Rename the Volume label (a name for your USB drive) or leave it as default.
Step 6. Check the Quick Format option under Format options.
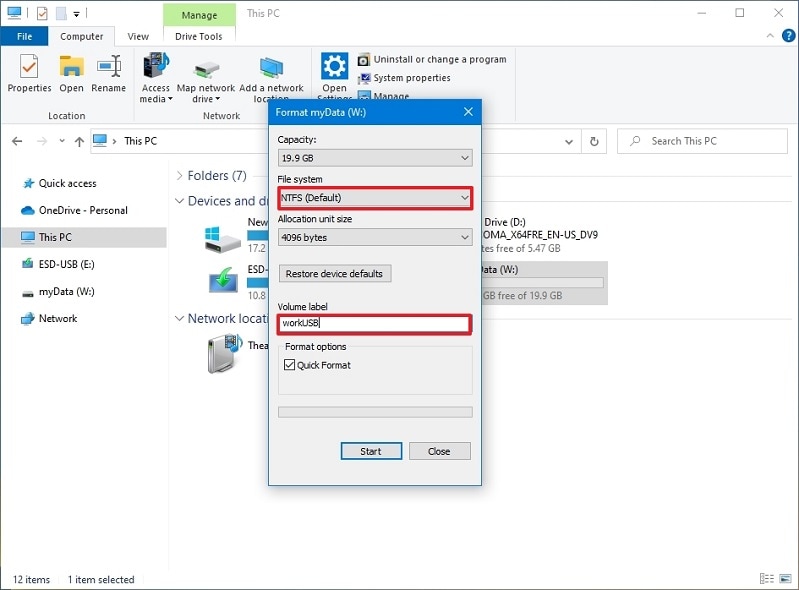
Step 7. Click on Start to initiate the format process.
Step 8. A warning shall pop up informing you that all data will be removed. Click OK to proceed.
Step 9. Windows format utility will quickly format the drive to the NTFS file system.
You should leave the Quick Format option unchecked if you encounter repeated errors when trying to format USB drive to NTFS. However, it might take a bit longer. Much like Disk Management, you can use your Computer for other tasks while the drive undergoes formatting.
Method 3: Format USB Flash Drive to NTFS Using CMD
Command prompt is an inherent feature in all Windows OS versions that reminds you of the DOS days. Even though Windows 11 offers the best UI integration to date, it still has the CMD option to carry out the same operations using lines of code. It is by far the most reliable method to convert USB to NTFS without installing additional software on your system.
To use CMD to format USB drive to NTFS:
Step 1. Connect the required USB drive to your PC.
Step 2. Press Win+R to open the Run program.
You must type in 'cmd' in the dialog box and press Enter.
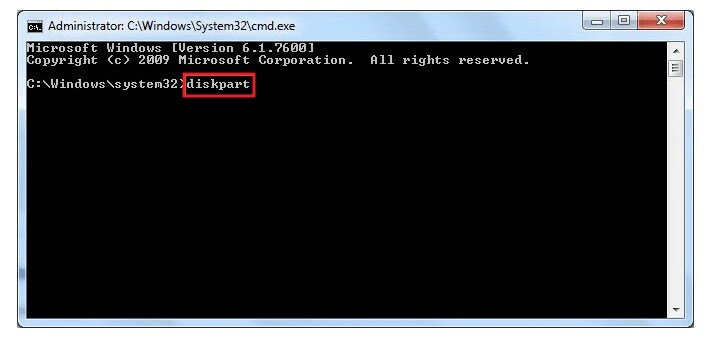
Step 3. Type in 'diskpart' from the initial command line and press Enter.
It will call the partition management program.
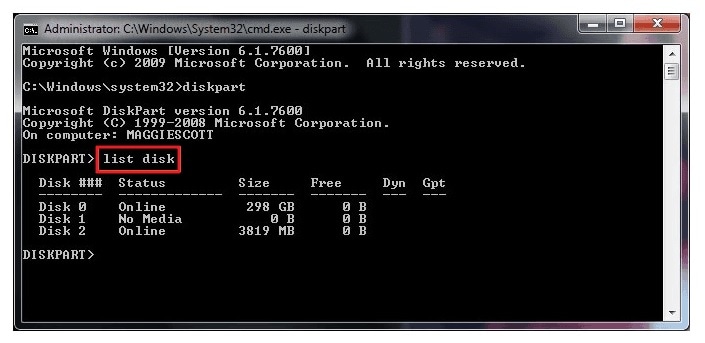
Step 4. Insert 'list disk' once the program opens.
It will list all the storage drives connected to your computer. It would be best to note down the USB drive name and number for further steps.
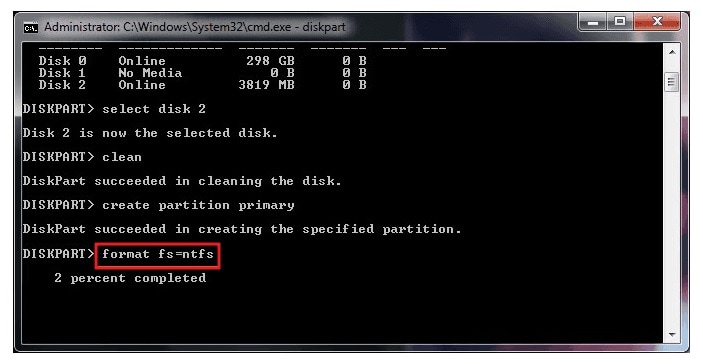
Step 5. Type in 'select disk 3' and press Enter (Replace the number 3 with your appropriate USB drive number).
Step 6. Next, type in 'list volume' and repeat the above two steps to select the required volume.
Step 7. Once the volume is set, enter the 'format fs=ntfs quick' command to begin the formatting sequence.
Step 8. Upon conclusion, enter the 'exit' command to close the partition management program.
Note that this is the fastest process to convert USB to NTFS as it accesses the drive without loading any UI. Although, you should remain careful when verifying the required disks and volumes. If not, you can lose essential data from other drives connected to your PC.
Method 4: Format USB Flash Drive to NTFS Using Rufus
Rufus is a third-party tool for creating bootable USB drives. Since the bootable USB drive process involves formatting the drive, you can use the tool to format your USB drive to the NTFS file system as well. It is available on the official Rufus website, and the latest package supports all the recent Windows OS versions.
Once you download and install a suitable package, you can run the tool and follow the below-mentioned procedure.
Step 1. Connect the USB drive to your computer.
Step 2. Rufus will detect and show your USB drive in the Device drop-down if connected.
Step 3. Click the Boot selection drop-down and select 'Non-bootable.'
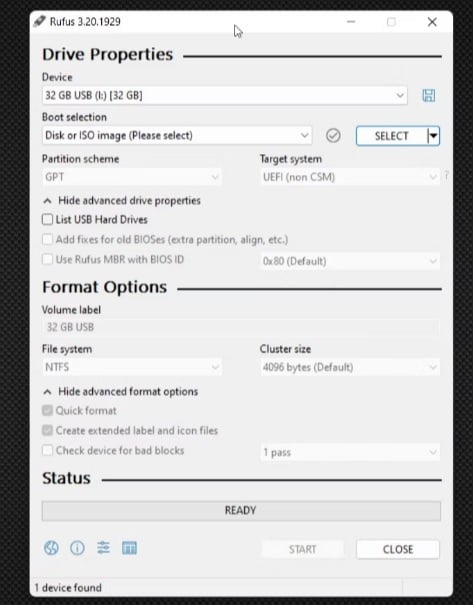
Step 4. Under the Volume label, type a name for your USB drive.
You can leave it as default if you wish.
Step 5. Browse through the File system drop-down and select NTFS.
Step 6. You can go to the Advanced Format Options section and select the more minute details or make it a Quick Format.
If you want to leave them as default, you can move on to the next step.
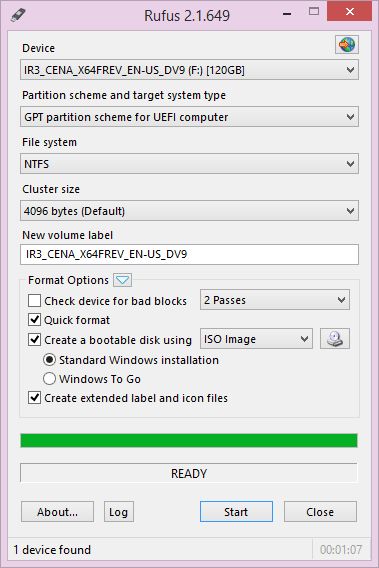
Step 7. Finally, click on Start to initiate the formatting procedure.
Step 8. Click OK to confirm the action.
Rufus doesn't put much drain on your system's hardware to format a USB drive, even if it ranges in the hundreds of TBs. It is entirely free to use, yet you can go for the premium version to get the most functions unlocked.
Method 5: Format USB Flash Drive to NTFS Using AOMEI Partition Assistant Standard
AOMEI is a partition assistant that can get you through formatting any drives, including USBs, connected to your system with minimal trouble. It has a more extensive installation but supports all Windows versions from XP all the way to 11. It can help you with all formatting, partition, and drive verification tasks with little need for input. The Standard edition is free to use for personal use.
To use it for formatting a USB drive to NTFS, you can use the following method.
Step 1. Insert your required USB drive into the system.
Step 2. Launch the AOMEI Partition Assistant Standard through the Start Menu or Search function.
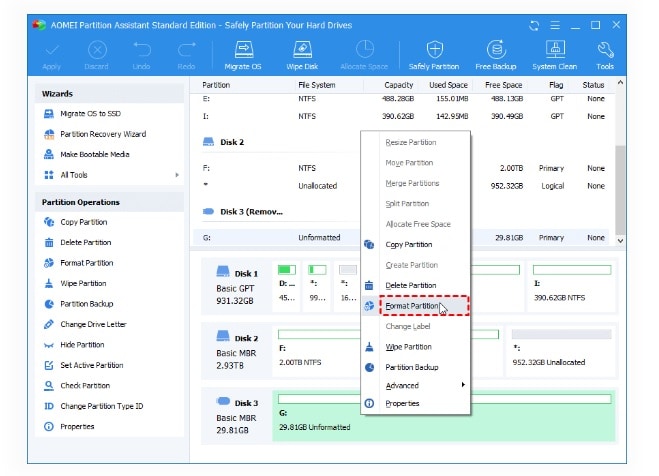
Step 3. Locate the USB drive from the menu and right-click on it.
Step 4. Select the Format Partition option from the drop-down menu.
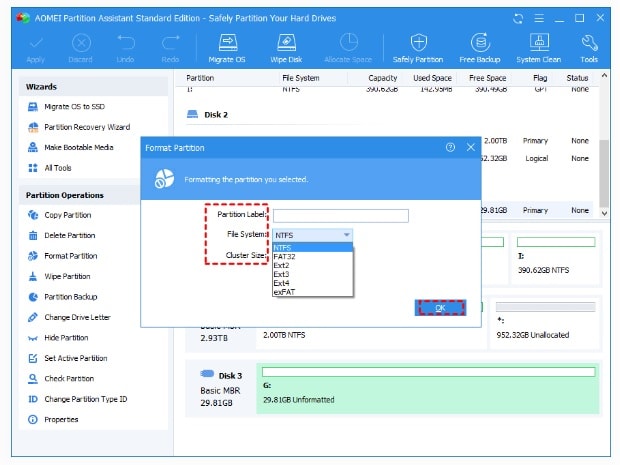
Step 5. In the next dialog box, set the file system as NTFS.
You can also determine the cluster size and volume label per your preference. Click the OK button when you're done.
Step 6. Go to the Apply button on the top pane in the main menu.
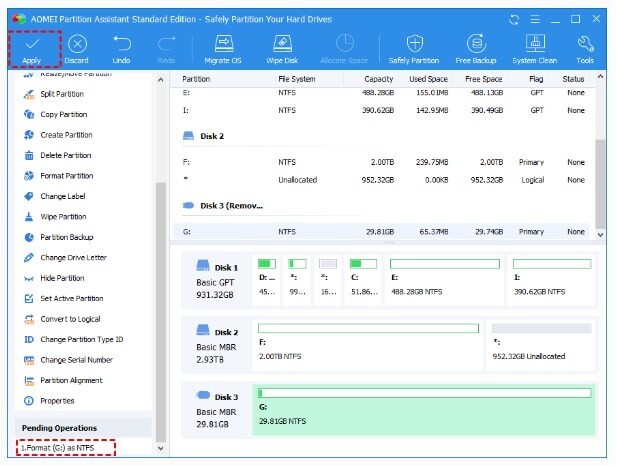
The formatting process will now commence, and a status bar will start filling up at the bottom of the screen. Once done, you can exit the application and use the USB drive as intended.
How to Check If a USB Drive Is Formatted With the NTFS File System
You can check your USB drive properties to confirm the changes and ensure it uses the NTFS file system. To check the USB Drive file system format:
Step 1. Browse through This PC from the File Explorer.
Step 2. Right-click on your USB drive and select the Properties tab.
Step 3. In the Properties dialog, open the General tab.
Step 4. Here, check if the File system section reads NTFS.
Can't Format USB Drive to NTFS - Causes and Fixes
Sometimes, when you try to convert USB to NTFS, you may receive the dreaded "Windows was unable to complete the format" message. Yes, it can be a bit stressful, but you can solve the issue by understanding the root cause and applying the appropriate solution, as mentioned below.
The Formatting Process Gets Terminated Before Completion
In case the formatting process for your USB flash drive shuts down before conclusion, it may be due to damage to the device. That can occur in the form of physical damage or within the digital sectors of the drive. It can also be due to the presence of malicious software within the drive, which can be hard to get rid of if you don't have a strong enough firewall.
Still, you can try the following methods to ensure the process completes within a reasonable time.
Check the USB Port and Connection: The most apparent issue with the flash drive is that it is not connected correctly. It may be possible that your system's port is damaged or that the device itself has a loose connector. Before trying to format the drive, it helps to check whether it fits snugly within the USB port and stays that way for the entirety of the process.
Some systems that get heated during formatting may allow the flash drive to disconnect. If so, you should use a USB extension cord or another USB port for the job.
Examine the Drive for Physical Damage: There is no use formatting a USB drive that is too far gone physically. That may not even show up with external damage, as shocks and vibrations can cause the electronics within to deteriorate. Therefore, you should always check thoroughly whether the drive is good to go for formatting.
Scan for Viruses and Malware: Shady software that inhabits your flash drive may prevent you from formatting the appropriate file systems. It is a common feature of ghost drives that don't even need to be opened to insert a trojan. That's why you should always scan a USB drive before formatting or backing up any data. Windows Defender is a reliable tool, but using third-party tools like Norton and McAfee can fetch you improved results. Try to take the time and use a deep scan to check thoroughly for any malware.
The Formatting Process Doesn't Commence
If the formatting process doesn't start in the first place, it is probably due to system errors or bad sectors within the drive. In such a scenario, you should try out the following methods to ensure that you convert USB to NTFS in a reliable manner.
Fix the Corrupted or Bad Sectors: Corrupted or bad sectors within the flash drive can prevent your system from accessing the entire storage device. They can occur due to physical factors such as moisture sneaking in or through inadequate file repair. In that scenario, you may have to create partitions using AOMEI that isolate those sectors, reducing the overall storage capacity of your flash drive. Alternatively, you can purchase a new flash drive to convert it to NTFS.
Remove Write Protection from the Drive: If your flash drive is write-protected, it might prevent specific software from accessing it for formatting. Thus, you need to remove the protection either by entering the correct password or using a third-party tool before you can change USB to NTFS.
Repair any File System Errors: File system errors can pop up as you try to format USB drive to NTFS using any GUI-based software. A clear indication of the file system's corruption is that the flash drive comes up as RAW when you pull it up on the Disk Management utility. In order to clear it, you can use third-party software like AOMEI or EaseUS Partition Master to convert USB to NTFS.
Conclusion
And that's all there is on how to change USB to NTFS. Windows makes it surprisingly straightforward and offers multiple avenues with slightly varying levels of success. Did we miss something? What is your preferred method to convert USB to NTFS? Feel free to share your thoughts in the comments below.