
In this article
What Is the DiskPart Disk Management Tool
DiskPart, the replacement for the -fdisk, is a command-line utility tool that allows users to manage existing disks or delete partitions or volumes in their PC via the DiskPart command. Users can enter various commands directly on the DiskPart to compile or organize hard disk partitions or generate a text file script to execute several varying commands.
The DiskPart runs on all Windows versions, from Windows 2000 to the latest versions. It is updated to a newer version every time Windows releases a new version of its OS. Its latest version features 38 commands.

Notably, most disk partition commands and operations you could otherwise only do in the Disk Management tool before are now integrated seamlessly into DiskPart. The DiskPart is most commonly used as a utility for partitioning internal hard drives, which can also format removable media devices, such as USB flash drives.
- DiskPart can prove useful in such situations:
- Converting basic disk to dynamic disk
- Creating partitions
- Format a partition
- Manage, delete, or edit partitions
- Assign, edit, or delete a drive letter
- Allows users to delete all information stored on a target disk using the clean command
- Enables users to access disks that are no longer displayed in the disk management tool
How To Open DiskPart in Windows 10/11?
To open DiskPart on a PC running Windows 10 or 11 OS, users need to have Administrator permission first. Here are two ways how you can open DiskPart in Windows 10/11:
Method 1: Using the Windows Search Bar
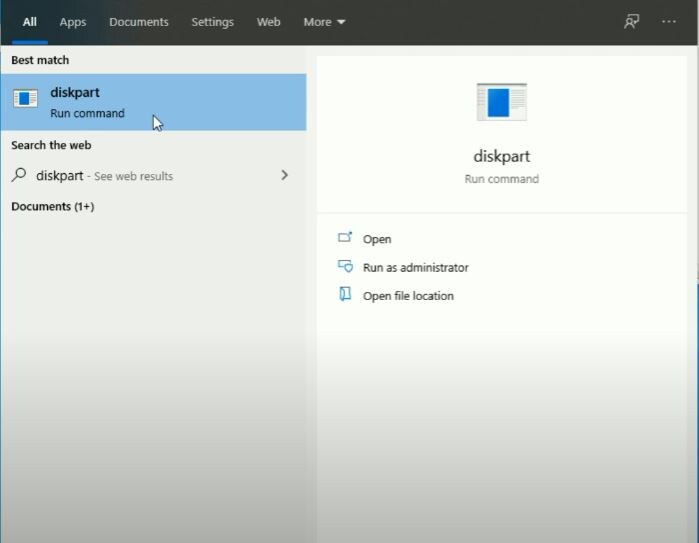
Step 1. Type diskpart in the Search box in your screen's bottom left corner.

Step 2. When the DiskPart appears in the search results, right-click it and select Run as administrator.
Method 2: Using the Run Command
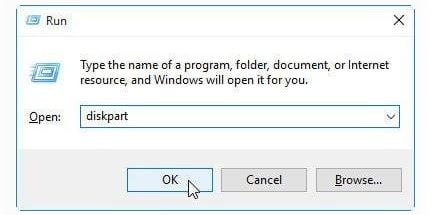
Step 1. Press the Win + R keys to open the Run window on your PC.
Type diskpart in the provided box, then click OK.
Important Tips When Using DiskPart Commands
First, using DiskPart requires a thorough understanding of data storage terminology. At the very least, to use DiskPart effectively, you must have a basic understanding of what Windows disks are, what it does, and their general purpose. With that in mind, only use DiskPart or dabble into its commands if you are sure what you are doing.
Always use caution while using DiskPart since there is no undo function if you accidentally select the wrong object or run the wrong command. Please note that once a command is entered, no matter how destructive it may prove, DiskPart will execute such. It does not ask for any confirmation before it runs.
For example, perform an errant DiskPart delete partition command. You will have no choice but to use another utility tool, such as a third-party partition recovery software, to retrieve the data you may have lost along with the wrongfully deleted partition.
Recover over 1000 types of data types, like photos, videos, emails, files, audios, etc.
Recover data from numerous scenarios. Be it due to files being overwritten, a system crash, accidental formatting or virus attack, Recoverit is able to make a total recovery.
Support recovery of data from 2000+ storage devices, including computer/laptop, USB flash drive, SD memory card, external hard disk, digital camera, etc.
Ensure 100% data safe and easy operations.
Here are a few tips to avoid issues when using DiskPart:
- Always back up the disk you plan to modify before you start using DiskPart
- Look up the disk terminologies you may still be unaware of or ask for help from someone more knowledgeable about the topic before using DiskPart
- Always be vigilant when using DiskPart, especially on systems that utilize dynamic disks.
How To Create a Partition Using DiskPart
Using DiskPart to create partitions isn't all that hard. Even if you are a beginner with the program, you can execute this command fairly easily. Here is how you create a partition using DiskPart:
Step 1. Press Win + R and input diskpart to open the DiskPart window.
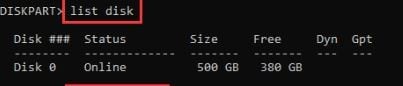
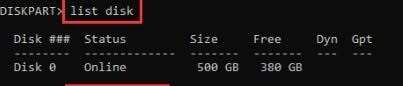
At the DiskPart window, list down the disks currently in your system using this command:
list disk
It puts all the disks in the current system in a list for you to know the disk number on which you want to create a partition.
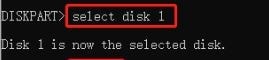
Step 2. Select the disk number in which you want to create the partition using this command:
select disk *
Replace the * with the disk number you want. To create a new partition using DiskPart, you must ensure unallocated space on your selected disk.

Step 3. After selecting the disk, you wish to modify, type one of the following commands according to your requirements:
- To create a primary partition:
create partition primary size = n
n represents the partition size in MB. Replace it with the MB size you wish your partition to be.

- To create a logical partition:
create partition extended size = x
create partition logical size = y
x represents the extended partition size in MB, while y represents the logical partition size in MB. You need to create an extended partition first to create a logical partition.
Step 4.Name the partition you created using the following command:
assign letter = *
Replace the * with the letter you want your partition to be named.

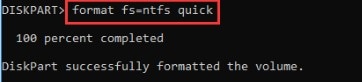
Step 5. To use your newly created partition, you must first format it. Enter the following command to do so:
format fs=ntfs or format fs=ntfs quick
The formatting process can sometimes prove slow, so if you want it to speed up, use the command with the word quick on it.
Close DiskPart after the partition creation process.
How To Create Volume Using DiskPart
When using dynamic disks in Windows OS, you can create up to four volume types using DiskPart. They are volume mirror, simple volume, striped volume, and RAID-5 volume. Let us show you how to create a simple volume using DiskPart.
Step 1. Open DiskPart. At the DiskPart window, list down the disks currently in your system using this command:
list disk
It puts all the disks in the current system in a list for you to know the disk number on which you want to create a volume.
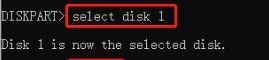
Step 2. Select the disk number in which you want to create the volume using this command:
select disk *
Replace the * with the disk number you want.

Step 3. Create the simple volume by entering the following command:
create volume simple size=1000
The size you input will be in MB. After creating volume, exit DiskPart.
How To Format Partition Using DiskPart
Using the DiskPart, you can format a local or an external hard drive for file storage in your Windows OS environment. Below is how you can format a disk partition using DiskPart.
Step 1. Launch DiskPart.
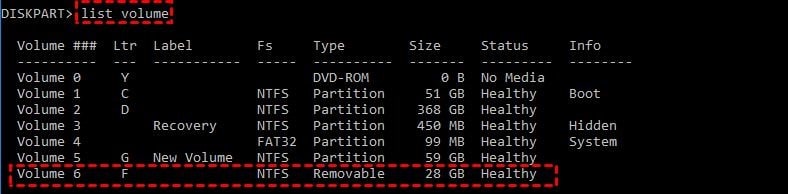
Then, list down the volumes currently in your system using this command:
list volume
It puts all the volumes in the current system in a list for you to know the volume number you want to format.
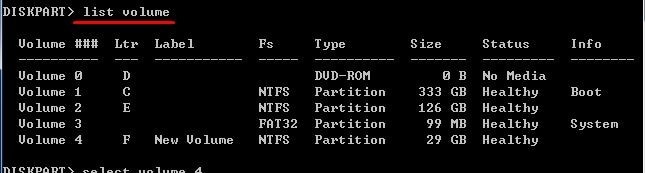
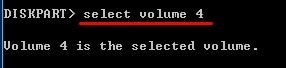
Step 2.Select the volume number which you want to format using this command:
select volume *
Replace the * with the volume number you want.
Step 3. Enter the following command to format your selected volume:
format fs=fat32 or format fs=fat32 quick
Use the command with the word quick on it if you want the process to speed up.
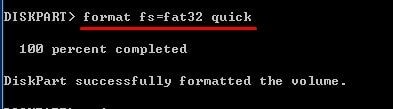
After formatting the partition, close DiskPart.
How To Extend Partition Using DiskPart
Many say having space for a partition or volume is the better way to configure 2 distinct disks. Dynamic disk extensions only append the recently added space. It adds disk space to the original partition without resizing the stored data.
Moreover, when a partition is configured using a RAID array, the configuration disconnects performance in each partition and does not provide fault tolerance. DiskPart, on the contrary hand, restripes your existing data. It benefits users with RAID array partitions because the existing partition data is distributed across all drive systems in the array rather than simply adding new space at the end.
Nevertheless, here is how you extend the partition using DiskPart:
First, ensure that there's free space available on the same drive next to the partition you wish to extend. Make sure that there are no other partitions between them. Also, remember to have a full backup of your important files before proceeding.
Step 1. Open the DiskPart window. List down the volumes currently in your system using this command:
list volume

Step 2. Select the volume using this command:
select volume

Step 3. Extend the selected partition/volume in MB.
If you do not specify the size, it should extend. Enter the following command:
extend

Exit and close DiskPart after you extend the partition.
How To Shrink Partition Using DiskPart
You can shrink a partition/volume using syntax commands through Windows Disk Management to get interface performance or DiskPart to directly shrink partitions/volumes in the command prompt. Here is how you shrink partitions using DiskPart:
Step 1. Start Diskpart. Then, run this command:
list volume
Step 2. Select the volume in your system using this command:
select volume

Step 3. Shrink the selected volume by entering the following command:
shrink desired=*size*

Replace *size* with your preferred volume size. Finally, close DiskPart.
How To Delete Partition Using DiskPart
DiskPart's delete command erases dynamic disks, volumes, partitions, and shadow copies. Assume you have multiple volumes on a given disk or an unwanted partition, such as a recovery partition, and you want to remove them; DiskPart can help you with that. Here's how to go about it:
Step 1. Open the DiskPart window. Then, execute this command:
list disk
It puts all the disks in the current system in a list for you to know the disk number on which you want to delete a partition.

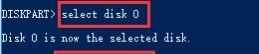
Step 2. Select the disk number in which you want to delete a partition:
select disk *
Replace the * with the disk number you want.
Step 3. List down the partitions in your selected disk:
list partitions
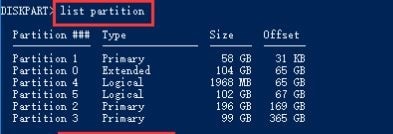
Step 4. Select the partition found on the selected disk:
select partition *
Replace the * with the partition you want to delete.

Step 5. Delete the selected partition:
delete partition

Then, close the DiskPart window.
How To Clean Partition Using DiskPart
DiskPart provides users with two options for wiping disks: clean and clean all. Both commands can erase or wipe a disk making it not initialized and unallocated, but they are different. Below is a table differentiating the two commands:
|
Clean |
Clean all |
|
Deletes all partitions on the selected drive. The deleted data could still be recovered using professional data recovery software. |
Securely erases the content of the drive. It writes over every sector on the chosen disk and completely zeroes out the data on the disk. Deleted data can’t be recovered by any means. |
|
Finishes quickly as it only marks the data on the target disk as deleted. |
It could take a while to finish based on the disk's size. |
|
Allows users to delete a certain partition on top of cleaning the disk. |
Does not allow users to do anything else besides cleaning the disk. |
Here are the steps for you to use the clean and clean all commands in DiskPart:
Clean
Step 1. Launch DiskPart. List down the disks currently in your system using this command:
list disk
It puts all the disks in the current system in a list, so you know the disk number you want to clean.

Step 2. Select the disk number you want to clean:
select disk *
Replace the * with the disk number you want.
Step 3. Clean the selected disk and exit DiskPart.
clean

Clean All
Step 1. At the DiskPart window, list down the disks:
list disk
It puts all the disks in the current system in a list for you to know the disk number on which you want to use clean all.

Step 2. Select the disk number you want to clean all:
select disk *
Replace the * with the disk number you want.
Step 3. Type this command to clean all the selected disks and close DiskPart.
clean all
Use DiskPart for Many Other Tasks
While what is listed above is already impressive in its own right, DiskPart still has several other uses or commands it could run. Here are a few more of them:
- Detail disk/partition/volume - provides detailed information about the selected disk, partition, or volume.
- Create volume stripe - creates a striped volume on the specified disk.
- Convert basic/dynamic/mbr/gpt - converts the selected disk from dynamic to basic/ from basic to dynamic/ from GPT to MBR, etc.
- Active - marks the selected partition as active.
- Assign - assigns a drive letter or mount point on the selected volume
Conclusion
After reading this tutorial, you should be able to delete partitions using DiskPart and its various other commands. Truly, DiskPart is an excellent command line utility to manage disks. It can be a very powerful tool once you know how it works