Android Transfer
- Android to Mac+
- Mac to Android+
- Android to Android+
- iTunes to Android+
- Samsung Transfer+
- HTC Transfer+
- iTunes to Android+
- Android to PC+
- PC to Android+
- Android to iPhone+

• Filed to: Android Transfer • Proven solutions
Taking selfies is a big trend today, and wherever you go, it is natural to see people taking selfies and a lot of photos using their Android smartphones rather than going for the conventional digital cameras. One vital reason for people preferring to use their smartphones instead of digital cameras to take pictures is that nobody ever travels anywhere without his/her smartphone. Therefore, a smartphone is readily accessible anytime and anywhere which means that you can share your best pictures with your family members and friends when you are on holiday.
Talking about photos, what if you got yourself a new Android phone and wish to transfer pictures from Android to Android seamlessly? If you are looking for possible ways on how to transfer photos from Android to Android without causing yourself a headache, you have come to the right place. In this article, we will share with you seven different methods to transfer contacts and photos from Android to Android.
- Part 1: App to Transfer All Photos from Android to Android with No Effort
- Part 2: How to Send Photos from Android to Android Via Gmail
- Part 3: How to Transfer Pictures from Android to Android Using Google Photos
- Part 4: How to Transfer Photos from Android to Android Google Drive
- Part 5: How to Transfer Photos from Android to Android with USB Cable And PC
- Part 6: How to Transfer Images from Android to Android Using Bluetooth
- Part 7: How to Transfer Images from Android to Android Using Android Beam
Part 1: App to Transfer All Photos from Android to Android with No Effort
The dr.fone software is a unique one-stop solution to move data and transfer photos from Android to Android phone. This revolutionary software has been designed with a clean User Interface (UI) keeping the end users in mind and with a customer-centric approach. It is probably the easiest and the most convenient software solution that can help you manage all your phone transfers when you wish to share data between two phones. This software is capable of seamlessly transferring content and files between Android, iOS as well as Nokia Symbian devices. If you have been looking for an ideal app to transfer photos from Android to Android, the dr.fone software is your best bet.
dr.fone - Phone Transfer (iOS&Android)
Features of the dr.fone
- Easy to Use: Even if you are a technically challenged person, you do not have to worry about using the dr.fone as it has an intuitive interface that is user-friendly.
- Full Data Security: When you transfer or upload files using this software, you do not have to worry about data corruption or the loss of data in any manner.
- Full iOS Support: Irrespective of the iPhone model or the version of iOS you use, you can rely on the dr.fone to work with all kinds of iOS operating systems.
- Proper Control of The Transferred Data: Using this software, you can easily control the data that you transfer and select a variety of data at a time.
Here are some easy steps to use this program to transfer your photos between your Android phones (or iOS phones) with just a few clicks!
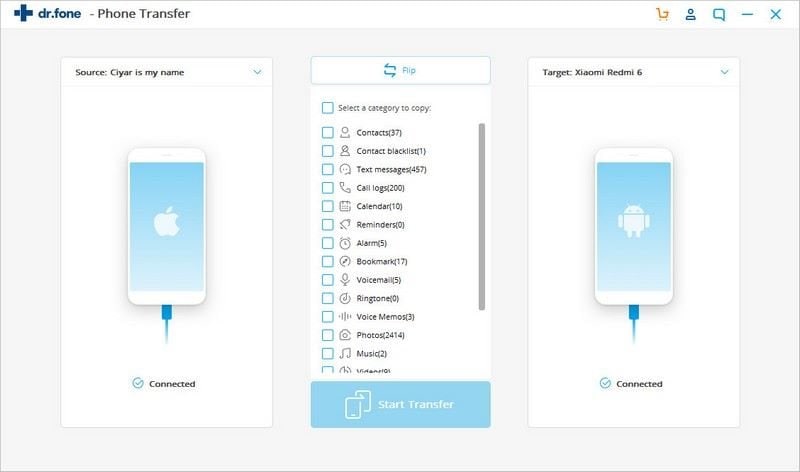
Step 1 Download, install and run the dr.fone software on your PC. Now, click on the tab “Phone Transfer” that you will find on the main interface of the program.

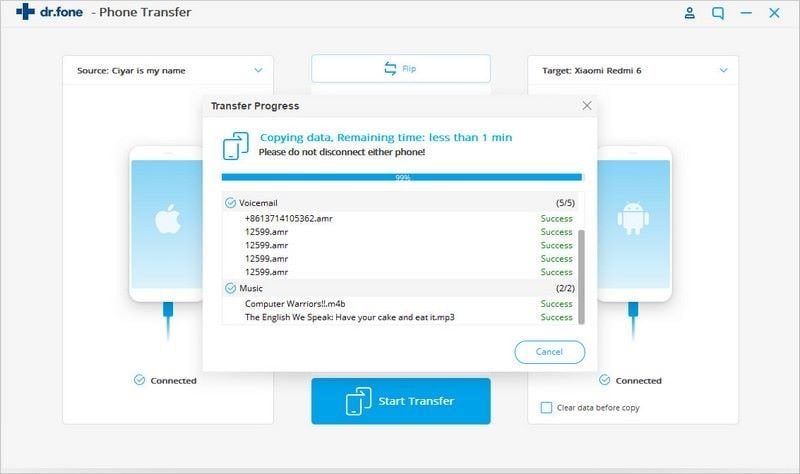
Step 2 Now, connect both your Android devices to your computer and select the data from the middle box that you wish to transfer from your old device to the new one. Simply check all the boxes for the files you wish to be transferred. After that, click on “Start Transfer” to initiate the process of data transfer between the two phones.
And that’s it! Transferring data using the dr.fone software from one device to another is a piece of cake. Using this device, you can rest assured that all your essential information, as well as files, are safely secured and backed up with just a few clicks.
Part 2: How to Send Photos from Android to Android Via Gmail
Another method that can help you transfer photos from Android to Android by using the Gmail app. If your Gmail account is programmed on your Android phone, you can easily transfer pictures from your old phone to your new one. Here’s how you do it!
Step 1 Open your Gmail app to start the process.
Step 2 Now, compose a new message in the app by clicking on the (+) icon or the pencil icon that is meant to compose new emails.
![]()
Step 3 Click on the attached button after composing the message. You will find a small paper clip icon at the top of your screen which is used for attaching files.
![]()
Step 4 Once you click on the attach button, you will see a menu appear at the bottom of the page. Tap on the pictures to attach the photos that you wish to transfer to your new device. You can even click on the “Camera” button and simply take a picture to attach it immediately.
![]()
Step 5 After you have selected all the photos that you wish to attach, click on “✔️” or “OK.”
Step 6 Now, since your images are attached, you can finish composing your email and enter the recipient’s email address.
Step 7 Once all that is done, simply send the message or email by clicking on the icon at the top of the screen that looks like an envelope. According to your network connectivity, it might take a few seconds or minutes for the pictures to be sent.
Part 3: How to Transfer Pictures from Android to Android Using Google Photos
To get started to transfer photos from Android to Android using the Google Photos, you must first download as well as install the app of Google Photos. To carry out this task, simply follow the steps given below:
To Save A Photo or A Video
Step 1 Open the app of Google Photos on your Android tablet or phone.
Step 2 Now, select a video or a photo.
Step 3 Click on “More” and then “Save to device.” If you already have the photo on your device, you will not see this option.
Download All Videos or Photos
Step 1 On your Android tablet or phone, open the app on Google Drive.
Step 2 Tap on “Menu” and then tap on “Settings.”
Step 3 Under Google Photos, click on “Auto Add.”
Step 4 At the top of the screen, you will see the option of “Back.” Click on it!
Step 5 Open the folder of Google Photos.
Step 6 Choose the folder that you wish to download.
Step 7 Click on “More,” then click on “Select All” and finally click on “Download.”
Transfer All the Photos to Another Google Account
If you have accidentally backed up all your photos on the incorrect Google account, you can also transfer them to another account. All you need to do is modify the account where you backed up all your photos and then share your entire photo library with that same account.
Saving all your photos on the correct Google Photos account will help you access all those photos easily on your new device. Therefore, you are essentially transferring photos from one Android device to another simply by saving the photos in the app.
Part 4: How to Transfer Photos from Android to Android Google Drive
You can also upload, share, view as well as edit files with the help of Google Drive. Transferring photos using Google Drive might take up some space in the Drive, but the good thing is that you will be able to access it on your new device without going through a headache that is usually associated with data transfer.
To transfer photos using Google Drive, here are some steps you can follow:
Upload as Well As View Files
Step 1 Open the app of Google Drive on your Android tablet or phone.
Step 2 Click on “Add” and then tap on “Upload.”
Step 3 Find all the files that you wish to upload and click on them.
Step 4 View all the uploaded files in your “My Drive” till the time you decide to move them again.
Doing this will allow you to access all your photos on your new device.
Part 5: How to Transfer Photos from Android to Android with USB Cable And PC
If you are wondering how to transfer pictures from Android to Android using a USB Cable and PC, your doubts will be cleared soon enough. Just follow the steps given below to carry out the process!
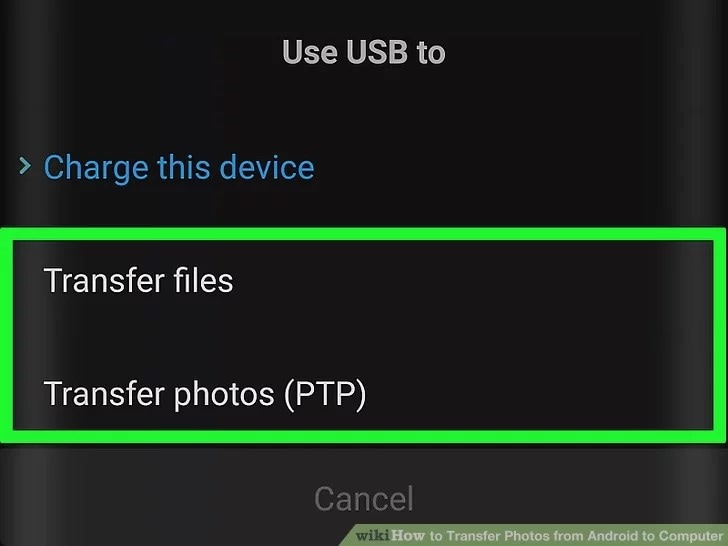
Step 1 First, connect your Android device to your computer using a USB cable. If your Android phone asks you to choose one type of connection, select Media Device (MTP) before continuing.
Step 2 Open Start on your PC. Click on the logo of Windows to do that.
![]()
Step 3 Now click on the icon that is in the shape of a folder on the lower-left part of the Start window. Tapping on it will open the File Manager.
Step 4 On the left of the File Explorer, you will see the name of your Android phone. You might be required to scroll down to find it. Alternatively, you can also tap on “This PC” and then click on your Android phone name.
Step 5 Double-click on the “SD Card” or the “Internal Storage” folder depending on where you wish to transfer your photos.
Step 6 Now click on the folder that says “DCIM.”
Step 7 Now click on the “Camera” folder. This is where all the photos on your Android phone are stored. You will be able to see the list of all the photos on your device. You might be required to open another folder if you have stored your photos in an album.
Step 8 Now, select the photos that you wish to transfer to your PC. You can select them independently or together according to the photos you require to store.
Step 9 Now, click on “Home.” You will find this tab on the upper-left part of the window of File Explorer.
Step 10 Now, click “Copy” in order to copy all the photos that you have selected. You can also choose to “Cut” all the photos if you wish to remove them after the transfer.
Step 11 Now, select the destination folder, where you wish to store all the pictures from the left side of the File Explorer window.
Step 12 Now, again click on “Home” where you will find the “Paste” icon. Click on it, and all the selected photos will get transferred to the folder you have selected, irrespective of whether you cut or copied the photos.
Part 6: How to Transfer Images from Android to Android Using Bluetooth
If you are wondering how can I transfer photos from Android to Android using Bluetooth, your doubts will be clarified once you read further.
Step 1 Switch on both of your Android phones and turn on the Bluetooth in them both. You will find the Bluetooth option in the Settings part of your phone. Turning it on will enable the feature of file sharing between both the phones. After that, connect both the phones in order to pair them for file transfer.
Step 2 Now, simply share the files from one device to another by opening the “File Manager” folder on the phone from which you are transferring the files.
And voila! All the files will be transferred from your old device to your new one using Bluetooth.
Part 7: How to Transfer Images from Android to Android Using Android Beam
Now you can stop thinking about how to transfer contacts and photos from Android to Android using Android Beam and do it yourself without any worries. You just need to ensure that Android Beam is enabled and you are good to go. To do transfer images using Android Beam, do the following:
Step 1 Unlock both your Android phones as files cannot be shared if your phones are locked.
Step 2 Open the items that you want to share such as photos, web pages, videos, contacts or apps.
Step 3 Press both your Android phones together from their backside. They need not touch each other but must be less than an inch distance-wise from each other.
Step 4 After a few seconds, you will see a notification saying “Touch to beam” at the top of the screen.
Step 5 Touch it, and you will see that the file has been sent to your other Android device.
Step 6 Now, simply click on the incoming file that you see on the other Android phone to confirm that you have received the photos.
Conclusion
It is natural for people to want to save their photos and other memories when changing their Android phones. Therefore, if you ever want an app to transfer pictures from Android to Android, you can simply use the dr.fone or any of the other methods listed in this article.
Elva
staff Editor