iPhone Problems
- iPhone Apple Logo+
- iPhone Update Problem+
- iPhone Sound Problem+
- iPhone Common Problems+
- iPhone syncing Problems+

• Filed to: Fix iPhone System • Proven solutions
There has been a lot of complaints pouring in from iOS users all around the world about a specific issue – The iTunes Error 17. They complain that this error is shown every time they try to update or restore their iOS devices using iTunes. Since Apple has released their new iOS version, users depend on iTunes to do a complete update.

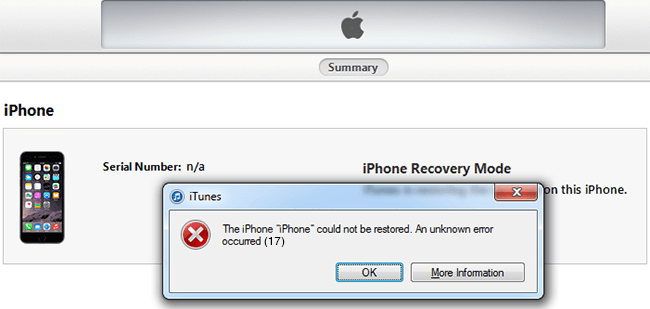
However, the Error 17 iTunes has prevented the device from updating or restoring through iTunes. To their dismay, the update or restoration process stops halfway, with an error window that reads “The iPhone could not be restored.”
Part 1: iTunes Error 17: Does Anybody Know Why It Really Happens?!
The iTunes Error 17 is observed during the update or restoration process of iOS devices through iTunes desktop software. Apple themselves have admitted to this problem and have rolled out a report stating that it is caused by the communication error between iTunes and Apple’s update server.
Now even before the error notification pops ups, there are some telltale signs that the user can notice an impending iPhone Error 17. Some of the most notable ones are:
- Your system running sluggishly
- The program failing to respond
- Uninitiated restarts during the update process
- The update takes an unusual amount of time even for a small increment in progress
However, after reviewing numerous customer care complaints on the issue, we know that the iPhone restore Error 17 isn’t just restricted to connectivity issues but can be also several software and hardware issues.
We have reviewed the case over and over and have come up with usable solutions to iTunes 17 error! If you have met with this notorious error, this list is for you!
Part 2: 5 fitting ways to fix iTunes Error 17
1. Maintain a stable internet connection
Like we had mentioned, Apple claims that the primary reason for iTunes Error 17 is the connection error between the software and the Apple Servers. Make sure you have a stable internet connection as breakages in connection will result in Error 17 in iTunes.
2. Ensure the USB connections are perfect
Communication error between the device and the servers can also arise from loose USB connections. Make sure that USB cable is plugged in neatly at both ends. Also, ensure that there are no breakages in the wire. It’s easiest Error 17 fix!
3. Check Firewalls, proxies, and Anti-virus
Firewalls, proxies, and antivirus can meddle with your internet connection and can prevent some apps on your device from accessing it. Disable add-on layers of internet protection for iTunes as you don’t have to worry about viruses or malware since it's from a trusted manufacturer.
4. Download and install the latest version of iTunes
To get the latest iOS updates, the latest version of iTunes is essential. If you are running on an outdated iTunes build, then that itself can contribute as the sole reason for iTunes error code.
5. Check/Reset the host's file for Apple server entries
Sometimes, iTunes cannot connect to the internet even when you have a solid internet and USB connection. This is caused by internal host files blocking the connection between the software and Apple servers. Fret not as there are fixes to reset these host files to pristine condition; we will walk you through them!
How to reset host files on Mac
If you are using a Mac to update/restore your iOS device, then these are the steps to reset host files and fix Error 17;
Step 1: Open finder; Applications > Utilities.
Step 2: Open Terminal.
Step 3: Type in the following command line and press return.
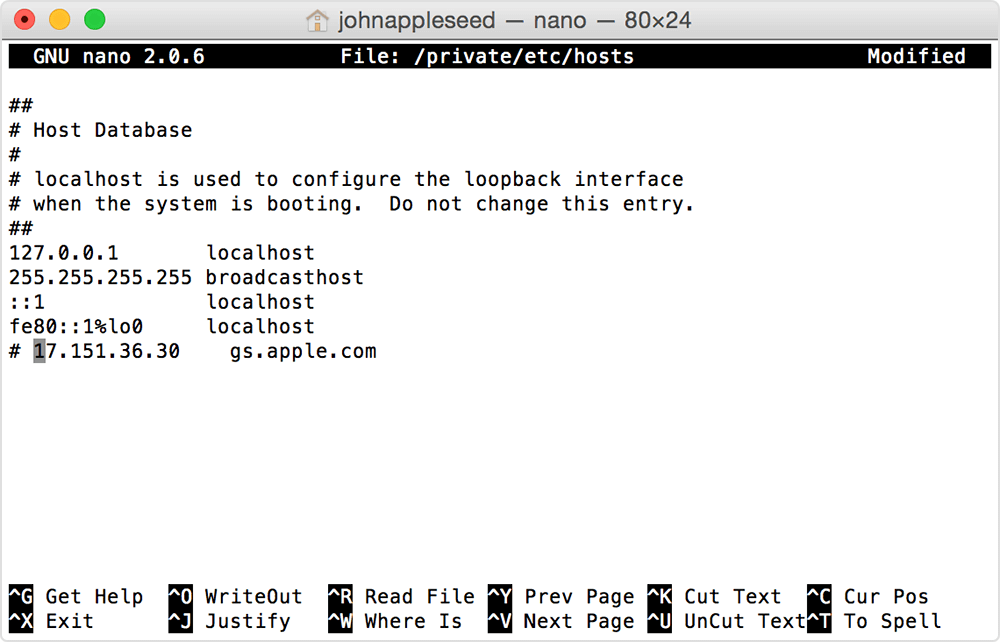
sudo nano /private/etc/hosts
Step 4: Type in your login passwords and press return.
Note: You won’t see your password in the terminal window when you type it.
Step 5: The following window will appear. It contains the list host file names. Locate the entry “gs.apple.com”.
Note: If you don’t see such a file, it means the iTunes Error 17 isn’t caused by host files. If you see the “gs.apple.com” entry, refer to the following steps.
Step 6: Insert ‘#’ and space to the front of “gs.apple.com”. Refer the following picture for the format.
Step 7: Click Control and O simultaneously to save the file.
Step 8: Click Return to save the file name.
Step 9: Click Control and X simultaneously to exit the screen and restart your Mac to before further use.
This method does not have any device restrictions. Even the Error 17 on iPhone 5s can be resolved with this method as well as the modern too!
How to reset host files on Windows (Windows 10)
Step 1: Open notepad in Windows
Step 2: Paste the following text into the new notepad file without changing the order
Step 3: Save the file to the desktop with the filename as “hosts". Close the notepad.
Step 4: Search %WinDir%\System32\Drivers\Etc in the Cortana search tab and select the folder icon
Step 5: Rename the hosts file to Hosts.old
Step 6: Now copy the host file saved in the desktop and move/copy it to %WinDir%\System32\Drivers\Etc. Enter the admin password if asked.
 # Copyright (c) 1993-2006 Microsoft Corp.

#

# This is a sample HOSTS file used by Microsoft TCP/IP for Windows.

#

# This file contains the mappings of IP addresses to host names. Each

# entry should be kept on an individual line. The IP address should

# be placed in the first column followed by the corresponding host name.

# The IP address and the host name should be separated by at least one

# space.

#

# Additionally, comments (such as these) may be inserted on individual

# lines or following the machine name denoted by a '#' symbol.

#

# For example:

#

#      102.54.94.97     rhino.acme.com          # source server

#       38.25.63.10     x.acme.com              # x client host

# localhost name resolution is handle within DNS itself.

#       127.0.0.1       localhost

#       ::1             localhost
Part 3: Need an easier way to fix iTunes Error 17 message? We have got you covered!
The worst part of iTunes Error 17 is that it does not let your phone update or restore. Also, having the update/restore process to stop midway has resulted in numerous cases where the phones got bricked. We are not solely talking about iPhones here, but all iOS devices in general. Therefore, if you got an iPad, Error 17 is definitely a concern!
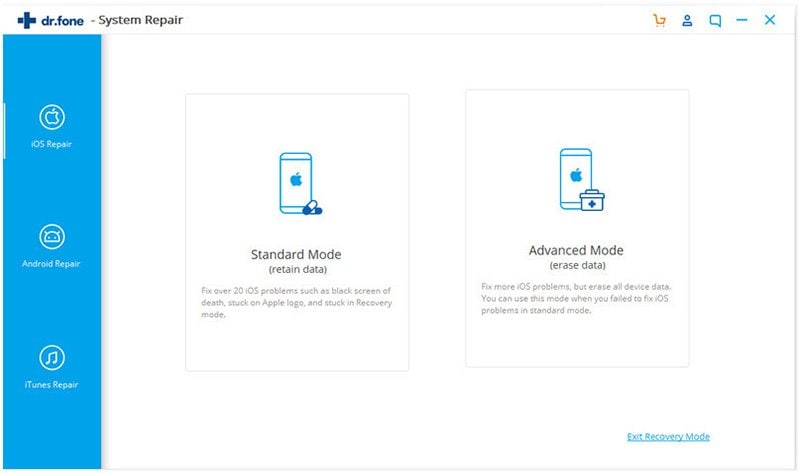
However, there is an even easier iTunes Error 17 fix! Something that will save you from the arduous job of checking every single fix on the list. It is a reliable and intuitive software program that does all the work for you – dr.fone - System Repair (iOS).
No more “iPhone could not be restored Error 17” notifications as the dr.fone - System Repair (iOS) is the best iPhone Error 17 fix there is! The iOS System Recovery tool is not just a one trick pony; it has an array of features in addition to Error 17 iPhone restore.

dr.fone - System Repair (iOS)
Best iTunes Error 17 Fix
- One click operation
- Safe and reliable
- Also applicable in iPad restore Error 17
- Intuitive UI
It’s easy to set up, easy to troubleshoot!
How to fix Error 17 on iTunes? We have laid out a step-by-step procedure to walk you through the whole process! Say goodbye to the “The iPhone could not be restored 17” error!
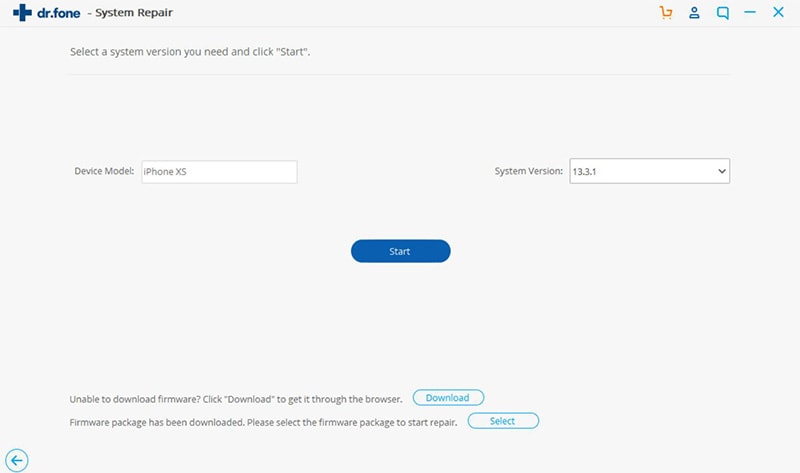
(1) Launch the dr.fone from your desktop. You can download the software from the official website. Connect your iOS device to the PC and click “Repair”.

2) Press “Start” to begin the repair process.
3) Follow the instructions to enter your device into DFU mode.
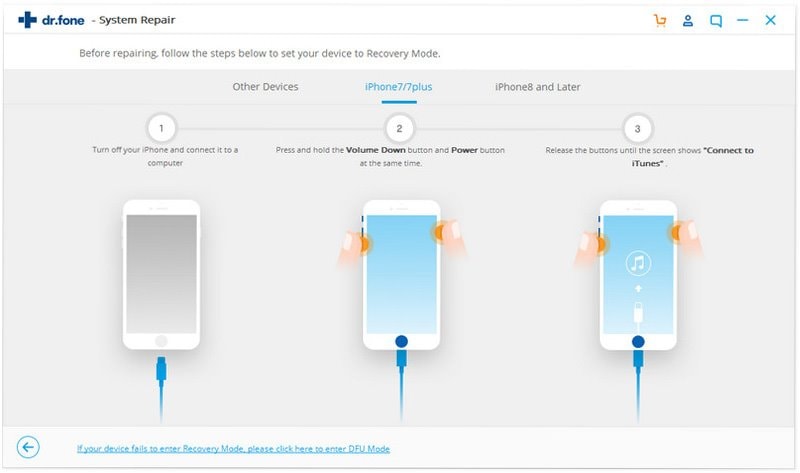
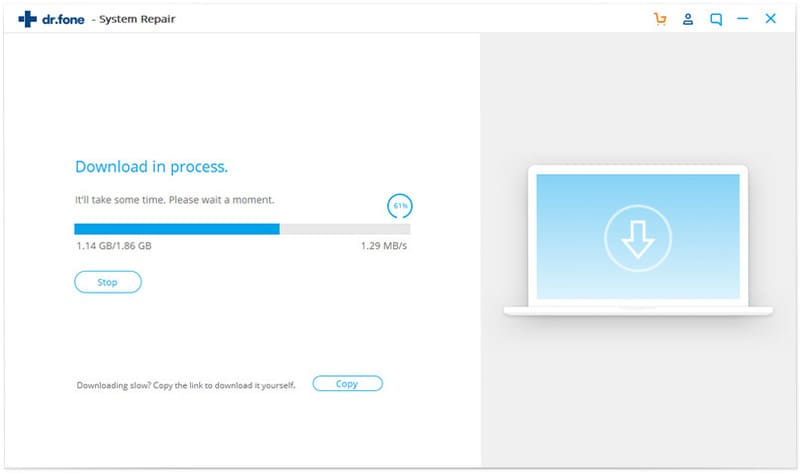
4) The system will them automatically recognize your iOS device. Ensure that the software has recognized the right info about your device. Click “Download” to begin downloading the iOS firmware. The software can also resolve the Error 17 iPad has when it updates/restores!
5) Wait for the system to finish downloading. The time will vary based on your internet connection and firmware file size.
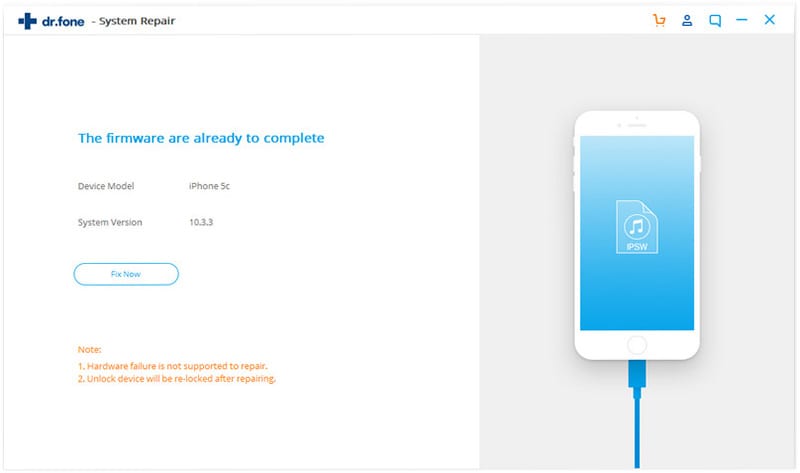
6) Click "Fix Now" proceed to repair your iOS device after successfully downloading the firmware.
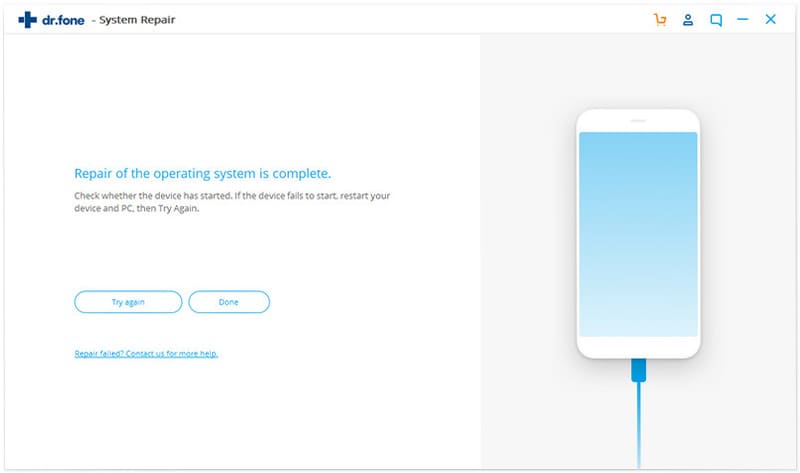
7) The window will show the successful repair of your iOS device!
And that’s it! The once click Error 17 iTunes fix! The two major perks of dr.fone - System Repair (iOS) are ease of use and convenience. You can have your iOS device setup and ready within minutes. The best part is that you get additional features that are also helpful in data backup and restore!
Elva
staff Editor