It could be a big "Disaster" when you are working in a Word document, all of a sudden, a power outage comes out of nowhere and all of the work you had done disappears. You wish you had saved the document but since you hadn't remembered to hit save, all the data you had entered is all gone.
Depending on just how much work you had completed, you may not be able to, nor have the time to re-write the document. Then you wish to recover an unsaved Word document in Microsoft Word 2016, 2013, 2010. 2007 or more earlier version. But the problem is how?
If you're also frustrated by this problem, then you've been the right place. In this post, we're going to show you 3 ways to recover unsaved Word documents in Windows 10, Windows 8, Windows 7, Windows Vista or Windows XP. You can go through these methods and try them to retrieve unsaved Word document without any data losing.
Part 1. Best Way to Restore An Unsaved Word Document on Mac or Windows
One of the best ways to recover any lost data including unsaved Word documents would be to ask help for data recovery program. But not all data recovery software on the market can do this job well. Here, our secret weapon is known as Recoverit for Mac.
This program is specifically designed to help you retrieve a word document that you didn't save regardless of how you lost it in the first place. And it also works well when you wish to recover other types of data from various disks. Cool, right? Now, you can get this program and take a biref look on the main features of this powerful Word Data Recovery software.
Powerful Mac Data Recovery Software:
-
Supports to recover lost, deleted and formatted data from your Mac, Windows, camera, iPod and other media devices.
-
100% safe and you can recover your lost data and files wothout loss of your data quality.
-
Also can recover music, video, photo, excel, word document and many other type of data.
-
It can recover lost data because of virus infection, unexpected power outages, accidental deletion, software crashes and even improper operations.

2,965,271 people have downloaded it
Follow these very simple steps to use this great program to recover your unsaved Word Document and continue editing it. Since the Windows and Mac version comes with the same UI design, so here, we'll take the Mac version as an example. Windows users can follow the same steps and perform them on your Windows computer by yourself.
Step 1Download and install the program to your Mac.
it is highly recommended that you install the program to a separate drive than the one containing the missing file or the one that you would normally use. You do this to prevent overwriting the data and improve your chances of recovering your data. Once the program has been successfully installed, launch it and you should see the following primary Window.
Step 2 Choose a drive strat scanning:
Click on the "Start" button to begin scanning the drive for the missing data. If you don't see your drive click on the refresh icon and it should appear.
Step 3 Start recovering files:
Select the file you would like to recover from the options and then click on the "Recover" button. The "filter options" button will provide you with additional settings where you can find your missing files in short time.
Note: The "Deep Scan" option on the bottom is available for you to do the deep scanning into your drive thus bring more documents for you.
Part 2. How to Recover Unsaved Word Document in MS Word 2010 or Above?
You probably already know that Word can automatically create a backup of your word Document every time you save it. But did you know that you can also have Word Automatically save your document while you work on it using the Auto Recover or Auto Save feature? You can then use this feature to recover any unsaved changes you may have made to the document.
1. How to Recover A Word Document that You Didn't Save using Auto Recover
If you have opened "AutoRecover" function in your MS Word 2010, Word 2013, or Word 2016. Then, you might be able to retrieve unsaved Word document by following the below steps:
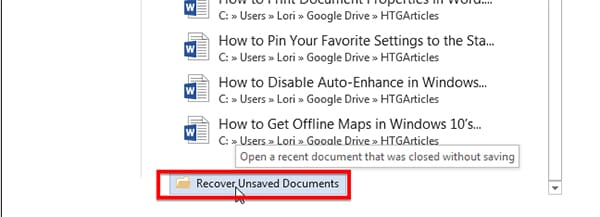
Step 1 In Word, hit Ctrl + O on your keyboard. At the bottom of the "Recent Documents" list, click "Recover Unsaved Documents".
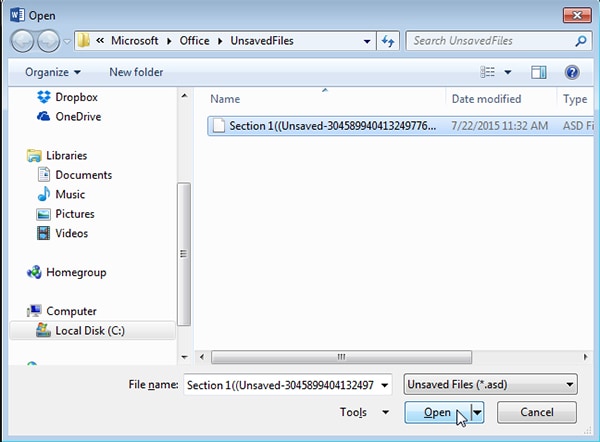
Step 2 This will open the "Open" dialogue box in the Unsaved files folder and you should be able to see a number if unsaved documents. Their names are a little weird so the only way to know which one you want, is to look at the data and time on each one.
Step 3 Double click on the document to open it. If it is in read-only mode, click on the "Save As" button in the yellow bar to save it. After you save it in a new location, you can re-open it and be able to edit it.
Now, your unsaved Word document is recovered using the AutoRecover feature. Obviously, this built-in feature is really useful when your working MS Word is suddenly shutdown or crash due to unknown reasons.
Thus, if you haven't opened this feature, you can follow the the below steps to enable AutoRecover on your Microsoft Word.
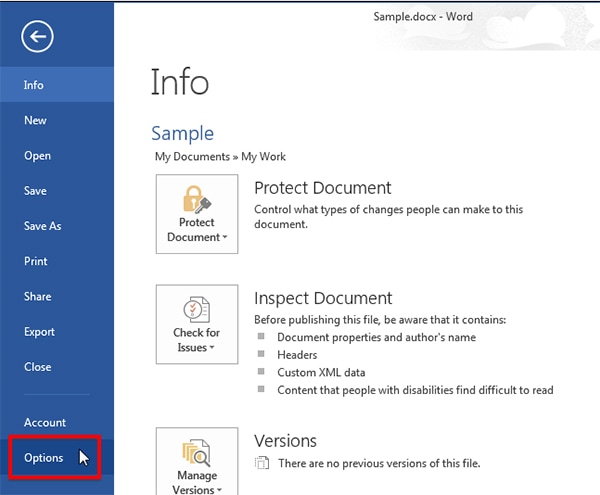
Step 1 Begin by clicking on the "File" menu within Word and then click on "Options" from the list of items on the left.
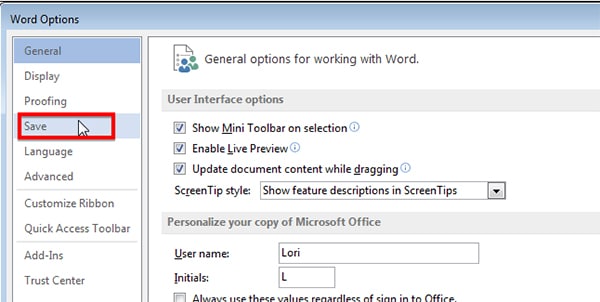
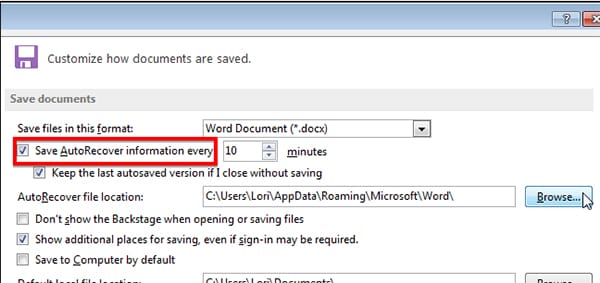
Step 2 In the Dialogue box that opens, click on "Save" on the left side of the Window.
Step 3 Click on the "Save Auto Recovery Information every" check box and then enter the duration of time you wish Word to save the document.
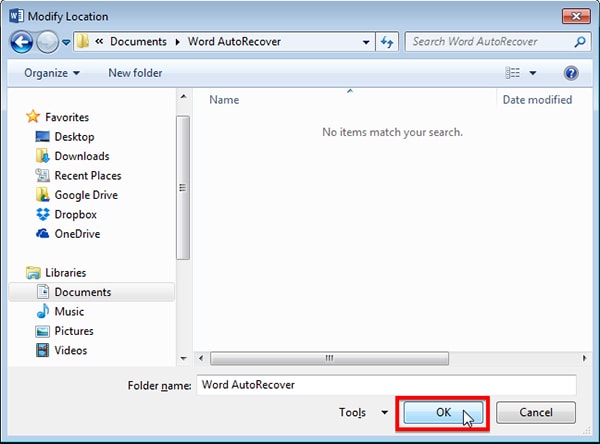
Step 4 Select where you want to save the Auto recover files in the "Modify Location" dialog box that appears and then click "OK". Click "OK" to close the "Word Options" Dialog box.
2. How to Restore Unsaved Word Document Using AutoSave Function
You can also make use of the Auto Save function to recover an unsaved Word Document. this feature is the same as the Auto Recover but it is also only available on Word 2010 and above.
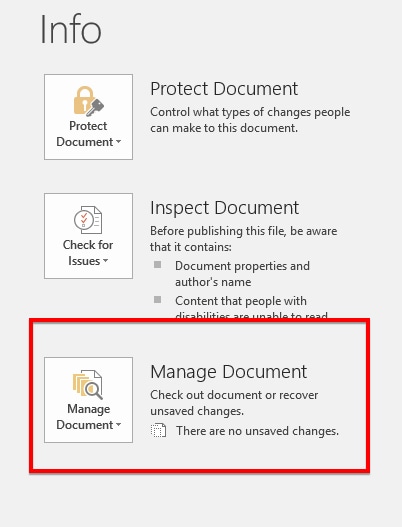
Step 1 To use the Auto Save function to recover an unsaved Word document, open Word and then click on the "File" menu. Click on "Info" and then under "Manage Documents" click on "Recover Unsaved Document".
Step 2 Alternatively, you can also go to Windows Explorer and find the path C:\Users\Username\AppData\Local\Microsoft\Office\UnsavedFiles.
All unsaved documents should be available there. Now all you have to do is select the draft and open it. You can then open it up in a fresh Word document and then save it under an appropriate name.
Keep in mind that the Auto Save Function will only work to recover documents that are 4 days old. After 4 days all unrecovered files are automatically deleted.
Part 3. How to Restore An Unsaved Word Document in MS Word 2007 or Below?
For Word 2007 and below, you can also retrieve an unsaved Word document in much the same way only this time you make use of the Auto recover feature. The Auto Recover feature saves a temporary copy of the Word document as you work, this way you can access it if something goes wrong.
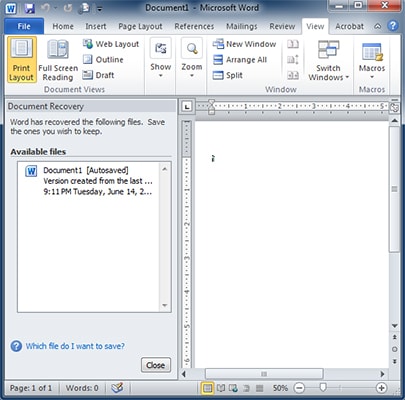
You can get the Auto Recover documents when you re-launch Word. The documents are often on the left side of the new Word window and you can just double click on either one of them to open it. You can then proceed to save the document for editing later.
If you re-launch Word and you don't see the Auto Recover documents, you can search for the temporary file in Windows search or go to the Temp Folder from Windows Explorer to find it.
Conclusion
Obviously, Auto Recover or AutoSave function we have seen above are only helpful if you had actually turned on the Auto recovery feature and you lost your document earlier than 4 days ago. If none of these pre-conditions apply to you, you will have lost your document entirely and have no way of getting it back unless you use a data recovery program like Recoverit for Mac.
This program can come in handy when you must recover an unsaved Word document. And it can be used on all kinds of Microsoft Word version without any data losing. So, if you're looking for a high efficiency way to recover your unsaved document as well as deleted or formatted files, Recoverit (Windows/Mac) could be the ideal solution for you.
But to avoid this problem in the future, it may be a good idea to save your document as you work on it and Word will continuously automatically save any changes you make. A backup of the document may also come in handy. With cloud storage solutions such as Google Docs and Dropbox, you have a lot of options and can access your document from any other device.



Elva
staff Editor