iPhone not turning on is yet another common issue seen in many phones nowadays, and if you're able to identify the root cause, fixing the problem could become quite easy and quick.
Part One: Why Won't My iPhone Turn On?
Although there could be several reasons your iPhone fails to turn on, most of the times this happens is due to:
1. Bad Software
This is the most common reason for your iPhone's boot failure. The category of ‘Bad Software' may include:
-
You tried to jailbreak your phone.
-
You installed an app (after jailbreaking) that was obtained from an untrusted source.
-
Any rogue or inconsistent app that you may have downloaded from the App Store.
-
An unstable version of iOS you may have updated your iPhone to.
-
You have upgraded your iOS to any beta (pre-release) version that contained several bugs.
-
You have downloaded an incompatible version of .ipsw file and attempted restoring your iPhone with that.
In addition to having a rogue or incompatible software, your iPhone may also fail to boot if a correct app was wrongly configured, and the new settings caused conflict with the boot process.
2. Discharged or Dead Battery
When talking about battery issues, your iPhone may fail to turn on if:
-
Its battery is completely drained out. Possible reasons for this could be:
-
Resource intensive apps or features were left enabled, even when they were not in use.
-
The auto-brightness feature was turned off, and your iPhone couldn't regulate the display light for optimum power consumption.
-
Wi-Fi or Bluetooth was left unconnected and they kept on searching for a device to connect to.
-
You left the Flashlight app turned on.
-
You left the iBooks app turned on with a page of a book opened that prevented the screen to automatically turn off the display.
-
The display time-out is set to maximum available duration, etc.
-
Its battery is completely dead and needs to be replaced with a new one.
3. Physical Breakdown
If there is physical damage, your iPhone won't turn on either. Below are a few common reasons for this:
-
If it fell from some height, probably from a dining or computer table.
-
Its motherboard fried during voltage fluctuation.
-
The entire device bent due to excessive pressure.
-
The hardware of your iPhone fried due to close proximity to the flames or a hot object, etc.
4. Water Damage
Water damage may cause your iPhone's hardware failure which may further prevent it from turning on. Reasons/instances that caused water damage to your phone may include:
-
You spilled coffee on your iPhone.
-
The phone fell in the water, way below its resistance depth suggested by Apple (in newer iPhone models).
-
Excessive humidity in the weather.
-
The phone was exposed to heavy rainfall.
-
Your iPhone was kept inside a damp cover/casing for a long duration.
Before proceeding to the next part, it is important that you analyze which of the above reasons is keeping your iPhone from turning on normally. Once you identify the root cause, the troubleshooting becomes comparatively quick, easy, and straightforward.
Part Two: What to Do When My iPhone Won't Turn On?
Depending on how or what made your iPhone unresponsive, the solutions may vary. Some of the proven tricks that fixed the issue for many users are given below:
1. Charge Your iPhone
If your iPhone was functioning properly earlier but stopped responding overnight, probably its battery got drained out faster than you expected. The best and the most obvious solution in such a case would be to plug it to a power outlet and leave it alone for a while. A noteworthy point here is, unlike other smartphones from different vendors, the iPhone takes a while to boot up after it is connected to a power source.
Once your phone has enough power to turn on, your first step should be to check the battery health and verify if it needs a replacement. The next thing you may want to do is to identify the resource-intensive apps and features and take appropriate actions as per your requirements to avoid such issues in the future.
2. Perform a Hard Reset (Force Start)
Due to regular advancements in technology with every new release of iPhone and iOS since the past few years, the process of hard resetting the phones has drastically changed. That said, different iPhone models accept different ways from end-users to hard reset. These methods are:
Hard Reset iPhone 6S Plus, iPhone 6 Plus or Earlier iPhones:
-
Press and hold down the Sleep/Wake and Home buttons simultaneously.
-
Wait while the iPhone powers back on.
-
Release both the buttons when the Apple logo appears on the screen.
Hard Reset iPhone 7 Plus or iPhone 7:
-
Press and hold down the Sleep/Wake and Volume Down buttons simultaneously.
-
Wait while the iPhone powers back on.
-
Release both the buttons when the Apple logo appears on the screen.
Hard Reset iPhone 8, iPhone 8 Plus or Above:
-
Press and release the Volume Up button once.
-
Quickly press and release the Volume Down
-
Press and hold down the Sleep/Wake
-
Wait while your iPhone powers back on.
-
Release the Sleep/Wake button when the Apple logo appears on the screen.
When you hard reset your iPhone, it pulls off all the power supply from the hardware momentarily and then powers them back again thus rebooting the entire device at the hardware level.
Many times, hard resetting resolves the problem and enables you to continue using your iPhone normally as before.
3. Reset Proximity Sensor
Although there's no toggle switch to enable to disable the Proximity Sensor on your iPhone and neither there's an app that you can remove or offload and then install it back, a few fixes explained below are still worth trying:
-
Reboot Your iPhone – Many times a normal reboot fixes the proximity sensor issue. Depending on the model, you may need to long-press the Sleep/Wake button, or press and release the Volume Up and Volume Down buttons (one at a time) and then long-press the Sleep/Wake button to reboot your iPhone.
-
Hard Reset Your iPhone – Because hard resetting disconnects all the device's hardware from the battery for a short moment, many times it is found to fix the proximity sensor issue.
-
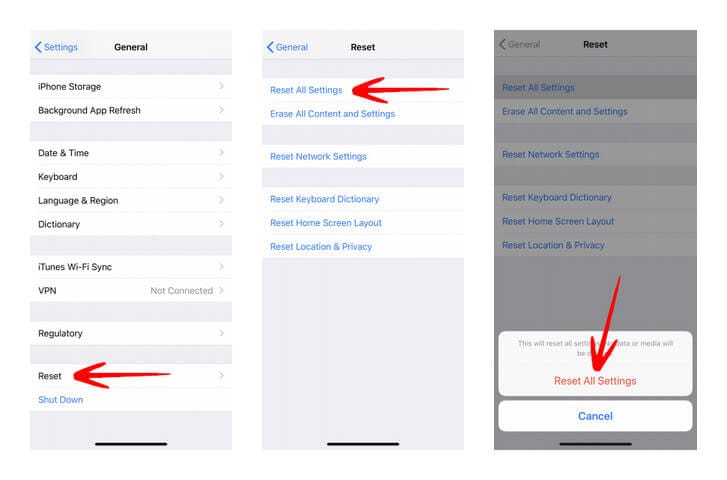
Reset All Settings – If rebooting or hard resetting fails to fix the problem, you can try resetting your iPhone's configurations. You can do so by following the steps given below:
-
Go to Settings .
-
Tap General .
-
Tap Reset .
-
Tap Reset All Settings .
-
Tap Reset All Settings on the confirmation box that pops up at the bottom.
-
Remove/Replace Screen Protector – If all of the above troubleshooting suggestions fail to work, you may want to check if the screen protector your iPhone's screen is covered with is not of cheap quality. Sometimes, bad quality screen protectors prevent the proximity sensors to function correctly and removing or replacing them with a good one fixes the issue.
-
Contact Apple's Technical Support Team – If the problem is not yet fixed, you should ask for technical assistance from Apple's Customer Support Team. If your iPhone is still under warranty, they may not charge anything from you, and you will have your device's proximity sensor back up and running in no time.
4. Restore Factory Settings via iTunes
As long as there is no physical damage and the battery is in working condition, updating your iOS via iTunes is the best solution if your iPhone won't turn on. However, if iTunes fails to update your phone, you can try restoring it which erases all your data from the iPhone during the process. Whether you decide to Update or Restore, you must put your iPhone in Recovery Mode to continue with the process. You can follow the steps given below to enter Recovery Mode:
Connect your iPhone to a Windows or Mac computer.
Launch iTunes.
Put your iPhone in Recovery Mode. To do so, leave your iPhone connected to the computer and:
On iPhone 8 or above
Press and release the Volume Up button once.
Then quickly press and release the Volume Down button once.
Next, press and hold down the Sleep/Wake button until your iPhone enters the Recovery Mode .
On iPhone 7 and iPhone 7 Plus
Press and hold down the Volume Down and Sleep/Wake buttons simultaneously.
Release the buttons when your iPhone enters the Recovery Mode .
On iPhone 6S Plus or earlier
Press and hold down the Sleep/Wake and Home buttons simultaneously.
Release the buttons when your iPhone enters the Recovery Mode .
Once in Recovery Mode , you can click Update on the iTunes box and follow the instructions from there. Alternatively, you can click Restore if updating the iPhone doesn't work.
5. Repair iPhone with dr.fone
If the above Apple's proprietary solutions fail to fix the issue, you can try a third-party app called dr.fone that is not only capable of fixing almost all types of issues related to iOS and iDevices, it makes the entire troubleshooting process as simple as child's play. To repair an iPhone that won't turn on with dr.fone:
-
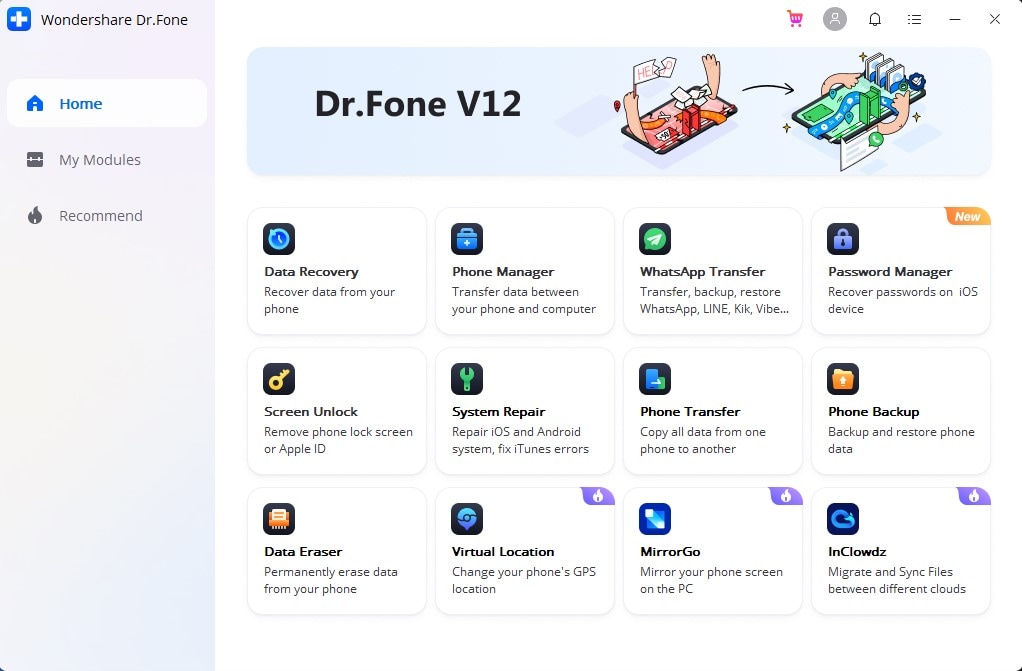
Download and install dr.fone. After that, connect your iPhone to your PC and launch dr.fone. (A Windows 10 computer is used here for example.)
-
Choose Repair .
-
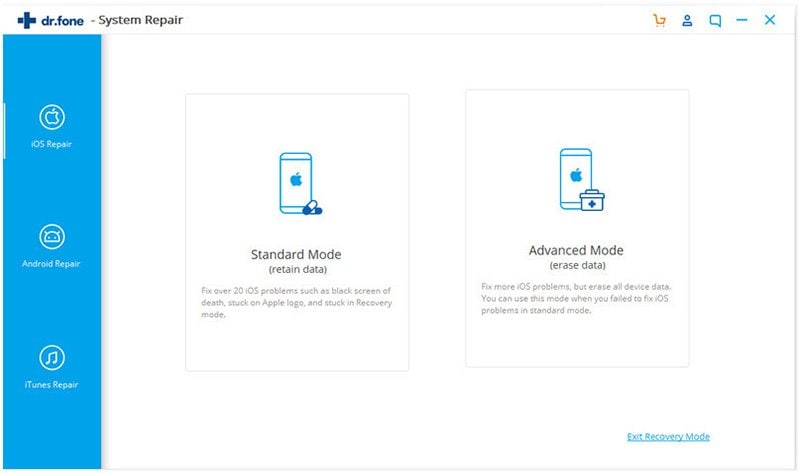
On the next window, locate and select iPhone/iPad Won't Turn On from the list and click Start..
-
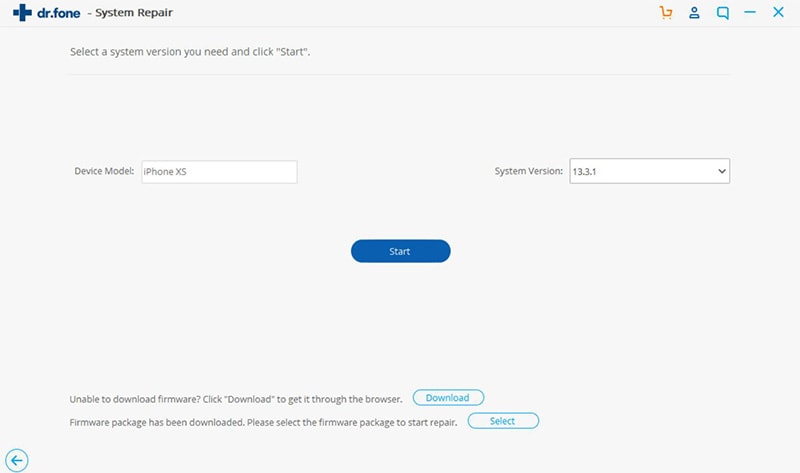
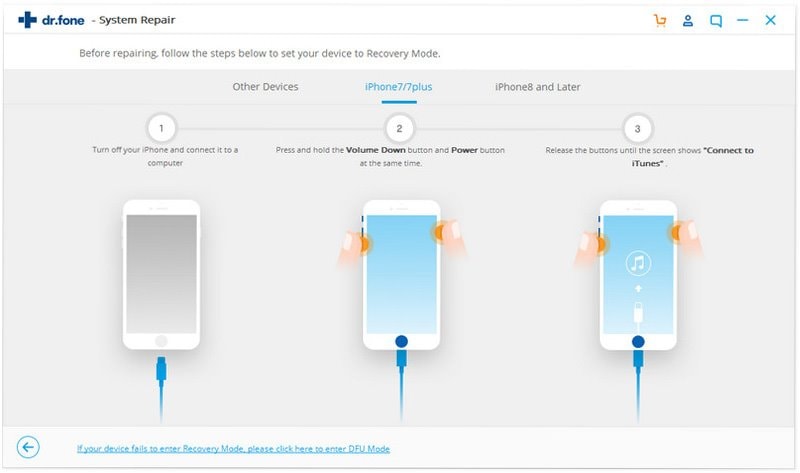
Select your iPhone model or the range of models it falls in from the top. Follow the instructions displayed on the window to put your iPhone in Recovery Mode.
-
Follow the instructions displayed on the window to put your iPhone in Recovery Mode.
-
Click Start when your iPhone enters Recovery Mode and dr.fone detects the phone, and follow the on-screen instructions to repair the booting issue.
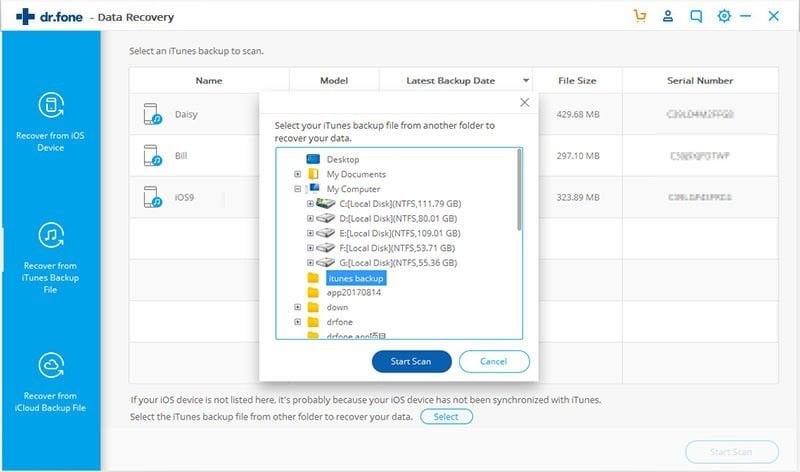
Note: If you have already downloaded the .ipsw file for your iPhone's iOS, you can click Select from the bottom and locate and select the file to begin the repair process.
Upon successful repair, you can continue using your iPhone normally.
Contact Apple Support
If none of the above suggestions works, it would be best to seek assistance from Apple's Technical Support Team. If your iPhone is still under warranty, you will get all the help at no cost. You may need to visit the nearest Apple Store in your area and ask for their help.
Part Three: How to Retrieve Photos from iPhone that Won't Turn On?
Practically speaking, you can't retrieve anything from the storage of your iPhone (or any other device) if it isn't active and its processor fails to communicate with the storage media;
UNLESS
You've already backed up your data to iCloud or your local computer, in which case data retrieval becomes fairly simple as long as you're using an efficient restoration tool. Fortunately, dr.fone exists and does a pretty good job when it comes to recovering photos (or any other data) if your iPhone won't turn on.
Unlike iTunes, dr.fone doesn't require your iPhone to be connected to your PC, and your data can be recovered from iCloud or iTunes backup and restored on your local computer seamlessly. The process is simple and straightforward, and can be completed quickly by following the steps given below:
-
Launch dr.fone,choose "recover".
-
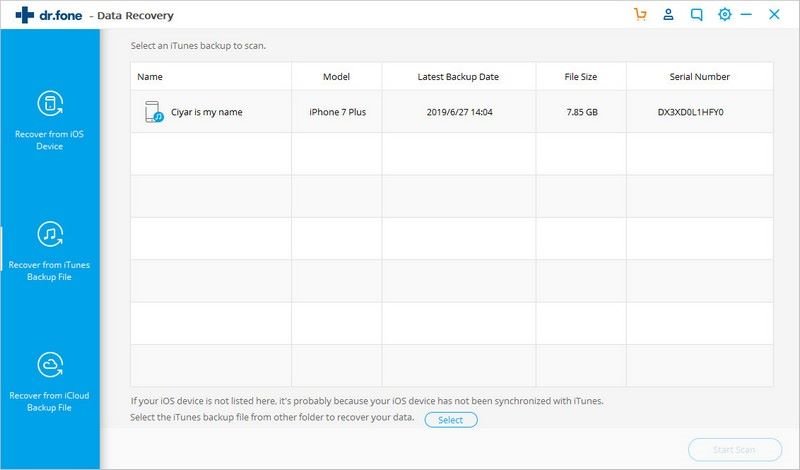
Click Recover iOS Data on the next window. Click Recover from iTunes Backup File .
-
Select your preferred iTunes backup file from the list on the next window. Click Start Scan.
-
On the next window, check the Photos box from the left pane.
-
Click Recover to Computer from the right pane, and follow the on-screen instructions to recover photos from the iTunes backup file.
Note: You can also click Recover from iCloud Backup File but if your iPhone won't turn on and you have activated two-factor authentication, you won't be able to receive the verification code that Apple sends when you try to sign-in to your iCloud account to access the backup file.
Conclusion
Although iTunes is an Apple's proprietary and is considered to be the most trusted solution for iDevices' problems, an efficient third-party tool like dr.fone makes the entire troubleshooting process simple, even for those with less or absolutely no technical knowledge.


Basil Rathbone
Editor