iPhone/iTunes Error
- iPhone Error List+
-
- iPhone Error 1
- iPhone Error 6
- iPhone Error 9
- iPhone Error 14
- iPhone Error 21
- iTunes Error 27
- iTunes Error 39
- iPhone Error 53
- iTunes Error 54
- iPhone Error 56
- iTunes Error 1035
- iTunes Error 13014
- iTunes Error 2001
- iPhone Error 2009
- iPhone Error 3194
- iPhone Error 4000
- iTunes Error 4005
- iPhone Error 4013
- iTunes Error 9006
- iPhone Error 9
- iTunes Error 3259
- iTunes Error 2002
- iTunes Error 17
- iTunes Error 51

• Filed to: Fix iPhone System • Proven solutions
iTunes error 14 is a common issue that many iPhone/iPad/iPod users face nowadays. Also known as iPhone error 14, the error appears when users try to upgrade their iOS device to the latest version which is iOS 12. The error 14 stops the process either by stopping the update in the middle of the process or by interrupting the system restore process.
The possible reasons for the iPhone error 14 are:
- An incompatible or bad USB that interrupts the proper connectivity.
- Unstable wireless connectivity that prevents proper internet connection and eventually, the software update.
- An older version of iTunes
- Insufficient storage that prevents proper space allocation for firmware
- A virus in iTunes
Before you panic and perform an action that leaves you with a device that is of no use, we would like to walk you through the ways you can use to fix the error 14.
Part 1. Try Apple's official solution
Before you try out any software related solution, you must try the official solutions to fix the errors. As it mainly occurs due to poor network connection or failed hardware, here are the troubleshooting methods you can follow.
1.1 Try a different USB cable and connecting the cable to another USB port
Follow the below-given steps and try again after every single step.
- First of all, use the USB cable that you got with your iOS device. In the case you don't have it, try another Apple USB cable.
- Use another USB port on your computer to check if the problem is with cable or the port.
- Switch to a USB port on another computer if none of the above-mentioned steps solves the issue.
There may also occur connectivity errors. These include "iPhone has timed out", "The connection was reset", "unknown error" the error 2001-2011 while restoring. In that case, you need to check the connection between your iOS device and computer, and then, resolve the existing issue. You can try any of these methods to fix the issue.
- Disconnect and reconnect your device.
- Check if the cable connection has got loose.
- As the device needs to be connected directly to the computer, make sure it is not connected to a battery pack, keyboard or a USB hub.
- Restart your iOS device.
- Use the latest version of iTunes.
- Disconnect all other USB devices from the computer (keyboard and mouse are exceptional here) and then reconnect your Apple device.
1.2 Check your hardware
Try the iPhone update process after each of these steps:
- Quit the iTunes if it is already open and then reopen it.
- Check the third-party security software installed on your computer.
- Check the reliability of your USB cable, network and computer. After this step, try twice to restore your device.
1.3 Contact Apple Support
If the error is still there, you must contact Apple Support
- Visit https://getsupport.apple.com/?caller=kbase and select your device.
- Then click on "Update, Backup & Restore" option.
- Select "Error message during restore/update in iTunes".
- Choose the most convenient option.
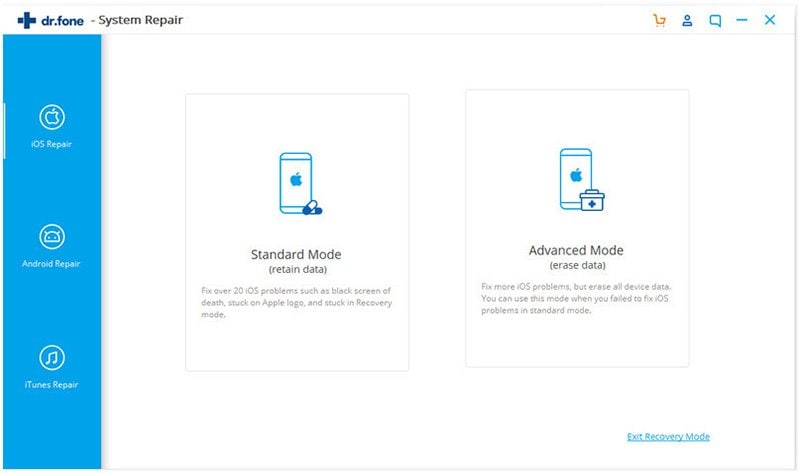
Part 2. Use dr.fone- Repair (iOS) to fix iTunes error 14
dr.fone is an all-in-one solution to simplify your iOS life. dr.fone- Repair (iOS) allows you to fix iOS system issues with just a few clicks. Whether your iPhone is stuck in the middle of recovery mode or encountered another issue like white Apple logo etc., it will let you fix the issue without causing any loss of data. The tool is fully compatible with all the iOS devices.

dr.fone - System Repair (iOS)
Best iPhone/iPad system recovery tool
- Easy to use tool that fixes issues in just a few clicks.
- Offers safe method of recovery without any data loss risks.
- Supports all iOS devices.
- Runs on both Windows and Mac OS.
- Potent enough to fix iPhone error 14.
1. Download dr.fone- Repair (iOS)
First of all, download dr.fone- Repair (iOS) making sure that the version is compatible with your computer.

2. Connect your iOS device to the computer
Connect your iPhone/iPad/iPad to your computer using a USB cable. Launch the tool. Wait until the connection is established and hit the "Start" button.
3. Activate DFU mode
When your device is connected successfully, the program will display the information of your device. Verify the information and hit the "Next" button to continue.
In the case your device is not recognized, the tool will ask you to boot your device into DFU mode.
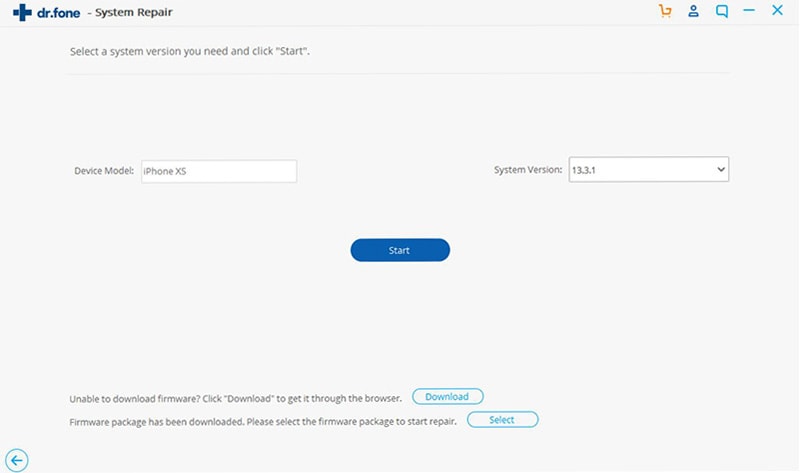
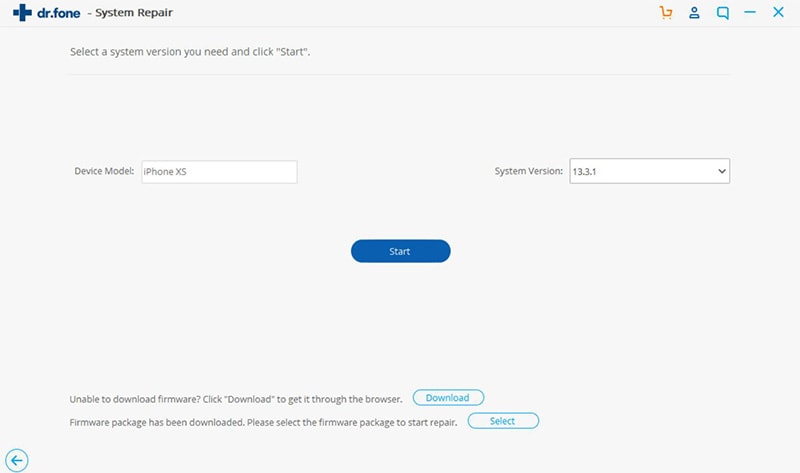
4. Download the matching firmware
Download the latest firmware for your iOS device by choosing the right information for your device. Once you verify the information, click the "Download" button.
If you forget your device model, you can click the green link shown below the Download button. The download process will take some time.
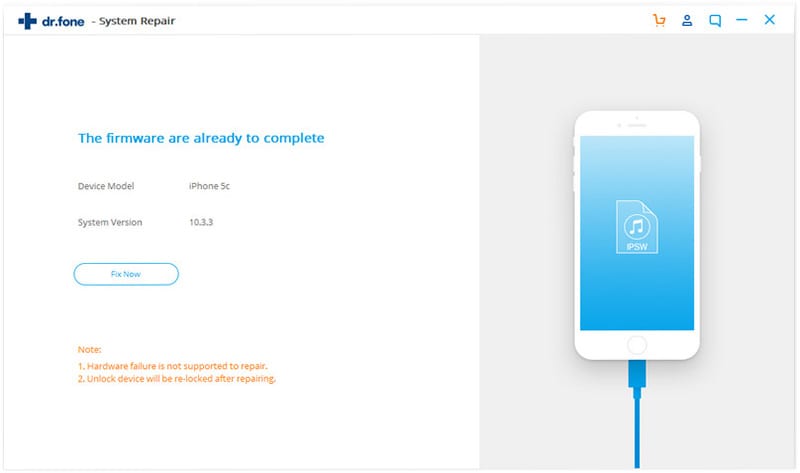
5. Fix iOS device problems
Once the download process is complete, you can begin the process for fixing your device. There is a checkbox at the bottom of the screen that is checked by default. It means the data of your device will be retained after the repair process is complete. Click on the "Fix Now" button to start the repairing process.
Part 3. Try restoring your iDevice on another computer or laptop
If the issue is still there after replacing USB cable, maximizing the storage capacity, updating the system software and assuring stable wireless connection, you must try the update process on another computer or laptop. Reliability of all these factors increases the chances of having a problem with the computer you are using to update your iOS device.
Part 4. Reboot your computer and hard reset iPhone
As most of the iPhone issues get resolved by rebooting the computer and hard resetting your device, you can try this method for fixing the error 14.
The process is simple. Just restart your computer and meanwhile hard reset your iPhone/iPod/iPad. As the hard reset process varies from device to device, you must check the instructions for yours. Here are the steps to reset iPhone 8/8 Plus, iPhone 7/7 Plus, iPhone 6 and the earlier models.
Hard resetting iPhone 8/8 Plus and iPhone 7/7 Plus
Push and release the "Volume Up" button quickly and do the same with "Volume Down" button. Then, press the "Sleep/Wake" button until the Apple logo appears on the screen.
Hard resetting iPhone 6/earlier
Hold the "Home" and "Sleep/Wake" buttons together for about 10 seconds. And release them when the Apple logo appears on the screen.
- Your device will automatically reset and you would need to enter the passcode.
- Check if the errors 14 has been fixed or not.
Part 5. Fix iPhone error 14 with the firmware file
Error 14 in iTunes usually arise due to the failed firmware file update when you try to upgrade your iPhone software. Generally, this kind of issues arise when the .ipsw file is corrupted. But as the .ipsw file is necessary for iOS restore, you need to fix it for getting fixing the error 14. You can do so by renaming, moving or deleting the .ipsw file so that iTunes can download a fresh copy of it.
5.1 Delete the corrupted .ipsw file
Steps to delete .ipsw on the computer:
1. Quit iTunes and Re-launch it on your computer.
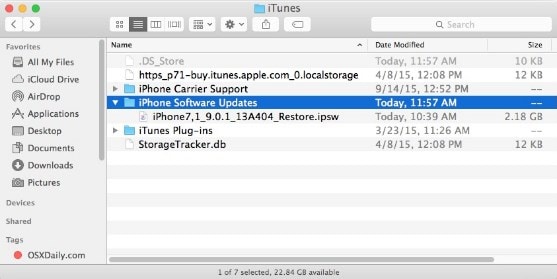
2. Go to system drive and tap "user". Select your username and click on "App Data". Choose "Apple Com"-> "iTunes"-> "iPhone Software Updates" and delete the .ipsw file/files.
Steps to delete .ipsw files on Mac are :
1. Quit iTunes and relaunch it.
2. Go to "Library"-> "iTunes"-> "iPhone Software Updates" and delete .ipsw file/files. In the older versions of Mac, the location of the .ipsw file/files will be ~/Library/Application Support/iTunes/.
5.2 Download .ipsw from www.ipsw.me and restore via iTunes
- After deleting .ipsw file/files, visit https://ipsw.me/ and choose your product.
- Then select your device model and version.
- Hit the "Download" button.
- Then connect your iPhone/iPad/iPod using the same path and restore your iDevice while following the iTunes prompts.
- Check if the error 14 is fixed or not.
In the case this trick does not work, the issue might be there because of the security software setting or iTunes settings.
Part 6. Replace the battery
Generally, the battery problems lead to the iTunes error 29. However, in some cases, the error 14 in iPhone/iPod/iPad also disappeared after users replaced the battery. So, in the case none of the other trial methods work and there is the probability that battery may be the issue, you must try this method.
All you have to do is remove the existing battery from your iOS device and replace it with a brand new battery. Once you are done with battery replacement, you can try restoring your iPhone/iPad/iPod with iTunes.
Part 7. Disconnect the LCD
LCD (Liquid Crystal Display) screen may be the reason for error 14 in the case you have changed it recently. What you can do in that case is disconnect the screen from your iOS device and try to restore the device via iTunes. You can also connect the old LCD in the case you have it with you.
Conclusion
All the methods except the 2nd one are hit and trial methods which may or may not work to resolve your issue and fix the iPhone error 14. When tried one after another, they may also affect your device and can lead to the loss of data. So, instead of using the methods that do not assure the recovery from the error 14 and put your device data at risk, it is better to use a software solution that guarantees the error fixing and recovery of your data. And dr.fone- Repair (iOS) is one of the best tools that you can use to fix all kind of errors your iPhone/iPad/iPod may encounter.
Elva
staff Editor