Photo Recovery
- Photo Recovery+
-
- Top 10 Best Photo Recovery Software
- Best Way to Do the Lost JPEG Photo Recovery
- How to Recover Photo on Google Backup
- How to Restore Lost Photos
- How to Restore Deleted Pictures
- Photo Backup Strategies
- 5 Free Photo Recovery Softwares
- Best Stellar Phoenix Photo Recovery Alternatives
- Restore Damaged Photos in Seconds
- Photo Recovery After Factory Reset
- How to Recover Corrupted Images
- Recover Lost Photos from A Formatted Drive
- Camera Photo Recovery+
- Computer Photo Recovery+
- Mac Photo Recovery+
- Phone Photo Recovery+
- SD Card Photo Recovery+

• Filed to: Photo Recovery • Proven solutions
"What are the different ways to recover deleted photos on Mac? I have lost all my photos and now can't seem to get them back!"
This is a common query related to data loss on Mac that a lot of users share these days. While Mac systems are extremely secure and reliable, they might suffer from an unexpected data loss as well. To avoid this, you should kbackup your Mac data frequently. Though, if you don't have its backup, then you need to use a dedicated the best photo recovery for mac. We will cover everything about it in this informative guide.
Part 1. How to Recover Deleted Photos on Mac?
When we delete photos from Mac, they aren't permanently erased right away. Instead, they are moved to a "Recently Deleted" folder. It will store all the photos deleted in the last 30 days. Therefore, if there is a photo that you have accidentally deleted in the last 30 days, then you can get it back with this technique.
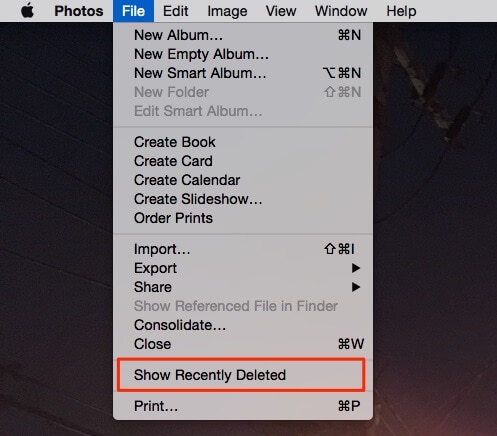
1. To start with, open the Photos app on your Mac. You can find it under the Applications feature.
2. Go to its File menu and click on the "Show Recently Deleted" option.
3. The Recently Deleted folder will have a list of all the photos that are deleted in the last 30 days. Their expiry time will also be displayed.
4. Simply select the photos you wish to get back and click on the "Recover" button.
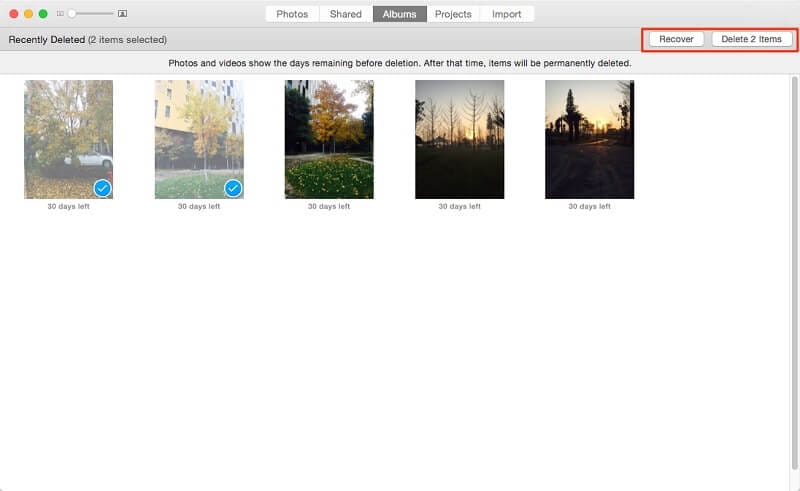
This will recover deleted photos on Mac and would restore them to their default location.
Part 2. Recoverit (IS) - Best Photo Recovery for Mac [Recommend]
Chances are that the above-listed solution might not help you perform an extensive photo recovery on Mac. In this case, you can take the assistance of Recoverit for Mac. A user-friendly tool, it can recover all the major formats of photos from your system. This includes JPEG, GIF, PNG, BMP, PSD, RAW, and all the other commonly used formats. By following 3 simple steps, you can recover all kinds of lost and deleted content from your Mac.

Recoverit (IS) for Mac
A Life Saver to Solve Your Data Loss Problems!
- It is a professional photo recovery software for Mac, known for its user-friendly interface and high data recovery rate.
- Users can recover their photos, videos, documents, audios, emails, etc. easily. It supports more than 1000 different data formats.
- You can perform photo recovery on Mac or any other connected external unit like pen drive, SD card, hard drive, and more.
- There are different recovery modes that the tool supports. Also, it can recover your photos under various scenarios like accidental deletion, lost partition, virus attack, etc.
- Since it provides a preview of the retrieved content, you can select the photos you wish to recover to your Mac.
You can learn how to recover deleted photos on Mac using Recoverit by following these simple steps.
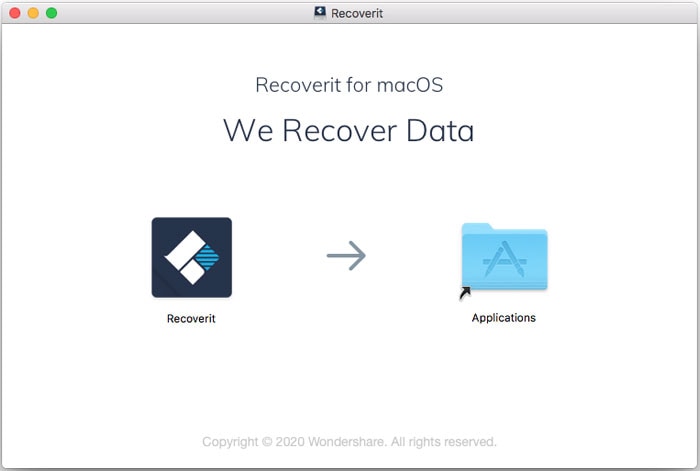
Step 1. Install and launch
Install and launch Recoverit (IS) program on your Mac.
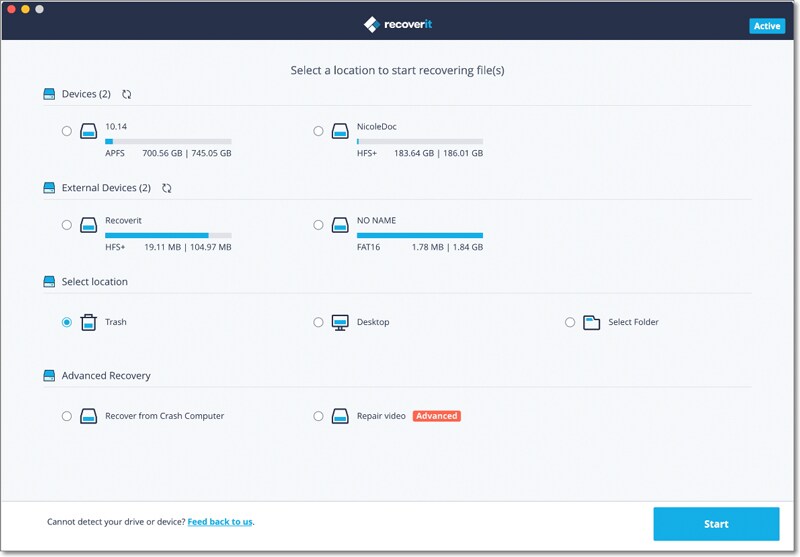
Step 2. Select a location to scan
In order to proceed, you would be asked the location to scan the data. It could be any internal partition or an external source (like SD card or a pen drive).
Step 3. Preview and restore your photos
This will automatically start the photo recovery process on Mac. Just wait for a few seconds as Recoverit would try to retrieve the deleted, lost, or inaccessible photos. In the end, the application will provide a preview of all the recovered content. You can just view the photos you want back, select them, and save them to a secure location.

Part 3. How to Disable SIP (System Integrity Protection) on Mac?
System Integrity Protection is a native feature on Mac that was introduced in macOS El Capitan at first. As the name suggests, it protects the core system files from any external damage. Ideally, the SIP feature keeps your Mac safe from malware attack. Though, if you wish to recover files that are stored in the system disk, then you need to disable this feature. In this way, third-party recovery tools can access the system disk and provide better results.
1. Restart your Mac at first. While restarting, press the Command and R key at the same time. This will boot your Mac in the recovery mode.
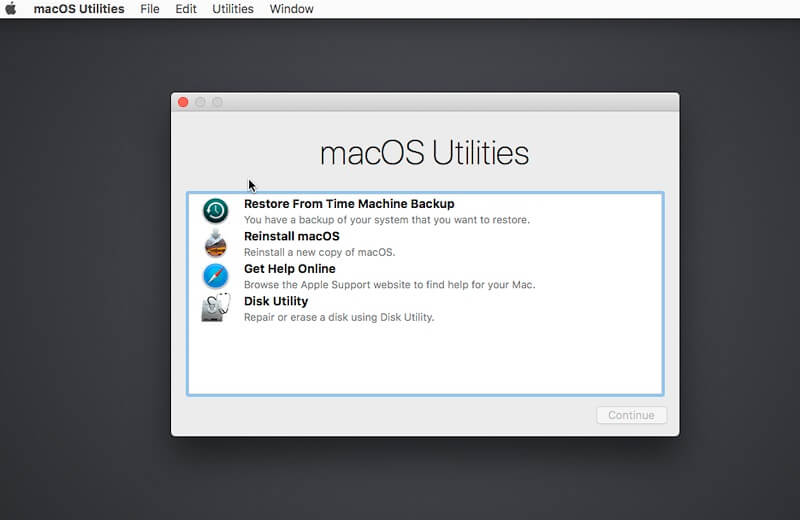
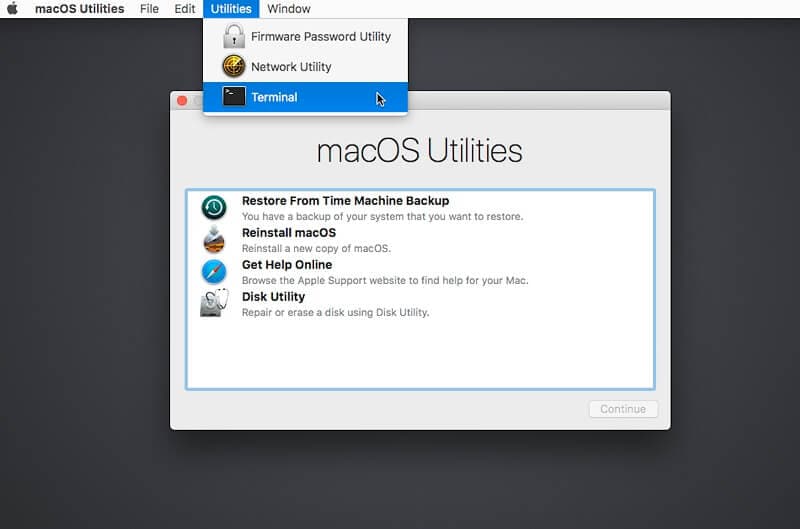
2. Go to the Utilities menu and open the Terminal from here.
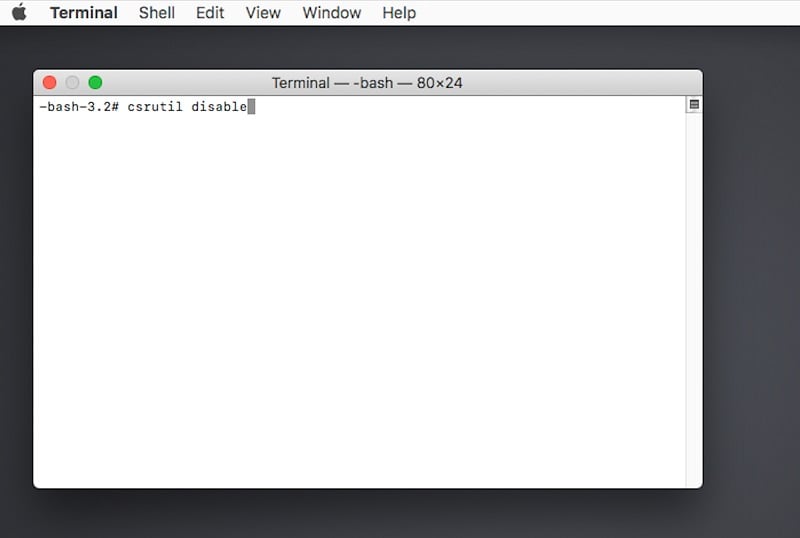
3. As the Terminal window will open, type the command: csrutil disable
4. Press Enter and wait for the command to run properly before restarting the system in the normal mode.
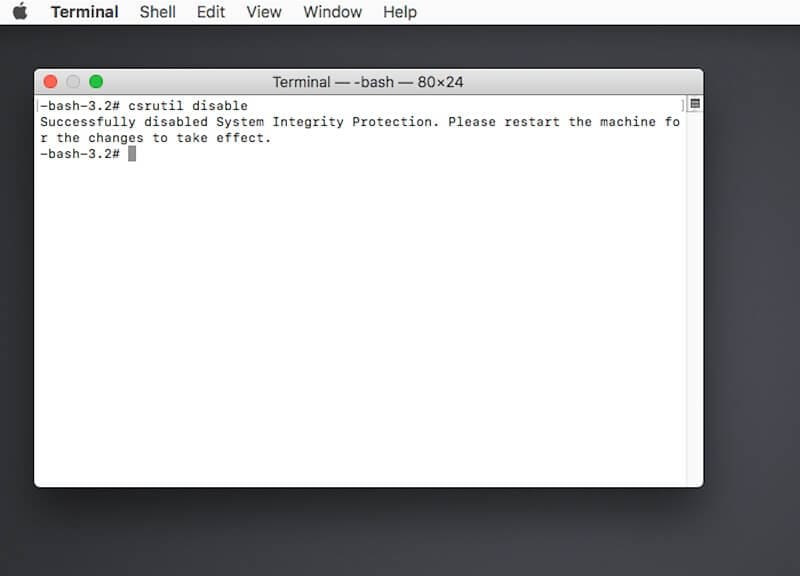
Once the System Integration Protection is disabled, you can easily recover deleted photos on Mac.
Part 4. Remember to Backup Your Mac Frequently to Avoid Losing Data
After learning about photo recovery on Mac, it is important to know the backup process as well. If you don't want to suffer from unexpected data loss, then it is better to backup photos on Mac. There are different ways to do it.
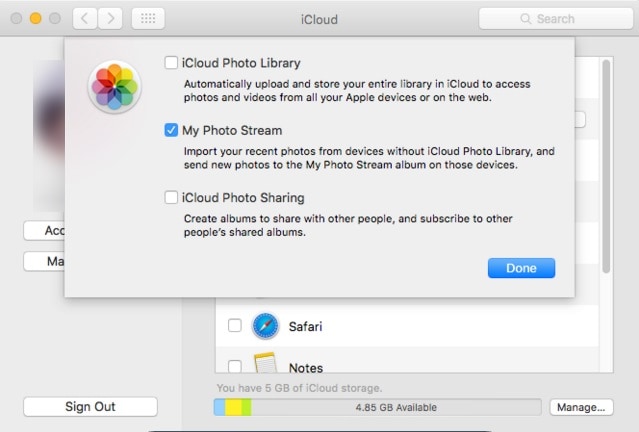
1. iCloud Backup
This is one of the best ways to maintain a backup of your photos wirelessly. The default free storage on iCloud is only 5 GB. So you need to make sure you have enough free space (or an upgraded account) beforehand. To backup Mac photo on iCloud, launch the iCloud app and enable the Photos sync option. You can also go to the advanced Photos option and enable the Photo Library feature.
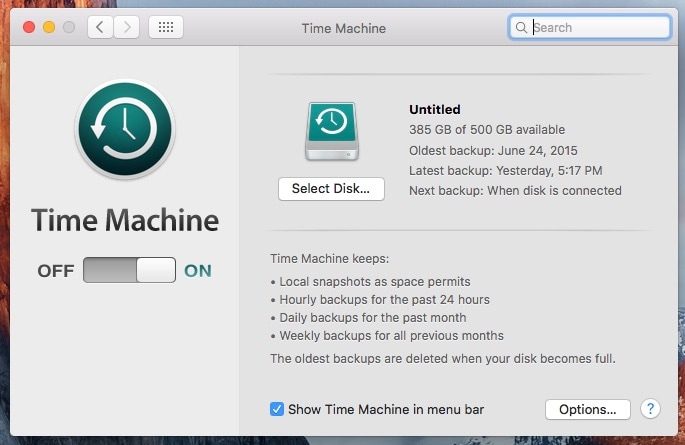
2. Time Machine Backup
Time Machine is the default feature on Mac to maintain a backup of your data. You can just launch the Time Machine app on Mac and turn it on. Furthermore, you can visit its settings and choose the type of data you wish to backup.
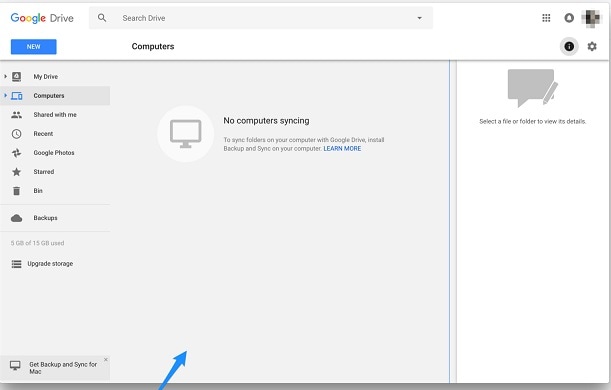
3. Google Photos
Google Photos is one of the best ways to organize your photos and take their backup. You can just sync your computer/Mac with Google Drive (Google Photos). If you optimize the size of the photos, then you can even store unlimited photos on Google Drive.
4. External Hard Drive
Lastly, you can backup photos from Mac to an external hard drive as well. Just attach the hard drive and manually maintain a second copy of your photos on it. This will let you have a second physical storage for your data.
I'm sure that after reading this guide you would be able to learn how to backup photos on Mac. Furthermore, we have provided a stepwise solution to perform photo recovery on Mac as well. We have used Recoverit (IS) to do it since it is a highly recommended tool. Used by both experts and beginners alike, it will certainly meet every data recovery need of yours.
Elva
staff Editor