“I do not know how I can make the best use of Recuva Portable to recover my deleted files. Can you help?”
- a question from Quora
Do you need a recovery of a file anytime and anywhere? Are you tired of installing and uninstalling various data recovery applications in your device?
Well, what if I say that you can now recover all your deleted files without the need for any installation. Astonished, how is it possible?
Recuva portable can make it all possible for you. So, for all those of you who are looking for data recovery and want to learn how Recuva full portable works, take a look at today’s article which will discuss the below points.
Part 1: Recuva Portable- Short Introduction
Recuva portable is a professional version of Recuva that is intended to perform the recovery process for your deleted or lost files. It was introduced to the software marketplace by CCleaner and can easily fit into a USB drive that you can carry anywhere, hence the name portable.
Moreover, it is categorized under a complete Piriform suite which is a combination of CCleaner for performing cleaning, and it acts as Defraggler for defragmentation. It is more useful and convenient for a business person as it requires no installation, and no special allocated space in the hard drive. It is upgraded with various recovery features and hence stands apart from other recovery tools.
Part 2: Recover Your Deleted Files with Recuva Portable
So, now are you ready to see how you can recover all your lost files with the help of Recuva pro portable?
Step 1 Download Recuva portable suite. As the first step, download the Recuva pro portable on your device.
Step 2 It will download as a ZIP file. Once you unzip it and open, you will be directed to the welcome interface like below shot. Click on “Next” and move further.
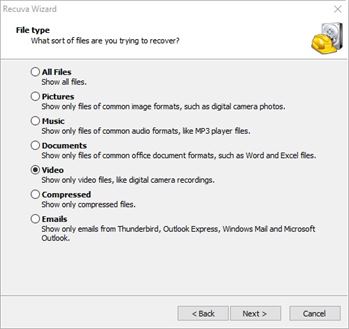
Step 3 Specify the file type you want to recover from the device. If you are not sure of the file type, click on the “Others” option that will display all the deleted files. Click on “Next” once done.
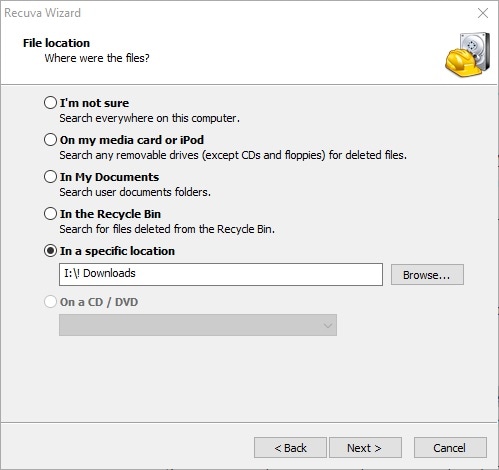
Step 4 Now, specify the file location in this step. Well, you might not remember the exact location and so, select “I am not sure” and hit the “Next” button.
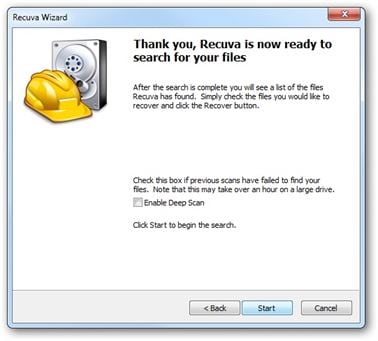
Step 5 The program will now start the scanning process to find out the deleted files, and you can also click the “Enable deep scan” checkbox if a deep scan is required.
Hit the “Start” button and start the scanning phase.
Step 6 You will get a pop-up notification on the progress of the scanning process.
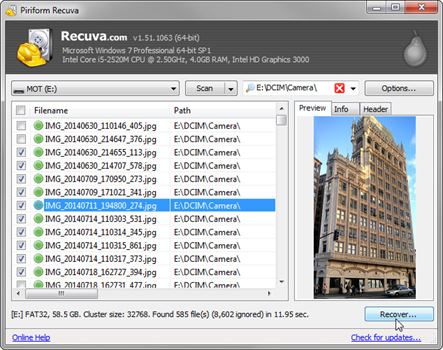
Step 7 Once the scanning is complete, the discovered files will appear on the screen along with the path or location. You can now decide which data files you need.
Finally, once you have decided the target files, you can recover them quickly by clicking on the “Recover” option from below.
Your lost files are now recovered with the help of Recuva portable version and are ready for use.
Note: For the first time, the download process of Recuva portable is mandatory. Once you have downloaded it from the Internet, you can transfer it to the USB drive and make it portable.
Part 3: The limitations of Recuva Portable Version
Although we find Piriform Recuva portable a reliable recovery tool, there are some areas where Recuva portable has a disadvantage:
-
There are times where there is a high chance for Windows to overwrite the MFT space of the file we are trying to recover. This issue makes recovery impossible.
-
Recuva portable suffers from a high risk of spamming and sometimes steals personal information too.
-
It makes use of enormous resources for the recovery process.
-
The recovery process isn’t smooth. There are too many steps to remember.
-
It is not compatible with Mac os x.
Part 4: Recoverit (IS)- The Best Alternative to Recuva Full Portable
So, what if Recuva portable fails to recover all your deleted files? What is the next possible solution that you could trust to get back my deleted files?
Yes, every problem has a solution, and when Recuva full portable fails, Recoverit (IS) is the best alternative. However, the critical fact to be noted is that this third-party software needs to be installed and is not portable, like Recuva portable.
Apart from installation, Recoverit (IS) works far better and excellent than Piriform Recuva portable. Wherever your file is (external devices or PC & Mac) and in whatever condition it may be (crashed or virus-attack), Recoverit (IS) will recover it for you without any hassle.
A few outstanding features of Recoverit (IS) software include:
-
Is your file attacked by any worm or Trojan horse? Are you unable to find or access it? Recoverit (IS) will make it possible for you.
-
Recoverit (IS) is a professional tool updated with leading technology making it convenient for external device recovery, system crash data recovery, and all-around recovery.
-
There are chances you may lose your favorite videos and memories in your latest digital camera, camcorder, and video player. If you wish to get them back, Recoverit (IS) will help you out as it supports a wide range of formats like MPEG, 3GP, MPG, AVI, MOV, and FLV, etc.
-
Usually, we all have that habit of closing our laptop without saving Word documents and then waste our time in finding it out. Recoverit (IS) supports more than 100 document types including DOC/DOCX, PPT/PPTX, EPS, ODP, OPF, and a lot more.
-
Feeling irritated to open the downloaded zip file and extract the data? Why should you worry when Recoverit (IS) has the ability to support ZIP, RAR, GZIP, SIT, LIB, SYS, and 7ZIP?

3,015,629 people have downloaded it
Now, let’s start recovering your deleted files.
Step 1 Launch of the program
Install and launch the program once the downloading process is over on your device (Mac or Windows).
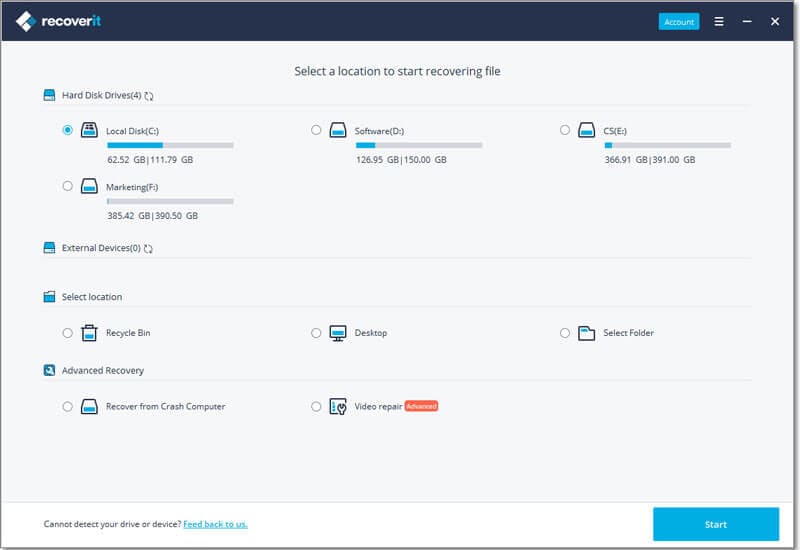
Step 2 Locating the Files
To start the scanning process, specify the location where you want to find the deleted files. It might be Recycle bin, program files, or local disk.
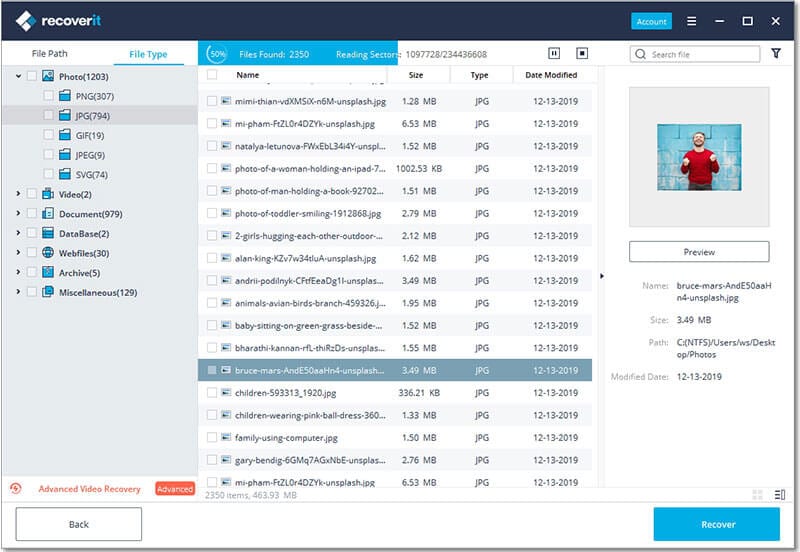
Once the location is specified, the program will scan and display the result on right-corner in the tree view.
Step 3 Recover the Files
Once you click on destined file type (Image, Document, archive), the deleted or lost files will now appear on the screen similar to the interface.
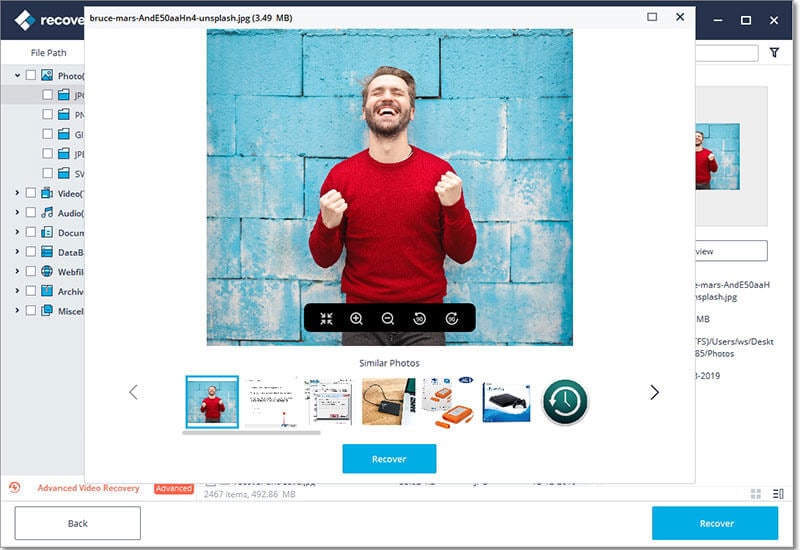
Preview the files you need from them and decide to select which ones you need back to click on the “Recover” option on the bottom of the interface.
You can now save the restored files in a new folder and use them when needed. Recoverit (IS) follows a simple but efficient user interface where the recovery process is carried out in a clear and clean manner.
Conclusion
Yes, recovery of files without the need for installation is now possible! You do not need to carry your software on your laptop all the time as Recuva full portable can work without installation. Whenever and wherever you lose your files, Recuva portable will fetch it for you in a few minutes. Alternatively, we have also discussed Recoverit (IS) which will be your best bet if Recuva portable 2016 fails due to its shortcomings.
So, without fail, try yourself and do recommend both the iSkysoft toolkit and Recuva portable to your friends to help them also locate their files.



Elva
staff Editor