Free File Recovery
- Recover Files Free+
- Top Free File Recovery List+
-
- 7 Data Recovery Crack and Serial Keys
- Top 10 Free Data Recovery Software [2020]
- Best Free Partition Recovery Software 2020
- Top 5 Free SD Card Recovery Software 2020
- Top 5 Free Hard Disk Recovery Software
- Top 5 Alternatives to iCare Data Recovery for Windows
- 5 Best Image Recovery Software
- Top 5 Best Media Recovery Free Download Software
- The Best Easy Data Recovery Software
- Top 10 Free Data Recovery Software 2021
- Top 10 Data Recovery Software for PC
- Top 10 Free USB Recovery Softwares Review [2020]
- Top 8 Free Windows 10 Recovery Tool Reviews [2020]
- Top 5 Advanced Disk Recovery Alternatives
- Best Diskdigger Video Recovery Solutions
- Free File Recovery Reviews+
-
- Active File Recovery Review With Pros & Cons
- Easy Recovery Free Review
- iCare Data Recovery Review
- iCare Data Recovery for Mac Review
- Mac Free Any Data Recovery Review
- Kroll Ontrack Data Recovery Review
- PC Inspector File Recovery Alternative
- Recover My Files Review
- Wise Data Recovery Software Review
- FreeUndelete Review
- Gihosoft Free Android Recovery Review

• Filed to: Free File Recovery • Proven solutions
“My Windows PC has been crashed and now I can’t seem to recover all the saved files from it. Can I use Easy Recovery Essentials free to perform data recovery on it?”
If you are also going through a similar situation, then this would be a must-read guide for you. A lot of people get Easy Recovery Essentials Free download to recover the lost data from their crashed Windows PC. Though, you must know that when a system is crashed, you don’t get a lot of chances to perform data recovery on it. Therefore, you should only use a reliable recovery application in this situation. To make things easier for you, we will provide a stepwise guide on how to use Easy Recovery Free right here.
Part 1: Easy Recovery Essentials Overview
1.1 What is Easy Recovery Essentials Free
As the name suggests, it is a freely available data recovery application that can scan a crashed or unresponsive Windows computer. Developed by NeoSmart Technologies, it can perform data recovery and several other operations even on a non-booting Windows system. To do this, users first need to create a bootable media by doing Easy Recovery Essentials Free download and installing it on a CD, DVD, or a USB drive. Later, they can take its assistance to boot a malfunctioning system.
- It can repair a malfunctioning Windows computer, even if it is crashed or can’t boot.
- There is a dedicated data recovery feature of the tool that can help us extract all kinds of lost or inaccessible content from the storage.
- It can also recover data on a system that has been severely infected by a virus.
- You can also browse and load previously taken backup files as well.
- There are also other features that the tool offers like partition editor, safe browser, etc.
- The application is available for free and supports the recovery of all kinds of media files, documents, and so on. Compatibility
You can run Easy Recover Essentials Free on every leading Windows version like Windows 10, 8, 7, Vista, and XP. It also runs on Windows Server 2016, 2012, 2008, and 2003.
1.2 How to Use Easy Recovery Essentials Free for Windows
Now when you know about the major features of Easy recovery Essentials Windows 7/8/10/XP Free, you can easily give it a try. Beforehand, you should take care of the following prerequisites:
- Make sure that you have the application saved on your computer. If not, you can visit its website and do Easy Recovery Free download full version.
- Have a CD, DVD, or a USB Drive that would be created into a bootable media. Take the backup of the saved data in it as it will be formatted in the process.
- The CD, DVD, or USB Drive should have enough storage to install the Easy Recovery Free software.
Once you are ready, simply follow these steps to learn how to use Easy Recovery Essentials Free on Windows 10, 8, 7, XP, etc.
Step 1 Download the application
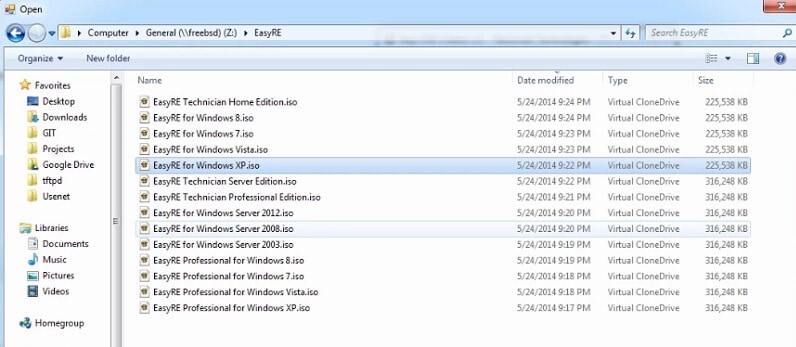
Firstly, visit the official website of Easy Recovery Free and download the tool on your system. The entire kit will be downloaded or you can just select the Windows version of the crashed system. Go to the location and select the ISO file for the relevant Windows version.
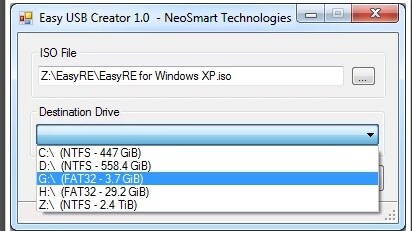
Step 2 Create a bootable media
If you are using a CD or a DVD, then you can simply burn the ISO file to it. If you are using a USB drive instead, then take the assistance of Easy USB Creator. Just launch the wizard, select the ISO file, and the connected USB drive. In this way, you can create the connected source a bootable media.
Step 3 Perform data recovery
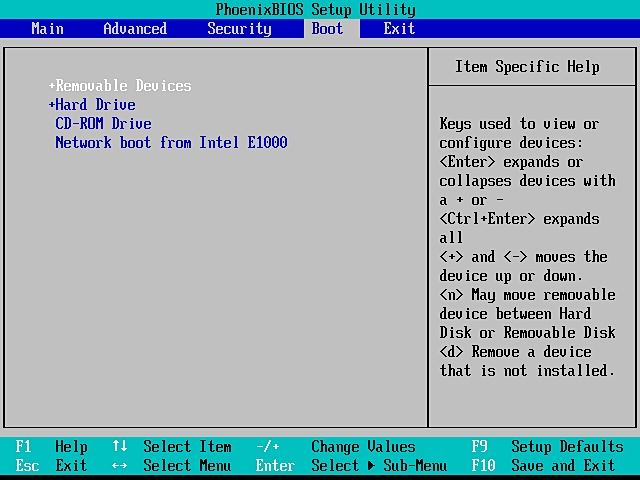
Now, connect the bootable media to the malfunctioning computer and turn it on. As it boots, press the BIOS key to enter its boot settings. It can be F2, F8, F10, F12, ESC, DELETE, or any other key. Once you enter the BIOS settings, change the boot priority for the connected media.
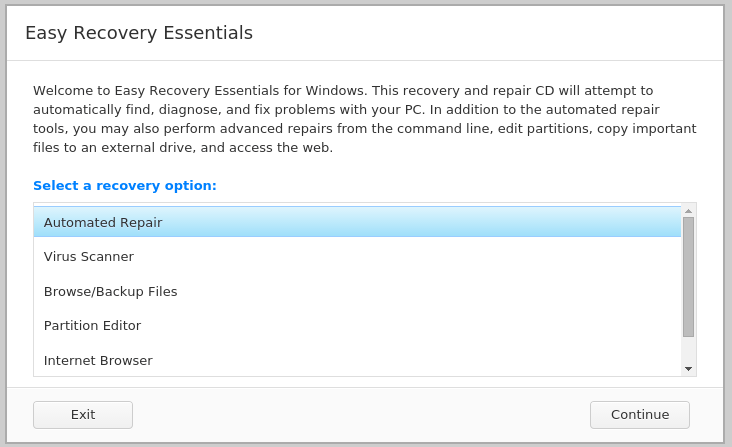
Your system will restart, but this time, it will load from the bootable media and display the Easy Recovery interface. Click on the option to recover your data and commence the scanning of your system.
1.3 Easy Recovery Essentials Reviews
To conclude our Easy Recovery Free review, let’s quickly have a look at its advantages, limitations, and user reviews.
- Freely available
- Can create a CD, DVD, or a USB drive as a bootable media
- Offers other add-on features as well
- Compatible with every leading Windows version
Cons
- A bit complicated to use and first-time users might need technical assistance
- Data recovery results are not that high
- Advanced features are only available for its premium version
Part 2: Best Alternative to Easy Recovery Essentials Free
As you can see, Easy Recovery Essentials Free has its own limitations and might not meet your requirements. Therefore, you should consider using a more advanced application, like Recoverit (IS). It is the best Easy Recovery Essentials Free alternative that offers a wide range of features. Its latest release, Recoverit (IS) 5.0 has an intuitive interface and lets us perform data recovery on any crashed Windows system. Let’s explore some of its major features in detail.
Recoverit (IS)
A Life Saver to Solve Your Data Loss Problems!
- The application is extremely easy to use and does not require any prior technical experience as well.
- It can create any compatible CD, DVD, or a USB drive into a bootable media. You can later use it to boot a Windows 10, 8, 7, Vista, or XP system.
- The tool can recover all kinds of content like your photos, videos, audios, documents, emails, and even raw files.
- Apart from Windows internal drive, it can also recover data from an external source like USB drive, SD card, external hard disks, and so on.
- The basic version of Recoverit (IS) is available for free, but to create a bootable media, you need to get its Ultimate subscription.
To learn how to perform data recovery using this Easy Recovery Essentials free alternative, you can follow these steps:
Step 1 Launch Recoverit (IS)
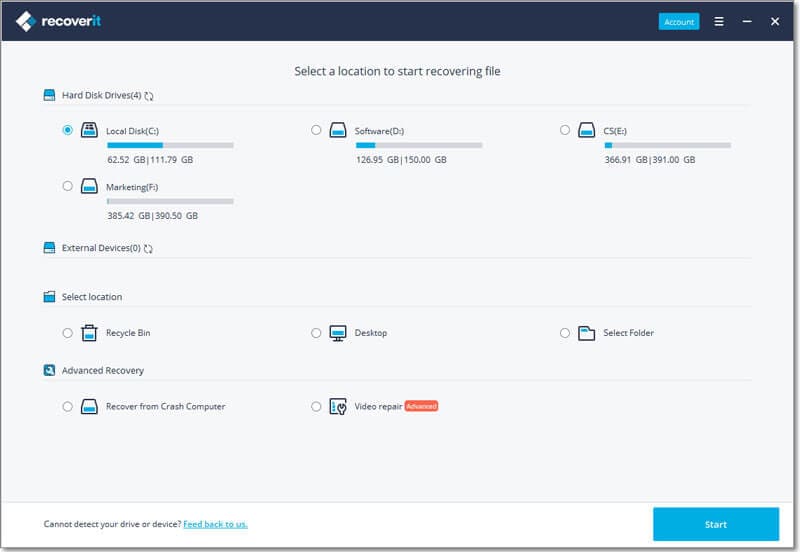
To start with, install and launch Recoverit (IS) on another working computer. Also, connect your USB drive or CD/DVD to it and let it detect it automatically. Once you launch the application, click on the “Recover from Crash Computer” option and proceed.
Furthermore, you will get the following warning message on the screen. Click on the “Start” button to initiate the wizard.
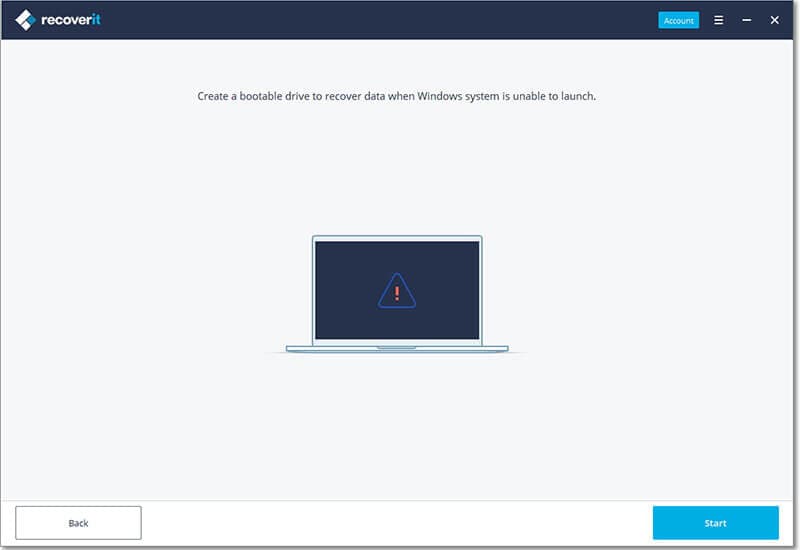
Step 2 Create a bootable media
Firstly, you need to select whether you wish to create the connected USB drive or a CD/DVD to a bootable media. Also, select its location and click on the “Create” button.
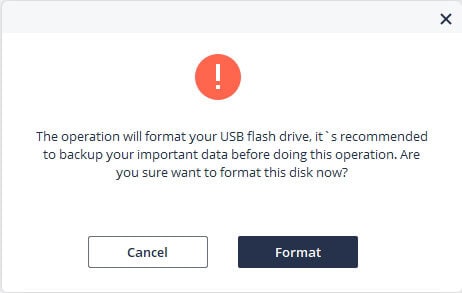
As the process will format the connected media, you need to confirm your choice by clicking on the “Format” button.
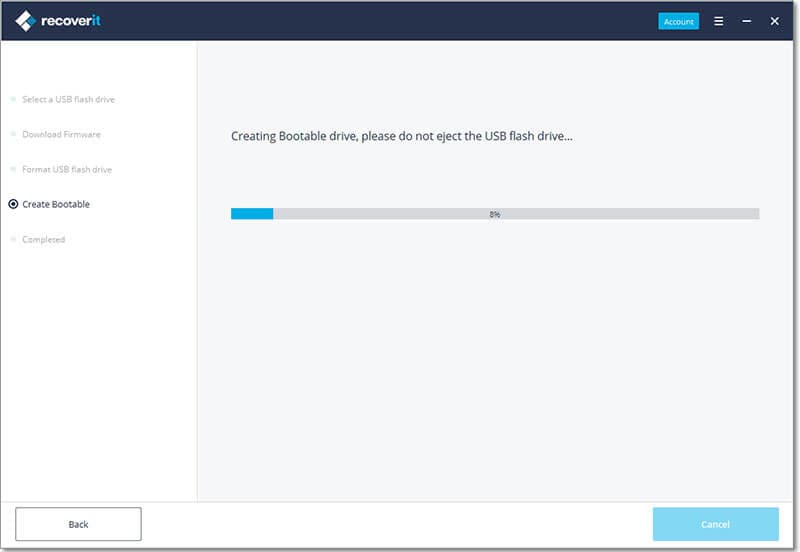
Wait for a while as the application will complete the needed operations to covert the connected source to a bootable media. Make sure that you don’t disconnect it in between.
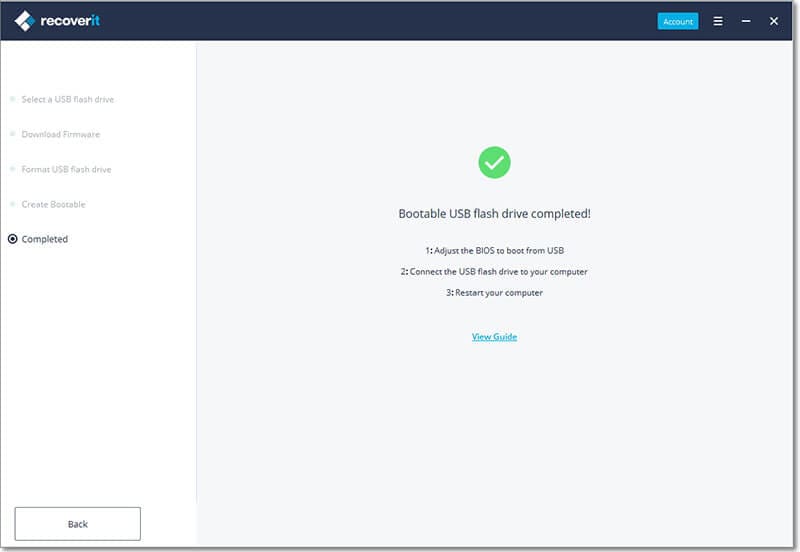
Once it is done, you will be notified. Now, you can safely remove the connected media from the system.
Step 3 Perform data recovery on a crashed system
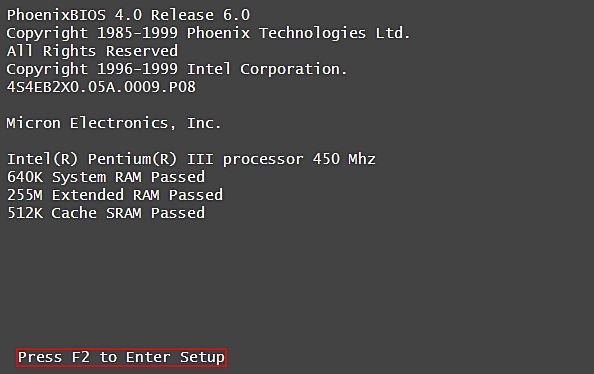
Great! You are almost there. Connect the bootable Windows media that you have created to the crashed system now and turn it on. As it starts, press the BIOS key a few times to enter its boot settings. It can be F2, F10, F12, ESC, or any other key.
Use the arrow keys to navigate the BIOS settings and go to the “Boot” section. Now, make sure that the connected media is the top priority here. Use the ENTER key to make a selection and the ESC key to exit.
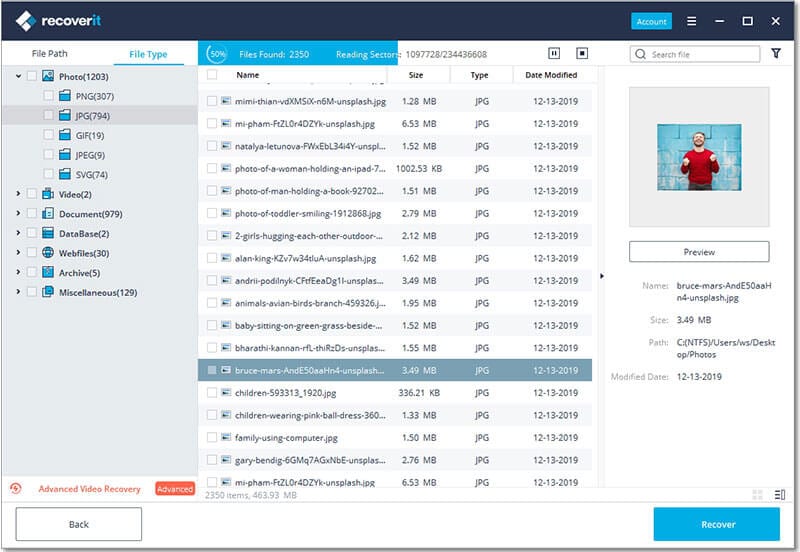
That’s it! Your system would be restarted now and load the bootable media content. This will display the Recoverit (IS) window for you to scan the crashed disk and get back your lost files.
Part 3: How to Avoid Data Loss in Future
Apart from that, you can also consider following these tips to avoid a similar data loss scenario.
- Don’t cram your system’s storage with too much data and make sure there is enough free space for its processing.
- Create different logical partitions and maintain a dedicated one for Windows and other system files.
- Try to keep a backup of your important files at a trusted location.
- Enable the firewall on your system or use an anti-malware tool to keep it safe.
- Avoid restarting your system when a file or application is still running in the background.
- Keep a data recovery tool (like Recoverit (IS)) handy to take immediate actions after losing your data.
The guide would have certainly helped you know more about Easy Recovery Essentials free download, features, and working. We have also listed its pros and cons for a clear understanding of the tool. If you want to get better results, then consider using Recoverit (IS) instead. It is the best Easy Recovery Essentials Free alternative that works on every leading Windows version. Simply use it as per your convenience and overcome all kinds of data loss scenarios in a jiffy.
Elva
staff Editor