Free File Recovery
- Recover Files Free+
- Top Free File Recovery List+
-
- 7 Data Recovery Crack and Serial Keys
- Top 10 Free Data Recovery Software [2020]
- Best Free Partition Recovery Software 2020
- Top 5 Free SD Card Recovery Software 2020
- Top 5 Free Hard Disk Recovery Software
- Top 5 Alternatives to iCare Data Recovery for Windows
- 5 Best Image Recovery Software
- Top 5 Best Media Recovery Free Download Software
- The Best Easy Data Recovery Software
- Top 10 Free Data Recovery Software 2021
- Top 10 Data Recovery Software for PC
- Top 10 Free USB Recovery Softwares Review [2020]
- Top 8 Free Windows 10 Recovery Tool Reviews [2020]
- Top 5 Advanced Disk Recovery Alternatives
- Best Diskdigger Video Recovery Solutions
- Free File Recovery Reviews+
-
- Active File Recovery Review With Pros & Cons
- Easy Recovery Free Review
- iCare Data Recovery Review
- iCare Data Recovery for Mac Review
- Mac Free Any Data Recovery Review
- Kroll Ontrack Data Recovery Review
- PC Inspector File Recovery Alternative
- Recover My Files Review
- Wise Data Recovery Software Review
- FreeUndelete Review
- Gihosoft Free Android Recovery Review

• Filed to: Free File Recovery • Proven solutions
“How to download and use Recuva on Windows 10? I have lost some of my important photos and have no idea whether Recuva for Windows 10 works or not!”
If you are also a Windows user who has suffered from an unwanted data loss, then you might be undergoing a similar situation too. Even after trying different ways to keep your data safe, chances are that you might end up losing it unexpectedly. The best way to retrieve your deleted files is by using a data recovery tool like Recuva Windows. To help you download and use Recuva Windows 7/8/10 application, we have come up with this stepwise tutorial. Read on and know how to use Recuva software for Windows and also learn about its best alternative.
Part 1: Where to Download Recuva Windows 10 Latest Version?
To start with, you need to know from where to download Recuva windows application on your system. Ideally, you can visit its official website to download its free or pro version. Most of the advanced features of the tool are only available for the pro version. Therefore, you should make sure that you have bought the correct subscription to meet your data recovery needs. Here’s a quick guide to help you download Recuva on Windows 10, 8, 7, Vista, or XP.
Step 1 To start with, go to the official website of Recuva by CCleaner and get the subscription of your choice. You can download the setup of its free or the pro version from here.
Step 2 Once the EXE file of the setup is downloaded, just click on it to initiate the process. Firstly, you can just select a preferred language for the setup.

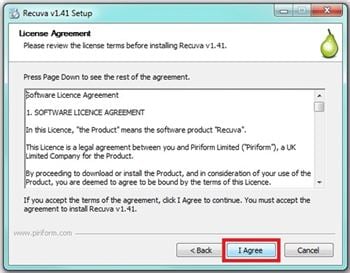
Step 3 Subsequently, you need to read and agree to the basic terms and conditions of the Recuva for Windows 8/7/10 application and proceed.
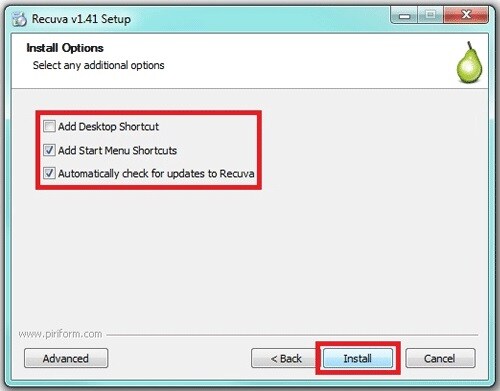
Step 4 To complete the setup, just decide whether you wish to add its shortcut on desktop or toolbar. Click on the “Install” button in the end and wait for a while as Recuva software for Windows would be installed.
Part 2: How to Recover Deleted Files on Windows 10 Using Recuva?
Once the Recuva on Windows 10/8//7 application has been installed, you can easily take its assistance to perform data recovery. You might already know that Recuva supports a wide range of data formats and scenarios. This means, you can get back your photos, videos, documents, and all kinds of important files that have been lost. Apart from performing data recovery on Windows internal hard drive, you can do the same on an external device as well. For instance, you can get back your lost data from an external hard drive, SD card, pen drive, and so on.
The overall process to use Recuva on Windows is quite similar for every major Windows version. All you got to do is follow these basic steps to get back your lost data using Recuva software for Windows.
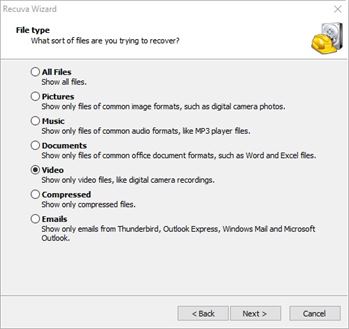
Step 1 Select a data type to scan
In order to use Recuva Windows 8/7/10 application, you need to launch it first. The Recuva portable Windows 10 wizard screen will be launched, stating details about the software. Just click on the “Next” button to start the Recuva Windows recovery process.

At first, you need to select the type of data you wish to scan. This will save the overall scanning time of Recuva on Windows. You can pick categories like picture, video, document, etc. or select the “All files” option as well.
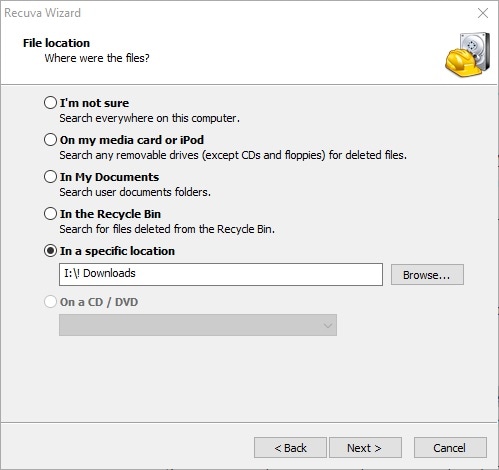
Step 2 Specify a location to scan
In addition to picking the type of data you wish to scan, you also need to specify a location as well. That is, where do you wish Recuva for Windows to look for the lost or deleted content. It can be on the Recycle Bin, attached memory card, My Documents, etc. You can browse to a specific location from here as well.
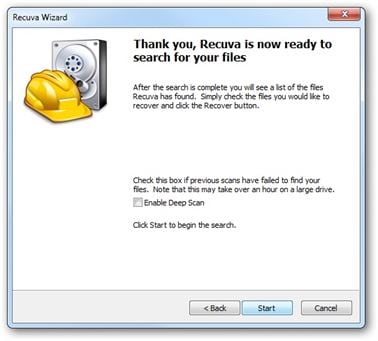
Step 3 Scan and Restore your data
In the end, you will get a confirmation screen like this with an option to perform a deep scan. You can either enable or disable this option and click on the “Start” button to begin the scan. As Recuva Windows will scan the respective location, you can wait for a while for the process to be completed.
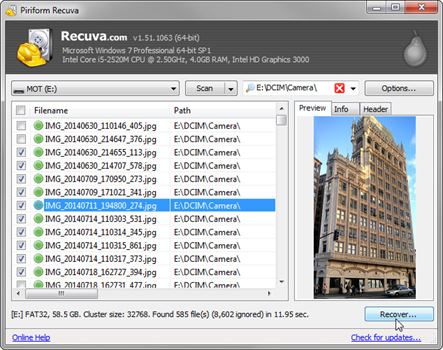
That’s it! You can now just preview the recovered data like photos and videos on the native interface of Recuva Windows. Select the files you wish to get back and save them to a trusted location. Apart from that, you can also perform an advanced scan to do a deep recovery of data.
Part 3: The Best Recuva Alternative to Find and Undelete files on Windows 10
Although Recuva for Windows 10 is a trusted recovery software, it suffers from some limitations. For instance, it might not entirely recover files of larger size and some of the recovered data can undergo compatibility issues as well. Furthermore, its free version has limited data recovery rate that might not meet your requirements. To overcome these limitations, it is suggested to use Recoverit (IS) instead. Considered as the best data recovery tool for Windows and Mac, it has one of the highest data recovery rates in the industry. Here are some of the leading features of Recoverit (IS):

Recoverit (IS)
A Life Saver to Solve Your Data Loss Problems!
- It is an extremely easy-to-use and highly professional data recovery software for Windows and Mac that also offers a free version to its users.
- It supports the recovery of more than 1000 different types of data files. This includes every major kind of photos, videos, audios, documents, and so much more.
- There are different data recovery modes that the application supports like Recycle Bin deletion, accidental deletion, virus attack deletion, lost partition deletion, and so on.
- You can perform an extensive data recovery on the internal hard drive of the system easily. Also, it supports recovery on external units like HDD, SD card, USB drive, MP3 player, digital camera, etc.
- There are two different scanning modes (quick and deep) that the tool supports as of now. The deep scan is a more extensive recovery option, but it will also take more time.
- A preview of the recovered content will be provided on the interface, letting you perform a selective data recovery.
After getting to know about these high-end features of Recoverit (IS), you must be willing to give it a try. If you also can’t get positive results from Recuva Windows recovery, then simply follow these steps:
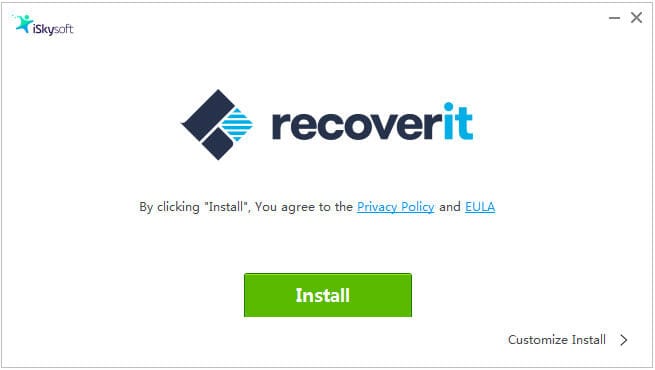
Step 1 Download and launch
To begin with, you can simply launch the Recoverit (IS) application on your Mac or Windows PC. If you wish to recover data from an external source, then connect it to your computer first.
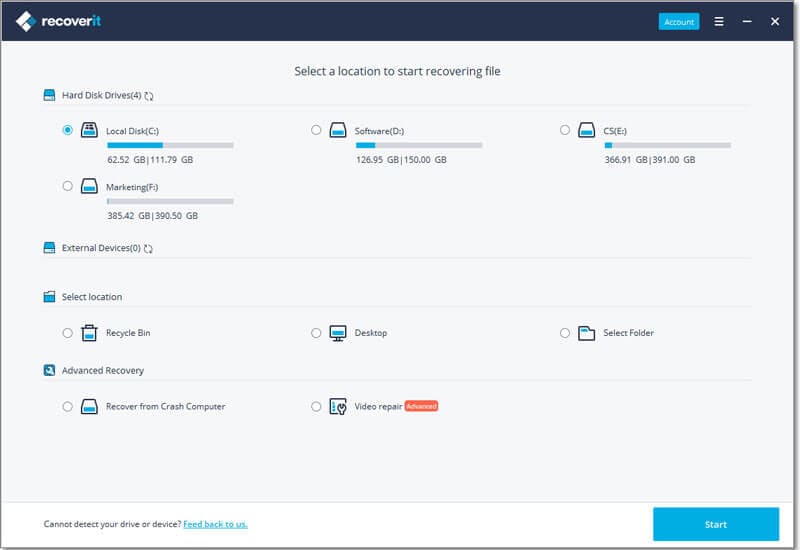
Step 2 Select a Location to Scan
As you would proceed, the application will ask you to select a source to scan your data. From the list of the available partitions and the connected external units, just pick a source to scan.
Step 3 Preview and Recover
Wait for a few minutes as Recoverit (IS) would scan the selected source and try to extract your data. Try not to close the application in between and view the progress of the process from an on-screen indicator.
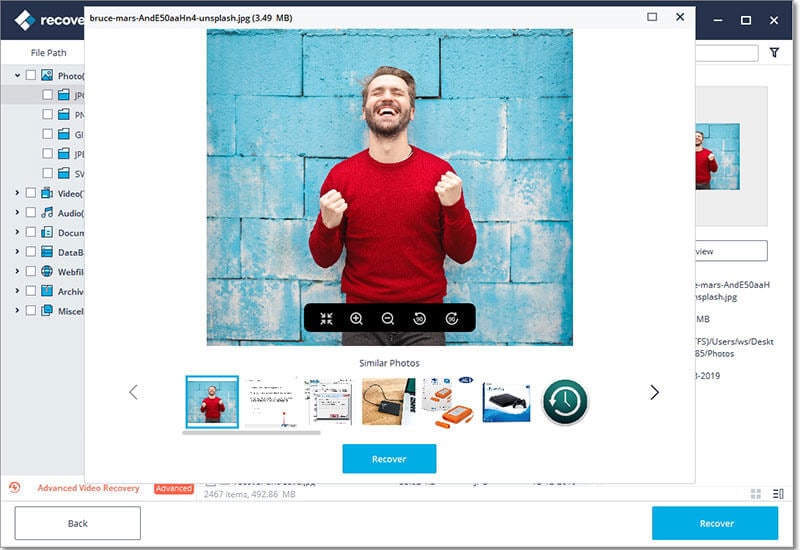
After when the process is completed, you will be notified. You can now preview the extracted data that will be listed under different categories here. There is also a search bar to look for specific files as well. Select the files you wish to extract, click on the “Recover” button, and save them a trusted location.
Although you would be able to get positive results with the quick scan, there is also an option to perform a deep scan on the system. Click on the “All-around Recovery” option on the bottom of the screen, letting the application perform an extensive scan on the source.
Conclusion:
After following this guide, you would certainly be able to know every essential thing about Recuva Windows 10. We have provided a step by step solution not only to download Recuva software for Windows, but also to use it like a pro. Since Recuva Windows 10 might not meet your requirements, you can also consider using a professional recovery tool like Recoverit (IS). A highly secure, user-friendly, and reliable data recovery tool, it will certainly help you get back all kinds of lost data in no time.
Elva
staff Editor