• Filed to: iPhone Recovery • Proven solutions
It's inevitable that sometimes, iPhone users encounter problems with their phone. Problems like forgotten passcodes and software issues may cause users to want to restore their phones. Buying a new phone, though not a problem, can also be a reason for a user to restore data from a saved backup file. To restore iPhone without iTunes or from iTunes, different tools can be used. Apple offers different options for you to be able to restore data to your phone. Apple's flagship music player, iTunes, is one of such tools that may help you put the data that you want back in your phone.
Part 1: 2 Methods to Restore iPhone Without iTunes
Method 1: How to Restore iPhone from iCloud without iTunes
The dr.fone - Backup&Restore (iOS) is a third-party application that can basically do what the iTunes-only method does. It goes a bit farther though. With the iSkysoft application, you may opt not to restore all the data that's in the backup file. This method, however, still requires that you have synced your iOS (including iOS 11) devices with iTunes or iCloud. Take note that you'll have to use your Mac or Windows PC for this.
Step-by-Step Guide to Restore iPhone Without iTunes
Step 1. Choose "Recover from iCloud Backup File"
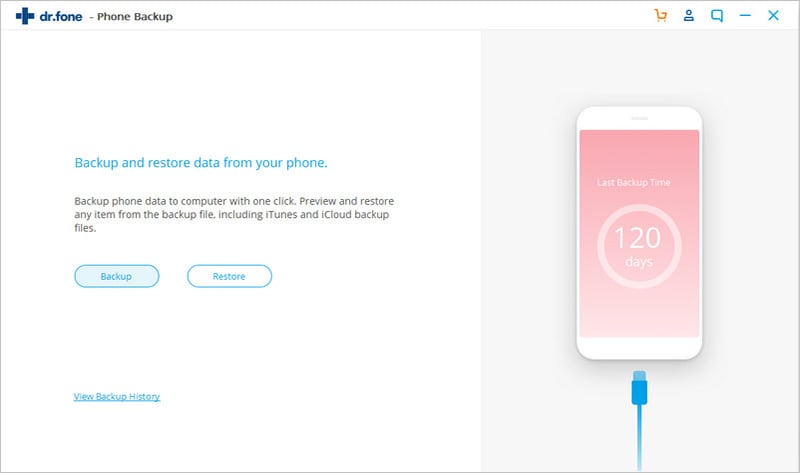
Download and install dr.fone from the download buttons below. Launch it and choose the "Backup&Restore" menu. Connect your iPhone with the computer via a USB cable. Choose "Recover from iCloud Backup" mode on the left side menus.
Step 2. Login iCloud account
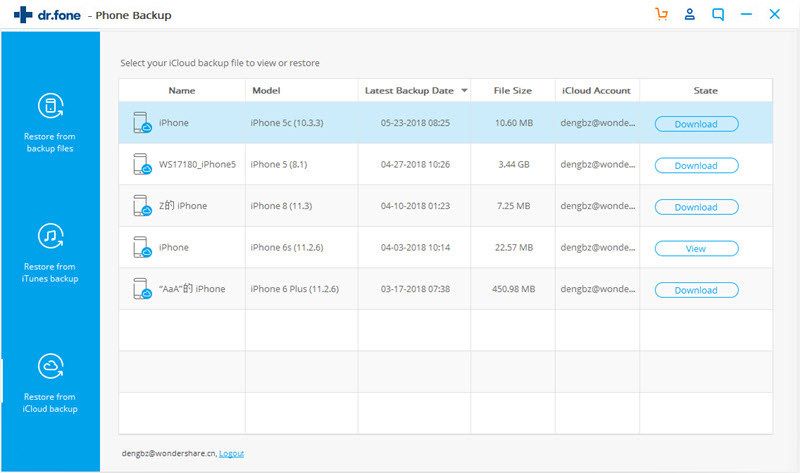
Login your iCloud account. When you're in, choose the backup file you'd like to restore and click "Download" to get it to your computer. After it, click "Next" button in the pop-up window to extract the downloaded backup file.
Step 3. Restore iPhone Without iTunes
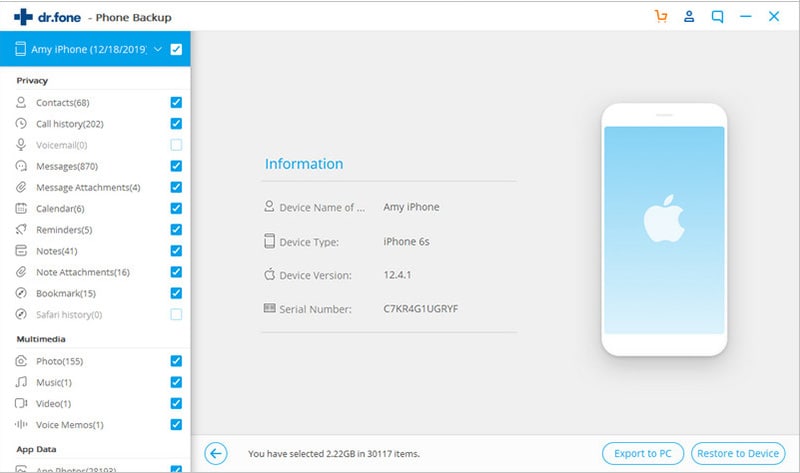
Once the scan is over, you can preview the data in detail one by one. Choose the one you'd like to restore and click "Restore to Device" to save it.
Why Choose This Software to Restore iPhone Without iTunes:
- 3 Recovery Modes: Allows to recover data directly from iPhone, extract iTunes and iCloud backup files.
- Up to 20 File Types: Recover lost notes, text messages, MMS messages, iMessages, contacts, photos, videos, call logs, etc.
- Various Data Loss: Retrieve data lost for deletion, factory settings restore, jailbreak failure, iPhone lost or broken, etc.
- Preview: Lets you read and preview found data before recovery.
- Flexible Recovery: Selectively recover any item you want from iPhone, iTunes and iCloud backup files.
Method 2: Restore iPhone without iTunes (using iCloud)
Although iTunes is a very useful application to help you restore your iPhone, you actually have a handful of applications to help you do the trick. If you're looking for another Apple application to help you out, you can always turn to iCloud for your restoration needs. Remember that to do this, you need to have an iCloud backup file created previously.
- Using your iPhone, go to "Settings", then "General". Tap on "Software Update". This shall allow your phone to check if an update for its operating system is available. Download the latest iOS version available if you still haven't got the latest one. This update is required for you to be able to restore from backup file you created using another device (probably broken or lost).
- Head on to "Settings", then "iCloud", then "Storage & Backup". At the bottom part of the screen, you should see a message with header "Last Backup". A date of the most recent backup should also be seen in the same section.
- Now go to "Settings", "General", then "Reset". Tap on "Erase all content and settings".
- In this method, you will also need the help of the "Setup Assistant". To proceed with it, tap Set up your device, then "Restore from a Backup". At this point, you should now sign in to iCloud.
- Tap "Choose backup". You will be presented with a list of all the available backups you've created previously. Choose from these backups to use for the restoration of your phone.
Part 2: How to Restore iPhone with iTunes (iTunes 12.3 Included)
Method 1: Restore iPhone with iTunes Backup Using dr.fone - Backup&Restore (iOS)
Step 1. Choose "Recovery from iTunes backup" Mode
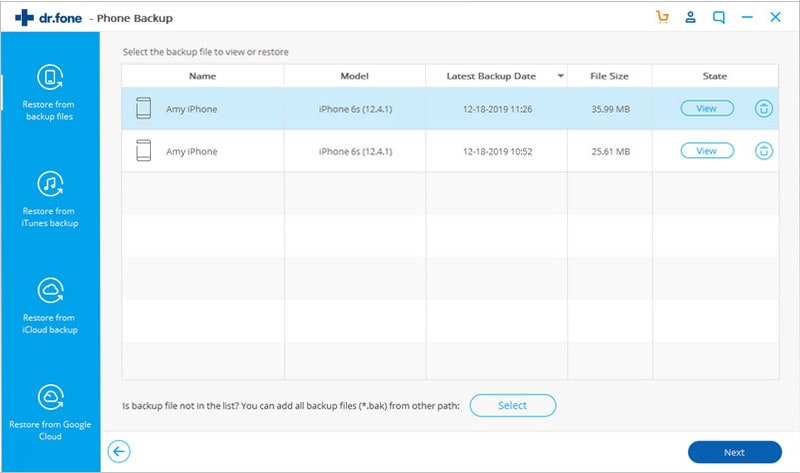
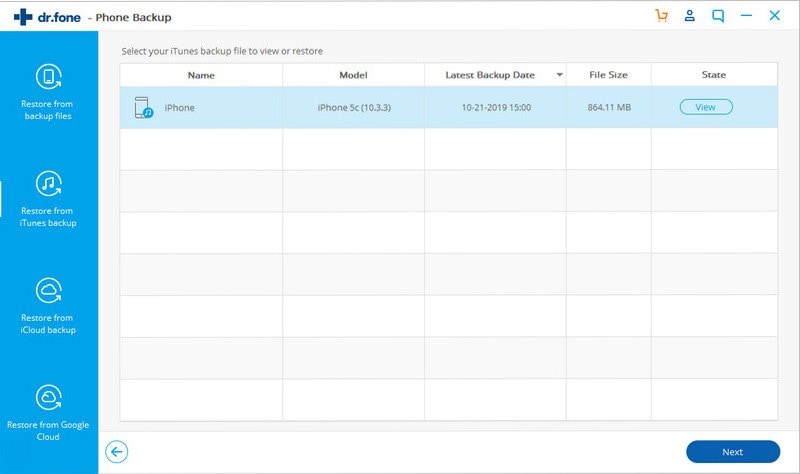
Make sure dr.fone - Backup&Restore (iOS) is open on your computer. Enter the Data Recovery interface. Connect your iPhone with computer. Choose "Recovery from iTunes backup" from the left menus. Then choose the backup files that contains the data your need. Click "View".
Step 2. Restore iPhone from iTunes
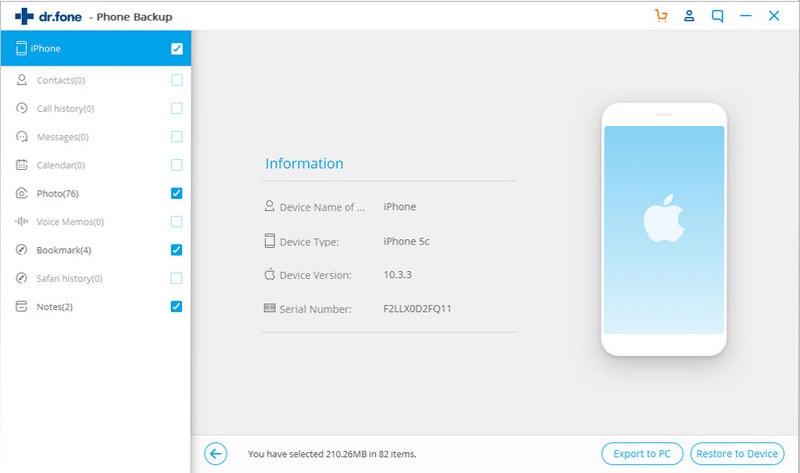
After scanning has finished, dr.fone will display all files found in the backup that you selected. You will be able to preview these files and you may select only the files that you want to restore, thus avoiding unnecessary files to be restored and take space in your phone. Once you're done choosing the files you want back, click on the "Restore to Device" button to restore them.
Method 2: Step-by-step Guide to Restore iPhone via iTunes
Restoring your iPhone (iPhone X and iPhone 8 Plus included) with a previous backup using iTunes is very easy to do. All it takes is just three steps: (If you want to restore iPhone without iTunes, please read the guides in Part 1 in this article.)
Step 1. Make sure that your phone is properly connected to the PC that contains the backup file you want to use for the restoration. It is recommended to use the cable that was originally included in the packaging of your iPhone so as to avoid any hardware issues during the process. Also ensure that you are running the latest iTunes version in the PC you're going to use.
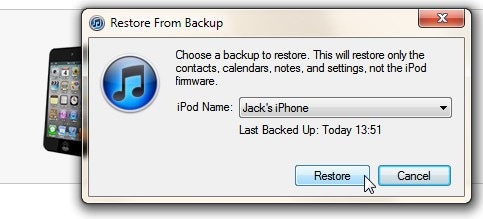
Step 2. Go to "File", "Devices", then "Restore from Backup".
Step 3. Choose the backup file that you want to restore to your iPhone. You might want to use the latest backup that you've made, perhaps.
Tips: iTunes Could Not Restore the iPhone (Including iPhone X, iPhone 8 and iPhone 8 Plus)
While iTunes seems a really good way to help you restore your data from a backup file, there could be some issues one might encounter while using it for restoration. Some examples of such issues are the following:
| Issues | Troubleshooting |
|---|---|
| Error 21 |
A hardware issue is causing the error to appear. Make sure your cable is perfectly working and is properly connected to your iPhone and your PC. Have your phone connect to a reliable network and make sure your computer is running well. Ensure that no security settings or software in your PC is blocking your phone's communication with Apple's update servers then attempt to update again. |
| Error 1 |
A hardware failure is most likely the reason. Booting properly into DFU mode should solve this issue. To do this, make sure your phone is properly connected to your computer and iTunes is open. Switch off your device then press on the power and home buttons for about 30 seconds. Release only the power button until the device is identified in iTunes. |
| iPhone won't restore with iTunes after failed jailbreaking attempt |
The software used to jailbreak the phone may have messed up phone's the software and configurations. Also having the phone boot in DFU mode will allow you to restore your phone using iTunes. See the solution for Error 1. |
| Error 3004 |
Another hardware issue, most likely with the USB cable, is this problem's culprit. Try replacing the USB cable you're using to connect your phone to your PC with one that you're sure that is working perfectly fine. Attempt to restore from iTunes again. |
| Restoring stops, the loading bar disappears, and an error message appears |
This issue is probably also caused by hardware problems. Replace your USB cable with a better or newer one, just to be sure, disable all security software and make sure your phone's network connection is strong and reliable. Restore again with iTunes afterwards. It should now work. |
These are all but five issues many iPhone users have been encountering when trying to restore their phones with iTunes. Most of these errors, usually denoted by their numbers, are caused by similar issues and can be solved using similar methods. Probably one thing that an iPhone user could take note of is to not panic while troubleshooting his or her phone for restoration so as to examine the error and solve it properly. After all, from my side, I would recommend you to restore iPhone without iTunes.


Elva
staff Editor