Recycle Bin / Trash Recovery
- Recycle Bin Recovery+
-
- A Full Guide on Recycle Bin Management and Recovery in Windows
- Every Recycle Bin Windows 10 Solution You Need
- Recycle Bin Windows 7 Solutions
- How to Fix Corrupted Recycle Bin in Windows and Restore Lost Data
- How to Find the Recycle Bin Location of Your Desktop
- Full Guide on Removing/Restoring Recycle Bin on PC
- Top Ways to Recycle Bin Data Recovery
- Where is Recycle Bin - How to Locate Recycle Bin on Windows
- How to Recover Deleted Files from Recycle Bin
- Easiest Way to Restore Deleted Files from Recycle Bin
- All You Need to Know About Hidden Recycle Bin
- Mac Trash Recovery+
-
- How to Securely Empty the Trash On Your Mac
- Tried-and-True Solution: How to Force Empty Trash Mac
- How to Restore Deleted Files from Trash on Mac
- 3 Easy Ways to Empty Trash in Gmail
- Easy Ways to Recover Emails Deleted from Trash
- How to Recover Deleted Mail from Trash on Mac
- Empty Trash From Your Mac and iPhone Easily and Securely
- Your Full Guide for Anything Related to Mac Trash
- How Find Recycle Bin and Restore Deleted Files on Android
- How to Empty Trash on iPhone/iPad/iPod (iOS 12 Supported)
- How to Empty Google Drive Trash and Undo Empty Trash
- How to Delete Trash on Mac Securely and Permanently
- Try These Multiple Methods to Recover Deleted Trash on Mac
- 3 Ways to Empty Trash on Mac Completely
- How to Undo Empty Trash Mac
- Recover Emptied Trash on macOS Mojave

• Filed to: Recycle Bin Recovery • Proven solutions
The delete key is designed to be a gateway to an altogether different location, the location of trash can. If you are on Mac, you may have heard that location being called the ‘mac trash, mac trash can or apple trash can.’ Hence, why is it so significant that we have to write on it?
Well, I bet you have faced the issue of needing your previously deleted files at least once in your life. Why do you have to delete them? What if you want to find them and restore the deleted files again? Wouldn’t it be magical if those deleted files are saved without you knowing about it?
Yes, sometimes you delete them, but, in the next instant require them. In that circumstance, the right person to search for, is named as ‘trash can.’
Part 1. What is Mac Trash?
So, what is Mac Trash? Well, it is that location in the Mac doc where whatever is necessary is put in. Simply, each and everything that you don’t require, you can put it in Mac Trash be it apps, audio, video, documents or any other file type.
Don’t require an audio file but it is sitting there for months? Drag it to the trash bin. Having multiple versions of a single document unnecessarily? Drag them to the trash bin. All you have to do is drag that particular icon on the trash icon and the job will be done.
Another way to move files in the trash is to select all the naysayers and dispose them by choosing File - Move to Trash or hitting Command + Delete.
Part 2. Where Do I Find the Trash Can on My Mac Computer?
How to access trash on Mac? Finding the trash bin on Mac is easy. It is located on the right side of the doc. You can recognize it by the following icon:

Another option through which you can find the mac trash can is by clicking on the Go To folder.
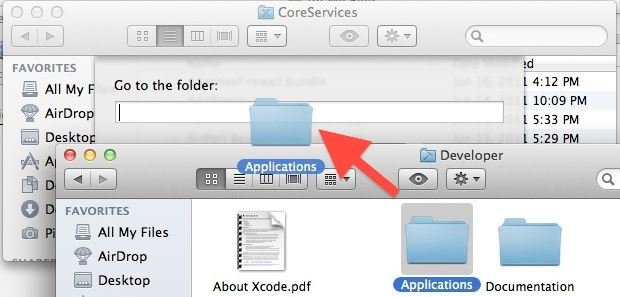
Simply click Go on the toolbar and select Go To Folder or press Command + Shift + G. After this, a window will open prompting to type the name of the folder. Type in Trash and you are ready to go.
If still, however, you are unable to find the trash folder on Mac then there is an issue in your operating system. The only way to fix this is by reinstalling your operating system. Reinstall your latest Mac OS and hopefully, the trash can will be right where it is supposed to be and you will be able to retrieve whatever you want from that folder.
Part 3. What to Do When Mac Trash Won’t Empty?
Most of the times, you delete items because you don’t need them. Hence, all such items are diverted in the trash bin. However, after some time, the trash bin may be filled with all those deleted items and eventually, space on the hard drive will run out.
What happens here is that, whenever you delete a particular item, it is still sored on the hard drive; just the directory where it is stored is changed to the trash can. Hence, as it piles up, so does the amount of space all the deleted items require.
In such situations, emptying trash is the best option. It is simple enough also. Just right click on the trash icon and hit the ‘secure empty trash’ option.
Here comes a complication. By some way or another, this option just doesn’t work. Well, don’t worry. We are here for you. You are covered. If it doesn’t empty through that option, we will force it to!
Method 1: Force Empty Trash using Terminal Commands
First up, let us try the following trick: Control-click on the item you want to delete and select delete immediately. Also, hold the Option key and then delete the Trash Bin on Mac. In this manner, those files will be permanently deleted from your Mac and you won’t need to worry about it later. If your trash just doesn’t empty by the above method, this is a great alternative: by forcing the trash on Mac with a few commands used to trick the operating system.
Follow these steps:
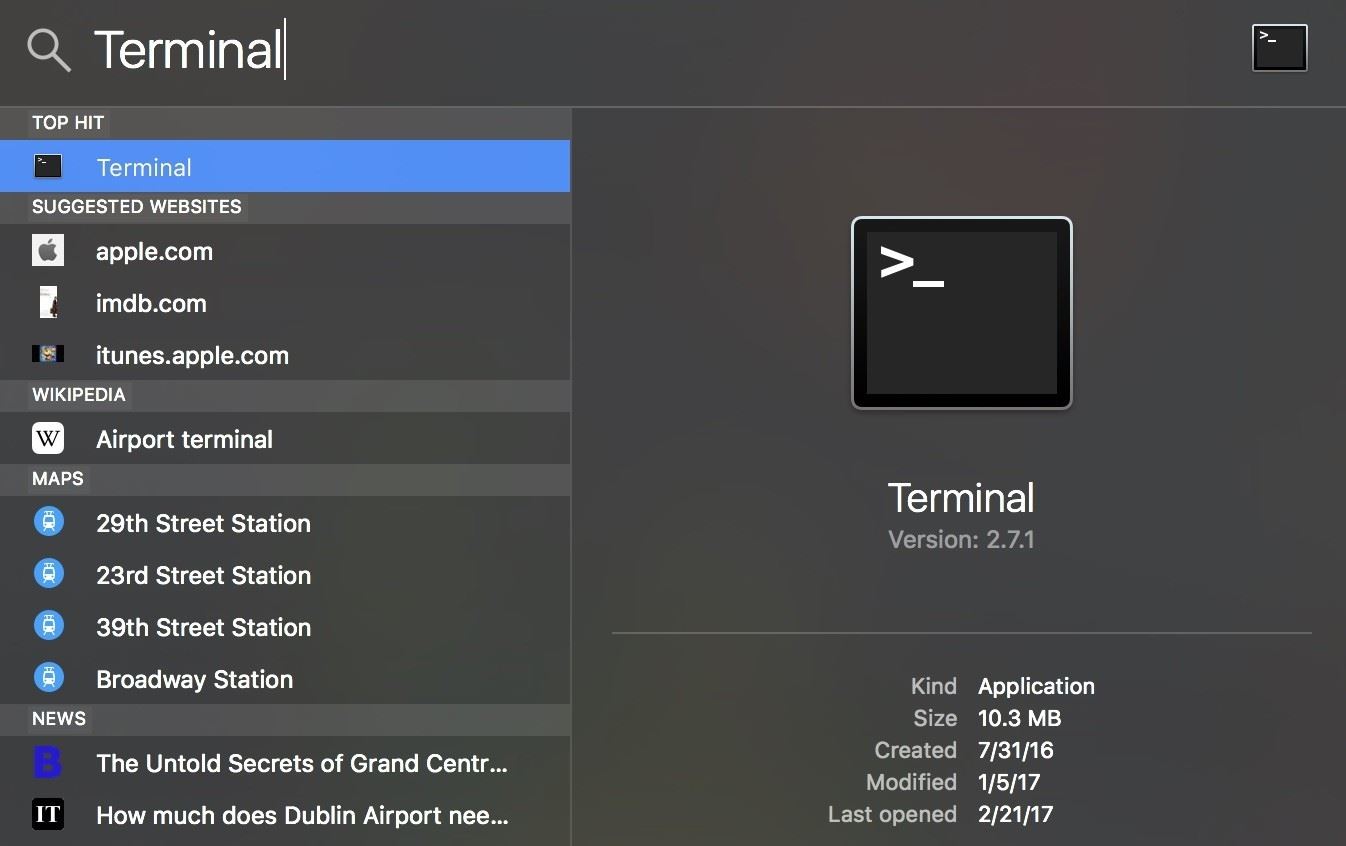
Step 1 Use the launch terminal to find Spotlight on your Mac. For beginners, Spotlight is a selection-based searching system, which creates and stores all indexes and locations of all items and files. Being search based, you can search any item through Spotlight.
Step 2 In the terminal, enter the following command ‘without hitting Enter afterward.’
sudo rm –R
Step 3 On your Trash Bin icon, control click to open it.
Step 4 Select all the files or the particular file that you want to delete.
Step 5 After selection, drag the files in the Terminal window.
Step 6 Hit Enter button.
Step 7 Fill in your Administrator Password. At that instance, you will see as if nothing has happened in the Terminal as you won’t see the password being typed into it. Nothing will change.
Step 8 Hit Enter again.
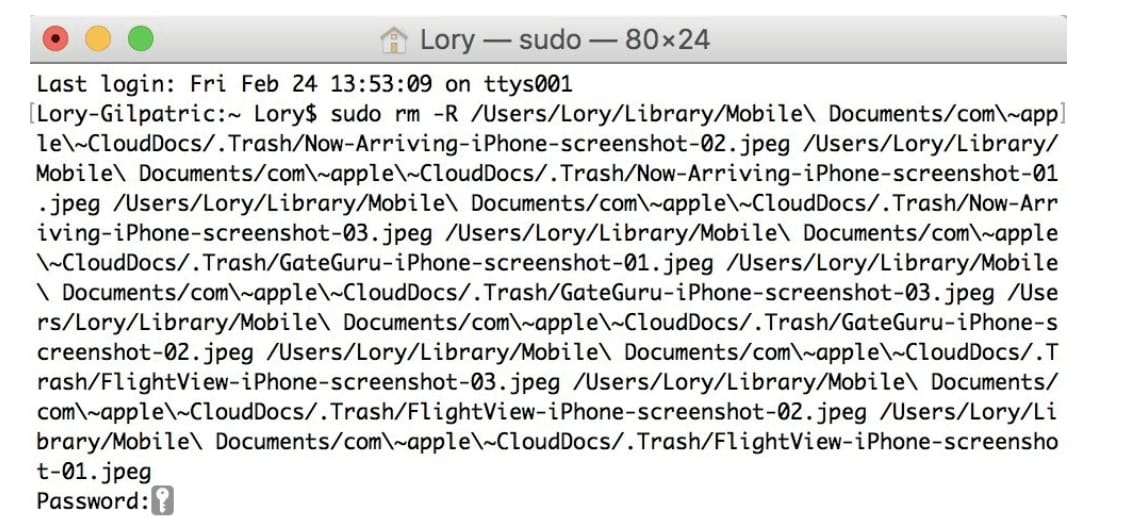
Step 9 If the process doesn’t work, probably you forgot to add a space after R. Rectify that and try the process again.
If the size of files is large, it may take some time. Sit back and relax as this process is bound to work every time.
However, sometimes a strange thing unfolds. An error message pops up when you try to empty trash on Mac that says some files that you want to delete are in use. It is strange, isn’t it? Well, still we got a solution for it. Here we go.
Method 2: Close All Files and Background Apps When Files are in Use
As mentioned earlier, if the message says the file is in use, you have got some options.
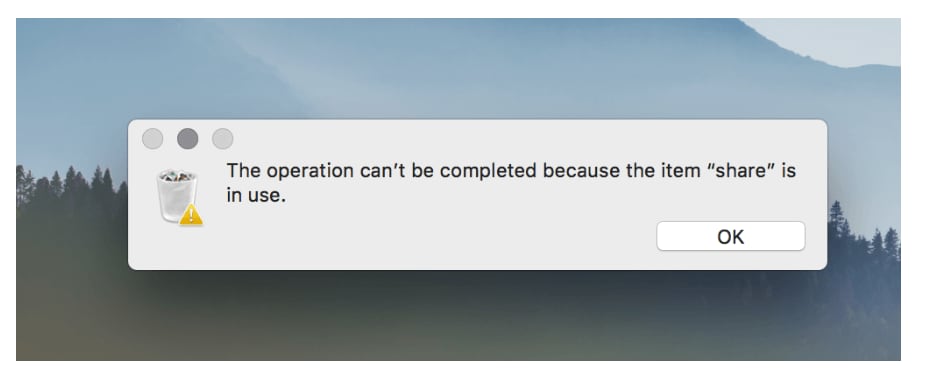
Step 1 Quit that app that might use the file under consideration. You can also try and quit all the apps to better complete the process. This step should do the trick.
Step 2 Even if that doesn’t work, the app using that file must be running in the background. In this case, you need to restart the computer and repeat the process. Fortunately, you will succeed in emptying the trash on Mac.
Step 3 In certain stubborn cases, the file still won’t be deleted. There should be a start-up item using the file; hence, start your Mac in safe mode. The safe mode will stop the running files.
Further, if you would like to go further in the process and see the exact application using that file you can use the following Terminal Command:
- Open the finder window by clicking on Trash.
- Open the Terminal window and type Isof (follow it by a space).
- Do not press return at any cost.
- The files that are in use; select them and drag them from Trash to the Terminal window.
- Now you can finally press return.
- All the applications using that file will be displayed.
If there is any application using it, quit it immediately. If it is a background process, terminate the process altogether by opening the Activity Monitor.
Method 3: Unlock the Files When Files are Locked
Of course, sometimes you lock some files to make them read-only or for any security reasons. In such case just putting them into trash won’t work most of the times.

i.e. If there is a single file, move it to trash and hit Shift + Command + Delete. For multiple files hold down the Option key alongside the Shift key to remove all locked files from the Trash Can.
If this doesn’t work which might be the case, well you only have to read further down here.
Option 1: Select all the files and press Option + Command + I (alternatively to get info, you can hold Option while choosing ‘Get Info’ tab from file menu).
Open the info pane after the pop-up will display the ‘get info’ option. Just un-tick the checkbox in front of ‘Locked’ option and you are done.
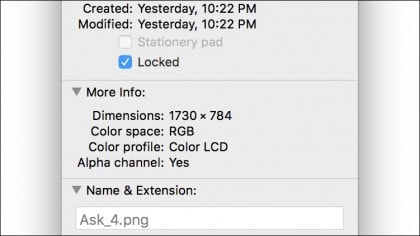
Emptying trash now is a kid’s job now.
If you would like to try a different approach which is better suited for a vast number of locked files spread across different folders and even drives, here is your life-saver.
Option 2: Open up the Terminal window in Applications – Utilities (Yes, it is the Terminal Window again. Seems to do the trick each and every time).
Enter chflags –R nouchg < directory_name>
Here < directory_name> is the path to the folder where the file is stored in, i.e., the parent folder.
Method 4: Turn off System Integrity Protection
For other unfortunate times, the Mac OS just assesses that the files to be deleted are high value and hence turns on the System Integrity Protection feature. Yes, the name is big but so is the complexity.
First up, System Integrity Protection as the name suggests is integrated with your Mac OS. Being a high-level security feature, it protects the Mac from external threats of viruses and malware. It is normally not advised to turn it off.
Further, the System Integration feature protects the Trash bin folder and prevents any modifications in that folder for threats of malware attack. Hence, before emptying trash, you might need to disable the SIP if the files you want to delete are somewhat risky in nature.
So how do you disable it then? Here we go:
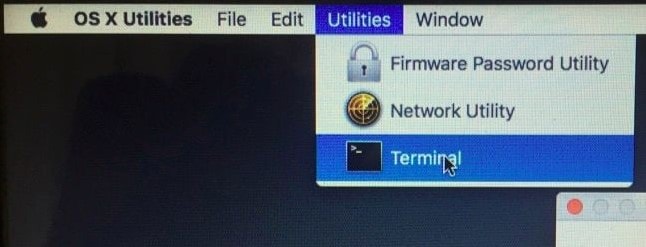
Step 1 Press Command + R while restarting your Mac. This will reboot the Mac in recovery mode.
Step 2 Click on ‘Utilities’ in the Recovery Mode menu. Select ‘Terminal’. This will direct you to a Terminal Window as shown below.
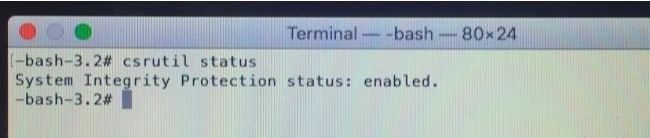
Step 3 Type the command csrutil status in the Terminal Window and press enter to see the current status of the System Integrity Protection. It should be enabled as it is. If that is the case, follow along.
Step 4 In the ‘Terminal Window’, to disable, type csrutil disable. The System Integrity Protection will get disabled through this process.
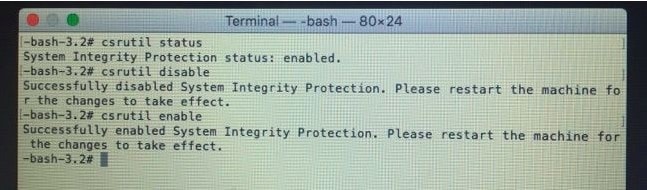
Step 5 After your work is done, simply head back to this Terminal Window and enter csrutil enable and you are good to go!
Part 4: How to Get Emptied Trash Back on Mac? Try Recoverit (IS) tool for Mac:
Here comes the hard part. You want your emptied trash back on Mac! Yes, the same files that you were stubborn to delete and actually succeeded in deleted are needed badly by you once more.
Your lifesaver, in this case, is named by the Recoverit (IS) tool for Mac, a powerful data recovery software that allows you retrieve data from Mac or external drives even if the Trash is emptied.

Recoverit (IS) for Mac
For, we have got you covered in the following areas:
- Recover all type of file having any file format including audio, video, documents, applications, etc.
- Professional software that is flexible as well as easy-to-use.
- The preview feature lets you see the file you want to restore before actually restoring it.
- The data recovery magic works under a majority of situations.
- Takes a few clicks. Simpler than any of abovementioned processes.
Step by step user guide on how to get emptied trash back on mac with iSkysoft:
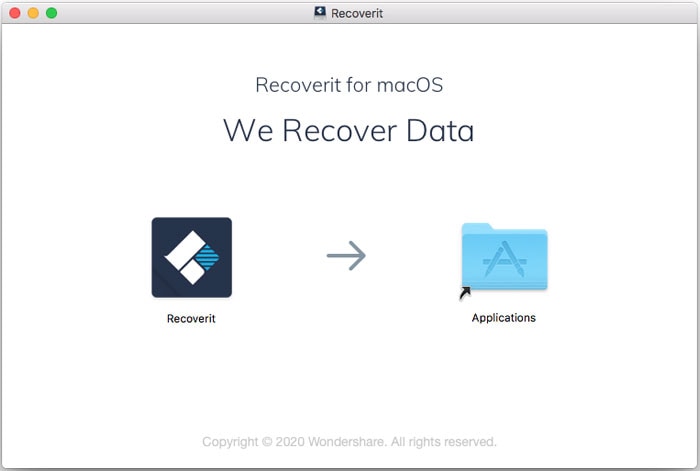
Step 1 Download the software:
Launch the official Recoverit (IS) tool after downloading it from the official iSkysoft website.
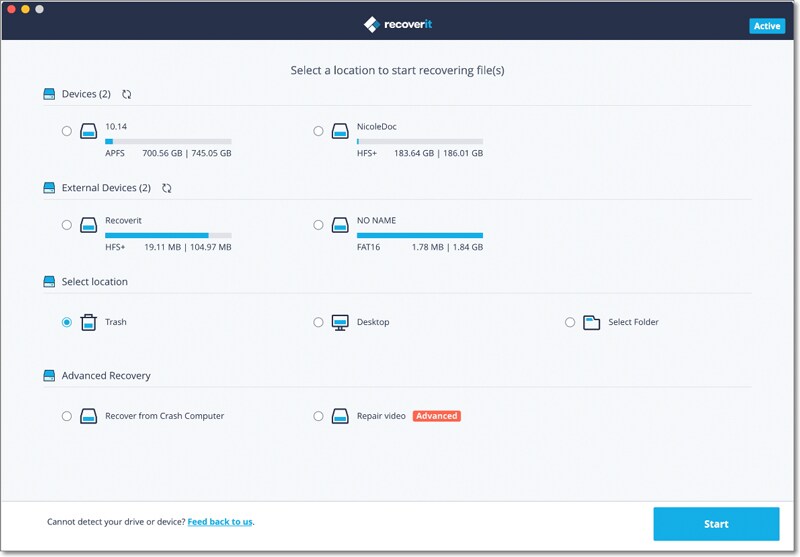
Step 2 Choose your drive:
After launching, you will be shown a recovery mode with a selection page. There are various alternatives of recovery modes for you to choose from. Choose the appropriate recovery mode. You will be redirected to trace the location of your file.
If you remember the actual location of the file before it was deleted, choose it.
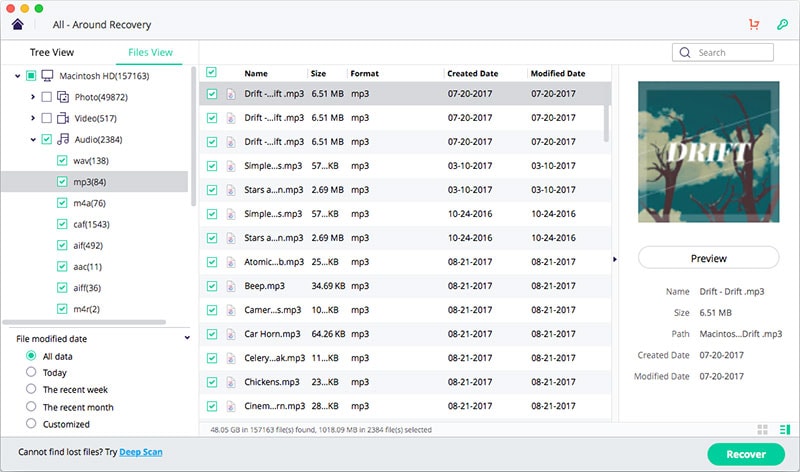
Step 3 Scanning process:
Sit back and enjoy the process as the iSkysoft solution scans the entire drive for your file.
Step 4 Preview and Recovery:
Use the preview feature to view the file you want to restore and after you are satisfied, hit the ‘Recover’ tab.
It’s done. Your deleted files are back in their respective place.
Conclusion
How to find trash on Mac? Where is trash on Mac? How to access trash on Mac? How to open trash on Mac? Where is the trash folder on mac? How to get emptied trash back on Mac? If these are the many questions troubling you, well we got you covered above, haven’t we?
Deleting files can be a tricky thing. Hence, we have listed all the possible complications arising while deleting and provided the solutions for each problem.
You will be able to complete the process using the above solutions.
Further, even if you accidentally delete much-required files from your Mac. Well, even in that case, we got you covered. Just get the Recoverit (IS) for Mac Tool. Simple it is. Yes, we will keep it that simple!
Elva
staff Editor