Recycle Bin / Trash Recovery
- Recycle Bin Recovery+
-
- A Full Guide on Recycle Bin Management and Recovery in Windows
- Every Recycle Bin Windows 10 Solution You Need
- Recycle Bin Windows 7 Solutions
- How to Fix Corrupted Recycle Bin in Windows and Restore Lost Data
- How to Find the Recycle Bin Location of Your Desktop
- Full Guide on Removing/Restoring Recycle Bin on PC
- Top Ways to Recycle Bin Data Recovery
- Where is Recycle Bin - How to Locate Recycle Bin on Windows
- How to Recover Deleted Files from Recycle Bin
- Easiest Way to Restore Deleted Files from Recycle Bin
- All You Need to Know About Hidden Recycle Bin
- Mac Trash Recovery+
-
- How to Securely Empty the Trash On Your Mac
- Tried-and-True Solution: How to Force Empty Trash Mac
- How to Restore Deleted Files from Trash on Mac
- 3 Easy Ways to Empty Trash in Gmail
- Easy Ways to Recover Emails Deleted from Trash
- How to Recover Deleted Mail from Trash on Mac
- Empty Trash From Your Mac and iPhone Easily and Securely
- Your Full Guide for Anything Related to Mac Trash
- How Find Recycle Bin and Restore Deleted Files on Android
- How to Empty Trash on iPhone/iPad/iPod (iOS 12 Supported)
- How to Empty Google Drive Trash and Undo Empty Trash
- How to Delete Trash on Mac Securely and Permanently
- Try These Multiple Methods to Recover Deleted Trash on Mac
- 3 Ways to Empty Trash on Mac Completely
- How to Undo Empty Trash Mac
- Recover Emptied Trash on macOS Mojave

• Filed to: Recycle Bin Recovery • Proven solutions
“My 2-year-old Windows laptop is giving me issues, I keep getting the Recycle Bin corrupted, can you help?”
Well, have you ever got this message? "The Recycle Bin on C/: is corrupted".
For those who haven’t, well that is the message that pops up when your Recycle Bin gets corrupted. Anything and everything present on a computer is prone to be attacked by malware and get corrupted which can result in loss of valuable data. There can be numerous reasons as to why a Recycle Bin gets corrupted. A corrupted Recycle Bin means it cannot hold data, rather, all deleted files are gone for good. That can be a total nuisance but worry not!
In this article, we will show you:
So, let us start with our first section on the basic reasons behind Recycle Bin corruption.
Part 1. How Can a Recycle Bin Get Corrupted?
There is no one reason for the Recycle Bin to get corrupted. However, many incidents and mishandling can harm it:
- When the OS isn't properly updated: Since updates bring new coding and patches to make software more immune to malware, not updating the OS regularly can cause the software to go obsolete and therefore more vulnerable to corruption.
- Malware attack: Like any other software, the Recycle Bin can get corrupted due to malware attacks. The malware can barge in through a flash drive or through a file we downloaded from an unknown site on the Internet.
- Improper care: Not having a proper firewall defense system can also be a cause of the corruption of the Recycle Bin.
- Inefficient Anti-Virus software: Again, an obsolete Anti-Virus software or an old Anti-Virus software may not be capable of defending the system software.
Likewise, there are a lot more reasons as to how a Recycle Bin can get corrupted.
Let us in the subsequent section now look at how to fix the Recycle Bin that is corrupted.
Part 2: How to Fix a Corrupted Recycle Bin?
There are a few different and easy methods that you can follow to rectify a corrupted Recycle Bin.
Note: We have referred to Windows 10 images for this section.
Method 1. Using Command Prompt to Reset Recycle Bin:
The first method is to reset the Recycle Bin, let us explore how:
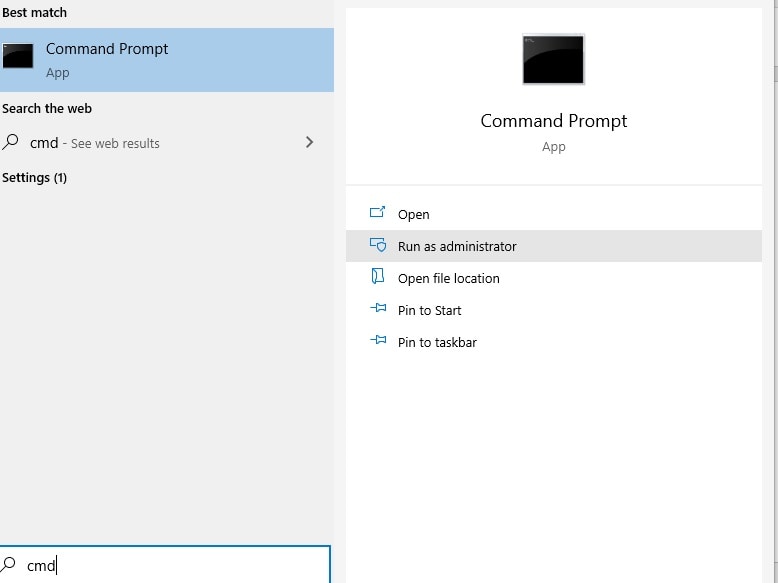
Step 1 Firstly, press the Windows icon on your keyboard and click on Start. You will then see a white color search bar. Then, type “cmd” and hit enter.
The suggestion will show a desktop app called Command Prompt post which you have to right-click on the Command Prompt and choose the option, "Run as administrator".
Step 2 A Command Prompt window will open. In that, type these exact words: rd /s /q C:\$Recycle.bin and click Enter.
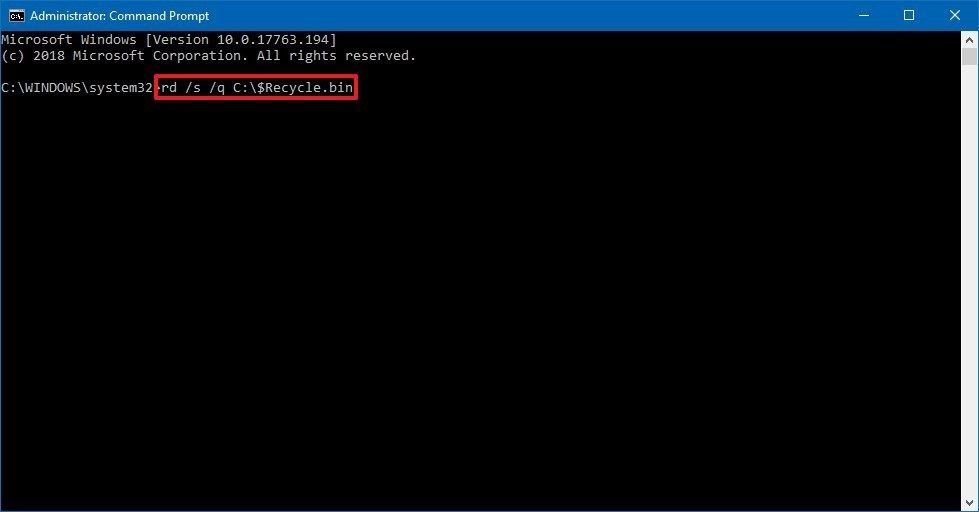
Step 3 This command will reset the Recycle Bin folder present in the C drive. To implement this change on all the drives, just replace the ‘C’ with the respective drive letter and keep the rest of the command same.
Step 4 Once done, the Recycle Bin on all folders will be deleted. Finally, reboot the computer and a new Recycle Bin will be created.
Method 2. Delete and Reinstall the Recycle Bin:
i. Deleting Recycle Bin:
Step 1 To begin, open the Control Panel from the search tab in the Start button on the desktop.
Step 2 Now, inside the Control Panel window, choose the File Explorer option and click on the View tab.
Step 3 Here, uncheck the System Protected Operating Files options and then go into each drive to delete permission and Recycle Bin folders.
Step 4 Lastly, reboot the windows. This will delete the Recycle Bin from your Computer.
ii. Now let us move on to learn how to reinstall Recycle Bin:
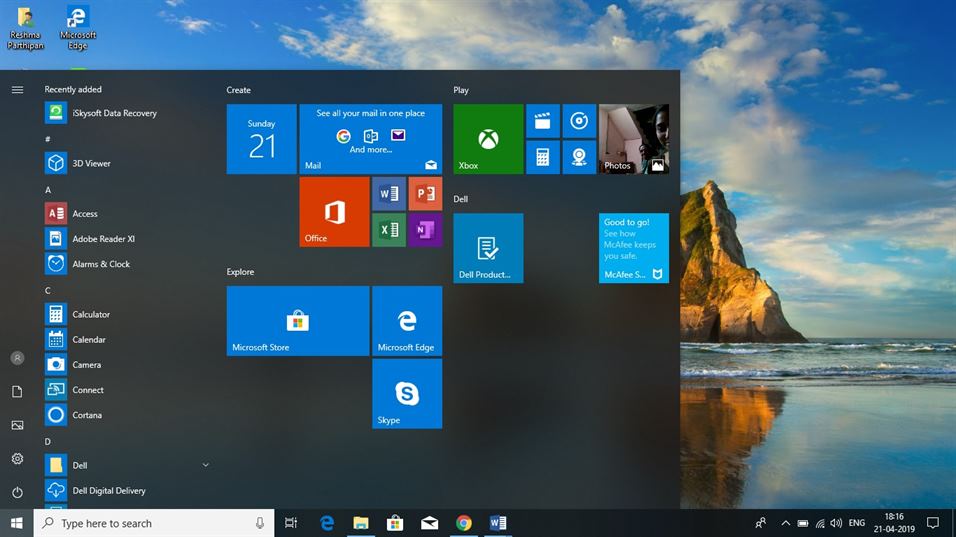
Step 1 Open Start and click on the Settings option located above the Power button on the lower left-hand side.
Step 2 Now, click on the Personalization option inside the Settings window.
Step 3 Inside the Personalization window slide down to the Themes option.
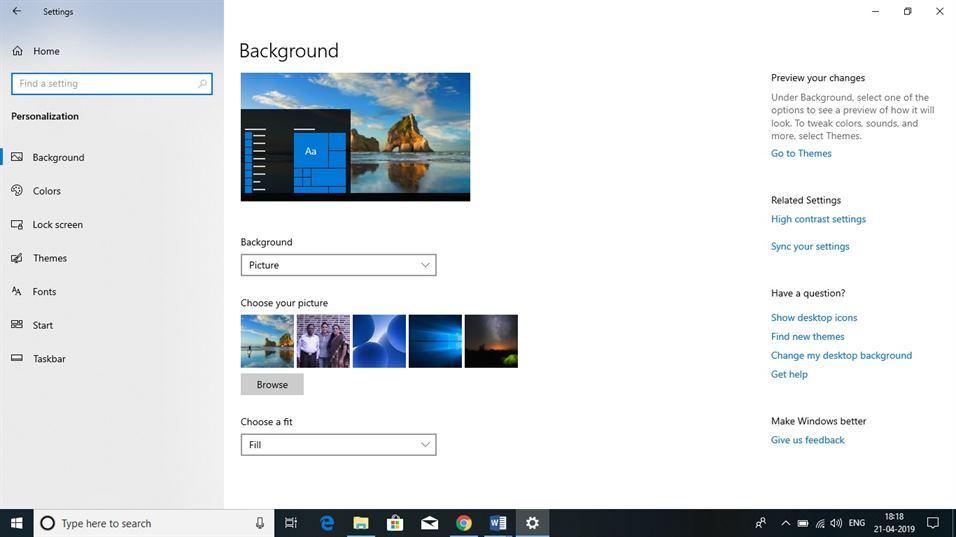
Step 4 Then, click on Desktop Icon Settings located on the right.
Step 5 Here, check the box beside the Recycle Bin option and click on Apply and OK. The new Recycle Bin icon will appear on the desktop.
Part 3. How to Restore lost data after Fixing/Repairing a Corrupted Recycle Bin
Even though the corrupted Recycle Bin on your PC would be fixed after the above method, you will end up losing all the data that was present in it. Now in order to get those files back, you will need an external software that can recover deleted Recycle Bin files also.
This is where the worldwide recommended software the Recoverit (IS) toolbox comes into the picture. The software has numerous features and can recover any form of data deleted in any manner.
To throw some light, let us look at the different manners of recovery that is offered by the Recoverit (IS).

Recoverit (IS)
A Life Saver to Solve Your Data Loss Problems!
- Recovers data from PC and any other storage device: The Recoverit (IS) does not only recover lost files on PC, but it also can recover deleted files from other external storage devices like Micro SD, SD, External Hard disks, USB, etc.
- All in One Data Recovery Tool: This software can recover files lost from all scenarios like from partition data loss to system crash data loss, to virus attack. It's an all in one data recovery tool.
- Recover over thousand data tools: Starting from pictures, videos, word files, Excel sheets, audios, the Recoverit (IS) software can recover anything and everything.
- User-Friendly: This software is simple to use and needs you to just follow three steps for efficient and quick data recovery.
The above features make it clear that the Recoverit (IS) is a total beast when it comes to data recovery.
So, now let us see how to recover files after the corrupted Recycle Bin is fixed:
Step 1 First of all, launch the Recoverit (IS) software.
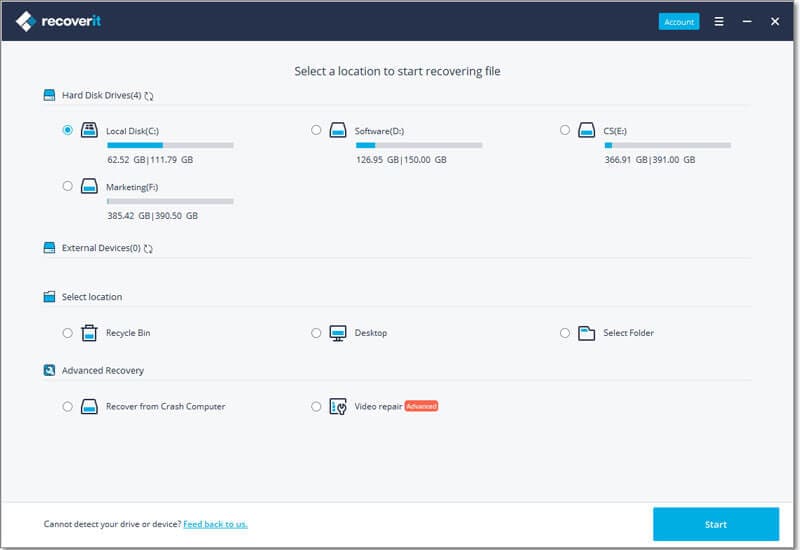
Step 2 Now, inside the Recoverit (IS) window, select the Recycle Bin recovery option.
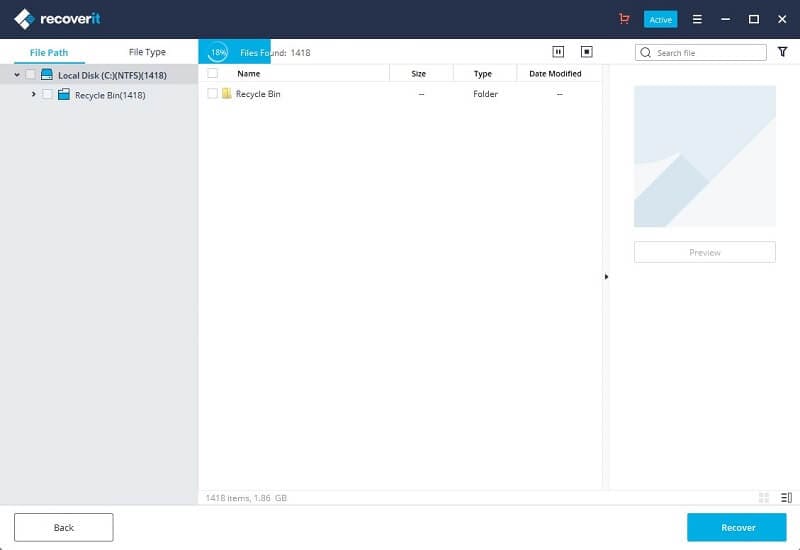
Step 3 The Recoverit (IS) software will run a scan on your Recycle Bin and show a list of all the files that were deleted during the uninstall and reinstall of the Recycle Bin.
Go ahead and use the preview window to see which files you want to restore, select them and finally click on Recover.

Note: Your files will get recovered and will available on your local drive in a couple of minutes depending on file size and your data connection speed.
Conclusion:
The Recoverit (IS) is an amazing tool for recovering data that could have been deleted due to the corruption of the Recycle Bin. However, as the saying goes, Prevention is better than cure, hence it is always better to avoid the Recycle Bin from being corrupted rather than trying to fix it. Proper updating of your Anti-virus systems and the operating system will ensure your computer’s software is well protected.
However, if even after all precautionary measures, if you are in the middle of losing important data, then this article will surely help you out.
Elva
staff Editor