Mac Data Recovery
- Mac Data Recovery+
-
- Undo Empty Trash Mac (macOS Mojave Supported)
- Recover Overwritten Files on Mac
- Recover Lost Data on Mac after Upgrading to macOS Mojave
- How to Show Hidden Files on Mac
- Top 10 Mac Data Recovery Software Reviews
- How to Recover Deleted Files on Mac
- Recover Deleted Files on Mac Without Software
- How to Delete Partition on Mac
- Mac Hard Drive Recovery
- Top 6 Ways to Recover Deleted Photos on Mac
- Word Not Responding on Mac? Fixed Now!
- Recover Files from Recycle Bin or Trash Folder on Mac
- 5 Best Methods to Recover Deleted Word Files on Mac
- Effective Solutions for “Desktop Files Disappeared on Mac”
- Recover Overwritten Files on Mac
- Apple Email Recovery
- Free Mac Data Recovery+
- Mac Repair and Restore+
-
- Format FAT32 and NTFS Drives on Mac
- All You Need to Know about MAC Recovery Mode
- A Detailed Guide on Mac Repair [2019]
- How to Perform Internet Recovery on Mac
- How to Restore MacBook Pro?
- How to Restore Mac to Factory Settings?
- How to Restore Mac from Time Machine? [2019]
- How to Restore Mac and Get All of Your Files Back
- How to Boot Mac into Recovery Mode?
- How to Restore MacBook Air Safely Without Loosing Data
- How to Securely Do a System Restore on Mac
- How to Restore iMac without Data Loss
- Best Mac Recovery Partition App
- Best Way to Perform Disk Recovery on Mac
- The Best Mac USB Recovery Tool

• Filed to: Mac Recovery • Proven solutions
After the release of OS X Lion in 2011, the users can boot Mac in recovery mode and perform various operations. The Recovery mode can diagnose the hardware issues in Mac, restore a backup, reinstall the OS X, and manage hard drives. Knowing how to boot into recovery mode on Mac is one of the most important things you should know about.
So, whenever you need to repair, restore, or reinstall the OS X, you can access the Recovery Mode. And if under any circumstances Mac won’t boot into recovery mode, then we have a solution for that too. Here in this article, we are providing you a complete guide on how to boot MacBook into recovery mode and what you can do if the recovery mode isn’t working.
Before you try out the methods, here is the list of devices which support recovery mode boot via different methods. If you are using an earlier model, then you won’t be able to use these methods:
- MacBook Pro (early 2011)
- iMac (mid-2011)
- MacBook and MacBook Pro (mid-2010)
- Mac mini (mid-2010)
- MacBook Air (late 2010)
- Part 1: How to Boot Mac in Recovery Mode from Time Machine?
- Part 2. How to Boot Mac in Internet Recovery Mode?
- Part 3: How to Create a Bootable Drive into Recovery Mode?
- Part 4. How to Boot into Recovery Mac Using Installation Disk?
- Part 5: How to Boot into Recovery Mac with Local Recovery?
- Part 6: How to Recover Data from the Unbootable Mac Computer?
Part 1: How to Boot Mac in Recovery Mode from Time Machine?
The main purpose of the Time Machine is to keep a backup of Mac. This special feature facilitated by Apple Inc allows the users to keep a track of the data stored on your Mac. It is recommended for the users to keep the backup of data on a different partition or use an external hard drive. It will allow the users to boot from the recovery partition on Mac and use it to restore the wiped out data.
To boot Mac into Recovery Mode using Time Machine, you have to follow the steps below:
Step 1 Restart your Mac in a regular way and hold the Option key of your keyboard when you hear a chime during the reboot.
Step 2 If you have the backup on an external drive, then insert it into the Mac. If the Time Machine backup is in another partition, then use it to access the recovery mode.
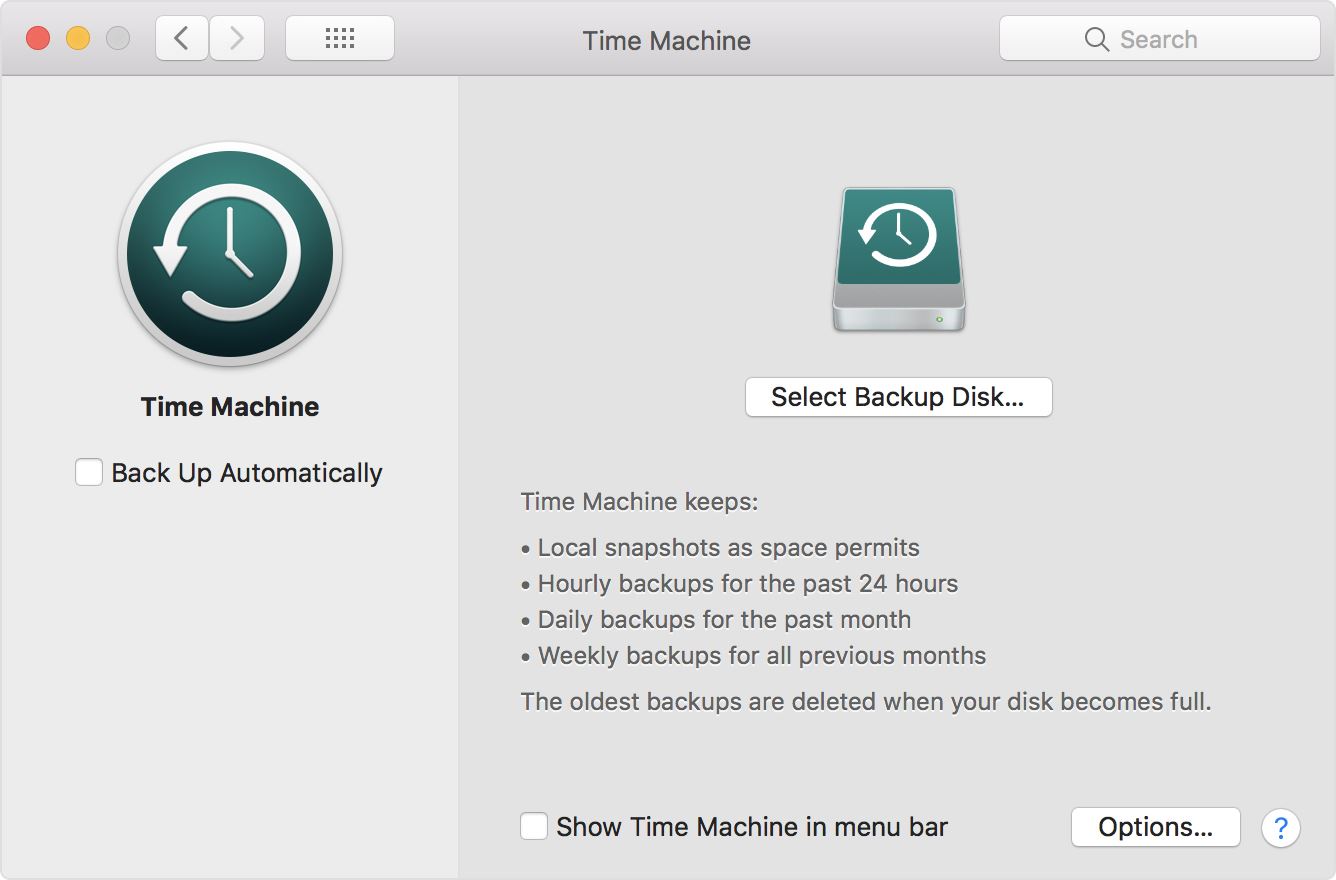
As you select the drive on the screen, you will be able to reboot your Mac into the recovery mode. Make sure that you carry out the steps carefully because a single mistake can lead to data loss. But don’t worry; we have the perfect Mac Data Recovery tool in hand.
Part 2. How to Boot Mac in Internet Recovery Mode?
The Internet Recovery Mode was introduced by Apple Inc. to allow the macOS to download the recovery hard disk partition contents. The service is entirely online and you only need to connect to the internet to access this feature. This Apple recovery boot option can be very helpful if your local drive gets corrupted and you can no longer access the local recovery tools. With this method, you can reboot your Mac in the same format or install a new version of OS X on your system. People often prefer using the Internet Recovery mode over Standard Recovery mode due to its capability of booting the system when the disk is corrupted.
Step 1 Restart your Mac from the Apple Menu and press the Command + Option + R keys when you hear the chime sound during startup.
Step 2 A globe icon will appear on the screen. It indicates that your Mac is booting into Internet Recovery mode. Make sure that you are connected to the Internet before using this method.

Step 3 If you are not connected, then you will have to set up a viable connection on the Mac, and then the system will finish booting.
You can use the Internet Recovery mode to perform several tasks. You can easily exit the recovery mode by restarting your Mac normally.
Part 3: How to Create a Bootable Drive into Recovery Mode?
Usually, it is recommended by the Apple Users to create a bootable disk or drive to keep the OS X Recovery Disk. It is done so that the users can access the recovery tools anytime anywhere. You can opt out for a USB 3.0 flash drive to store the required OS X boot recovery tools. You can look at the methods to create a bootable drive according to your macOS X version. Once you have created the drive, you can follow the steps below to boot Mac in the recovery mode using the bootable drive.
Step 1 Reboot Mac and hold the Option key until you hear the chime. Now attach the bootable OS X Recovery Disk to your Mac and select it from the list of prompts.
Step 2 Your Mac will launch through the Drive into the recovery mode and you can access the recovery tools for various tasks.
Don’t worry about creating the bootable drive as there are plenty of methods. From Yosemite to Lion, OS X El Capitan to later version, all of them has a slightly different method. So, you will have to choose the method which is compatible with your macOS.
Part 4. How to Boot into Recovery Mac Using Installation Disk?
Luckily, you can also use an Installation Disk to reboot Mac in recovery mode. The older Mac system already came with a recovery DVD that can be used for recovery routines. But if you have a newer version of OS X, then you can use Installation disk to perform recovery. Follow the steps below:
Step 1 Insert the DVD or installation disk in the CD/DVD drive of your Mac.
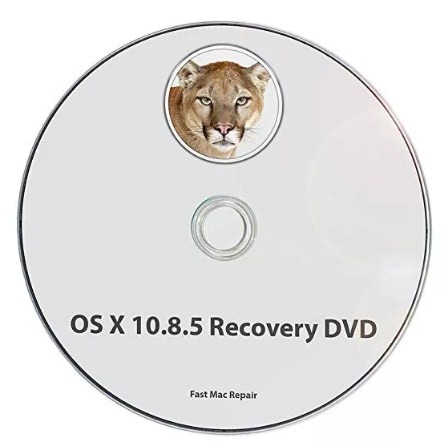
Step 2 Reboot your Mac. When the chime sound plays, press and hold down the C key on the keyboard to enter the recovery mode.
And that’s it, your Mac will reboot into the recovery mode and you can access the tools for various operations.
Part 5: How to Boot into Recovery Mac with Local Recovery?
The Local recovery is the method which uses the local drive to boot Mac to recovery mode. The steps you need to follow are given below:
Step 1 Follow the usual procedure to restart your Mac. When you hear the chime during reboot, press and hold the Command + R keys until you see the recovery screen pop up on the screen.
Step 2 The local recovery drive will load and you will be able to use it to perform the recovery task.
You can use the local drive to access recovery mode using the time machine too.
Part 6: How to Recover Data from the Unbootable Mac Computer?
When you are trying to use Mac OS X recovery boot mode, it is common to make a few mistakes. It can lead to sudden data loss situations. If you also suffered from data loss then you will need help to recover the data on your Mac. Fortunately, you have access to Recoverit (IS) for Mac. It is powerful data recovery software which can deal with various data loss scenarios. Plus, you can recover unlimited files with this tool from all storage media.
Recoverit (IS) for Mac
The key features of this tool are given below:
- Recover lost data from storage devices like Mac, HDD, Removable drives, digital devices, RAID, etc.
- Wide array of format support for images, audios, videos, documents, archives, and other files too.
- Rescue all Mac data which is lost due to virus attack, formatted drive, lost partition, system crash, or emptied recycle bin.
- 100% safe and reliable method of recovery with a 99% success rate.
- Quick and fast recovery speed to get your lost or deleted files back.
Begin with downloading and installing the software on your Mac. Once the setup is finished, the software will be ready to use. The step by step guide to using the Recoverit (IS) for Mac is given below:
Step 1 Run Program:
Launch Recoverit (IS) tool for Mac and the home interface will open up. Choose the pick due to which you lost your data. If you don’t know the exact case why data loss happened then you can pick the All-Around Recovery mode. It is the most comprehensive recovery mode.
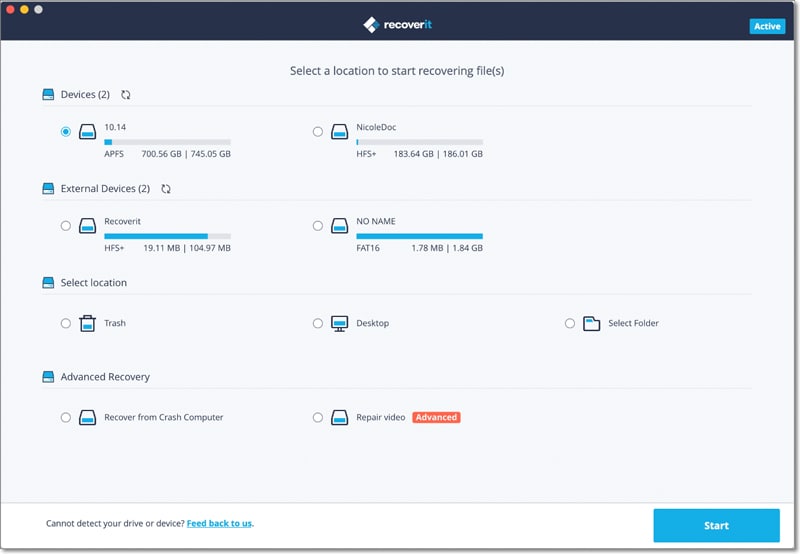
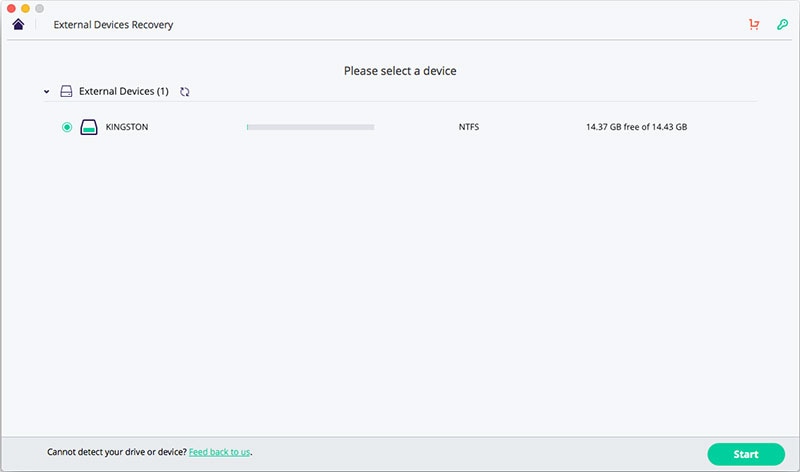
Step 2 Select a Drive:
Now, you need to pick the drive to scan for the lost data.
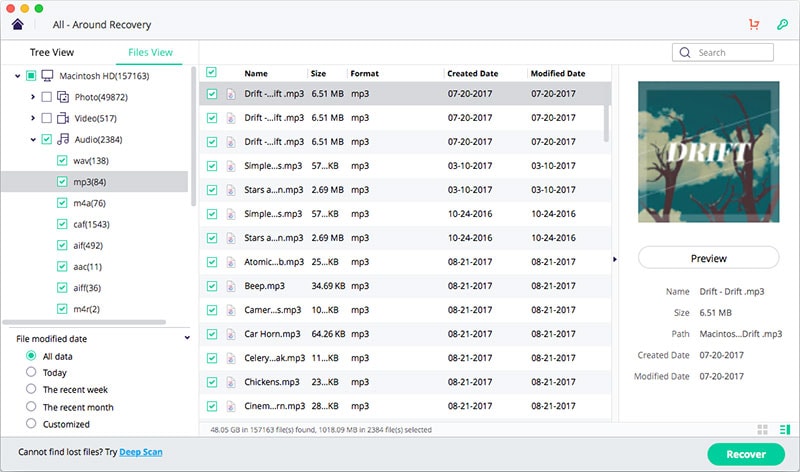
Step 3 Preview Data:
Once the scan is complete, the data will be listed on the screen sorted out according to their format. You can find the files according to their format and have a preview of them to see if they are corrupted on not.
Step 4 Recover Data:
Select the files which you need to get back on your Mac and tap on the Recover option at the bottom of the screen. You can select as many files as you want and the files will be saved on your system.
When you are recovering the files, make sure that you don’t save them in the previous location because it can corrupt the data.
Conclusion:
Now you know how to boot Mac into recovery mode on macOS 10.14 Mojave or any other version of Mac. If you follow the steps carefully, you will be able to use the recovery tools without any problem. But if you are unfortunate to follow the steps correctly, you still don’t need to panic. You can use Recoverit (IS) for Mac tool to retrieve the lost files anytime anywhere. Don’t forget to share this guide with your friends and family to help them learn how to boot Mac in recovery mode safely.
Tips: Disable SIP and Get Data Recovery on macOS High Sierra/Mojave!
Since macOS High Sierra system, Mac users are not allowed to access any system folder or app on Mac because of SIP(System Integrity Protection), a security feature of Apple's macOS operating system introduced in OS X El Capitan. Therefore, if you need to recover lost data on Mac under macOS Mojavea/High Sierra, you need to disable SIP on Mac firstly before recovery.
Three simple steps to disable "System Integrity protection":

Step 1 Firstly, reboot the Mac and press "Command + R" keys simultaneously after you hear the startup chime, then you will boot OS X into "Recovery Mode".
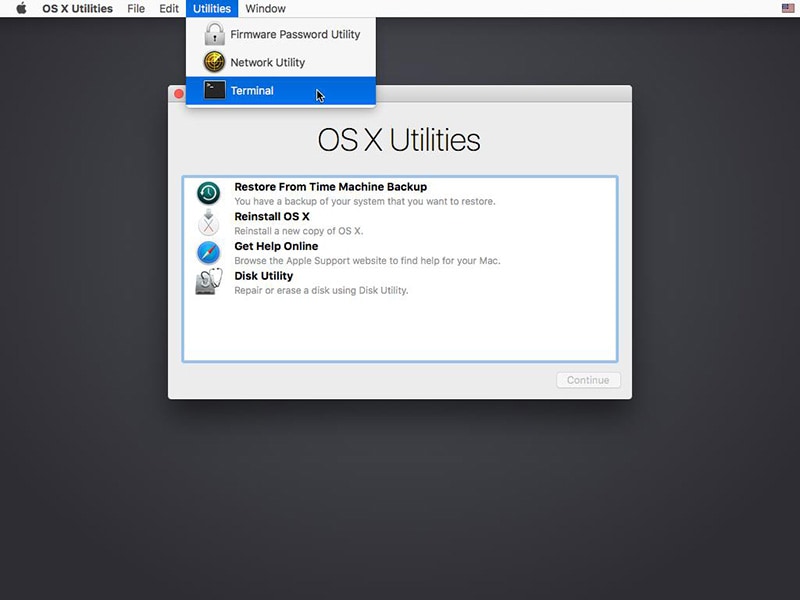
Step 2 Then you will get the "OS X Utilities" window. Press the "Utilities" menu at the top of the window, and choose "Terminal" option from the drop down box.
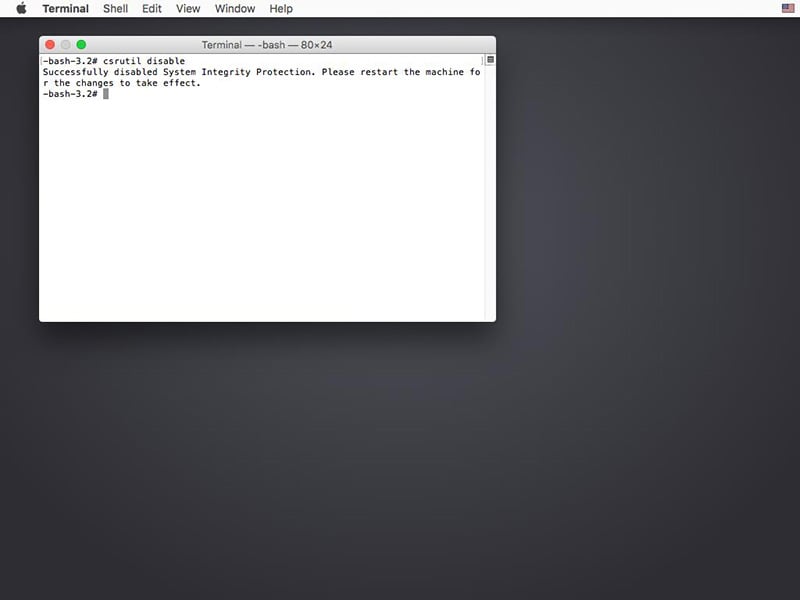
Step 3 In the "Terminal" window, type in "csrutil disable" and press "Enter" to disable System Integrity Protection, then restart your Mac and start to recover lost data from Mac.
Last but not least: Once you recovered the lost data on Mac, remember to turn on the SIP(System Integrity Protection) for your Mac security. Reboot Mac - in the "Terminal" window, type in "csrutil enable" and press "Enter", then restart your Mac. That's it.
Elva
staff Editor