Mac Data Recovery
- Mac Data Recovery+
-
- Undo Empty Trash Mac (macOS Mojave Supported)
- Recover Overwritten Files on Mac
- Recover Lost Data on Mac after Upgrading to macOS Mojave
- How to Show Hidden Files on Mac
- Top 10 Mac Data Recovery Software Reviews
- How to Recover Deleted Files on Mac
- Recover Deleted Files on Mac Without Software
- How to Delete Partition on Mac
- Mac Hard Drive Recovery
- Top 6 Ways to Recover Deleted Photos on Mac
- Word Not Responding on Mac? Fixed Now!
- Recover Files from Recycle Bin or Trash Folder on Mac
- 5 Best Methods to Recover Deleted Word Files on Mac
- Effective Solutions for “Desktop Files Disappeared on Mac”
- Recover Overwritten Files on Mac
- Apple Email Recovery
- Free Mac Data Recovery+
- Mac Repair and Restore+
-
- Format FAT32 and NTFS Drives on Mac
- All You Need to Know about MAC Recovery Mode
- A Detailed Guide on Mac Repair [2019]
- How to Perform Internet Recovery on Mac
- How to Restore MacBook Pro?
- How to Restore Mac to Factory Settings?
- How to Restore Mac from Time Machine? [2019]
- How to Restore Mac and Get All of Your Files Back
- How to Boot Mac into Recovery Mode?
- How to Restore MacBook Air Safely Without Loosing Data
- How to Securely Do a System Restore on Mac
- How to Restore iMac without Data Loss
- Best Mac Recovery Partition App
- Best Way to Perform Disk Recovery on Mac
- The Best Mac USB Recovery Tool

• Filed to: Mac Recovery • Proven solutions
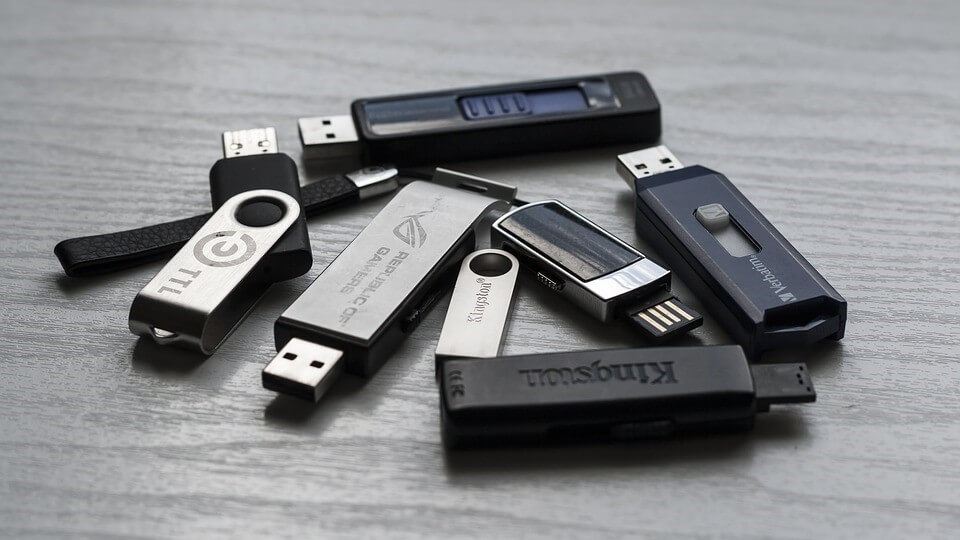
Many users have reported that they have problems using external devices like a USB drive or External hard drive on Mac. Many of these problems arise because of the incompatibility of the USB drives with Mac. It can be remedied by formatting the USB on Mac.
If you are wondering how to format USB on Mac, then you have come to the right place. In this guide, we will help you through formatting USB drives and external drives on Mac. We will also share the details on why file format is important when it comes to storage drives and how you can get your devices to work on any MacOS with ease.
Part 1. Why You Need to Format USB on Mac
Having external USB devices is a boon because of their portability and plug-and-play nature. And due to these reasons, it is easy to get viruses or malware on your drives. Formatting the drive gives a quick and easy solution to clear all files and get the drive back to its pristine storage condition. Here are some of the reasons why would want to format USB on Mac.
1-click file delete: Formatting the hard drive allows you to clear all the data in the USB drive with a click. This is far better than selecting the files individually and then deleting them.
Virus or malware removal: The best feature of USB or External hard drive is that they are able to connect to different PCs and share data. The adverse effect is that there is also a higher chance of your device getting affected by viruses or malware. Simply deleting the files won’t do anything as the only option is to format the USB drive on Mac.
File Format change: File format decide how information should be stored on the storage drive. The most common file formats are FAT, NTFS and exFAT. Mac cannot read certain file types and the device should be formatted in order to view the files on Mac. We will discuss this in detail in the following sections.
Better drive health: By formatting your external devices every once in a while, it frees them up from the age-old redundant files. This results in better drive health. It is always a good practice to format your external USB drives so that they perform at their best.
Part 2: Steps on Formatting Hard Drive on Mac
Formatting a hard drive on a Mac is not so hard granted that you have the right tools with you. We have provided a step by step guide that you can use to format your drive on Mac. One thing that you should note here is that we are going to format the external drive in such a way that it is Mac compatible. You may not be able to use the same hard disk on Windows Machines after this process.
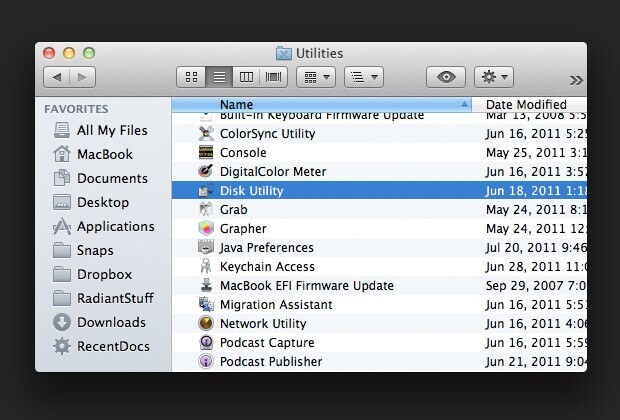
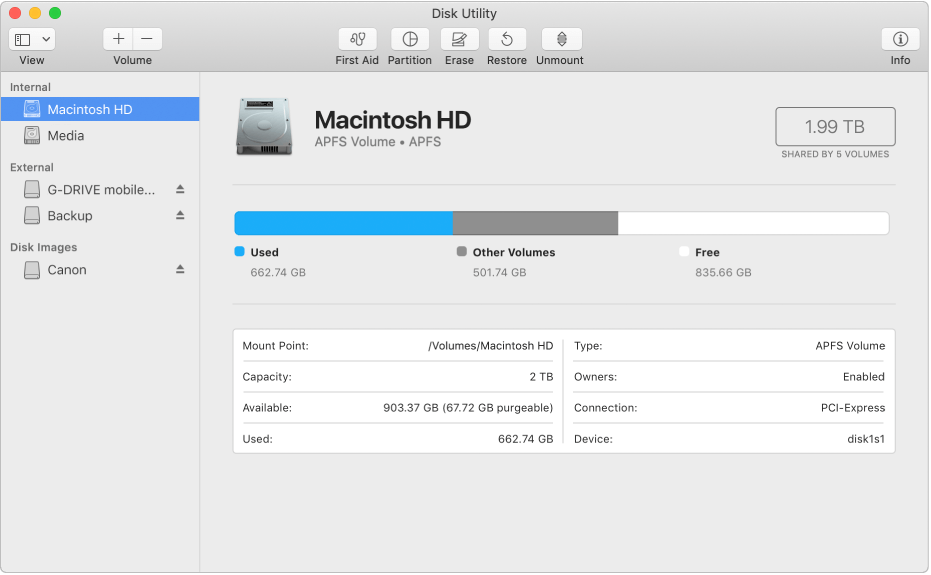
Step 1 Go to Utilities> Disk Utility. You can find the Utilities section in Finder.
Step 2 Open Disk Utility and select the drive you want to format on Mac.
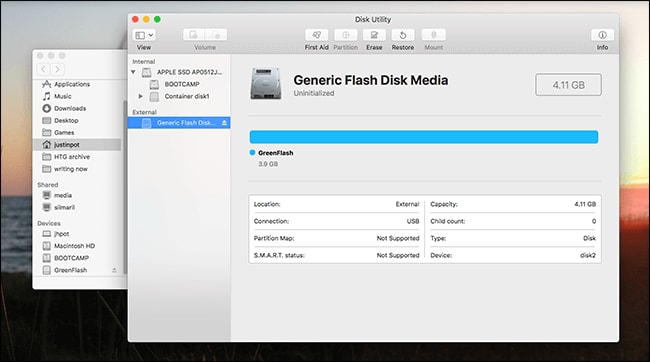
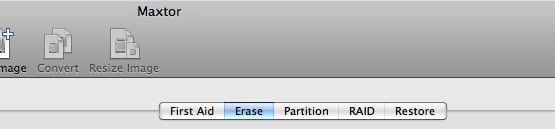
Step 3 Click on the Erase option that is provided at the top.
Step 4 In the following window, click on the Volume Format. Make sure you choose Mac OS Extended (Journaled).
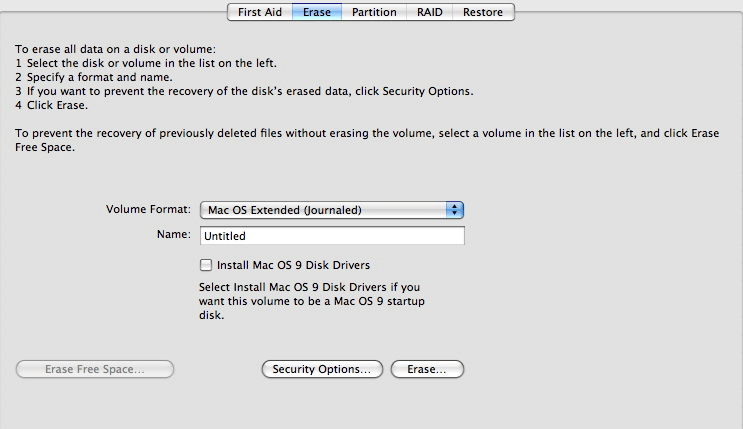
After you choose Mac OS Extended (Journaled), the hard disk will work on any Mac OS devices. This also means that the hard drive will not be compatible with Windows devices. If you want to use your external hard drive with Windows devices, you have to choose between either FAT or exFAT file format options.
Part 3. The Best File Format Choice of External Drive on Mac
The concept of file formats and their compatibility might confuse you, so we are going to make it simple. The following are the most common file format options and we will help you choose the best for you based on the platforms you use.
NTFS: NTFS or New Technology File System was developed by Microsoft and it is the most common file format system used on Windows devices. The NTFS was developed as an improvement over FAT and HPFS file formats. Mac doesn’t recognize the NTFS file format, hence any storage devices formatted with NTFS will not be read by the MacOS.
FAT: FAT or File Allocation Table was designed for storage devices that didn’t have much storage capacity. Hence it was used for formatting floppy disks and other older storage devices. With storage devices getting more and more storage space, FAT file format could no longer keep up with the modern requirements. Hence, this file format is not commonly seen nowadays.
FAT32: FAT32 is an advanced form of FAT file format that is engineered for larger storage devices. However, FAT32 limits single file transfer to just 4GB. So if you have a file that is more than 4GB, you cannot copy it to a FAT32 formatted drive. The FAT32 file format is used in USB drives that are of smaller storage sizes.
ExFAT: ExFAT or Extended File Allocation Table was made by Microsoft in 2006 is an upgraded form of FAT32 that doesn’t have the constraints of FAT32. ExFAT removes the file transfer bottleneck of 4GB and allows unlimited file partitions. ExFAT is commonly used in modern USB devices.
MacOS Extended (Journaled): In the guide, we formatted the external USB drive with MacOS Extended (Journaled). It is also known as HFS+ file format. This is the most recent file format that Apple used for formatting external storage drives. You can also format internal drives with this file format.
Then, which file format is best for your external devices?
When you format a USB drive or External drive on Mac, you might be having which file format to choose. we have made the choice easy for you! External drives used on Only MacOS: If you are using your external storage devices on just MacOS, then the best option for you is MacOS Extended (Journaled). They provide the best performance for Apple PCs. However, you cannot use them with Windows PCs.
External drives compatible for both Windows and Mac: If you want your external USD drive to be compatible with both Apple and Windows devices, then choose exFAT file format. For USB devices with low storage (in the range of 4 – 8GB) formatting it with FAT32 will be the best option. Both exFAT and FAT32 file formats are compatible with both operating systems.
Part 4. How to format USB to FAT32 on Mac
As mentioned before, FAT32 is one among the very few file formats that you can use interchangeably between Windows and a Mac. So if you have a USB drive that is formatted in some other file formats, you need to first format it to FAT32 so that you can use it on Mac as well as PC.
The following steps will help you format any external USB with FAT32 file format on Mac.Step 1 Open Finder and navigate to Utilities>Disk utility.
Step 2 Open Disk Utility to see the drives connected to the Mac.
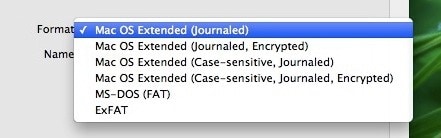
Step 3 Select the drive you want to format and click on Erase. A small window will appear. Out of all the format options, click on MS-DOS(FAT).
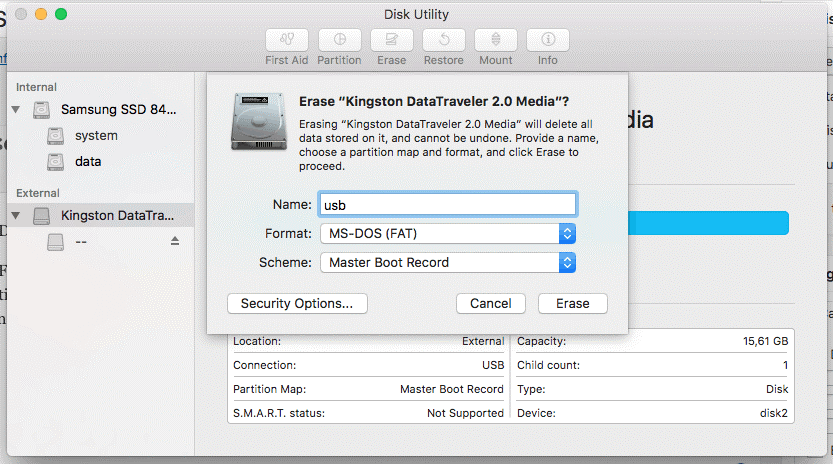
Now wait for the formatting to be over and you will have your USB drive converted to FAT32. When using FAT32, keep all the restriction of this file format in mind. Other than that, your USB device will now work on both Windows and Mac systems.
Part 5. Recover Formatted Data on Mac: Get Your Files Back with Recoverit (IS)
Did you just realize that you forgot to move some files before formatting your drive? This isn’t a rare case as many users have reported the same thing and in the rush of things, accidentally deleting or formatting important personal or professional files are a common occurrence.
However, did you also know that you can actually get back the files you just formatted? Now you can with Recoverit (IS) Tool.
The Data Recovery Tool from iSkysoft is aimed to help users recover lost files. The software works by scanning the storage devices on Mac to find the hidden data and then extracting it with powerful recovery tools
Why choose Recoverit (IS) Tool?

Recoverit (IS) for Mac
The features of dr.fone makes it hard to not recommend for anyone who needs a reliable data recovery software.
- External USB support: You can use Recoverit (IS) on both internal and external storage devices.
- Multi-file support: The data recovery tool support both media files and office documents. Multi-device support: Supports iMac, MacBook, iPod, etc.
- Support for multiple file formats: Recoverit (IS) works on APFS, NTFS, FAT, ExFAT file formats.
- Preview function: The user can preview the file before recovery.
Let’s now look at the actual steps involved in the process. The whole process is easy and it will only take you minutes.
Step 1 Download and Install Recoverit (IS) Tool Download the latest version of Recoverit (IS) Tool from the official Website.
Step 2 Review and choose a recovery mode
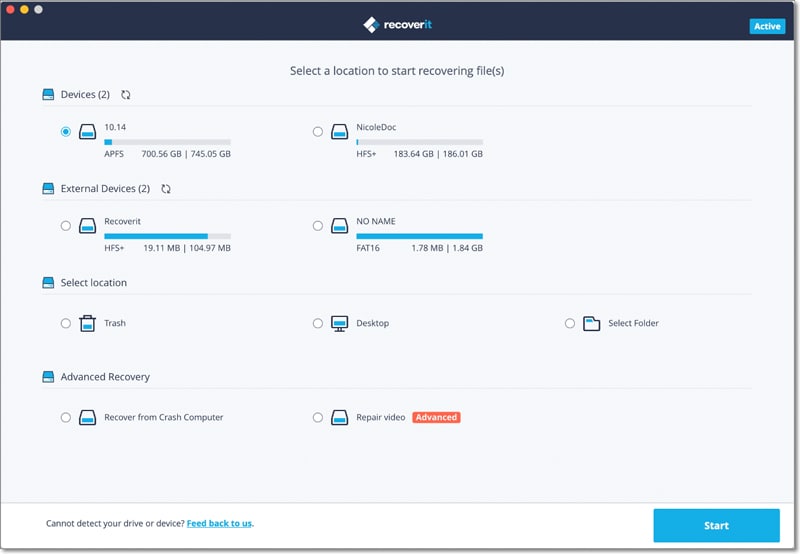
Launch the software to see the recovery options. Select Formatted Data Recovery.
Step 3 Choose the drive that you wish to scan
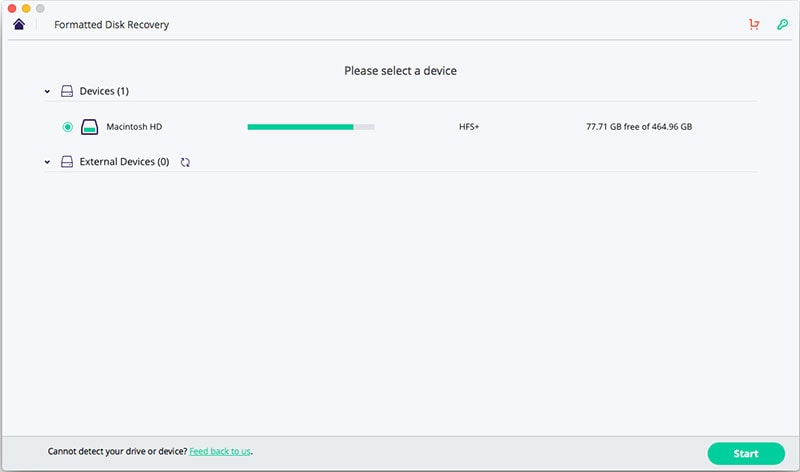
The software will show you the list of drives on the device. Select the one which you need to scan and click Start.
Step 4 Preview and recover the files
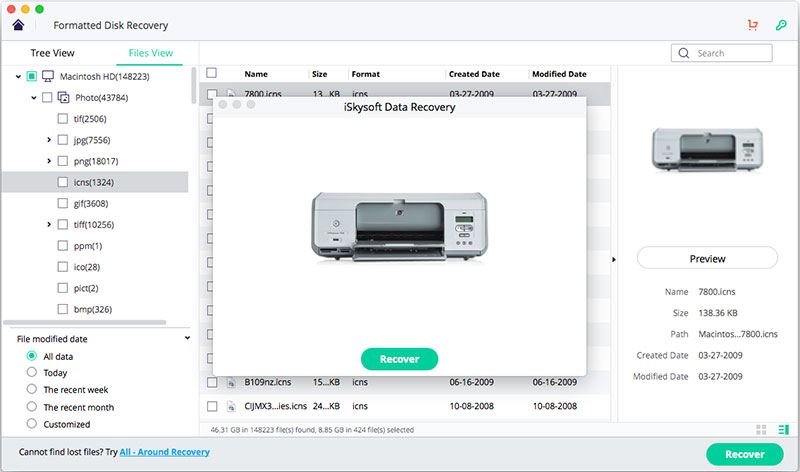
The software will bring up the scanned files. you can preview them and if you wish to recover them, click Recover.
Recovering lost files was something that was solely handled by professionals. But now with iSkysoft, you can recover deleted or formatted files with ease, and that too in the comfort of your home.
Conclusion
Formatting USB on Mac is must if you want to use it with MacOS properly. By using this guide, you can learn about both formatting USB drives as well as the different file formats you can use in the process.
Make sure you use the right file format for your external devices so that they can best serve their purpose.
Elva
staff Editor