Mac Data Recovery
- Mac Data Recovery+
-
- Undo Empty Trash Mac (macOS Mojave Supported)
- Recover Overwritten Files on Mac
- Recover Lost Data on Mac after Upgrading to macOS Mojave
- How to Show Hidden Files on Mac
- Top 10 Mac Data Recovery Software Reviews
- How to Recover Deleted Files on Mac
- Recover Deleted Files on Mac Without Software
- How to Delete Partition on Mac
- Mac Hard Drive Recovery
- Top 6 Ways to Recover Deleted Photos on Mac
- Word Not Responding on Mac? Fixed Now!
- Recover Files from Recycle Bin or Trash Folder on Mac
- 5 Best Methods to Recover Deleted Word Files on Mac
- Effective Solutions for “Desktop Files Disappeared on Mac”
- Recover Overwritten Files on Mac
- Apple Email Recovery
- Free Mac Data Recovery+
- Mac Repair and Restore+
-
- Format FAT32 and NTFS Drives on Mac
- All You Need to Know about MAC Recovery Mode
- A Detailed Guide on Mac Repair [2019]
- How to Perform Internet Recovery on Mac
- How to Restore MacBook Pro?
- How to Restore Mac to Factory Settings?
- How to Restore Mac from Time Machine? [2019]
- How to Restore Mac and Get All of Your Files Back
- How to Boot Mac into Recovery Mode?
- How to Restore MacBook Air Safely Without Loosing Data
- How to Securely Do a System Restore on Mac
- How to Restore iMac without Data Loss
- Best Mac Recovery Partition App
- Best Way to Perform Disk Recovery on Mac
- The Best Mac USB Recovery Tool

• Filed to: Mac Recovery • Proven solutions
“My macOS Sierra screenshot is not working even after trying several times. Can someone tell me how to fix this problem and take screenshots on Mac?”
If you are also a regular macOS user who is suffering from a similar situation, then you have come to the right place. Although Mac provides a seamless solution to take screenshots, sometimes it can malfunction. There might be a hardware or software issue behind the screenshot on Mac not working issue. No matter what the situation is, you can easily troubleshoot this problem through different techniques. In this guide, we will help you overcome this issue and teach you how to take screenshots on Mac like a pro.
Part 1: What is a Screenshot?
As the name suggests, a screenshot is ideally a capture of the screen. We can take screenshots of our mobile, computer, and all kinds of consoles. It captures the activity of the screen and lets us save it in the format of our choice like PNG or JPEG. If you want, you can capture the entire screen of your system or crop a certain portion as well. Mostly, screenshots are used to depict an issue, help with tutorials, troubleshooting, and so on.
Part 2: How to Take a Screenshot on Mac
Before we discuss ways to fix screenshot on Mac not working, it is important to learn how to take screenshots. In this way, you can be sure if you are following the right approach while taking screenshots on your system or not. Here’s how you can quickly take a screenshot of the entire screen or selected portions.
- Keyboard shortcuts
Simply press the keyboard shortcut Shift + Command + 5 to get the screen grab capture option on your screen. If you want to capture the entire screen directly, then press Shift + Command + 3. To capture a portion of the screen, press the Shift + Command + 4 keys instead. Also, you can press Command + Shift + 6 to save the screenshot of the Touch Bar.
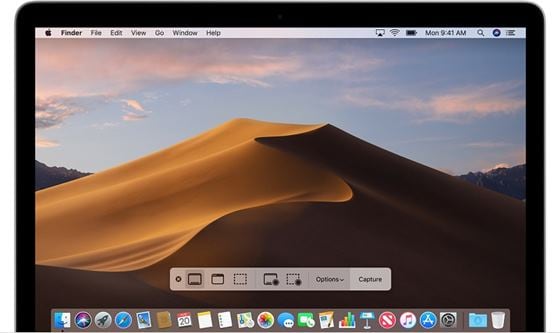
- Capture the entire screen
Once you get the screen capture controls, click on the screen capture button and your pointer will change to a camera icon. Just go to the screen you wish to capture and click on it. Now, you can save or share this capture.
- Capture a window
From the screen grab options, click on the second icon to capture a window instead. Go to the window you wish to capture and click on it. Later, you can save it as JPEG.
- Capture a portion of the screen
On the screen capture menu, there is an option to capture just a portion of the screen (the third icon). Click on it to see the pointer changing. Now, you can just drag the pointer and crop the area of the screen you wish to capture. When you are done, click on the capture button to save it.
- Capture a menu
Firstly, click on the menu to reveal its content and press Command + Shift + 5 to get the screen capture options. From here, you can capture the entire screen or just the portion of it with the menu content visible.
Apart from these features, you can also record your screen (or its portion) as well from here. You can visit the “Options” menu to explore its settings and other features.
Part 3: How to Fix "Screenshot on Mac Not Working" Error
By now, you would be able to take screenshots on Mac without any issue. Though, if after following the above-mentioned steps, you are still facing unwanted problems, then consider following these suggestions.
1. Check the Keyboard Shortcut Settings
As you know, we take the assistance of keyboard shortcuts to get the screenshot menu, it is important to check them first. If there is a change in keyboard shortcuts for screenshots, then you can easily fix it this way. Here’s how you can check keyboard shortcuts on Mac.
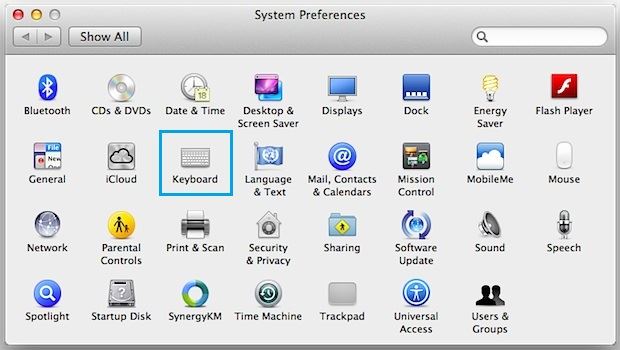
Step 1 Firstly, go to your Mac’s desktop to access Finder. Click on the Apple icon and open System Preferences.
Step 2 Once you get the System Preferences window, click on the “Keyboard” option. This will open the Keyboard preferences pop-up on the screen.
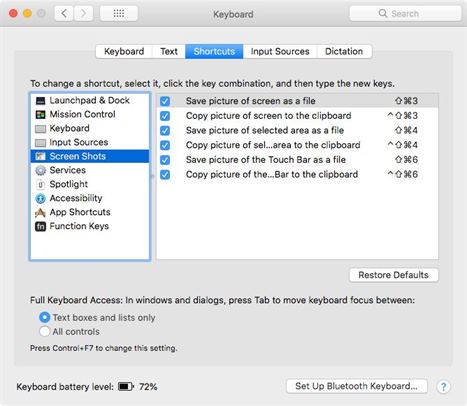
Step 3 From here, go to the “Shortcuts” tab. On the left panel, you can view shortcuts for different features. Visit the “Screenshots” option from the list.
Step 4 On the right, you can view different keyboard shortcuts for various actions. If you want, click on the “Restore Default” button to restore the shortcuts to default settings.
2. Restart Your Mac
Sometimes, the simplest solutions can help us fix even a serious issue with Mac. When we restart Mac, its current power cycle and cache resets. If there was a minor issue with the firmware or settings, then you can fix it with a simple restart.
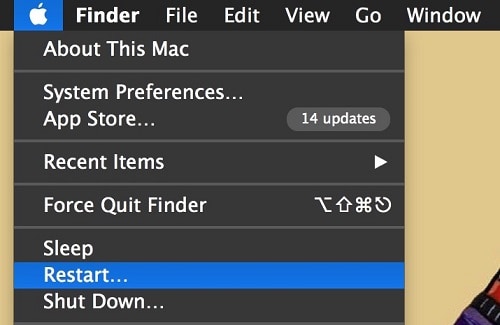
Step 1 To restart a Mac, just go to the desktop and click on the Apple logo on the top-left corner.
Step 2 Click on the “Restart” button and confirm your choice when you get a warning message on the screen. Wait for a while as your Mac would be restarted.
Step 3 If you wish to restart it in the Safe Mode, then just press and hold the Shift key while the system boots.
3. Use Grab to Take Screenshot on Mac
In case if your keyboard shortcuts are not working, then you can take the assistance of Grab to take screenshots as well. It is a dedicated utility application developed by Apple to take pictures and screenshots. Therefore, you can take its assistance and fix screenshot on Mac not working using Grab.
Step 1 To start with, go to your Mac’s Applications > Utilities and launch the Grab app from here.
Step 2 Once the application is launched, go to the “Capture” option on the main menu. From here, you can capture the entire window, screen, or a selection.
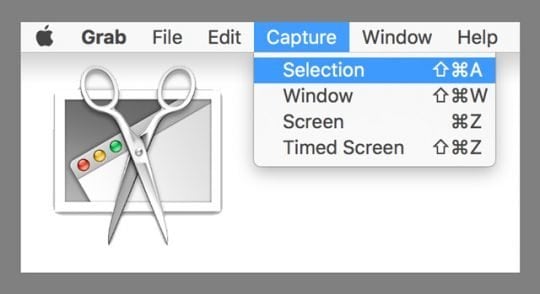
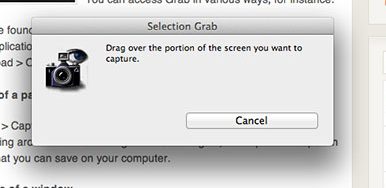
Step 3 If you wish to capture a portion of the screen, then click on “Selection” or press Shift + Command + A. Now, you can select a specific area by dragging the cursor.
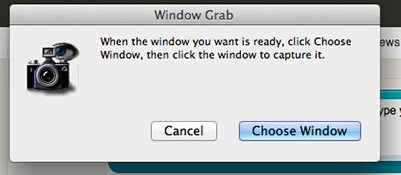
Step 4 In the same way, you can click on the “Window” option as well to capture an entire window. As a pop-up would launch, click on “Choose Window” and select the window you wish to capture.
Apart from that, the Grab application can also be used to take timed screenshots as well. You can also view the screenshots and manage them.
4. Use Preview to Take a Screenshot on Mac
Just like Grab, you can also take the assistance of Preview to take screenshots on Mac. Ideally, Preview is used to view the stored photos or transfer them from one source to another. Though, the app also provides tons of add-on features for us to take screenshots.
Step 1 Firstly, launch the Preview app on your Mac from its Applications.
Step 2 Now, go to File > Take Screen Shot and choose if you wish to capture the entire screen, a window, or a selected area.
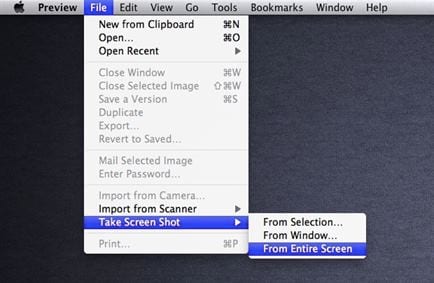
Step 3 Make the relevant selection and capture the screenshot of your choice. Once it is done, click on the “Save” button in the end and save the file to the desired location.
Part 4: How to Recover Lost Screenshots on Mac
By following the above-listed solutions, you can easily fix the screenshot on Mac not working problem. Though, there are times when users end up deleting their saved screenshots by mistake. If you have also lost these captures or any other data by mistake, then consider using Recoverit (IS). One of the best recovery tools out there, it runs on every major macOS and Windows version. By following a simple click-through process, you can get back all kinds of lost, deleted, or inaccessible content from numerous sources.

Recoverit (IS) for Mac
A Life Saver to Solve Your Data Loss Problems!
- The application is extremely easy to use and features different scanning modes to extract the lost or deleted content.
- It can recover every major kind of photo format and screen captures like PNG, JPEG, TIFF, BMP, and even RAW, PSD, or CRW files.
- Apart from photos, you can also extract videos, audios, documents, compressed folders, and so much more.
- It will let you preview your screenshots first on its interface. You can select them and save them to any desired location.
- The tool also supports every common file system like HFS, APFS, exFAT, NTFS, etc. It is also compatible with external devices like SD cards, pen drives, hard disks, MP3 players, digital cameras, and so on.
To get back the lost or deleted screenshots from Mac using Recoverit (IS), follow these steps:
Step 1 Pick a Recovery Mode
As you will launch Recoverit (IS) on your Mac, you would be asked to select a recovery mode. In case if you have accidentally deleted photos, click on “Deleted Files Recovery” mode.

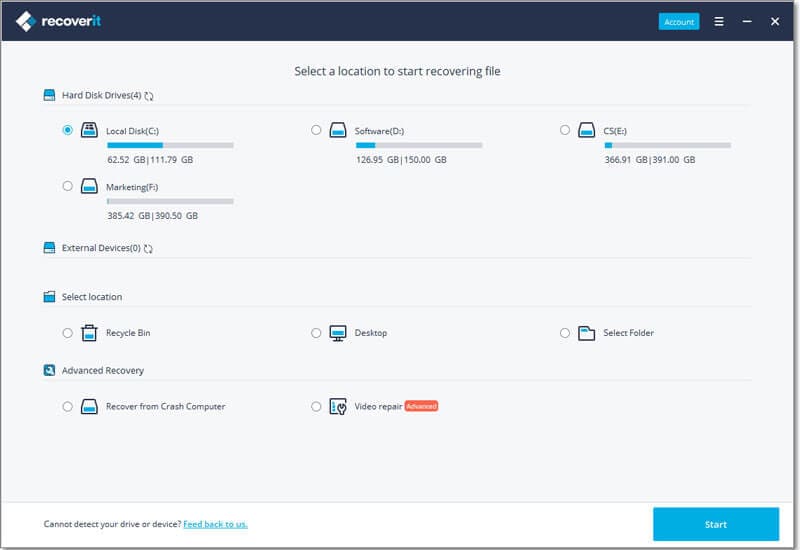
Step 2 Pick a location to scan
Subsequently, you would be asked to pick a location to scan. You can select an internal drive or an external device to proceed.
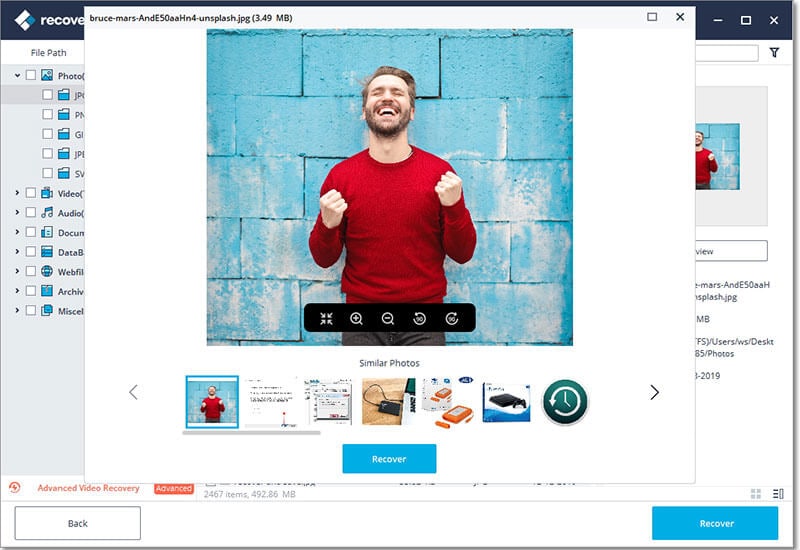
Step 3 Preview and recover your data
Simply wait for a while as the application will scan the selected source and extract the deleted files. When the process is completed, it will display your data under various categories. You can now preview the retrieved screenshots and save them to your Mac storage again.
Although the quick recovery would be able to yield positive results, you can also perform a deep scan as well. To do this, click on the “All-around Recovery” at the bottom of the screen.
Part 5: Tips for Managing Screenshots on Mac
You can also consider following these suggestions to manage screenshots on Mac and avoid any unwanted issue.
- The keyboard shortcuts for some macOS versions might alter a bit. You can consider visiting the Apple information center to know more about the screenshot shortcuts.
- Try not to overwrite the default shortcuts with customized choices. This can tamper with the original keyboard shortcuts of Mac.
- Mac already provides native utility tools like Grab and Preview to take screenshots of the system. You can consider using them instead of any third-party tool.
- Too often, users forget saving the screenshots after taking them. Make sure that the screenshot is saved to a secure location once you have captured the screen.
- If you don’t want to suffer from an unexpected loss of your saved screenshots, then keep a recovery tool handy.
The guide would have certainly helped you take screenshots on Mac without any issue. In case if the feature of screenshot on Mac not working, then you can always follow the above-listed suggestions. Apart from that, you can install Recoverit (IS) tool for Mac. It can be used to get back your deleted screenshots and all kinds of other data in a seamless manner. If you are still facing issues with data recovery on Mac, then let us know about it in the comments below.
Elva
staff Editor