Erase Android
- Delete Android Data+
-
- Delete Shortcuts on Android
- Delete Cookies on Android
- Delete Stubborn Apps on Android
- Delete Malwares on Android
- Delete Bookmarks on Android
- Delete Browsing History
- Delete Snapchat Messages on Android
- Delete Calendar on Android
- Permanently Delete Android Data
- Delete Downloads on Android
- Delete Contacts on Android
- Delete Music from Android
- Delete Photos from Android
- Delete Data on Samsung
- Delete Backups on Android
- Delete Files on Android
- Delete Email Accounts on Android
- Uninstall Apps on Android
- Delete Widgets on Android
- Delete Videos from Android
- Delete Games on Android
- Delete Google Account on Android
- Delete Gmail Account on Android
- Delete SMS on Android
- Delete Voicemail on Android
- Delete All Data on Samsung S7/S7 Edge
- Wipe Android Phone+
- Data Erasing Lists+

• Filed to: Erase Android • Proven solutions
Deleting content from SD card is a simple task. However, wiping data from it in an Android device is completely different. It is because you can use the SD card as an external device to move media files or as an internal storage memory. Android allocates different extensions for both the options to ensure that user does not treat it just an external memory card. Both the alternatives have their benefits and limitations. Choosing any one of the options is dependent on the requirement of the user. So, you do not need to fuss about the different issues which may otherwise arise when you are looking to wipe SD card on Android.
With this easy tutorial at your hands, it would be easier than ever for you to completely wipe the SD card and you can get rid of the data in a simple and systematic manner. In this guide, there will be simple steps which are so elaborated that it will be easy for you to follow even if you are not the smartest when it comes to technology. So, let us get started.
dr.fone - Data Eraser (Android) is perfect for permanently deleting all the documents and data on any of your Android devices, without any damages.
dr.fone – Android Data Eraser
Most Highlighting Features Which Makes it Secure and Reliable:
- Support most of the devices running on Android operating systems.
- Securely delete all your personal and sensitive information contained on an Android device.
- Help in scanning the memory and wipe unwanted junk files to create space for Android users.
- Rewrite data on previously deleted content to ensure it is unrecoverable.
How to delete all data on Android?
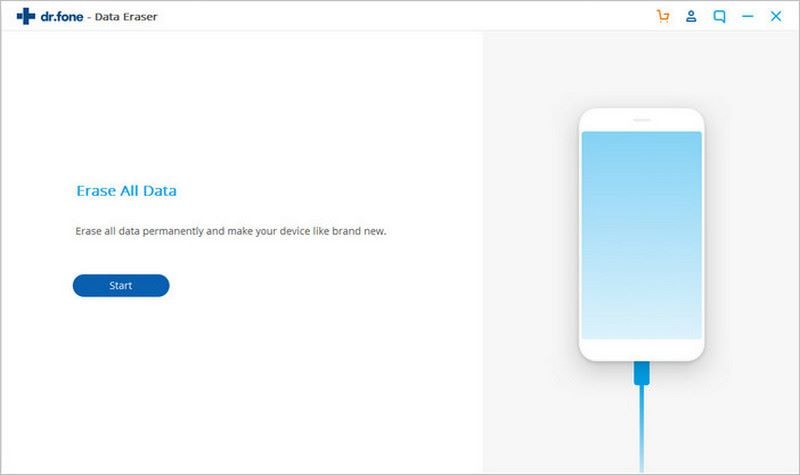
Step 1. Launch the dr.fone, connect your Android device to PC, and then click on "Erase" section.

Step 2. Move on to hit the “Start” button as shown below to begin erasing all the data on your android phones or tablets irrevocably.
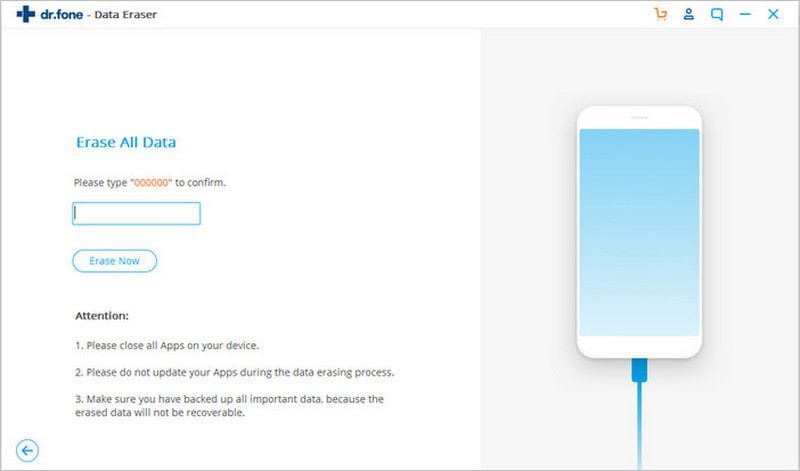
Next, you need to confirm the data delete action by typing in “000000” and then tap “Erase Now” to proceed with erasing data permanently. As the dr.fone will delete all of data and settings on Android, you had better make a backup of important data in advance because they won’t be recovered by any means after being erased.
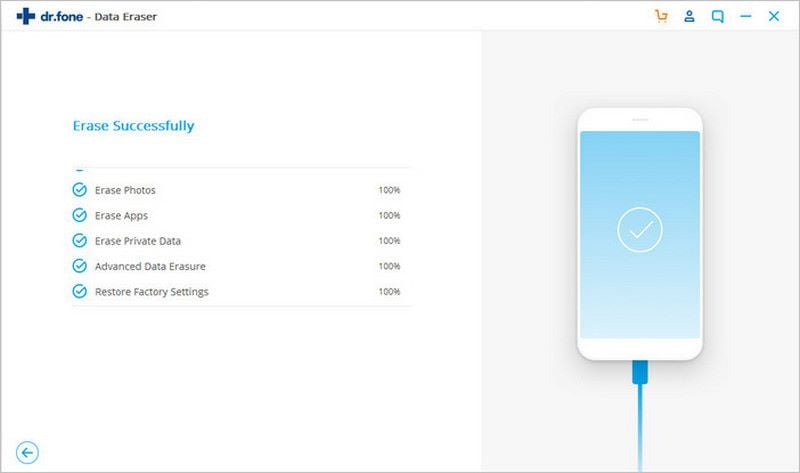
Step 3. Perform factory reset on Android - in the end, to erase all settings on your android phone or tablet, you need to tap “ Factory data reset” on android device when a pop-up message is sent to you.
2 Methods to Wipe SD Card Data on Android
Wiping system partition in Android is nothing but deleting the OS and available applications. Even after removing the OS, you can still enter into the bootable menu or recovery menu and install a fresh ROM or OS. The following guide will help you with deleting the system partition on your Android device. However, it is advisable to create a backup of your device first.
Method 1. Using the Built-in Application in Android system
Step-By-Step Guide to Wipe SD Card on Android
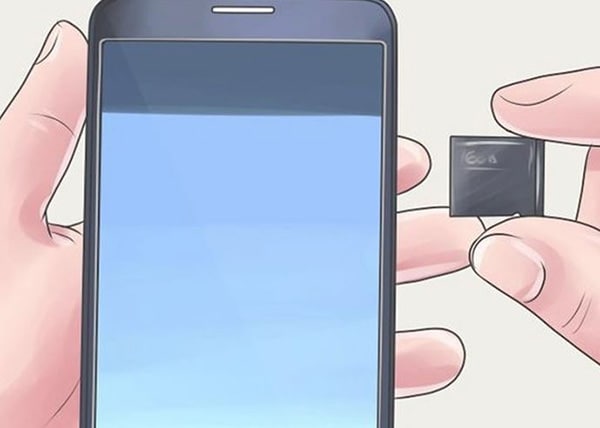
Step 1. Make sure that the SD card in present in the Android device. If not, insert it into the gadget.
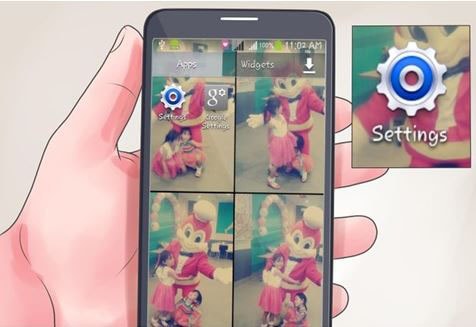
Step 2. Open the device settings app on the device after inserting the SD card. You can enter the app by pressing the home screen button or the dedicated button present on the device. From the menu, scroll down to pick "Storage" menu, which resides under the "Device" heading.
Step 3. Under the "Storage" section, select "Unmount SD Card" feature.
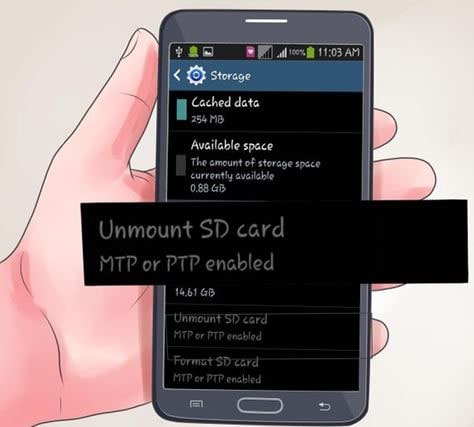
Step 4. From the same menu, choose "Format SD card" option. Selecting the feature will begin formatting the SD card. If you are using the latest version of the operating system, then you need to specify whether you would like to use it to transfer media files or as in internal memory. Select any one of the options and tap "Continue". If you are using a lock for the SD card, then you need to enter the PIN to allow access to the card.
Note: Formatting the SD card will wipe the entire content. Make sure you have created a backup of the necessary data before beginning the process.
Method 2. Using SD Card Cleaner App
SD card provides the chance to store data, which occupy larger space. Due to the limitation in the internal memory of a device, we often choose external SD cards for increasing the storage capacity. However, over a period, the SD card becomes full and becomes difficult to format. Furthermore, selecting individually and deleting a file is a time-consuming activity. It is here that you can use SD Card Cleaner for Android to format and delete unwanted files from the SD card in an easy way.
Step-By-Step Guide to Wipe SD Card on Android
Step 1. Install the app from the play store. Run the program. The application begins scanning the device. It includes both the internal and external memories.
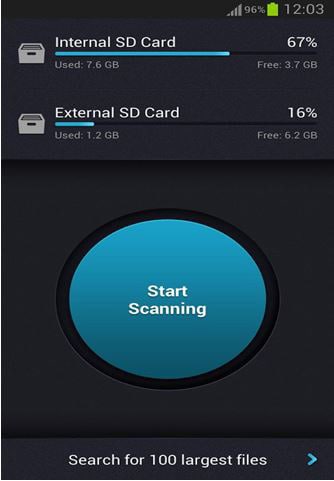
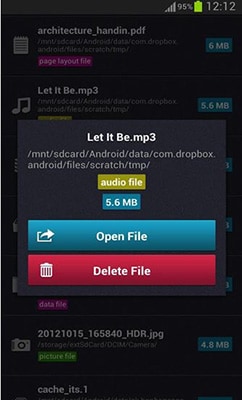
Step 2. The program runs the scanning the background. SD Card Cleaner will then display the contents of larger files first after finishing the scan. From the list, you can easily choose the files that are occupying space and delete selectively. As the app displays the files with larger files first, it makes it convenient for you to pick the unwanted files that you no longer use and create space.
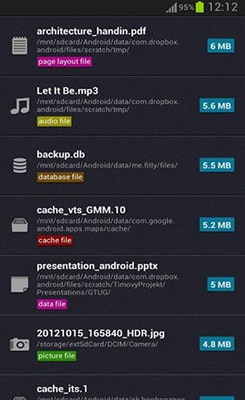
Step 3. You can then select the unwanted files that are occupying space unnecessarily and choose the delete them. The app will wipe the files from the SD card, creating additional space, which you can use for other needs.
Write in the End
You can further use the app to clean the device's internal memory. With the help of the app, you can quickly list the files that are occupying more space and choose the unwanted ones to create space in the system. Through this process, you do not have to format your SD card often, which often results in malfunctioning over a period.
Elva
staff Editor