Hard Drive Recovery
- Format Hard Drive+
-
- How to Clone Hard Drive
- How to Format Hard Drive from Bios
- Format Hard Drive for Xbox One
- How to Format C Drive in Windows 10/7/XP
- How to Perform PS4 External Hard Drive Format
- How to Format Hard Drive from Bios
- Format Hard Drive for Xbox One
- How to Format C Drive in Windows 10/7/XP
- How to Perform PS4 External Hard Drive Format
- How to Format Drive in Linux
- How to Format Hard Drive to NTFS
- How to Format WD My Passport
- How to Format Your Drive to FAT32 System
- Format HDD Low Level
- Format a BitLocker Encrypted Drive
- How to Unformat Hard Disk
- How to Format a RAW Drive
- Fix Your Hard Drive’s Formatting Issues
- How to Format SSD
- How to Format your Hard Drive to exFAT File System
- How to Format a Hard Drive to FAT32
- Hard Drive Recovery+
-
- Top 10 Hard Drive Recovery Tools
- How to Recover Lost Data from Maxtor External Hard Drive
- How to Recover Data from Hitachi External Hard Drive
- How to Recover Data from Dead Hard Drive
- How to Recover Data from SimpleTech External Hard Drive
- How to Recover A Formatted Hard Drive in 3 Simple Clicks
- How to Recover Lost Data from Iomega External Hard Drive
- How to Recover Data from Toshiba External Hard Drive
- How to Recover Data from Transcend External Hard Drive
- Lacie External Hard Drive Data Recovery and Repair
- Best Way to Recover Data from a Floppy Disk
- How to Recover Data from HP External Hard Drive
- Best Method to Recover Data from Crashed Hard Drive
- How to Repair Toshiba Hard Disk
- Recover Files from WD My Book External Hard Drive
- Ways to Repair Seagate Hard Disk
- Fix Hard Drive Error+
- Hard Drive Tips+
- Mac Hard Drive Recovery+
-
- Recover Lost Data from Seagate External Hard Drive on Mac
- How to Recover Data from Formatted Hard Disk Drive on Mac
- How to Recover Data from Seagate Backup
- How to Recover Lost Data from Western Digital External Hard Drive
- Top 5 Tools for Mac Disk Recovery on Mac
- How to Format Toshiba Hard Drive for Mac
- Format a Hard Drive for Mac: Ultimate Guide 2021

• Filed to: Hard Drive Recovery • Proven solutions
Most of us use BitLocker very often to encrypt our Drives and keep them secure from any kinds of theft and threat. But when it comes to formatting BitLocker encrypted Drives, many get stuck at one step or another due to lack of knowledge of formatting encrypted Drives. The process of formatting Hard Drive encrypted with BitLocker is different than the process of formatting a normal Hard Drive. Thus, we have discussed an easy way to format your BitLocker encrypted Hard Drive. Go through the article and follow the method to successfully format your encrypted Hard Drive.
Part 1. Is it Possible to Format a BitLocker Encrypted Hard Drive?
In most of the cases, it’s very easy to format or erase a Hard Drive on Windows. But when it comes to formatting encrypted Hard Drive, the answer becomes a little complicated. Can I Format an Encrypted Hard Drive? Yes, you can format an Encrypted Hard Drive, but the process is comparatively complicated then formatting a normal Hard Drive.
There are various ways through which you can successfully format an Encrypted Hard Drive:
- While formatting an Encrypted Hard Drive, you will be asked for a password to unlock the encryption. You can feed in the password and format your encrypted Drive successfully.
- You can use various paid tools available in the market that can help you in formatting an encrypted Hard Drive.
- You can use some command-line tools provided by the Windows to de-encrypt your Drive and then format it.
There are chances that if you try, you will be able to format an encrypted drive without using any of the above-mentioned ways. But in that case, the Drive will still remain Encrypted after formatting.
Part 2. How to Format Hard Drive Encrypted with BitLocker?
There are various ways to format a BitLocker encrypted Hard Drive. You can use a paid tool, or you can use the Windows Command Line as well. But we are going to discuss one of the easiest methods to format a Drive encrypted with BitLocker. This method may not work in all the cases, but it can help most of you.
Follow the steps to successfully format a BitLocker encrypted Hard Drive:
Step 1 On the Home Screen of your Windows, go to the Search Panel on the Task Bar, and search for “Disk Management”. Click on the Disk Management option from the search results to enter the Disk management window.
Step 2 You will see all of your Systems Drives listed in the Disk Management window. Now, identify your BitLocker encrypted Drive that you want to format. Right-click on the BitLocker encrypted drive and click on the “Format” option.
Step 3 Now, on a pop-up panel, check the Drive Name, System, and Allocation Size, and click Ok. You will see a warning notification that will insist you to Backup all of your data before erasing the Drive, act accordingly and click “Ok” if sure.
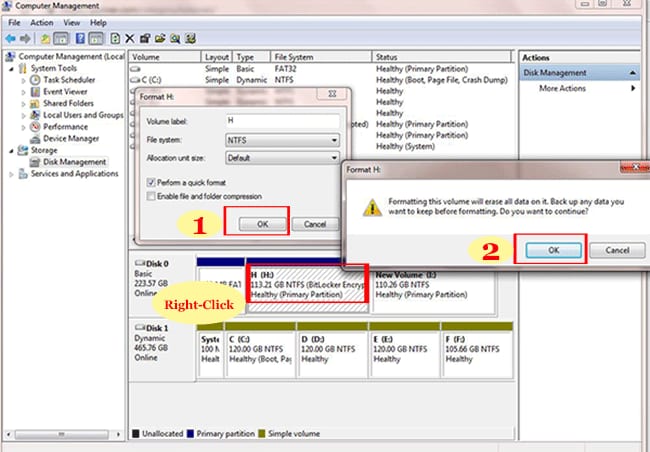
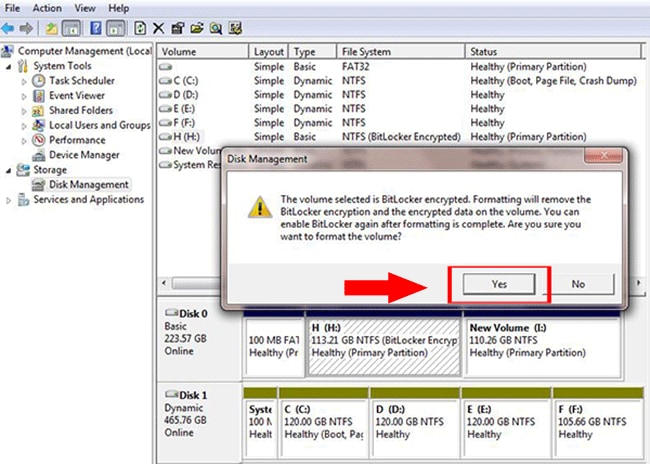
Step 4 On the last step, you will see a notification warning you that this process will erase all the data stored on your Drive, and will also remove the BitLocker encryption. If you are sure to format BitLocker encrypted Drive then click “Yes”.
Your BitLocker protected Drive will be formatted in a few minutes, and then you will be able to access your Drive on your system.
Part 3. How to Recover Data from Formatted BitLocker Drive? Use Recoverit (IS) Tool
It’s good that you have successfully formatted BitLocker encrypted Drive, but the problem is that all the data from your drive is now lost. You can restore your data from the Backup, but in case if you don’t have any backup as well, then all of your important files and data stored on the Drive are gone permanently.
There is one solution to this problem i.e. to perform BitLocker encrypted Drive data recovery with the use of a data recovery tool. You can use Recoverit (IS) Tool to recover all the data deleted from your BitLocker encrypted Drive due to formatting. Recoverit (IS) tool is capable of recovering all of your lost data, and it supports recovery from all kind of Drives. You can use it on Windows, or Mac, and you can even try it for free.
Recoverit (IS)
Powerful Features of Recoverit (IS) Tool:
- You can recover data deleted from your Drive due to any reason including the formatting of BitLocker encrypted Drive.
- It is compatible with Windows and Mac.
- You can recover data from all kinds of devices i.e. Android, Mac, Windows, HDD, SSD, Floppy Disk, Digital Camera, USB Drive, etc.
- You can choose from two scanning modes i.e. All-around Scan and Deep Scan for better scanning results.
- You can use the Bootable Recovery feature to recover your data from a crashed Windows.
- It allows you to preview the scanned file before the final recovery process.
- You can recover more than 1000 File types including ZIP files, Document Files, Audio Files, Video Files, App Data Files, etc.
- It allows you to scan and preview data with the free trial version.
User Guide to Recover Data from formatted Drive:
Preparation:
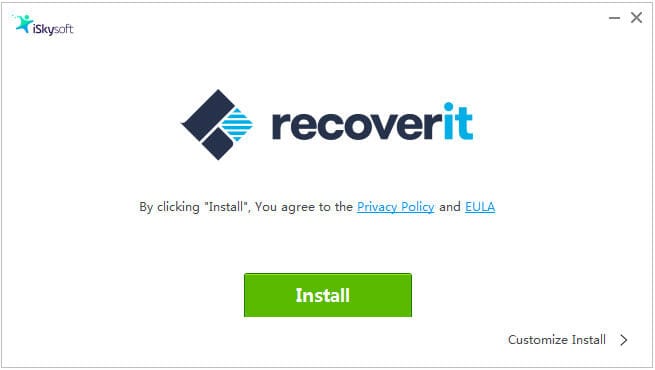
- To initiate with the recovery of data from a formatted encrypted Hard Drive, you first need to download the iSkysoft Recovery tool and install it on your System. You can go to the Recoverit (IS) Tool website and download the compatible version of the tool with your OS.
- If the formatted encrypted Hard Drive from which you want to recover data is an External Hard Drive, then you will be required to connect it to your System first. You can use a compatible USB cable to connect if with your system. Once connected, make sure it’s recognized by your System, and try to keep the connection uninterrupted.
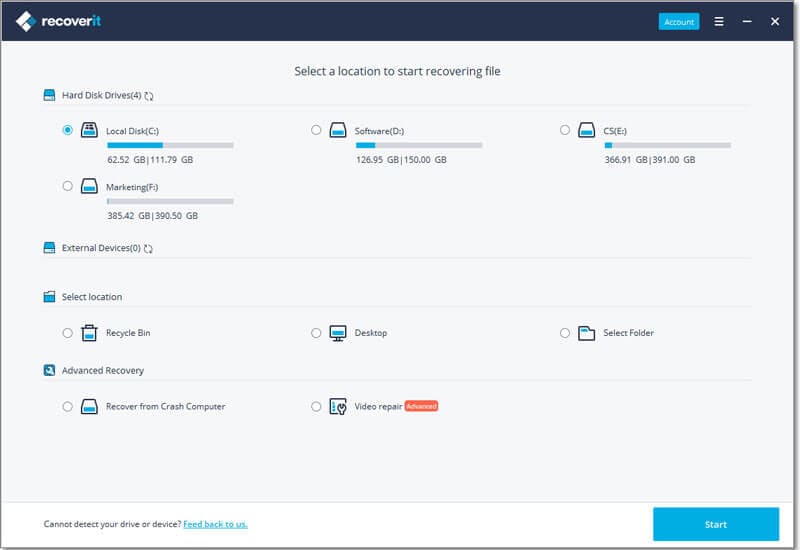
Step 1 Launch the Recoverit (IS) Tool on your PC after the installation is completed. You will directly be directed towards the Drive selection window where you will be required to select your formatted Drive. Choose from all the listed drives. You can refer to “External Storage Devices” or “Storage Drives” sections depending upon if your drive is external or internal. Select the drive, and initiate the scanning process by clicking on the “Start” button.
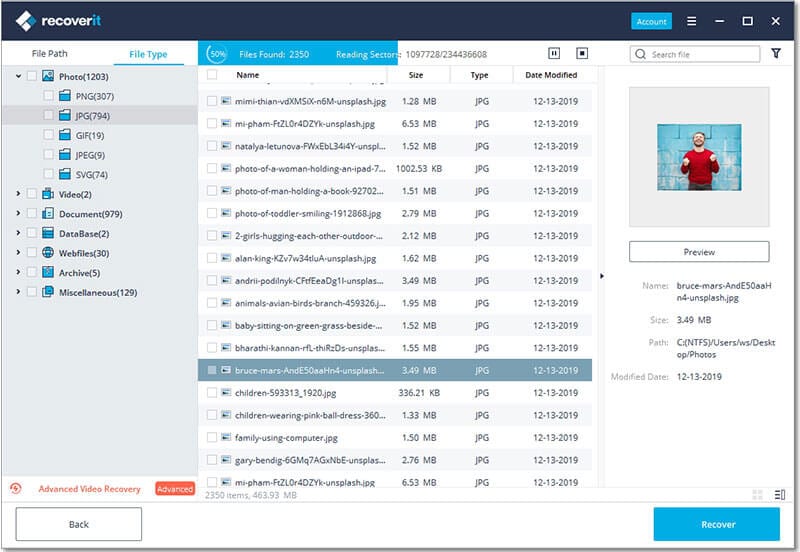
Step 2 Once you click the Start button, the program will begin the scanning process of your selected drive automatically with the help of All-around scanning. It might take a while depending upon the size of the data in the drive, but you can pause and resume the scanning process in between as per your convenience. In case you see the files already in the list that you want to recover, then you can proceed with the recovery process directly. Or else you can let the program scan the entire drive.
Bonus Tip:
During the scanning process, you can choose the specific file type from the “File Type” section on the left panel. This will allow you to scan for a particular file type that you selected, resulting in more effective scanning. You can also scan a particular folder or location on your selected drive.
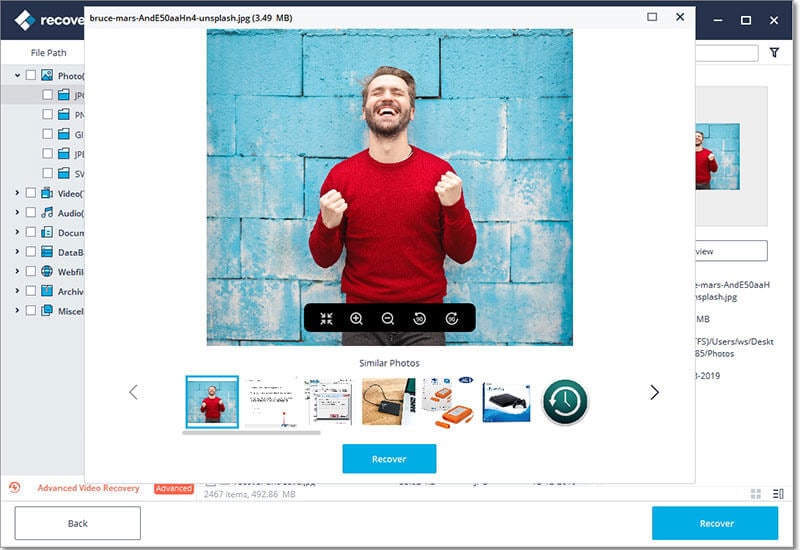
Step 3 When the scanning is done, you will see all the scanned files listed on the Window. These are all the files that you lost from your drive during scanning. Find the files that you want to recover by searching for them or either navigating through all the files. Once you find the files that you want to recover, you can then simply preview them by using the Preview button. Now, select the files to be recovered and click on “Recover” button. Choose a secure location on your System and click “OK”. Wait till all the files are restored on the selected location.
Conclusion:
You need to be careful while formatting a BitLocker encrypted Hard Drive, as even the slightest mistake can corrupt the Drive. You can follow the method mentioned above, or you can try various other methods available on the Internet to format your Drive that is encrypted with BitLocker. Once your drive is formatted, you need to be quick in recovering the Data with the help of iSkysoft Tool, or else you’ll lose all the data permanently.
Elva
staff Editor