Hard Drive Recovery
- Format Hard Drive+
-
- How to Clone Hard Drive
- How to Format Hard Drive from Bios
- Format Hard Drive for Xbox One
- How to Format C Drive in Windows 10/7/XP
- How to Perform PS4 External Hard Drive Format
- How to Format Hard Drive from Bios
- Format Hard Drive for Xbox One
- How to Format C Drive in Windows 10/7/XP
- How to Perform PS4 External Hard Drive Format
- How to Format Drive in Linux
- How to Format Hard Drive to NTFS
- How to Format WD My Passport
- How to Format Your Drive to FAT32 System
- Format HDD Low Level
- Format a BitLocker Encrypted Drive
- How to Unformat Hard Disk
- How to Format a RAW Drive
- Fix Your Hard Drive’s Formatting Issues
- How to Format SSD
- How to Format your Hard Drive to exFAT File System
- How to Format a Hard Drive to FAT32
- Hard Drive Recovery+
-
- Top 10 Hard Drive Recovery Tools
- How to Recover Lost Data from Maxtor External Hard Drive
- How to Recover Data from Hitachi External Hard Drive
- How to Recover Data from Dead Hard Drive
- How to Recover Data from SimpleTech External Hard Drive
- How to Recover A Formatted Hard Drive in 3 Simple Clicks
- How to Recover Lost Data from Iomega External Hard Drive
- How to Recover Data from Toshiba External Hard Drive
- How to Recover Data from Transcend External Hard Drive
- Lacie External Hard Drive Data Recovery and Repair
- Best Way to Recover Data from a Floppy Disk
- How to Recover Data from HP External Hard Drive
- Best Method to Recover Data from Crashed Hard Drive
- How to Repair Toshiba Hard Disk
- Recover Files from WD My Book External Hard Drive
- Ways to Repair Seagate Hard Disk
- Fix Hard Drive Error+
- Hard Drive Tips+
- Mac Hard Drive Recovery+
-
- Recover Lost Data from Seagate External Hard Drive on Mac
- How to Recover Data from Formatted Hard Disk Drive on Mac
- How to Recover Data from Seagate Backup
- How to Recover Lost Data from Western Digital External Hard Drive
- Top 5 Tools for Mac Disk Recovery on Mac
- How to Format Toshiba Hard Drive for Mac
- Format a Hard Drive for Mac: Ultimate Guide 2021

• Filed to: Hard Drive Recovery • Proven solutions
“I need to reformat my Mac and just wondering which best hard drive format is for Mac. And is it possible to recover a drive that I’ve lost?”
The simplest way to add storage to Mac is by buying an external hard drive. And most of the external drive comes formatted for Windows or both Windows and Mac. If you want to ensure maximum efficiency, it might require you to format a hard drive for Mac compatibility.
Even though the formatting of a drive is necessary at some point, you may, also, mistakenly erase some data that you didn’t intend to. And it happens in a flick of time. Yes, losing a drive is the most painful part especially when you are handling a delicate document. But technological advances are slowly easing this pain. There are ways to recover formatted hard drive Mac. But before looping to how to do a successful recovery, let’s see the plenty of other reasons you might want to reformat the hard drive for Mac.
Part 1: What Causes to Format Hard Drive for Mac?
Formatting hard disk for Mac is particularly necessary for purchases of generic PC drives, which nearly all come preformatted for Windows rather than Mac OS.
And even though connecting the preformatted hard drive for Windows will work fine on Mac, it is important highly recommendable you format the hard drive exclusively for Mac compatible file system. This is important if you aren’t going to use it on another platform.
In fact, here are some occasions that will force you to format Mac compatible File System:
- When you want to use the drive with the Time Machine.
- When you want to make a disk bootable on Mac.
- When you want to resolve corruption or unreadable error of storage drive.
- Format the startup disk to reinstall macOS.
- Format the storage drive incase Disk Utility fails to repair it.
Part 2: What is the Best Format for Mac Hard Drive?
When the time comes, it will require you to format HDD for Mac. Because most of the new drives come already formatted—most likely in NTFS for Windows, or FAT32 for maximum compatibility.
While the Mac system can open both, none of the two above is desirable for Mac User. For maximum performance, you’ll need to reformat the drive to one of Mac’s file systems.
And there are several file systems that Mac can support. But which one is the best?
Let’s explore 4 file systems—Apple File System (APFS), Mac OS Extended (HFS+), exFAT (Extended File Allocation Table), and MS-DOS (FAT) to give a detailed take of each of the 4, and correctly identify which one you should pick.
Apple File System (APFS)
It is the most recent file system from Apple intending to replace the Mac OS Extended file system. Today, all new Macs come with macOS preinstalled on an APFAS file system.
Apple optimizes this file system for use with solid-state drives (SSDs) and flash storage, but you can still use it on the traditional mechanical hard disk drive (HDD) too.
This file system is appropriate when you have an SSD or a new flash drive that you do not intend to use on the Windows system.
The best part of this new system is that it is speed-optimized. You can execute common functions almost instantaneously due to the flawless data organization.
Better yet, the file system focuses on data encryption and advanced metadata handling.
The only problem is that you cannot use the APFS file system to backup with Time Machine yet.
Mac OS Extended (HFS+)
It was the main file system used for Mac system storage from 1998 until Apple launched APFS.
This file system is suitable for both SSDs and HHD. Besides, it works efficiently with all Apple’s operating systems and allows back up on the Time Machine. In fact, this is the best file system you can use for Mac.
ExFAT
ExFAT is a file system by Microsoft that provide compatibility on both Windows and Mac platform.
The only problem with exFat is that it is more prone to fragmentation than using an Apple-based file system. This system file is more stable than third-party NTFS or HFS+ drivers the reason why many consumer devices, like media playback devices and TV, natively supports it.
MS-Dos (FAT)
This option offers near-universal interoperability with either Mac or Windows operating systems. When your drive is formatted this way, it can easily transfer data from your Mac device and other PCs. Furthermore, it becomes easy to transfer files to video game systems such as Xbox. The only drawbacks are that this format does not support the transfer of larger files ranging from 4 GB and neither can you create a startup drive for your Mac OS device using this option.
Of the 4, which is the best file system for Mac? The correct question, however, is:
Why do you want to format the hard drive for Mac? Answering this question right directs you to the right file system to opt-in.
Part 3: How to Format a Hard drive for Mac without Data Loss
Now that you know the best File System for Mac, how do you format hard drive for Mac compatibility without data loss?
The procedure is simple, similar on all drives, and the same through all connections.
But note that:
Formatting a drive removes all reference to the data stored on it, it is wise you back up the drive before you format it.
Back up the Mac start-up drive to an external storage medium to ensure you lose no data. Alternatively, you can use the Time Machine for backup.
Step-by-Step Guide to Format Hard Drive for Mac Using the Disk Utility
- Launch the Disk Utility. You have 2 options to execute this step. One, head to Applications and advance to Utilities. Alternatively, tap Command and Space simultaneously and start typing Disk Utility.
- On the Disk Utility windows, you’ll see a listing of the available drives on the left pane.
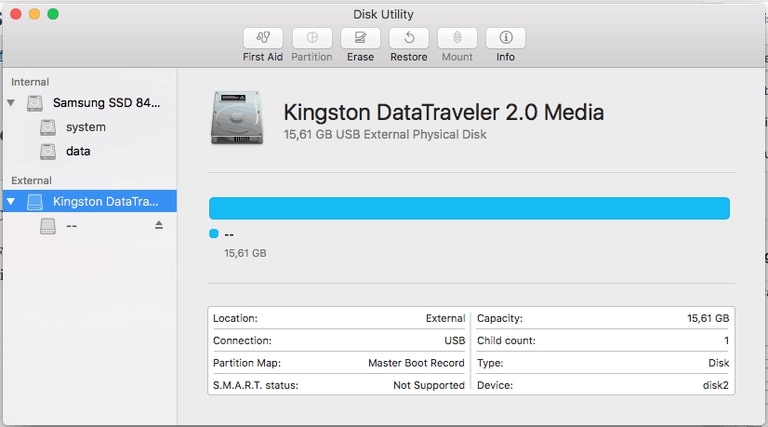
- Hit the Erase option. Then advance to selecting the Name, Format, and Scheme in the respective field and click Erase.
- Your drive will format with the File System you’ve opted in.
Part 4: How to Recover Data from Formatted Mac Hard Drive
Suppose you didn’t create a back for your data, and you’ve lost your data, you might want to recover them. And you’ll require a recovery tool to get your data back.
And online, there are plenty of data recovery options to get your data back. But not all deliver excellent recover solutions. So, we are going to focus on one that delivers powerful results for Mac.
Introducing Recoverit (IS) Tool This is a recovery tool for all Mac devices and the best solution to un-format data. The tool comes with a well-knitted resource that deep-scan your drive to deliver a 98% chance of bringing your data back.
Recoverit (IS)
Features
- Unlimited Data Recovery for Mac: Retrieve all formatted files regardless of the file type even from the latest encrypted APFS file system.
- The tool comes with a lineup of sophisticated utilities to that scrap deeper into your hard drive to bring back photos, videos, documents, audio, emails, archives, and even more format files.
- Data Recovery on Any Storage Device on Mac: Recover any data from any storage media on Mac starting with the Mac itself, memory cards, digital devices like (camera, iPod, Player,) hard drives, removable drives, and even more.
- Effortless Data Recovery: Besides the recovery of formatted data, you can recover nearly all types of data loss—from mistaken deletion, disk formatting, hard drive corruption, macOS reinstall, hardware failure, system crash, and even more in simple three-step. No codes. No-fuss. Just a three-step simple procedure—Start, select, and preview before recovery.
User Guide: How to Recover Formatted Hard Drive for Mac Using Recoverit - Data Recovery
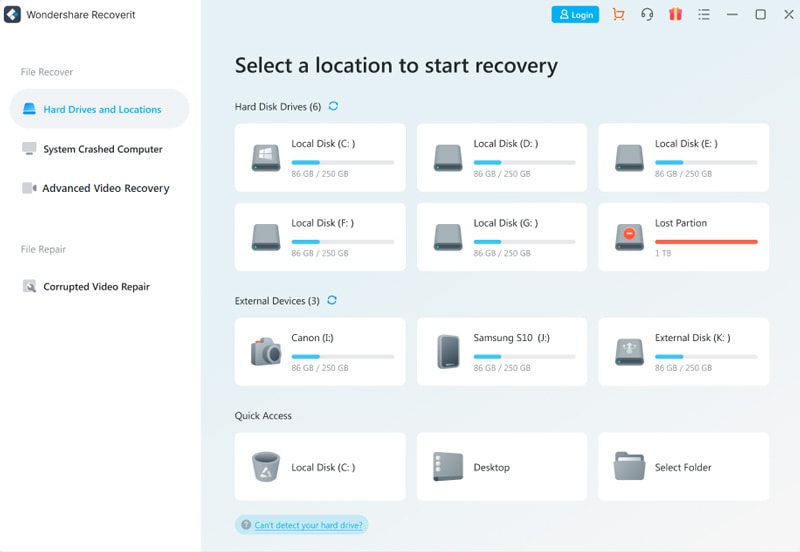
Step 1 Select the Formatted Hard Drive
On the home screen of the Recoverit tool, select a location or a partition where your lost files were initially in. Next, hit the ‘Start’ button to let the software commence the recovery process.
Step 2 Scan for the formatted Data
Hit the ‘Scan’ button to execute the scan and wait while the tool crawls deeper into your formatted storage device.
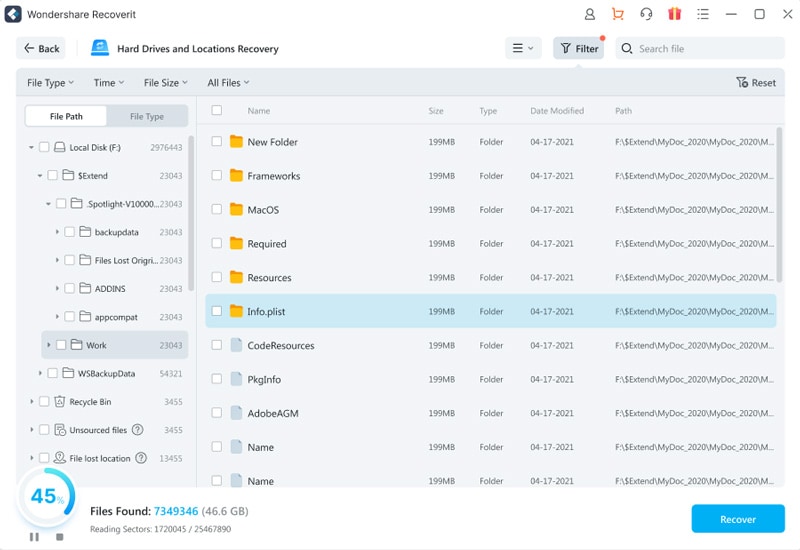
Step 3 Preview and Recover
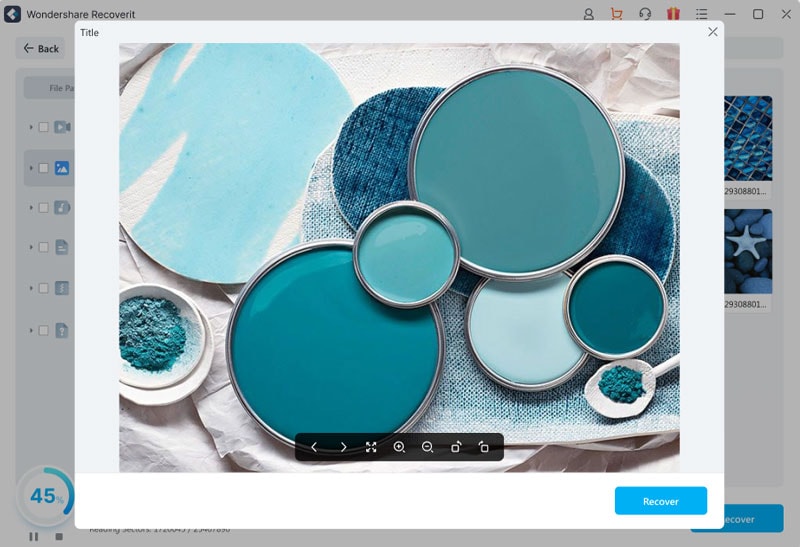
Hit the ‘Preview’ feature to preview data before recovery. You can keenly select your recoverable files by checking the boxes against them.
After the file preview process, click on the ‘Recover’ button to retrieve data from your formatted hard drive for macOS device.
Conclusion
There are plenty of reasons why you might want to format a hard drive for Mac. Fortunately, Disk Utility—built right into macOS is readily available to help you execute the formatting.
The way you’ll format your hard drive depends on how you want to use it.
If you want to format the drive to use on both Mac and Windows systems, you’ll choose the ExFAT from the list format options.
If you want to format it for use with the time machine, it will require you to select the HFS+ option from the format list available.
Elva
staff Editor